
Wintering Dahlias: How to Protect Your Tubers Through the Cold
If you’re a dahlia enthusiast, you know the heartbreak of losing these beautiful tubers to winter’s harsh grip. You don’t have to wave goodbye to your prized blooms each year – with the right timing and techniques, you can preserve your dahlia tubers through the coldest months. From choosing the perfect moment to lift them from the ground to creating ideal storage conditions, there’s an art to successfully overwintering these garden treasures that’ll guarantee vibrant blooms next season.
Contents
- 1 When to Lift Your Dahlia Tubers
- 2 Essential Tools and Materials for Storage
- 3 Step-by-Step Guide to Digging Up Tubers
- 4 Cleaning and Preparing Tubers for Storage
- 5 Optimal Storage Conditions and Methods
- 6 Monitoring Tubers Throughout Winter
- 7 Spring Revival: Getting Tubers Ready for Planting
- 8 Frequently Asked Questions
When to Lift Your Dahlia Tubers
After the first frost blankets your garden, it’s time to lift your dahlia tubers from the ground. You’ll know it’s the right moment when the foliage turns black and limp, signaling the end of the growing season. Don’t wait too long after this first frost, as repeated freezing can damage your precious tubers.
Choose a dry, sunny day to begin the lifting process, preferably in the morning so your tubers can dry throughout the day. If you’re in zones 3-7, you’ll need to lift all your dahlias before the ground freezes solid. For gardeners in zones 8-10, you can often leave your tubers in well-draining soil through winter, though lifting them offers better protection and control. Watch your local weather forecast carefully, as timing is vital for successful tuber storage.
Essential Tools and Materials for Storage
Once you’ve timed the lifting of your dahlias perfectly, gathering the right storage supplies will set you up for winter success. You’ll need clean, sturdy containers and quality packing materials to keep your tubers healthy through the cold months.
| Storage Item | Purpose |
|---|---|
| Cardboard boxes | Provides airflow and moisture control |
| Peat moss/vermiculite | Creates insulating, dry environment |
| Labels/markers | Identifies varieties and planting dates |
| Newspaper/kraft paper | Wraps individual tuber clumps |
Begin by collecting your storage items before lifting day arrives. Select boxes that are deep enough to hold multiple layers of tubers, and make sure your packing material is completely dry. You’ll want enough newspaper to separate each clump, preventing direct contact between tubers. Don’t forget a sharp permanent marker for writing clear, detailed labels that won’t fade over winter.
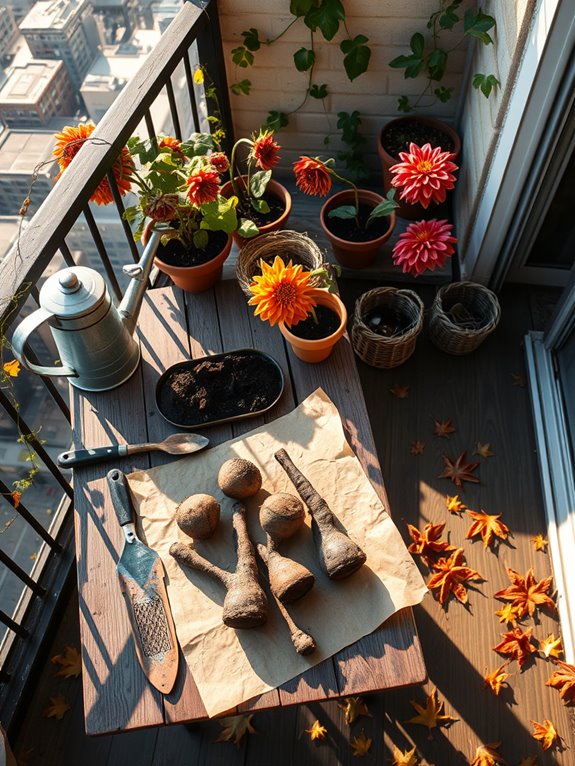
Step-by-Step Guide to Digging Up Tubers

The delicate process of lifting dahlia tubers requires careful timing and precise technique to guarantee their survival through winter dormancy. Wait until after the first light frost has blackened your dahlia’s foliage, then cut the stalks down to about 6 inches above ground level.
Choose a dry, sunny day to begin digging. Starting about 12 inches from the main stem, insert your garden fork straight down and gently lift the entire root ball. Carefully work around the plant in a circle, loosening the soil as you go. Once you’ve freed the clump, lift it straight up to avoid breaking the tender neck connections between the stems and tubers. Shake off excess soil and rinse the clump with a gentle stream of water, being careful not to damage the tubers’ protective skin.
Cleaning and Preparing Tubers for Storage
Clean tubers can make the difference between healthy spring growth and winter rot. After digging up your dahlia tubers, gently brush away loose soil with your fingers or a soft brush, being careful not to damage the delicate skin. You’ll want to remove any remaining dirt, dead stems, and damaged portions.
Look closely at each tuber’s surface for signs of disease, cuts, or soft spots. Healthy tubers should feel firm and have a light brown, unblemished outer layer. If you spot any problems, trim away affected areas with clean, sharp pruning shears until you reach healthy tissue. Don’t wash the tubers with water, as moisture can lead to fungal growth during storage. Instead, let them air-dry in a shaded, well-ventilated area for 24 hours until they’re completely dry to the touch.
Optimal Storage Conditions and Methods
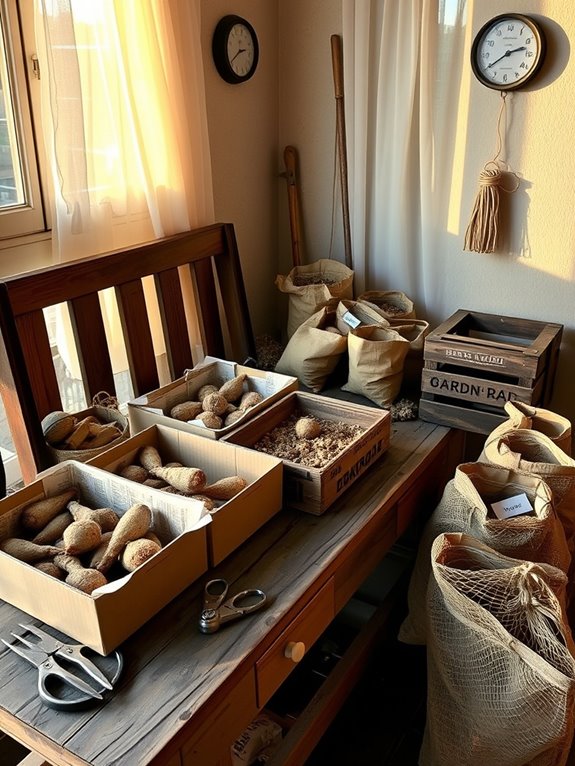
Properly storing dahlia tubers requires creating an environment that balances temperature, humidity, and airflow. You’ll need a cool, dark space where temperatures stay between 40-50°F (4-10°C), like a basement, garage, or root cellar. Pack your tubers in breathable containers filled with slightly damp peat moss, vermiculite, or sawdust to maintain ideal moisture levels without risking rot.
- Check your stored tubers monthly for signs of mold, shriveling, or decay, removing any damaged pieces to protect the healthy ones
- Keep storage containers elevated off concrete floors using wooden pallets or shelving to prevent moisture absorption
- Label each container with variety names, colors, and planting dates using waterproof markers on plastic tags
Remember to maintain consistent conditions throughout winter, adjusting ventilation or adding humidity as needed to keep your tubers firm and viable until spring.
Monitoring Tubers Throughout Winter
Successful winter storage requires regular monitoring of your dahlia tubers to catch and address any issues before they spread. Check your stored tubers every 2-3 weeks for signs of rot, mold, or shriveling. You’ll want to remove any affected tubers immediately and adjust storage conditions if you notice widespread problems.
| Warning Sign | Required Action |
|---|---|
| Black spots | Remove affected areas |
| White mold | Increase ventilation |
| Shriveling | Add light moisture |
| Soft spots | Discard tuber |
During your inspections, gently feel each tuber’s firmness – they should remain plump but not mushy. If your tubers look wrinkled, mist them lightly with water, but don’t soak them. When you spot mold, dust the tubers with sulfur powder and improve air circulation by opening storage containers briefly or adding small ventilation holes.
Spring Revival: Getting Tubers Ready for Planting
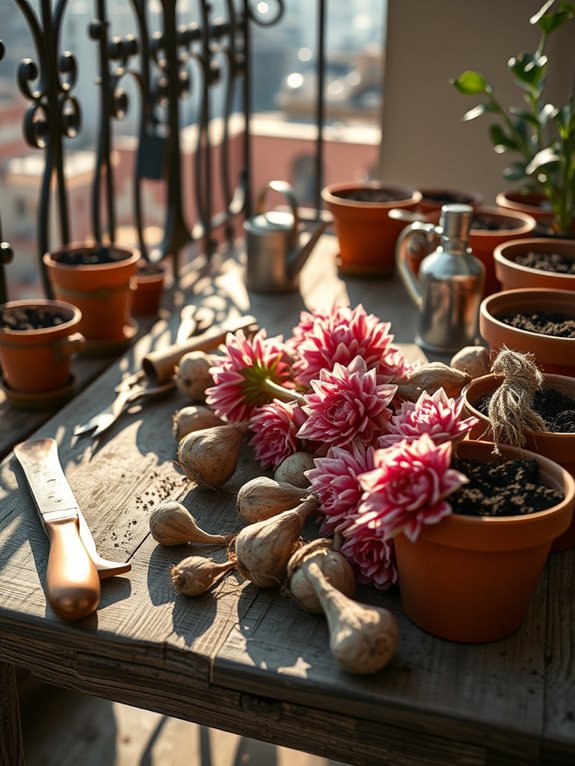
After monitoring your dahlia tubers through the winter months, late winter brings the exciting time to wake them from dormancy. You’ll want to begin this process about 4-6 weeks before your region’s last frost date, giving your tubers plenty of time to develop strong shoots and roots.
- Remove tubers from storage and inspect each one carefully for firmness, checking that they’re plump and free from soft spots, mold, or shriveling
- Place healthy tubers in shallow trays filled with slightly damp potting mix, positioning them so the crown faces upward, and keep them in a bright, warm spot around 65-70°F
- Once sprouts emerge and reach 2-3 inches tall, trim away any weak shoots, leaving only the strongest 2-3 stems per tuber to guarantee robust growth
Frequently Asked Questions
Can I Leave My Dahlias in the Ground if I Live in Florida?
Florida’s warm embrace means you can let your dahlias snooze right in the ground all year. Just make sure your soil’s well-draining and you’re in USDA zones 8-11, where winter’s bite won’t harm them.
Why Did My Stored Dahlia Tubers Turn Black and Mushy?
Your dahlia tubers likely rotted due to excess moisture and poor ventilation during storage. You’ll want to store them in a dry, well-ventilated place between 40-50°F, nestled in peat moss or vermiculite.
How Many Years Can I Reuse the Same Dahlia Tubers?
You can reuse healthy dahlia tubers indefinitely, often for 3-5 years or more. Just divide them when they get crowded, and you’ll have fresh plants each season as long as you store them properly.
Are Dahlia Tubers Poisonous to Cats and Dogs?
Like silent guardians in your garden, dahlia tubers can pack a toxic punch. You’ll want to keep your furry friends away, as these beauties contain poisonous compounds that can make cats and dogs sick.
Can I Grow Dahlias From Store-Bought Tubers That Look Wrinkled?
You can grow dahlias from wrinkled tubers if they’re still firm when squeezed. If they’re not mushy or moldy, plant them and they’ll likely sprout. However, fresh, plump tubers offer better success rates.