
10 Small Garden Tricks That Create Illusions of Space
You don’t need a sprawling yard to create an enchanting garden space. With the right visual tricks and design techniques, even the smallest outdoor area can feel like a spacious retreat. Whether you’re working with a tiny balcony or a compact backyard, clever use of mirrors, diagonal pathways, and strategic color choices can transform your limited garden into an airy oasis. Let’s explore these proven illusion-creating methods that’ll help you maximize every square inch of your outdoor sanctuary.
Contents
- 1 Use Mirrors to Double Your Garden’s Visual Space
- 2 Create Diagonal Lines and Pathways
- 3 Implement Strategic Color Zoning
- 4 Build Upward With Vertical Gardens
- 5 Layer Your Plants by Height
- 6 Install Multi-Level Lighting Effects
- 7 Choose the Right-Sized Furniture
- 8 Add Curves to Break Up Straight Lines
- 9 Maximize Corner Spaces With Built-In Features
- 10 Paint Boundaries With Space-Enhancing Colors
Use Mirrors to Double Your Garden’s Visual Space
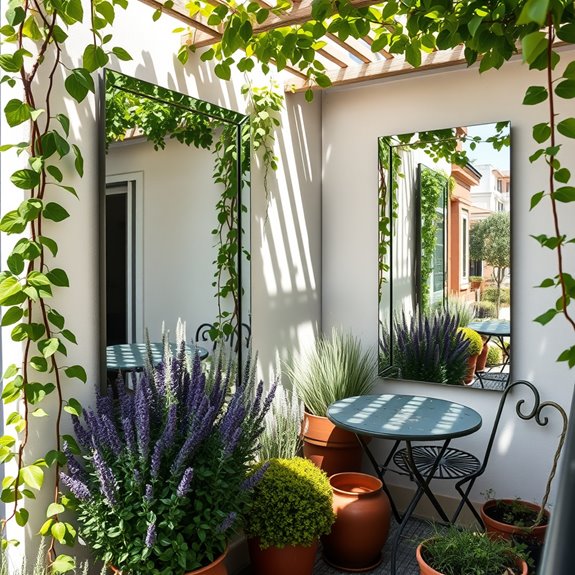
Strategically placed mirrors transform intimate garden spaces into seemingly endless botanical wonderlands.
Whether mounted on walls or positioned between climbing vines, mirrors create captivating illusions that double your visual space while reflecting natural light throughout the garden. Trailing plants like jasmine and clematis appear to cascade infinitely, while potted herbs and compact flowering plants multiply into a lush oasis that delights the eye from every angle.
The sensory experience becomes magnificently amplified as mirrors bounce both light and movement throughout the space.
Watch butterflies appear to dance in pairs as they flutter past reflective surfaces, and enjoy how gentle breezes create synchronized ripples through doubled images of ornamental grasses. The interplay of real and reflected elements creates a mesmerizing atmosphere that makes time seem to stand still.
When selecting mirrors for outdoor use, opt for weather-resistant materials like acrylic or specially treated glass.
Position them to avoid harsh glare and ensure they’re securely mounted. Consider using multiple smaller mirrors rather than one large piece, as this creates interesting perspectives while being easier to maintain. Frameless designs often work best, allowing the mirrors to blend seamlessly into the garden setting.
Getting started is simpler than you might think.
Begin with a single mirror positioned to reflect your favorite plant or garden feature. Experiment with angles and positioning until you find the perfect spot that creates depth without overwhelming the space. Even the smallest balcony can benefit from this trick – just ensure your mirror placement complements rather than dominates your garden’s natural elements.
Create Diagonal Lines and Pathways
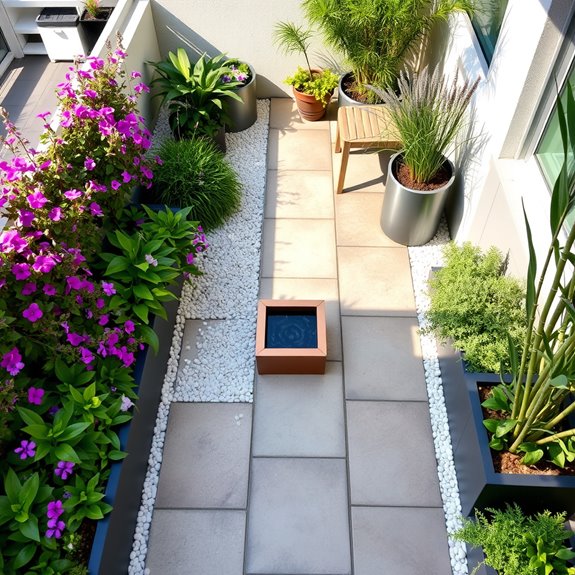
Diagonal paths and lines create an enchanting illusion of space in small gardens, transforming modest plots into seemingly expansive landscapes. Carefully placed stepping stones laid at 45-degree angles draw the eye along an extended visual journey, while diagonal planting beds filled with cascading flowers like verbena and trailing petunias add depth and movement. This clever design technique breaks away from conventional straight lines, offering a more dynamic and engaging garden experience.
The sensory journey along diagonal pathways engages visitors in unexpected ways. As one meanders across angled stepping stones, different garden sections reveal themselves gradually, creating mini-destinations and moments of discovery. Fragrant herbs planted along the diagonal beds release their scents when brushed against, while ornamental grasses sway and rustle in the breeze, adding gentle movement and sound to the experience.
Practical implementation of diagonal design requires careful planning but offers excellent functionality. These angles naturally create distinct garden zones, perfect for separating vegetable beds from seating areas or creating maintenance paths. The corners formed by diagonal lines provide ideal spots for focal points like decorative containers or small water features, maximizing every inch of available space.
To recreate this design approach, start with a simple diagonal path using natural materials like gravel or stepping stones. Align planting beds at the same angle, and use repeated elements like similar containers or plant groupings to maintain visual coherence.
Even in the smallest garden, a single diagonal line from corner to corner can create the illusion of greater depth and transform an ordinary space into something extraordinary.
Implement Strategic Color Zoning
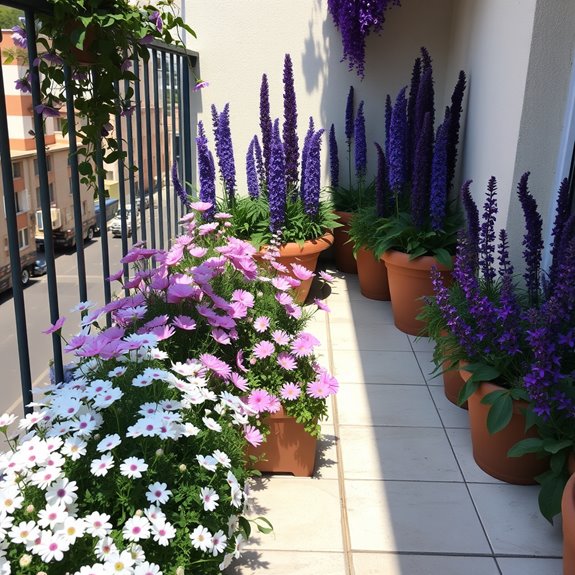
Strategic color zoning transforms a small garden into a masterfully orchestrated visual symphony. By thoughtfully arranging plants in distinct color families, you create captivating focal points and natural flow throughout the space.
Picture clusters of purple salvias seamlessly transitioning into soft pink cosmos, then flowing into crisp white alyssum borders. This intentional color progression guides the eye through the garden while making the space appear larger and more organized.
The sensory experience of a color-zoned garden extends beyond visual appeal. Walking through deliberately planned color sections creates distinct emotional responses – from energizing reds and oranges in entertaining areas to calming blues and purples in meditation spaces.
Each zone becomes its own micro-environment, inviting different moods and activities throughout the garden.
Practical implementation of color zoning requires careful consideration of blooming seasons and plant heights. Plan for continuous color by incorporating plants that flower at different times within each zone.
Layer plants with taller specimens at the back, medium-height plants in the middle, and ground covers in front. Consider foliage colors as well as flowers to maintain visual interest even when blooms fade.
Creating your own color-zoned garden starts with a simple plan. Begin by dividing your space into three distinct areas and assign a color palette to each.
Start small with just a few plants per zone, focusing on varieties that thrive in your specific lighting conditions. As your confidence grows, expand your palette gradually, always maintaining clear transitions between color zones to preserve the organized, intentional feel of your garden design.
Build Upward With Vertical Gardens
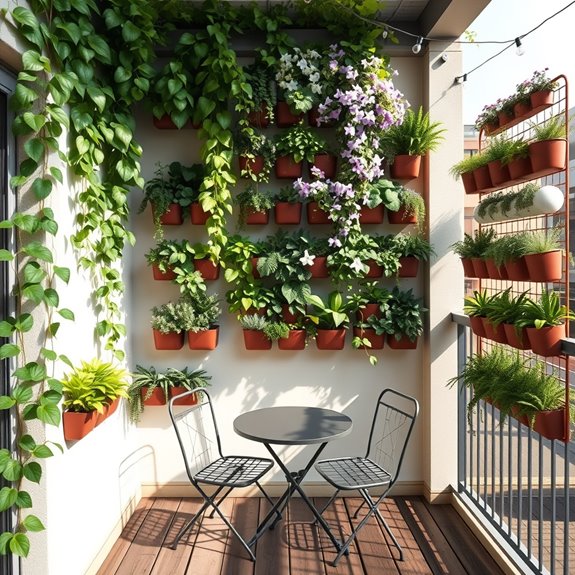
Transform your limited outdoor space into a living tapestry with vertical gardens that climb gracefully toward the sky. Lush cascades of trailing ivy and delicate ferns create natural curtains of greenery, while compact climbing roses and fragrant jasmine weave their way up trellises and framework. The dramatic visual impact of plants growing upward draws the eye and creates an illusion of expanded space, turning blank walls into vibrant green canvases.
The sensory experience of a vertical garden envelops visitors in a peaceful sanctuary. The gentle rustling of leaves in the breeze provides a natural soundtrack, while climbing plants offer subtle fragrances throughout the day. As the sun shifts, dancing shadows create ever-changing patterns across the space, adding depth and visual interest to the vertical landscape.
Practical considerations make vertical gardens an ideal solution for small spaces. Modular planting systems, pocket planters, and repurposed pallets maximize growing area while minimizing floor space usage. Strategic placement of plants ensures proper light exposure, while built-in irrigation systems simplify maintenance. The vertical structure also provides natural cooling and insulation for adjacent indoor spaces.
Creating your own vertical garden starts with a simple framework and careful plant selection. Begin with one wall section and a few hardy climbers like pothos or morning glories.
Add layers gradually, mixing textures and colors to suit your style. Even the smallest balcony can support a vertical garden using stackable containers or a single trellis – the key is to think upward rather than outward, allowing nature to guide your design skyward.
Layer Your Plants by Height

Like a perfectly composed symphony, a garden layered by height creates a captivating visual masterpiece that draws the eye from ground to sky.
Tall ornamental grasses and climbing jasmine form the backdrop, while mid-height lavender and salvias create a robust middle section. Ground-hugging sedums and creeping thyme carpet the foreground, each layer working in harmony to maximize both space and visual interest.
The sensory journey through a layered garden unfolds naturally as you move through the space. The gentle rustle of tall grasses mingles with the sweet perfume of climbing roses, while lower herbs release their aromatic oils with the slightest touch.
This multi-level arrangement creates an immersive experience that engages all the senses, from sight to smell to sound.
Practical considerations make layered planting particularly clever for small spaces. Tall plants at the back prevent them from overshadowing shorter specimens, while ensuring proper air circulation between layers helps prevent fungal issues.
The graduated heights also make maintenance more manageable, with easy access to each plant tier for watering and pruning.
Personalizing a layered garden offers endless possibilities. Mix edibles with ornamentals by incorporating dwarf fruit trees as tall elements, flowering herbs in the middle, and strawberries as ground cover.
Add personal touches with varying container heights, using pedestals or hanging baskets to enhance the vertical dimension.
Creating a layered garden begins with a simple formula: place plants in groups of three heights – tall (back), medium (middle), and short (front).
Start small with just one of each height category, then gradually expand as you become comfortable with the maintenance routine. Even the tiniest garden can accommodate this approach by scaling the plant sizes to fit the available space.
Install Multi-Level Lighting Effects
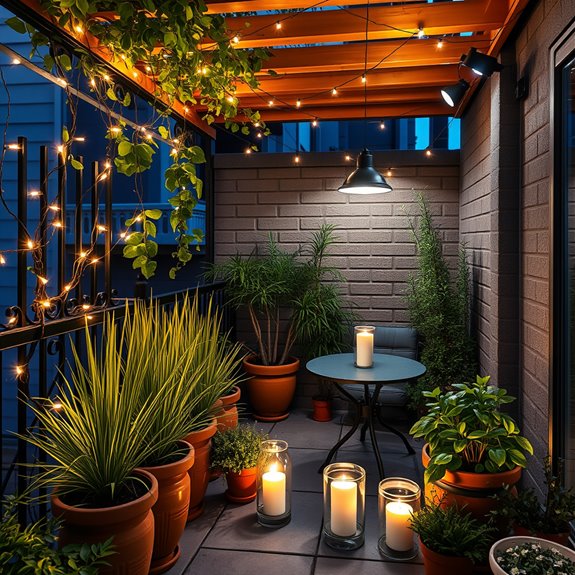
Multi-Level Lighting Effects transform an ordinary garden space into a magical nighttime retreat. Strategic placement of lights at different heights creates depth and dimension, with twinkling fairy lights draped through climbing jasmine, solar-powered stake lights illuminating pathway edges, and spotlights highlighting architectural plants like ornamental grasses and compact bamboo.
The layered lighting creates dramatic shadows and soft glows that make the garden come alive after sunset.
The sensory experience of a well-lit garden extends garden enjoyment well into the evening hours. Soft lighting creates an intimate atmosphere perfect for outdoor dining or quiet contemplation, while the interplay of light and shadow adds mystery and romance. The gentle illumination attracts moths and other nocturnal pollinators, adding another dimension of garden life to observe.
Practical considerations for multi-level lighting start with power sources. Solar lights offer sustainable, cord-free solutions for areas far from outlets, while low-voltage systems provide reliable illumination for key features. Weather-resistant fixtures and proper installation height prevent damage from irrigation and garden maintenance.
Consider motion sensors or timers to automate the lighting system and conserve energy.
Creating this enchanted evening garden is achievable in any space. Start with three lighting levels: ground-level path lights, mid-height accent lights for plants and features, and overhead string lights or downlighting from structures.
Focus on highlighting special features first, then fill in with ambient lighting. Even the smallest garden can become a nighttime sanctuary with thoughtfully placed lights at various heights.
Choose the Right-Sized Furniture
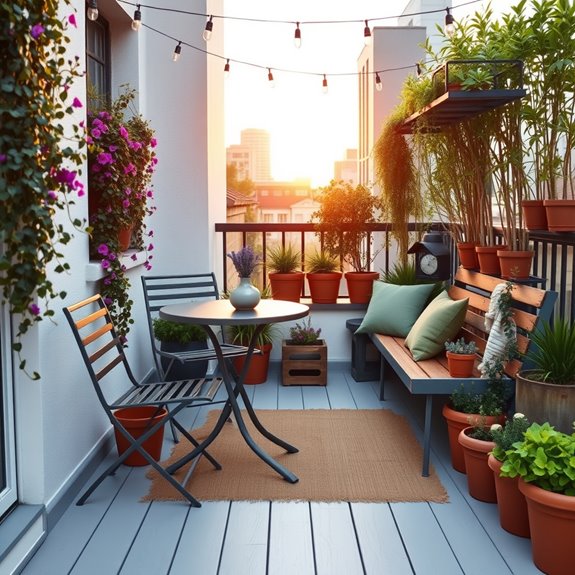
Thoughtfully selected furniture transforms even the tiniest garden into an intimate outdoor sanctuary. Slim-profile bistro sets nestle perfectly into corner spaces, while foldable chairs and tables adapt to changing needs. Sleek benches with built-in storage maximize functionality without overwhelming the space, creating an atmosphere where greenery and comfort exist in perfect harmony.
The magic lies in how properly scaled furniture creates distinct zones within a small garden. A compact loveseat paired with weatherproof cushions offers a cozy reading nook, while a narrow bar-height table against a wall provides an ideal spot for morning coffee or casual dining. These intentional arrangements make the space feel larger and more purposeful.
When selecting pieces, consider materials that complement your garden’s style while standing up to the elements. Powder-coated metal furniture offers durability and a modern aesthetic, while natural teak or acacia wood brings warmth and character. Pieces with open designs, such as mesh or slatted patterns, maintain visual lightness and allow air circulation.
Custom touches elevate the furniture arrangement into a personal retreat. Add weather-resistant throw pillows in coordinating colors, incorporate small side tables for plant displays, or hang string lights overhead to create ambiance. Multi-functional pieces, like ottomans that double as storage, add versatility without cluttering the space.
Start by measuring your garden space carefully and drawing a simple layout. Leave adequate pathways around furniture pieces and consider traffic flow. Remember that less is more – select a few key pieces that serve multiple purposes rather than filling every inch.
Even the smallest garden can become an inviting outdoor room with properly scaled furniture as its foundation.
Add Curves to Break Up Straight Lines
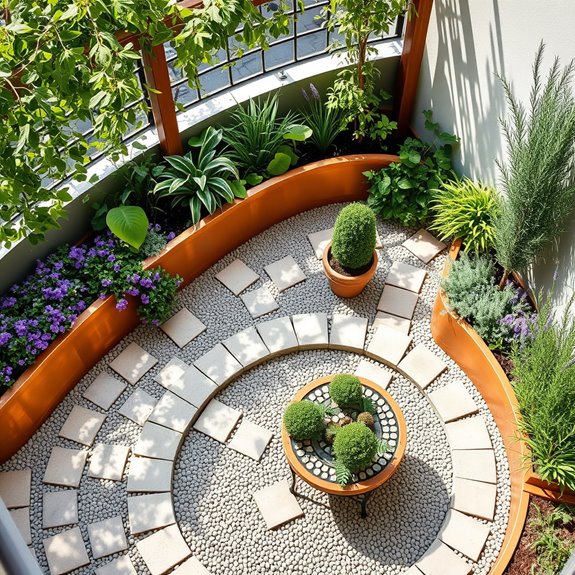
Curves bring a natural, flowing grace to even the smallest gardens, softening harsh angles and creating an inviting landscape that draws the eye through the space. Gently winding pathways lined with rounded river rocks guide visitors past flowing ornamental grasses and mounding perennials like lavender and coral bells.
The strategic placement of curved borders and bedding areas transforms rigid boundaries into organic shapes that mirror nature’s own design principles.
The sensory journey through a curved garden path engages all the senses – the soft crunch of gravel underfoot, brushing past aromatic herbs that release their scent, and the gentle rustling of ornamental grasses in the breeze. Each bend creates a sense of discovery, revealing new garden vignettes and peaceful resting spots.
Practical implementation of curves requires careful planning to maintain accessibility and functionality. Start with broad, sweeping curves rather than tight turns, ensuring pathways remain easy to navigate and maintain.
Use flexible garden hoses or rope laid on the ground to experiment with different curved patterns before making permanent changes. Consider the viewing angles from both inside and outside your home to maximize visual impact.
Creating your own curved garden doesn’t require extensive space or resources. Begin by identifying one or two key areas where a gentle curve could replace a straight line – perhaps a border edge or small pathway.
Use continuous plantings of low-growing flowers or ground covers to emphasize the curved shape, and incorporate round containers or circular stepping stones to reinforce the flowing design.
Even the smallest gardens can be transformed by introducing just a few well-planned curves.
Maximize Corner Spaces With Built-In Features
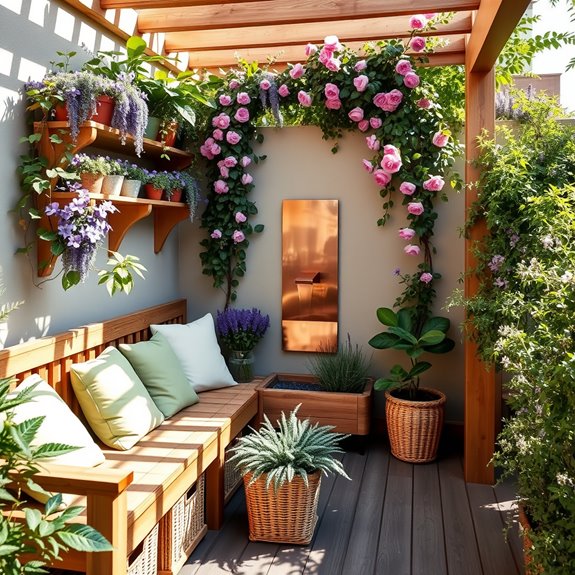
Transform neglected corners into enchanting garden sanctuaries with built-in features that maximize every inch of space.
Picture a cozy nook where climbing jasmine and delicate ferns cascade from tiered wooden corner shelving, while built-in bench seating adorned with plush weatherproof cushions creates an intimate retreat.
Strategic corner trellises support flowering vines like clematis and morning glories, adding vertical interest and natural screening.
The sensory experience is truly immersive in these thoughtfully designed corners.
The gentle rustling of ornamental grasses mingles with the sweet fragrance of climbing roses, while the sound of water trickling from a space-saving corner fountain creates a peaceful atmosphere.
These built-in elements work together to engage all the senses and create a calming escape from the everyday world.
From a practical standpoint, built-in features offer remarkable functionality in corner spaces.
Weather-resistant storage benches can house gardening tools and supplies, while integrated irrigation systems can be discreetly installed within the structure.
Modular corner planters can be adjusted seasonally, and fold-down tables provide flexible space for activities without permanent commitment to floor space.
Creating your own corner garden sanctuary is achievable in any space.
Start with a single corner shelf or trellis, then gradually add elements as your vision evolves.
Focus on plants that grow vertically, incorporate multi-functional furniture, and remember that even the smallest corner can become an extraordinary garden feature with thoughtful planning and creative use of built-in elements.
Paint Boundaries With Space-Enhancing Colors
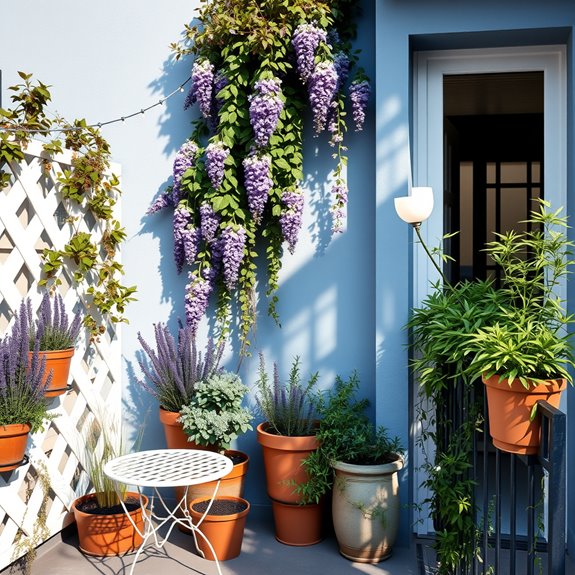
Creating visual depth through strategic color choices can transform even the smallest garden into an enchanting outdoor sanctuary. Soft blues, cool greens, and misty grays painted on fences and walls create an illusion of receding space, while bright white trim draws the eye outward. This clever use of space-enhancing colors forms a perfect backdrop for cascading jasmine, climbing roses, and vertical greenery that seems to float against the carefully chosen palette.
The psychological impact of these calming color choices extends beyond mere spatial illusion. Cool-toned boundaries promote a sense of serenity and tranquility, making the garden feel like a peaceful retreat from the outside world.
As evening approaches, these subtle hues take on an ethereal quality, creating a magical atmosphere as twilight settles over the space.
Consider practical aspects when selecting your paint colors. Weather-resistant exterior paints in semi-gloss finishes not only protect boundaries but also reflect light effectively throughout the garden. Light-reflecting properties of carefully chosen colors can brighten shadowy corners and create depth where none existed before.
Choose paints that complement existing elements like stone pathways or architectural features.
To recreate this space-enhancing effect, start with a single boundary wall in a soft blue-gray tone. Add white accents to frame garden features and gradually extend the color scheme to other boundaries as confidence grows.
Remember that lighter tones near the garden’s edges create depth, while darker accents closer to the entrance ground the space. Even the smallest garden can benefit from this simple but effective design approach.