
7 Small Garden Ideas With Big Impact
Like a tiny jewel box waiting to be filled with treasures, your small garden holds endless potential for transformation. You don’t need sprawling acres to create an outdoor oasis that captures attention and soothes the soul. Whether you’re working with a compact balcony or a modest backyard, clever design choices can maximize every inch of your space. Let’s explore seven game-changing ideas that’ll help you turn your petite plot into a stunning sanctuary worth showing off.
Contents
Embrace Vertical Growing With Living Walls
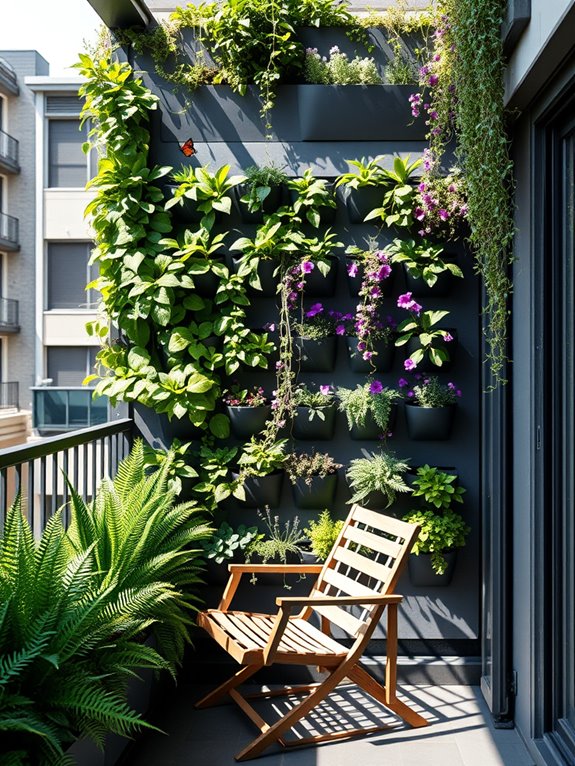
Transform your compact outdoor space into a lush, vertical oasis where cascading greenery and vibrant blooms create a living tapestry against your walls. Trailing vines of jasmine and clematis intertwine with compact ferns and colorful petunias, while structured pocket planters hold an array of herbs and succulents. The vertical composition draws the eye upward, creating an illusion of expanded space while turning ordinary walls into extraordinary garden features.
This living wall brings nature to eye level, establishing an intimate connection between indoor and outdoor spaces. Imagine stepping onto your balcony or patio to be greeted by a wall of texture and movement, where butterflies dance among flowering plants and the gentle rustle of leaves creates a peaceful atmosphere. The vertical garden becomes both a stunning focal point and a practical solution for growing everything from ornamental plants to fresh herbs and even compact vegetables.
Key Elements:
- Modular pocket planters or vertical garden panels
- Sturdy mounting system
- Irrigation system with timer
- Growing medium suitable for vertical gardens
- Plant varieties suitable for vertical growing
- Waterproof backing material
- Drainage collection system
- Support structures for climbing plants
- LED grow lights (for shaded areas)
- Maintenance tools (pruners, watering can, fertilizer)
Begin implementation by assessing your wall’s structural integrity and installing a waterproof barrier to protect the building surface. Mount the vertical garden system securely, ensuring proper weight distribution and adequate drainage.
Install an irrigation system with multiple delivery points to ensure even water distribution throughout the living wall. Layer your plantings strategically, placing drought-tolerant species at the top and moisture-loving plants at the bottom where water naturally accumulates.
Choose plants based on your wall’s exposure to sunlight and local climate conditions. Group plants with similar water and nutrient needs together to simplify maintenance. Regular pruning, fertilizing, and system checks will maintain the wall’s health and appearance.
Monitor the irrigation system frequently to prevent over or under-watering, and adjust seasonal watering schedules as needed. Adapt your vertical garden design based on available space and weight restrictions.
For smaller balconies, consider lightweight pocket planters or modular systems that can be expanded over time. In areas with limited natural light, incorporate grow lights and choose shade-tolerant species.
Consider installing a fold-down maintenance platform for easier access to higher sections, and select a mix of perennial and annual plants to ensure year-round interest while allowing for seasonal updates to keep the display fresh and engaging.
Create Multi-Level Garden Zones
Transform your compact garden into a captivating multi-dimensional landscape by creating distinct zones at varying heights. Picture cascading levels of lush greenery, where climbing roses and trailing ivy gracefully descend from elevated planters, while hardy herbs and compact vegetables thrive in raised beds below. This vertical approach creates an illusion of expanded space, with each level offering its own microclimate and visual interest, from ground-hugging creeping thyme to eye-level container gardens filled with vibrant flowers.
The magic of multi-level gardening lies in its ability to create separate garden rooms within a small footprint. Terraced areas can transition from sunny Mediterranean-style plantings featuring lavender and sage at the top level, down to shade-loving ferns and hostas below. Architectural elements like stone retaining walls, wooden platforms, and metal scaffolding provide structure while doubling as support for climbing plants, creating a seamless blend of hardscape and living elements.
Key Elements:
- Retaining walls or tiered planters
- Vertical growing structures
- Mixed-height containers
- Stepping stones or pathways
- Plant supports and trellises
- Drought-resistant plants for upper levels
- Shade-tolerant plants for lower levels
- Drip irrigation system
- Multi-level lighting
- Weather-resistant materials
Begin implementation by assessing natural slopes or creating artificial elevation changes using retaining walls or raised beds. Start with the highest point, typically at the back of the garden, and work forward in descending levels. Install a reliable irrigation system that can reach all levels, ensuring proper drainage between tiers to prevent water logging.
Incorporate stable access points between levels using steps or sturdy pathways that can withstand regular maintenance visits. When selecting plants, consider their mature size and growth habits, placing larger specimens at the back and trailing plants near edges where they can cascade. Remember to leave adequate spacing between levels for maintenance access and to prevent overcrowding as plants mature.
Design adaptations can easily accommodate different spaces, from large terraced gardens to small balconies. For balconies, use stackable containers, wall-mounted planters, and hanging baskets to create vertical interest. Consider lightweight materials and ensure all structures are securely anchored.
In windy locations, opt for wind-resistant plants and avoid tall, unstable elements that could pose safety risks. Regular pruning and maintenance will keep the different zones distinct and prevent aggressive plants from overwhelming their designated spaces.
Design a Cozy Corner Retreat
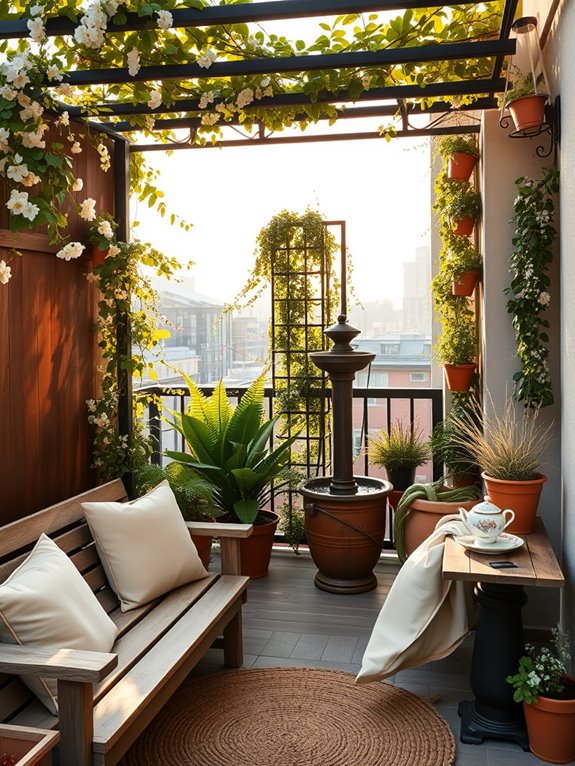
Transform a modest garden nook into an enchanting retreat by crafting a cozy corner that serves as your private sanctuary. Climbing jasmine and delicate fairy lights drape overhead, while plush outdoor cushions rest upon a vintage wooden bench, creating an intimate atmosphere perfect for morning coffee or evening relaxation. Potted lavender and sage release calming fragrances, as ornamental grasses sway gently in the breeze, providing a natural screen of privacy.
The space comes alive with thoughtfully layered elements, starting with a weathered trellis supporting fragrant climbing roses or clematis. A small water feature provides gentle ambient sounds, while container-grown ferns and hostas add lush greenery at varying heights. Weatherproof storage ottomans double as extra seating, and strategically placed solar lanterns cast a warm glow as daylight fades.
Essential Elements:
- Comfortable seating (bench or chairs)
- Weather-resistant cushions
- Climbing plants and trellis
- Small water feature
- Solar-powered lighting
- Potted herbs or fragrant plants
- Decorative containers
- Privacy screens or tall plants
- Side table or surface
- Storage solutions
Begin implementation by selecting the most sheltered corner of your garden, ideally with some existing structural support for climbing plants. Install a sturdy trellis or pergola first, ensuring it’s properly anchored.
Position your seating to maximize views of the surrounding garden while maintaining a sense of enclosure. Layer your plantings from tall to short, starting with climbers at the back, then medium-height shrubs, and finally lower-growing plants in the foreground.
When establishing the space, consider seasonal changes and maintenance requirements. Choose plants that provide year-round interest, mixing evergreens with flowering varieties. Install an automatic watering system or group plants with similar water needs together for easier care.
Ensure all furniture and decorative elements are weather-resistant and properly secured.
For smaller spaces or balconies, focus on vertical elements and multi-functional pieces. Use hanging planters and wall-mounted containers to maximize growing space. Consider folding furniture or bench seating with built-in storage. Scale down water features to tabletop versions, and opt for dwarf varieties of favorite plants.
In extremely tight spaces, create the illusion of a larger area using mirrors or light-colored materials that reflect light and make the space feel more open.
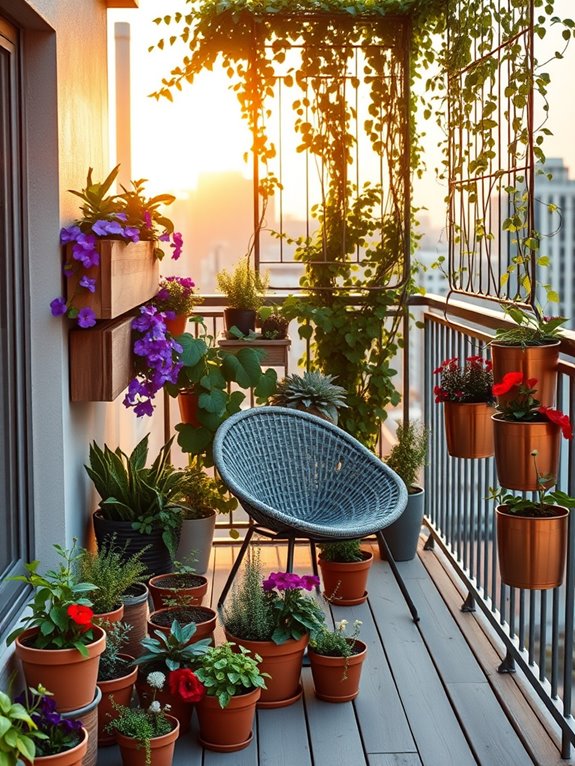
Maximize Space With Container Gardening
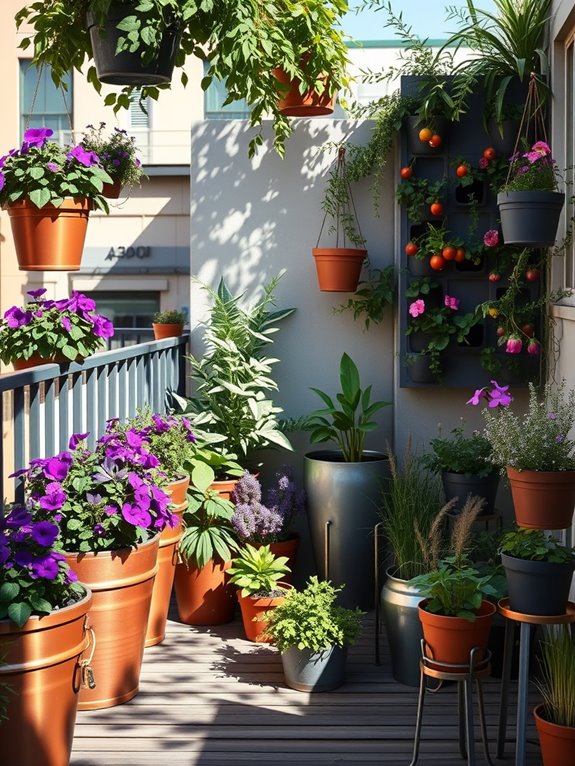
Transform your compact outdoor space into a lush oasis with strategic container gardening, where colorful pots cascade with blooming petunias, fragrant herbs, and trailing vines. Terra cotta containers in varying heights create visual interest while hosting a vibrant mix of compact vegetables, dwarf fruit trees, and ornamental grasses.
The arrangement resembles a living wall of greenery, with each container contributing to a cohesive garden tapestry. The vertical layers of containers create intimate garden rooms, even in the smallest spaces. Mediterranean herbs like rosemary and thyme spill over copper planters, while compact tomato varieties reach skyward in sleek modern vessels.
Statement containers featuring Japanese maples or decorative bamboo anchor the space, while hanging baskets overflow with cascading flowers, creating a garden that extends from ground to sky.
Essential Elements:
- Containers of various sizes and materials
- Potting soil and organic fertilizer
- Irrigation system or watering cans
- Plant supports and trellises
- Multi-level shelving or plant stands
- Drainage materials (gravel, pottery shards)
- Selection of compact plants
- Decorative mulch
- Container casters or dollies
Start by mapping your available space and sunlight patterns, then arrange containers in groups of odd numbers, positioning larger specimens at the back and shorter plants in front. Install a drip irrigation system to ensure consistent watering, particularly for containers in hard-to-reach spots.
Place plant stands and shelving units strategically to maximize vertical space while ensuring all plants receive adequate light. Consider weight distribution when placing containers on elevated surfaces or balconies.
For balcony gardens under 50 square feet, focus on lightweight containers and rotating seasonal plantings. Larger spaces can accommodate multiple growing zones, incorporating both edible and ornamental plants.
Consider installing a folding trellis system that can expand during growing seasons and compact during winter months. Monitor soil moisture carefully, as containers dry out faster than ground plantings, and establish a regular feeding schedule to maintain plant health in the limited soil volume.
Incorporate Mirrors and Reflective Elements
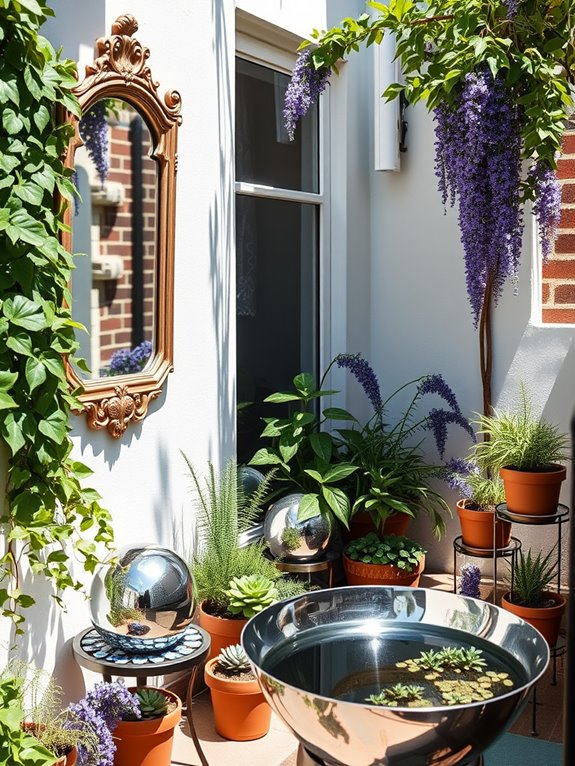
Transform your small garden into an enchanting wonderland by strategically incorporating mirrors and reflective elements. Cleverly positioned mirrors create the illusion of expanded space, while reflecting lush greenery, colorful blooms, and dancing light throughout your garden. The interplay between natural elements and reflective surfaces generates a magical atmosphere where climbing jasmine, potted ferns, and trailing ivy appear to multiply endlessly into the distance.
Reflective gazing balls, metallic wind chimes, and mirrored mosaic tiles add sparkle and movement to the garden, catching sunlight and creating mesmerizing light displays. These elements work in harmony with water features, whose rippling surfaces provide additional reflective qualities. The overall effect is a dynamic, ever-changing garden space that feels significantly larger and more immersive than its actual dimensions.
Essential Elements:
- Weather-resistant outdoor mirrors
- Metallic gazing balls
- Mirrored mosaic tiles
- Polished stainless steel planters
- Reflective wind chimes
- Mirror-finish garden ornaments
- Chrome or silver plant stands
- Reflective water features
- Glass or mirror-backed trellises
- Metallic garden furniture
Begin implementation by conducting a thorough site analysis to identify optimal mirror placement, ensuring reflected sunlight won’t create hazardous glare or heat pockets. Mount larger mirrors on sturdy garden walls or fences, angling them slightly downward to reflect plantings rather than the sky.
Create layers of reflection by positioning smaller decorative mirrors and metallic elements at varying heights throughout the garden, incorporating them into living walls or nestling them among plants.
Extra Considerations: Weather exposure significantly impacts reflective elements, so choose materials rated for outdoor use and clean them regularly to maintain their effect. For balcony gardens, use lightweight acrylic mirrors instead of glass, and focus on smaller reflective elements that can be easily secured.
Consider your climate – in hot regions, position mirrors to avoid amplifying heat, while in shadier areas, use them to redirect light to sun-loving plants. Always ensure mirrors are securely mounted and positioned to avoid startling wildlife or creating confusion for birds.
Install Smart Storage Solutions
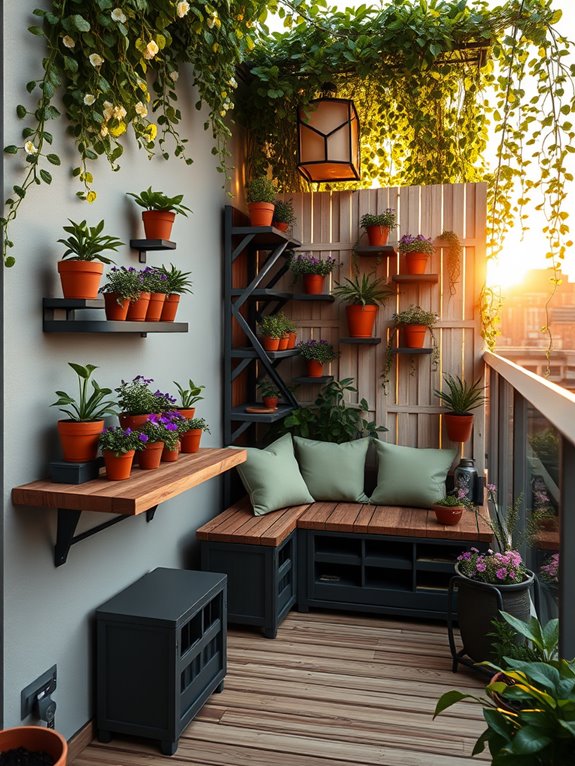
A thoughtfully planned small garden with smart storage solutions transforms cramped spaces into an efficient yet enchanting outdoor sanctuary.
Vertical storage units blend seamlessly with climbing jasmine and ivy, while fold-away furniture nestles against walls adorned with mounted herb planters. Decorative storage boxes double as seating areas, their weathered wood surfaces complementing the natural elements while concealing garden tools and seasonal items.
The space maintains its charm through clever organization, featuring tiered shelving that showcases cascading plants like trailing petunias and spider plants, creating a living wall effect.
Hidden storage compartments beneath built-in benches house irrigation equipment and soil bags, while decorative lattice screens conceal utility areas. The overall aesthetic remains uncluttered and serene, with each storage solution contributing to the garden’s visual appeal.
Key Elements:
- Multi-functional bench seating with storage
- Wall-mounted tool organizers
- Fold-away furniture
- Vertical shelving units
- Weather-resistant storage boxes
- Lattice screens
- Hanging organizers
- Corner storage solutions
- Tiered plant stands
- Under-deck storage systems
Implementation begins with a thorough assessment of the available space and identification of primary storage needs.
Install wall-mounted solutions first, ensuring they’re securely anchored and waterproofed. Position larger storage units strategically to create natural divisions within the garden while maximizing corner spaces.
Integrate plant displays with storage elements by installing tiered shelving that accommodates both decorative items and practical storage needs.
Choose weather-resistant materials and ensure proper drainage around storage areas to prevent water damage.
Regular maintenance includes checking hinges and catches on storage units, applying protective coatings annually, and reorganizing seasonally to maximize space efficiency.
For smaller spaces, focus on vertical storage solutions and multi-functional pieces that can be adjusted or moved as needed.
Balcony gardens benefit from hanging organizers and collapsible storage units, while larger spaces can incorporate more substantial built-in solutions.
Consider incorporating rolling storage units for flexibility, and ensure all storage solutions are properly secured against wind and weather conditions.
Style and size adaptations should prioritize maintaining clear pathways and preserving open areas for relaxation and entertainment.
Add Water Features for Depth and Movement
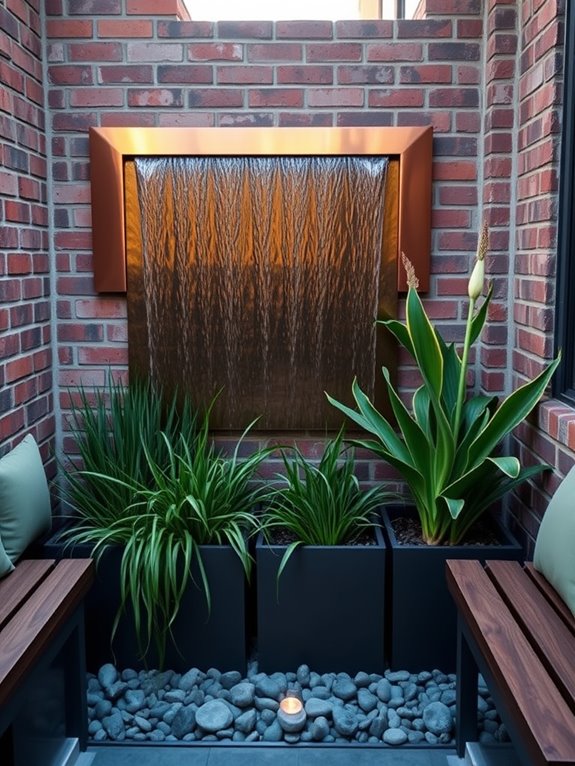
Water features transform even the tiniest garden into a soothing oasis, creating depth and dimension through the mesmerizing interplay of light, sound, and movement. Whether it’s a compact wall fountain cascading over copper panels, a small ceramic bowl with floating water lilies, or a sleek modern water blade creating a crystalline curtain, these aquatic elements draw the eye and create an immediate focal point.
The gentle sound of flowing water masks urban noise while attracting songbirds and beneficial insects, making the space feel larger and more alive.
Natural stone, weathered copper, and glazed ceramics provide the perfect backdrop for water features, complemented by moisture-loving plants like Japanese forest grass, dwarf papyrus, and creeping jenny that soften edges and create lush surroundings. Solar-powered pumps can eliminate the need for electrical connections, while LED lighting transforms these features into dramatic nighttime displays, extending the garden’s usefulness well into the evening hours.
Key Elements:
- Water feature (fountain, bowl, or cascade)
- Submersible pump
- Water-resistant lighting
- Moisture-loving plants
- Decorative stones or pebbles
- Water treatment products
- Filter system
- Waterproof liner
- Installation hardware
- Timer system
Installing a water feature begins with selecting a level location and ensuring proper electrical access if not using solar power. Create a stable base using pavers or a concrete pad, ensuring it can support the weight of the filled feature.
Install the pump and lighting according to manufacturer specifications, using waterproof connections and hiding cables beneath decorative stones. Position plants around the feature’s edges, using containers with good drainage and appropriate soil mixtures for water-loving species.
When adapting water features for different spaces, consider vertical options for narrow balconies, such as wall-mounted fountains or water walls. For larger areas, multiple interconnected features can create a stream effect.
Always ensure weight restrictions are considered for elevated installations, and install automatic top-up systems to maintain water levels during hot periods. Choose salt-resistant materials in coastal areas, and consider incorporating a small pond filter system to keep water clear and reduce maintenance needs.