
7 Indoor Garden Ideas That Thrive With Little Sun
You don’t need a sun-filled room to create a thriving indoor garden that transforms your space into a verdant retreat. Whether you’re dealing with north-facing windows, towering buildings that block natural light, or windowless rooms, there’s a creative solution waiting to bring life to those dim corners. From sleek vertical gardens illuminated by LED strips to cozy terrariums that create their own miniature worlds, these seven ingenious approaches will help you cultivate lush greenery in even the most challenging conditions.
Contents
Low-Light Plant Wall for Small Spaces
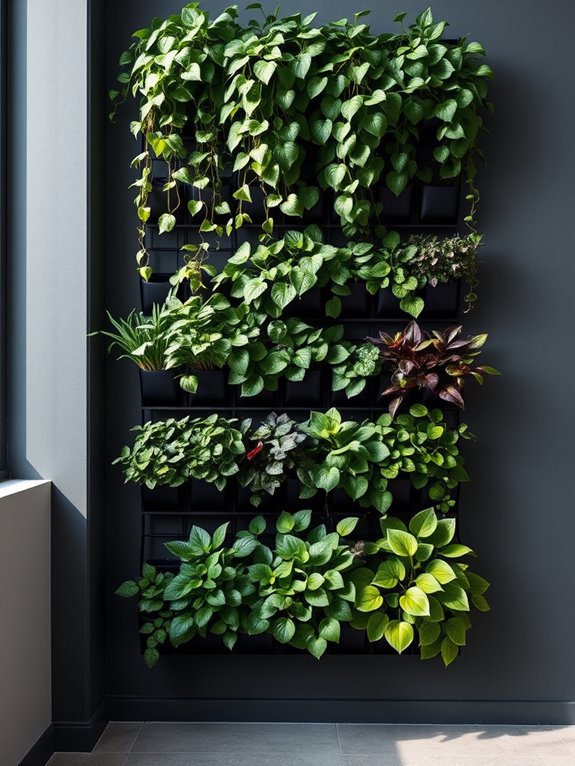
Transform any dim corner into a lush vertical oasis with a thoughtfully designed low-light plant wall. Deep emerald pothos cascade downward like natural curtains, while heart-shaped philodendrons and striking snake plants create dynamic layers of varying heights and textures. The verdant collection brings life to otherwise forgotten spaces, turning blank walls into living artwork that thrives even in minimal natural light.
This space-saving solution combines functionality with natural beauty, creating a calming focal point that purifies the air while maximizing every square inch of available space. Dark-tolerant ferns add delicate movement, while the rich purple undertones of Chinese evergreen leaves provide subtle color variations.
Mounted on sleek modular panels or arranged in hanging pocket planters, these hardy specimens create an organic tapestry that evolves with each new growth.
Essential Elements:
- Mounting system (vertical planters, pocket gardens, or modular panels)
- Low-light tolerant plants (pothos, philodendron, snake plant, ZZ plant)
- Proper drainage system
- Grow lights (optional for extremely low-light areas)
- Moisture-resistant backing
- Automatic watering system or accessible watering method
- Plant-safe mounting hardware
- Growing medium suitable for vertical gardens
Begin installation by securing a moisture-resistant backing to protect your wall, then attach your chosen mounting system according to manufacturer specifications.
Arrange plants strategically, placing larger specimens at eye level and trailing varieties at the top where they can cascade naturally. Ensure each plant has adequate room for root growth and future expansion. Install an irrigation system that provides consistent moisture without oversaturation, or position planters for easy hand-watering access.
Design Considerations and Adaptations: For smaller spaces, choose compact varieties and focus on creating distinct visual layers rather than overwhelming the space with too many species.
Consider incorporating adjustable grow lights for darker corners, and select plants with similar water requirements to simplify maintenance. In tight spaces, use corner-mounted systems or create multiple smaller plant groupings rather than one large installation. Always factor in mature plant size when planning your layout, as some species can double or triple in size over time.
Terrarium Gardens Under Artificial Light
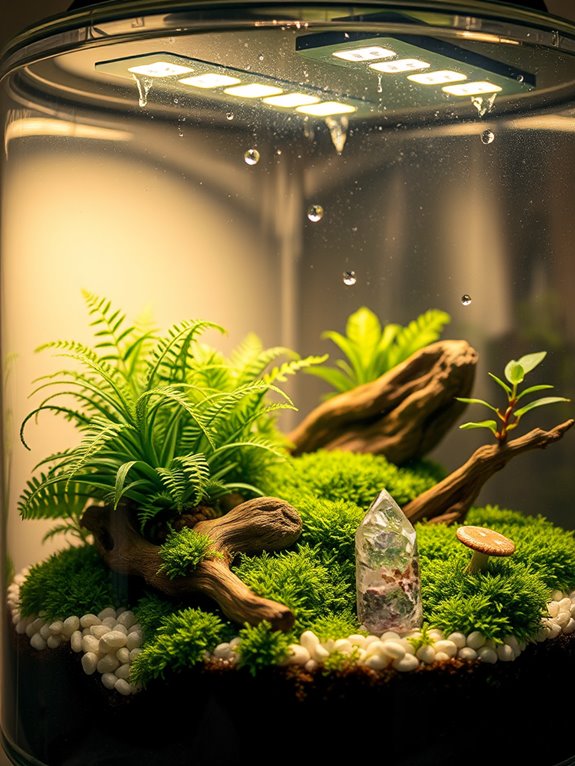
A terrarium garden under artificial light creates a mesmerizing miniature ecosystem, where delicate ferns, moss, and tropical plants thrive beneath the gentle glow of specialized grow lights. The crystal-clear glass walls of the terrarium reflect and amplify the light, creating an enchanting display of shadows and illuminated foliage. Small decorative elements like polished stones, tiny figurines, or driftwood pieces add personality and depth to this self-contained wonderland.
The combination of artificial lighting and enclosed space produces a humid, tropical environment perfect for nurturing exotic plants that might struggle in typical indoor conditions. The controlled ecosystem allows for creative layering of plants, from carpet moss and creeping fig at the base to taller specimens like mini orchids or prayer plants reaching toward the light source. This creates a dynamic vertical garden that appears to be a living snapshot of a rainforest floor.
Key Elements:
- Glass terrarium container
- LED grow lights or full-spectrum fluorescent lights
- Activated charcoal
- Well-draining potting mix
- Decorative stones or gravel
- Small tropical plants
- Moss varieties
- Drainage layer materials
- Humidity-loving plants
- Miniature decorative elements
- Light mounting system
- Timer for lighting
To implement this garden style, begin by creating proper drainage layers in your terrarium using gravel and activated charcoal. Position the grow lights approximately 12-18 inches above the terrarium, adjusting based on plant needs and light intensity. Arrange plants by height and light requirements, placing shade-loving species under taller plants and light-hungry specimens closer to the top.
Install your lighting system on a timer to provide 12-14 hours of daily illumination, simulating natural daylight cycles. When designing your illuminated terrarium garden, consider the heat output of your chosen lighting system and maintain adequate ventilation to prevent overheating. For smaller spaces, opt for compact LED systems that produce minimal heat and can be mounted on adjustable arms.
Layer plants more densely in smaller terrariums to create the illusion of depth, and use mirrors or reflective surfaces behind the terrarium to amplify light and create the appearance of a larger space. Regular monitoring of humidity levels and occasional pruning will keep your miniature ecosystem thriving in its artificial environment.
Shade-Loving Herb Corner Setup
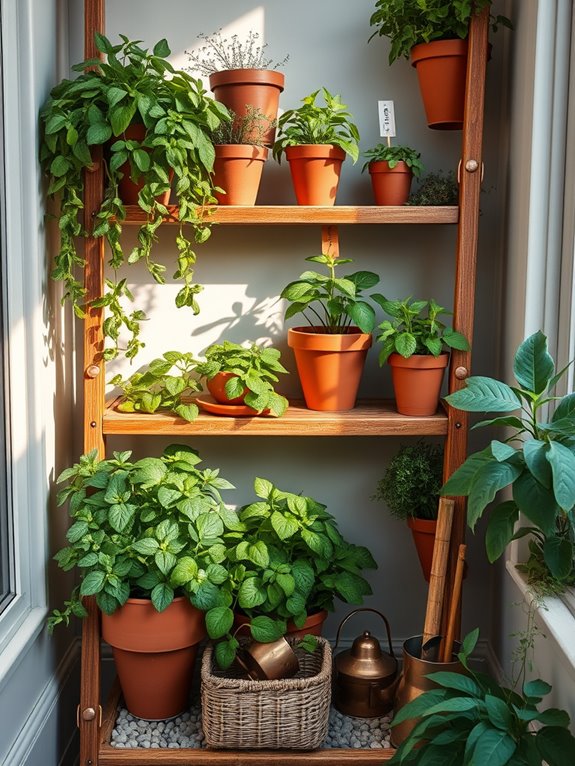
Transform an underutilized shady corner into a lush, aromatic herb sanctuary that proves not all herbs need full sun to thrive. Deep green mint leaves cascade over terracotta pots, while delicate Vietnamese coriander and woodland-native sweet woodruff create a multi-layered tapestry of textures.
The varying heights of plants, from low-growing creeping thyme to taller lemon balm, create visual interest while maximizing the vertical space in your cozy corner. Copper plant markers catch subtle light filtering through nearby windows, adding warm metallic accents among the foliage. Natural materials like bamboo stakes and woven baskets complement the organic feel, while a small vintage ladder shelf provides multiple levels for displaying plants.
The result is a practical yet enchanting nook that brings both culinary convenience and natural beauty to your indoor space.
Essential Elements:
- Shade-tolerant herbs (mint, parsley, chives, sweet woodruff)
- Terracotta pots in varying sizes
- Multi-tiered plant stand or ladder shelf
- Moisture-retaining potting soil
- Copper or wooden plant markers
- Small watering can
- LED grow light strip
- Humidity tray
- Natural fiber basket for tool storage
- Bamboo stakes or plant supports
Position your herb corner where it receives indirect light, ideally near a north or east-facing window. Start by arranging larger pots on the floor level, then work upward with progressively smaller containers on your tiered display.
Group plants with similar water needs together, and install an LED grow light strip under each shelf to provide supplemental lighting during darker months. Use humidity trays filled with pebbles beneath the pots to maintain moisture levels, especially important for shade-loving herbs.
Adaptation possibilities abound regardless of available space. For minimal square footage, utilize vertical wall planters or hanging containers. In larger areas, incorporate a comfortable sitting area with a small table for immediate herb access while cooking.
Consider self-watering containers for consistent moisture, and rotate plants periodically to ensure even growth. Monitor air circulation, as shade corners can sometimes become stagnant – a small fan on low setting can help prevent fungal issues while strengthening plant stems.
Vertical Shelf Garden With LED Strips
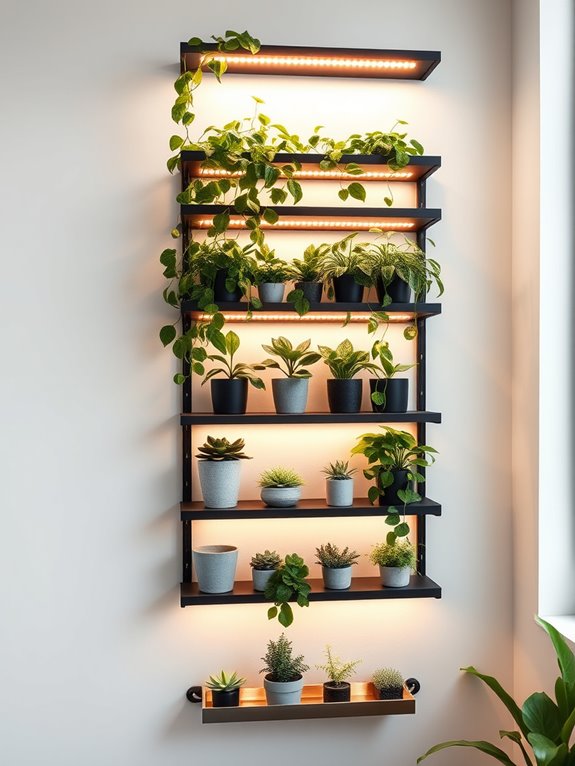
Transform any interior wall into a living tapestry of green with a modern vertical shelf garden enhanced by LED grow lights. Sleek metal or wooden shelving units adorned with cascading pothos, vibrant peace lilies, and compact herbs create a stunning visual display that doubles as a functional growing space. The soft glow of LED strips bathes the foliage in a perfect spectrum of light, casting gentle shadows and highlighting the various textures and shapes of the plants while adding a contemporary design element to your room.
This garden style merges industrial chic with natural beauty, offering a perfect solution for urban dwellers seeking to maximize their growing space. Arranged in tiers, the plants create depth and dimension, while the LED strips provide both practical growing power and ambient lighting. Small succulents peek out between larger specimens, while trailing plants like string of pearls and philodendrons gracefully spill over the edges, softening the geometric lines of the shelving structure.
Key Elements:
- Metal or wooden shelving unit
- LED grow light strips
- Power supply and dimmer switches
- Plant containers with drainage
- Drip trays
- Mounting hardware
- Various indoor plants
- Growing medium
- Watering can
- Timer for lights
- Cable management supplies
Begin installation by securing the shelving unit firmly to wall studs, ensuring it can support the weight of plants, soil, and water. Install LED strips under each shelf, connecting them to a timer and dimmer system for controlled light exposure. Position drip trays on each shelf before adding plants, arranging them by light requirements with shade-tolerant species on lower shelves and light-loving plants on upper tiers.
Create a watering schedule that accounts for different plant needs and ensure proper drainage systems are in place to protect your walls and floors. Essential considerations include selecting plants that thrive under artificial light and managing humidity levels around your vertical garden.
For smaller spaces, opt for compact shelving units or corner designs, while larger areas can accommodate multiple units or longer shelf spans. Consider incorporating a mix of plant sizes and growth habits to create visual interest, and remember to rotate plants periodically for even growth. Monitor light intensity and duration, adjusting as needed based on plant response and seasonal changes.
Water Garden Featuring Peace Lilies
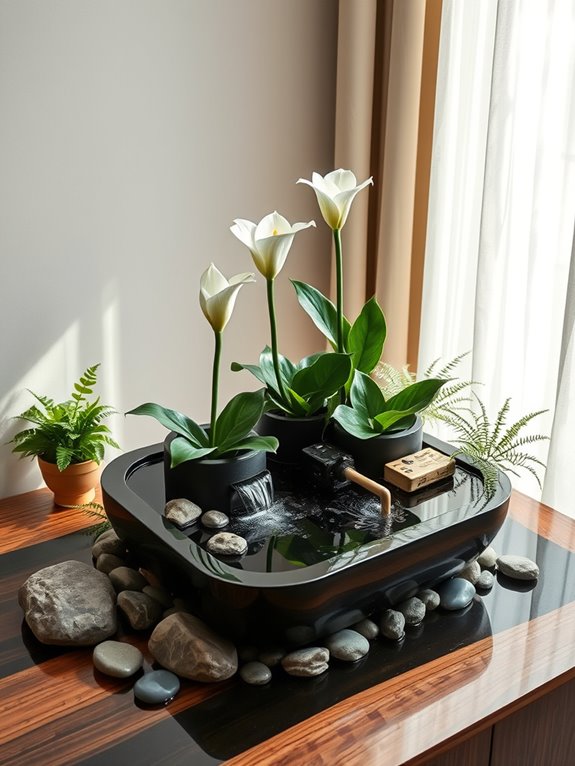
Transform your indoor space into a serene oasis with a water garden centered around elegant peace lilies. The gentle sound of flowing water creates a meditative atmosphere while the striking white blooms of Spathiphyllum rise above glossy dark green foliage, creating a sophisticated yet natural aesthetic.
Crystal-clear water reflects ambient light, adding depth and dimension to your living space while small decorative stones and pebbles create visual texture along the water’s edge. This harmonious blend of aquatic and terrestrial elements brings the peaceful energy of a woodland stream into your home.
Peace lilies, thriving in the humid microclimate created by the water feature, stand as living sculptures above the water’s surface. The combination of moving water and lush greenery naturally humidifies the air, creating the perfect environment for both plants and people to flourish.
Essential Elements:
- Peace lily plants (2-3 specimens)
- Shallow decorative water basin or pond
- Small recirculating pump
- LED underwater lights
- Smooth river rocks
- Aquatic plant containers
- Water-safe fertilizer
- Activated charcoal
- pH testing kit
- Water treatment supplies
Position your water garden where it receives bright, indirect light and establish a stable base for your water feature. Fill the basin with treated water and arrange submersible planters containing peace lilies so their roots remain consistently moist but not submerged.
Install the pump and adjust water flow to create gentle movement without splashing. Layer decorative stones around plant bases and along the water’s edge to conceal hardware and create natural transitions between elements.
Consider your space’s unique characteristics when designing your water garden. For compact areas, choose a smaller basin and fewer plants, perhaps incorporating a wall-mounted water feature. Larger spaces can accommodate multiple water levels or additional plant varieties like ferns and mosses.
Monitor water quality weekly, maintain consistent water levels, and trim yellowing leaves promptly to preserve the garden’s pristine appearance.
Dark Corner Fern Collection
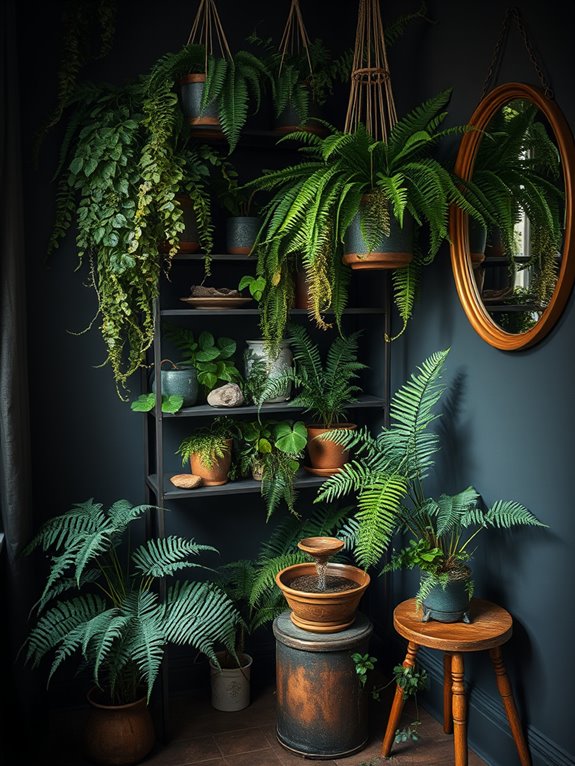
Transform that dim, neglected corner into a lush sanctuary with a carefully curated collection of ferns. The layered textures of Boston ferns, bird’s nest ferns, and maidenhair ferns create a cascading effect of varying green hues, from deep emerald to silvery sage. Placed strategically on tiered stands or hanging planters, these shade-loving plants bring movement and life to spaces that other plants might reject, turning darkness into an advantage.
The peaceful atmosphere of a dark corner fern collection evokes the feeling of a secluded forest floor, where dappled light filters through the fronds. Complement the natural beauty with moss-covered rocks, weathered wood elements, and perhaps a small tabletop water feature that provides gentle humidity. The subtle interplay of textures and shadows creates a meditation-worthy space perfect for quiet contemplation.
Essential Elements:
- Boston ferns
- Bird’s nest ferns
- Maidenhair ferns
- Japanese painted ferns
- Tiered plant stands
- Hanging planters
- Moss-covered rocks
- Humidity tray
- LED grow lights (if needed)
- Moisture meter
- Well-draining potting soil
- Decorative pots with drainage
Begin by assessing your corner’s natural light levels and installing supplemental lighting if necessary. Arrange plants in a graduated display, placing larger ferns like Boston ferns at floor level and working upward with smaller varieties. Position plants so that larger specimens don’t overshadow smaller ones, creating a natural-looking gradient.
Maintain consistent humidity by grouping plants together and using pebble-filled humidity trays beneath the pots. Success with this garden style heavily depends on proper moisture management. Most ferns prefer consistently moist but not waterlogged soil, so establish a regular watering schedule based on individual plant needs and seasonal changes. Monitor humidity levels and adjust according to season, using a small humidifier during dry winter months if necessary.
Extra Design Tips: For smaller spaces, focus on vertical arrangements using wall-mounted planters or hanging baskets to maximize space. Consider installing mirrors behind the fern collection to amplify light and create the illusion of depth.
In larger areas, incorporate seating to create a reading nook or meditation space. For challenging spaces with extremely low light, consider artificial ferns mixed with live specimens to maintain the lush appearance while reducing maintenance demands.
Kitchen Counter Garden With ZZ Plants
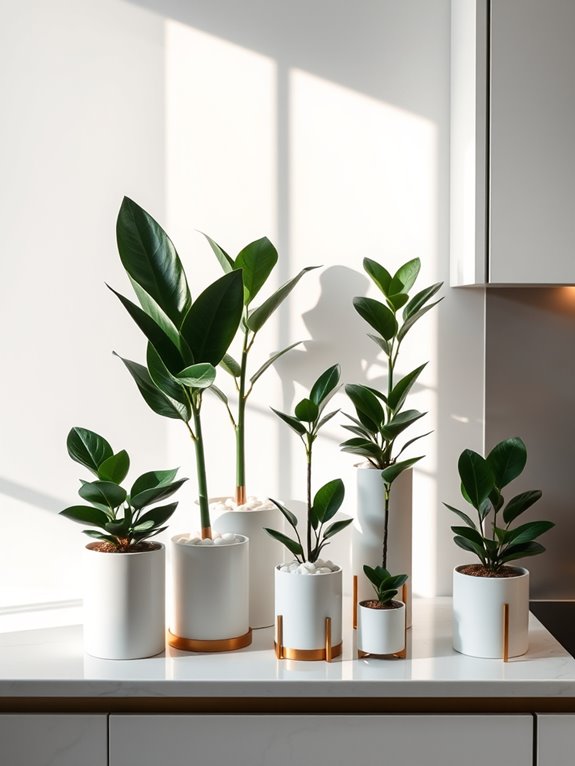
Transform your kitchen counter into a sleek, modern oasis with the sophisticated presence of ZZ plants (Zamioculcas zamiifolia). These glossy, dark green plants create an elegant statement with their naturally sculptural form, featuring stems that arch gracefully outward like contemporary art pieces.
The geometric arrangement of their oval-shaped leaves brings a sense of order and calm to the busy kitchen environment, while their polished appearance complements both modern and traditional kitchen designs.
The minimalist beauty of ZZ plants allows for creative styling with metallic or ceramic containers, creating an upscale botanical display that doesn’t overwhelm the functional space of your counter. Their ability to thrive in low-light conditions makes them perfect for kitchen corners away from windows, and their air-purifying qualities add a practical element to their aesthetic appeal.
The deep green foliage provides a striking contrast against light-colored countertops and backsplashes.
Essential Elements:
- 2-3 ZZ plants of varying sizes
- Modern ceramic or metallic planters
- Decorative pebbles or river rocks for top dressing
- Moisture-retaining potting mix
- Drainage trays or saucers
- Small plant riser or stand (optional)
- LED grow light (for very low-light areas)
Position your ZZ plants in groups of odd numbers, varying their heights using appropriately sized containers or subtle risers. Choose pots that complement your kitchen’s color scheme while ensuring proper drainage to protect your countertops.
Place larger specimens in corners or at the end of counters where they won’t interfere with food preparation, and arrange smaller plants near the backsplash. Maintain adequate spacing between plants to allow for air circulation and prevent crowding.
For optimal growth, water ZZ plants only when the top 2 inches of soil feels dry, typically every 2-3 weeks. Clean their leaves monthly with a damp cloth to maintain their glossy appearance and remove any kitchen grease that may accumulate.
These plants thrive in temperatures between 65-75°F, making them perfectly suited for the kitchen environment.
Design Tip: For smaller kitchen counters, opt for compact ZZ plants or consider creating a vertical display using wall-mounted planters. In larger spaces, incorporate varying pot heights and sizes to create visual interest, and consider adding small LED strip lights beneath upper cabinets to enhance the plants’ appearance.
For kitchens with limited natural light, position plants near under-cabinet lighting or supplement with grow lights specifically designed for indoor plants.