
How to Overwinter Dahlia Tubers for Next Year’s Blooms
Sarah’s prized dinner-plate dahlias brought vibrant color to her garden all summer, and now she’s determined to save those precious tubers for next spring. If you’ve invested time nurturing these stunning blooms, you’ll want to preserve their potential through the cold months ahead. While overwintering dahlias might seem challenging, you’ll find it’s a straightforward process that requires just a few basic materials and some careful timing. Let’s explore how to keep your tubers healthy until planting season returns.
Contents
- 1 When to Lift Your Dahlia Tubers
- 2 Essential Tools and Materials for Storage
- 3 Preparing Tubers for Winter Storage
- 4 Choosing the Perfect Storage Location
- 5 Monitoring and Maintaining Stored Tubers
- 6 Common Problems and Solutions During Storage
- 7 Spring Revival: Getting Tubers Ready for Planting
- 8 Frequently Asked Questions
- 8.1 Can I Overwinter Dahlias in Containers if I Have Limited Garden Space?
- 8.2 Are Dahlias Worth the Effort of Overwintering Compared to Buying New Ones?
- 8.3 How Many Years Can I Successfully Store and Reuse the Same Tubers?
- 8.4 Will Overwintered Dahlias Produce Flowers That Are Identical to Their Parent Plant?
- 8.5 Can I Share Divided Dahlia Tubers With Friends During the Winter Months?
When to Lift Your Dahlia Tubers
Once autumn temperatures begin dropping consistently below 50°F (10°C), it’s time to start planning when you’ll lift your dahlia tubers from the ground. You’ll want to dig them up after the first light frost has blackened the foliage but before a hard, killing freeze can damage the tender tubers.
Watch your local weather forecast carefully, and plan to lift the tubers on a dry, sunny day when the soil isn’t waterlogged. If you’re in zones 3-7, aim to dig them up in late October or early November, depending on your specific climate. For warmer zones 8-10, you can wait until early December. Don’t wait too long, though – frozen soil will make the job difficult and risks damaging the tubers, which need to stay plump and firm for successful storage.
Essential Tools and Materials for Storage
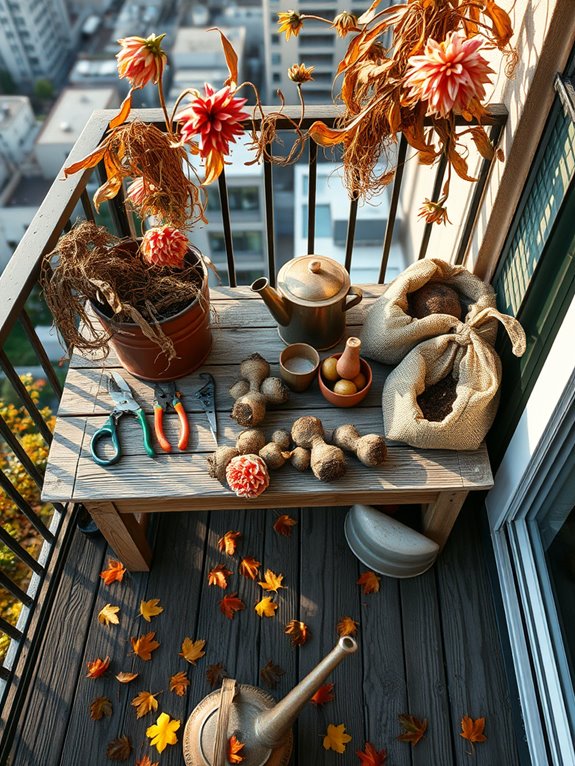
Before digging up your dahlia tubers, gathering the right tools and storage materials will make the process smooth and organized. You’ll need clean, sharp pruning shears, a sturdy garden fork, and a gentle water spray nozzle for cleaning. Collect several plastic storage bins with ventilation holes, paper bags, or cardboard boxes that will keep your tubers dry and protected.
For the storage medium, you’ll want coarse vermiculite, dry peat moss, or clean sawdust to cushion and insulate the tubers. Don’t forget to grab permanent markers and waterproof labels to identify your varieties. Keep newspaper or kraft paper handy for wrapping individual clumps, and gather clean rags or old towels for drying. A fungicide powder is optional but recommended to prevent rot during storage.
Preparing Tubers for Winter Storage

After your dahlias have experienced their first light frost, it’s time to prepare the tubers for their winter rest. You’ll want to dig carefully around each plant with a garden fork, gently lifting the entire root system while keeping the stems attached.
- Cut back the thick, darkened stems to about 6 inches above the crown, making clean diagonal cuts with sharp pruners.
- Wash off excess soil from the tubers using a gentle stream of water, revealing their natural tan or pinkish color.
- Inspect each clump thoroughly, removing any soft, damaged, or diseased portions with a clean knife.
- Allow the tubers to air-dry in a sheltered, well-ventilated space for 24 hours, turning them occasionally to guarantee even drying.
Remember to handle your tubers with care during this process – they’re more delicate than they appear.
Choosing the Perfect Storage Location
Three key factors make an ideal storage spot for your dahlia tubers: temperature, humidity, and darkness. You’ll need a cool, dry space that maintains a consistent environment throughout winter. Choose a location that stays between 40-50°F (4-10°C) and keeps humidity at 40-50%.
| Storage Location | Suitability Rating |
|---|---|
| Basement | Excellent |
| Garage | Good |
| Root Cellar | Excellent |
| Crawl Space | Fair |
| Shed | Poor |
Your storage area shouldn’t freeze or experience dramatic temperature swings. A basement often provides the perfect conditions, while an unheated garage can work if you’ve got good insulation. Keep your tubers away from windows and heating vents that could dry them out. Using a thermometer and humidity meter helps you monitor conditions and adjust as needed.
Monitoring and Maintaining Stored Tubers
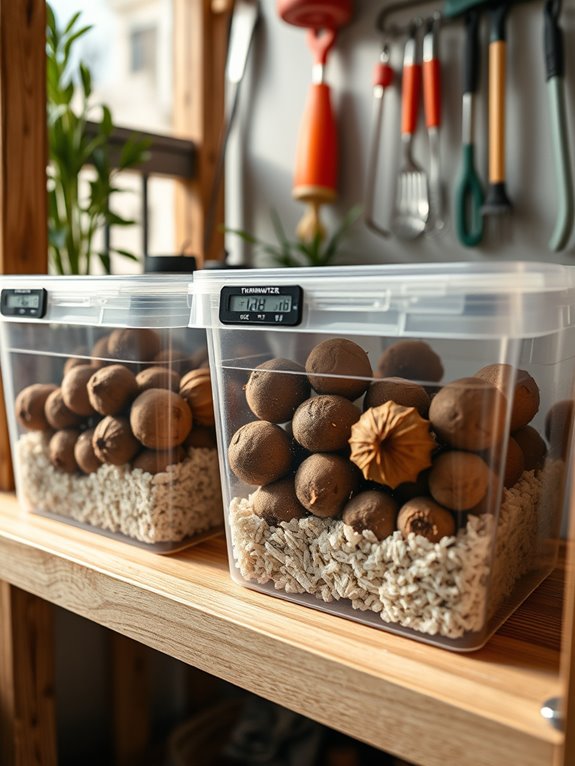
Successful dahlia storage requires regular monitoring and maintenance throughout the winter months. You’ll need to check your tubers every 2-3 weeks to guarantee they’re staying healthy and disease-free while they rest in their winter home.
- Check tubers for any soft, mushy spots or black areas that indicate rot, and remove affected sections immediately with a clean, sharp knife
- Inspect the packing material for ideal moisture – it should feel barely damp, like a wrung-out sponge, not wet or completely dry
- Look for any signs of premature sprouting, which suggests your storage area might be too warm
- Examine the tuber clusters for shriveling, and lightly mist the packing material if they appear dehydrated
If you notice any concerning changes, adjust your storage conditions promptly to protect your precious dahlia collection.
Common Problems and Solutions During Storage
Even the most carefully stored dahlia tubers can encounter issues during their winter rest. Watch for shriveling, which signals dehydration – you’ll need to lightly mist the packing medium or add slightly damp vermiculite around affected tubers. If you spot fuzzy white or gray mold, immediately remove infected tubers and increase air circulation in your storage area. Black, soft spots indicate rot, so trim away the damaged sections until you reach healthy, firm tissue.
Pest problems can also arise when mice or insects find their way into storage containers. Place mousetraps nearby if you notice droppings or nibbled tubers. For insect issues, dust affected tubers with diatomaceous earth. If tubers begin sprouting too early, move them to a cooler spot, ideally between 40-45°F, and guarantee complete darkness to slow premature growth.
Spring Revival: Getting Tubers Ready for Planting
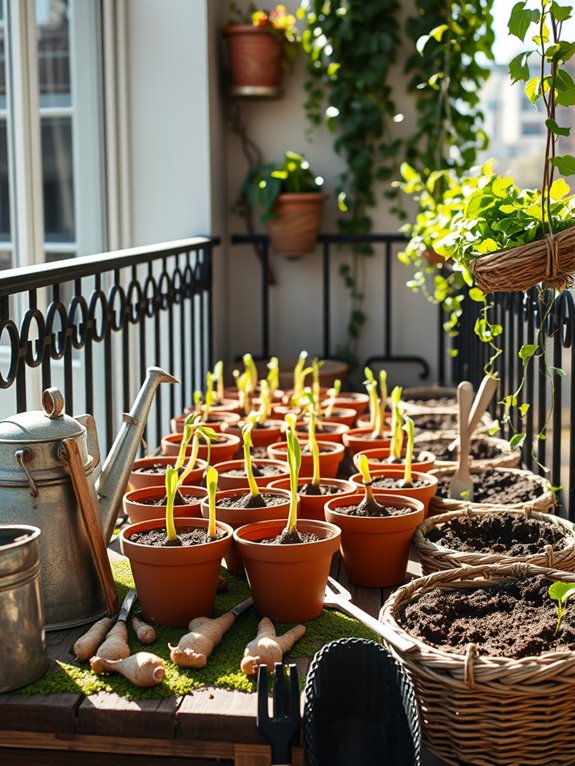
When early spring arrives and temperatures begin to warm, it’s time to wake your dahlia tubers from their winter slumber. Check your stored tubers carefully, gently brushing away any remaining storage medium and inspecting for firmness, plumpness, and signs of life. You’ll notice small, pink growth buds emerging from the crown if your tubers are healthy and ready for the growing season.
- Place tubers in shallow trays filled with slightly damp potting soil, positioning them with growing tips facing up
- Move trays to a bright, warm spot (65-70°F) to encourage sprouting
- Mist the soil lightly when it feels dry, avoiding direct water on tubers
- Watch for fresh, green shoots to emerge within 2-3 weeks, indicating successful revival
Once sprouts reach 2 inches tall, your dahlias are ready for garden planting.
Frequently Asked Questions
Can I Overwinter Dahlias in Containers if I Have Limited Garden Space?
While you could pretend you’re running a luxury spa for tubers in containers, it’s not ideal. You’re better off storing cleaned, dried dahlia tubers in boxes with peat moss in a cool, dark place.
Are Dahlias Worth the Effort of Overwintering Compared to Buying New Ones?
You’ll save significant money by overwintering dahlias since mature tubers produce more blooms than new plants. Plus, you’ll keep your favorite varieties and can divide large clumps to expand your collection each year.
How Many Years Can I Successfully Store and Reuse the Same Tubers?
Like a faithful old dog that keeps giving love, your dahlia tubers can serve you 3-5 years or more. You’ll find they’ll multiply too, giving you extra plants if you’ve stored them properly each season.
Will Overwintered Dahlias Produce Flowers That Are Identical to Their Parent Plant?
You’ll get identical flowers from your overwintered dahlias since they’re genetic clones of the parent plant. If you’re growing named varieties, you can count on the same colors, patterns, and forms year after year.
Don’t worry about damaging the tubers – they’re tougher than they look! You can absolutely share divided dahlias with friends during winter. Just guarantee each piece has an “eye” and is properly dried before gifting.