
7 Garden Ideas With Statement Pots
Recent surveys show that 68% of homeowners consider their outdoor containers the most impactful element of their garden design. You’ll find that statement pots aren’t just vessels for plants—they’re architectural features that can transform your outdoor space into a stunning sanctuary. From sleek modern planters to vintage-inspired urns, these versatile containers offer endless possibilities for creating focal points, defining spaces, and showcasing your favorite flora. Let’s explore seven creative ways to elevate your garden’s style with eye-catching containers.
Contents
- 1 Create a Dramatic Entrance With Oversized Planters
- 2 Design a Contemporary Container Garden Wall
- 3 Mix and Match Textured Pots for Visual Impact
- 4 Build Height With Tiered Statement Containers
- 5 Craft a Bold Color Story With Coordinated Pots
- 6 Transform Corners With Statement Pot Clusters
- 7 Style Your Patio With Sculptural Container Gardens
Create a Dramatic Entrance With Oversized Planters
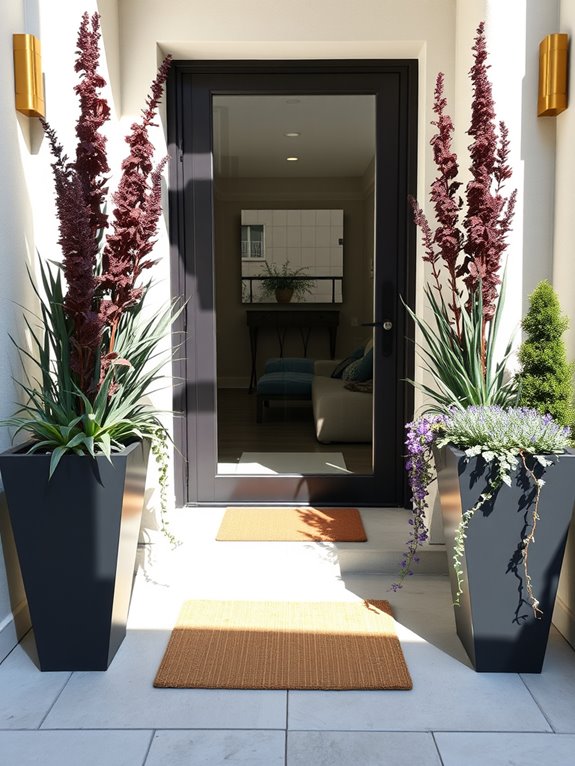
Transform your entryway into a grand welcome statement with strategically placed oversized planters that command attention and create an air of sophistication. Tall, sculptural containers filled with dramatic foliage plants like New Zealand flax, umbrella plants, or towering ornamental grasses establish an immediate visual impact. The substantial scale of these vessels, whether in classic terra cotta, sleek modern metals, or textured concrete, frames your entrance while creating a sense of permanence and architectural interest.
These statement containers can be arranged symmetrically to flank doorways or steps, creating a formal, balanced approach that guides visitors naturally toward your entrance. Layer the plantings with cascading elements like silver falls dichondra or trailing ivy to soften the edges, while upright specimens like Italian cypress or columnar boxwood provide year-round structure. The combination of heights, textures, and forms creates a dynamic entrance that transitions seamlessly from exterior to interior spaces.
Key Elements:
- Oversized planters (minimum 24″ diameter)
- Tall focal point plants
- Cascading companion plants
- Weather-resistant containers
- Quality potting soil
- Adequate drainage materials
- Complementary hardscaping
- Strategic lighting
- Seasonal accent plants
Position the largest containers first, ensuring they’re placed on stable, level surfaces that can support their considerable weight when filled. Create proper drainage by elevating containers slightly off the ground using hidden pot feet or risers.
Layer the planting design with a thriller (tall, dramatic centerpiece), fillers (mid-height plants for volume), and spillers (trailing plants) to achieve a full, professional look. Consider the mature size of chosen plants to maintain proportional balance with your containers and entryway scale.
Before finalizing container placement, study your entrance at different times of day to understand light patterns and ensure plants will thrive in their chosen locations. Watch traffic patterns to avoid creating obstacles, and consider seasonal maintenance needs like watering access and winter protection. Install an irrigation system or place containers within easy reach of water sources to simplify care routines.
For smaller spaces, adapt this concept by selecting slimmer, vertical containers that provide height without consuming excessive floor space. Consider lightweight materials like fiberglass or resin that mimic more expensive materials while being easier to move and maintain.
Incorporate built-in reservoirs or self-watering systems to reduce maintenance demands, and choose plants that maintain their impact even when viewed from close quarters. Remember that even modest-sized entrances can achieve dramatic effects through careful scaling and thoughtful plant selection.
Design a Contemporary Container Garden Wall
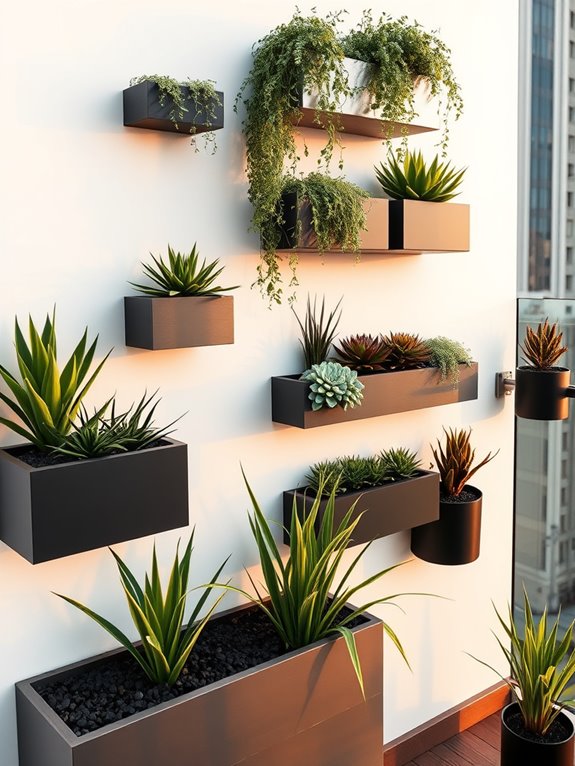
A contemporary container garden wall transforms an ordinary vertical space into a striking architectural masterpiece. Sleek, metallic planters in various geometric shapes cascade down the wall in a deliberate pattern, creating a living tapestry of foliage and flowers. The clean lines of chrome, brushed steel, or matte black containers contrast beautifully with the organic shapes of trailing plants like Silver Falls dichondra, Japanese forest grass, and modern varieties of ferns.
The sophisticated arrangement draws the eye upward, making clever use of height while maintaining a minimalist aesthetic. Bold specimen plants like black mondo grass and architectural succulents provide strong focal points, while varying heights of containers create depth and visual interest. LED strip lighting concealed behind the containers adds drama after dark, casting subtle shadows and highlighting the dramatic silhouettes of carefully chosen plants.
Key Elements:
- Modern geometric planters in metallic finishes
- Mounting brackets and secure wall anchors
- Drip irrigation system
- LED strip lighting
- Trailing plants (dichondra, ivy, forest grass)
- Architectural plants (succulents, mondo grass)
- Contemporary soil covers (black river rocks, crushed glass)
- Moisture meters
- Professional-grade potting mix
- Wall waterproofing system
Installation begins with careful planning of the wall layout, marking precise locations for mounting brackets that will support the weight of filled containers. Each planter should be securely anchored and include proper drainage systems to prevent water damage to the wall.
Install the irrigation system before mounting planters, ensuring all containers receive consistent moisture. Position larger statement pieces at key focal points, typically at eye level or slightly above, then fill in with complementary smaller containers and trailing plants.
Design considerations should account for plant mature sizes, sunlight patterns, and maintenance access. Choose low-maintenance plants that suit your light conditions and climate zone.
When adapting this design for different spaces, maintain proportional balance – larger balconies can accommodate bigger containers and more dramatic height variations, while smaller spaces might focus on a single striking vertical arrangement with fewer, more impactful pieces. Consider using lightweight materials and self-watering containers to reduce maintenance needs and structural load on the wall.
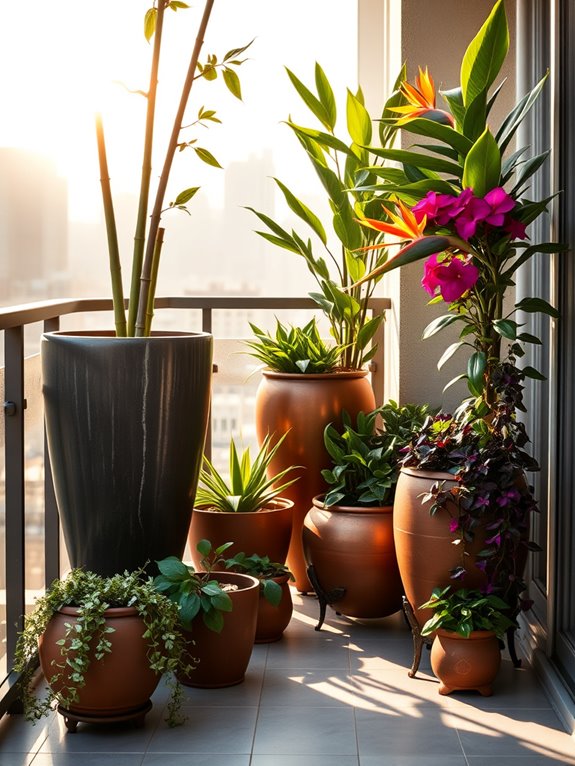
Mix and Match Textured Pots for Visual Impact
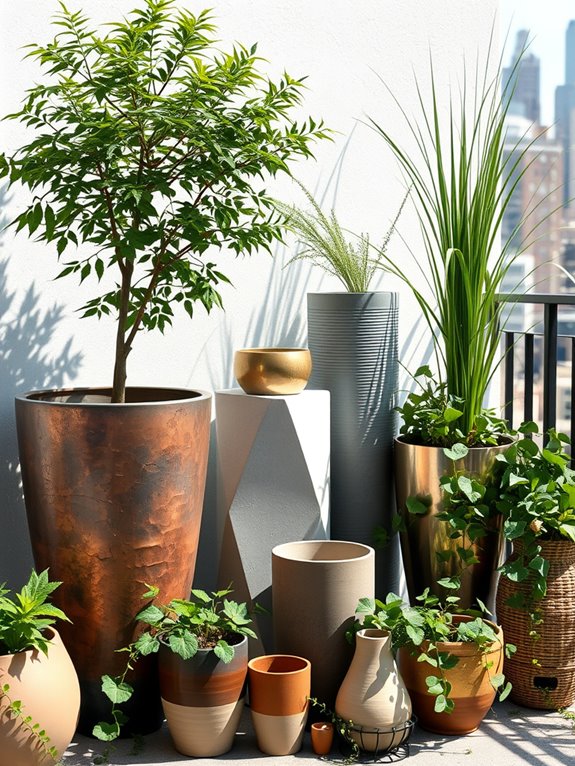
A thoughtfully curated collection of textured pots creates a captivating visual symphony in the garden, where rough terra cotta mingles with smooth glazed ceramics and weathered concrete vessels. Tall ribbed planters stand proudly alongside dimpled bowls and geometric containers, each surface catching light differently throughout the day.
Cascading plants like trailing ivy and silver falls dichondra spill over rusticated edges, while upright architectural plants such as snake plants and zebra grass emerge from sleek modern vessels.
The interplay of different pot textures transforms an ordinary garden space into an artistic installation, where shadows dance across varied surfaces and create depth even in smaller areas.
Metallic containers with hammered finishes reflect sunlight onto neighboring stone-textured planters, while natural fiber baskets add organic warmth. The combination of materials – from glossy ceramics to matte concrete – creates visual intrigue that changes with viewing angles and weather conditions.
Key Elements:
- Variety of pot materials (ceramic, concrete, terra cotta, metal, fiber)
- Range of surface textures (smooth, rough, ribbed, dimpled, hammered)
- Mix of pot heights and sizes
- Contrasting plant forms
- Strategic pot groupings
- Complementary color palette
- Proper drainage materials
- Quality potting soil
- Plant selection for various pot sizes
Begin implementation by selecting a cohesive color palette for your pots, ensuring the textures remain the focal point without competing colors. Arrange containers in odd-numbered groupings, placing larger textured pots as anchor pieces and surrounding them with complementary smaller vessels.
Create depth by positioning smooth-textured pots behind more intricate ones, allowing the eye to discover layers of detail. Ensure proper drainage in all containers and use appropriate potting mix for each plant type.
When designing a textured pot garden space, consider the viewing angles and available light throughout the day. For compact balconies, focus on vertical arrangements using wall-mounted textured planters or tiered displays. Larger spaces can accommodate multiple groupings with pathways between them.
Maintain visual cohesion by limiting your texture palette to 3-4 main types, and remember that plant foliage will add its own textural elements to the overall composition.
Build Height With Tiered Statement Containers
Creating stunning visual drama with tiered statement containers transforms an ordinary garden space into a dynamic vertical showcase. Staggered levels of oversized containers in varying heights create an architectural display that draws the eye upward, while cascading plants like trailing petunias, ivy, and creeping jenny spill over edges to soften the structured arrangement. Rich glazed ceramics in complementary colors, combined with metallic or stone-finished pots, add sophisticated texture and depth to the composition.
The layered effect achieved through careful placement of containers creates distinct planting zones that can accommodate different plant varieties. Tall architectural plants like bamboo or ornamental grasses anchor the highest tier, while medium-height flowering perennials occupy the middle layer, and ground-hugging succulents or spreading flowers fill the lower levels. This arrangement creates a living wall effect that maximizes vertical space while maintaining visual balance and proportion.
Essential Elements:
- Statement containers in 3-4 different heights
- Variety of pot materials (ceramic, metal, stone)
- Plant supports and stakes
- Quality potting soil
- Multi-level plant selection
- Drainage materials
- Drip irrigation system
- Container risers or platforms
- Weather-resistant pot feet
To implement this garden style, begin by positioning the largest containers at the back of your space, ensuring they’re properly elevated on sturdy platforms or risers for adequate drainage. Create subsequent tiers by arranging medium and smaller containers in descending heights, maintaining approximately 8-12 inches between levels for plant growth and maintenance access.
Consider weight distribution and stability, particularly for rooftop or balcony gardens, by using lightweight materials for upper tiers and heavier containers at the base.
Keep plant maintenance manageable by installing an automatic drip irrigation system that reaches all containers, ensuring consistent watering across the different levels. Consider incorporating self-watering containers for the highest tiers to reduce maintenance demands. Position plants strategically, with sun-loving varieties on upper tiers and shade-tolerant species below where they’ll naturally receive filtered light.
For smaller spaces, adapt this concept by using wall-mounted containers or vertical gardening systems that achieve the same tiered effect while occupying minimal floor space. Consider collapsible or modular container systems that can be reconfigured as needed, and choose dwarf plant varieties that maintain the desired aesthetic without overwhelming limited space.
Incorporate multifunctional elements like built-in seating with integrated planters to maximize space efficiency while maintaining the dramatic tiered effect.
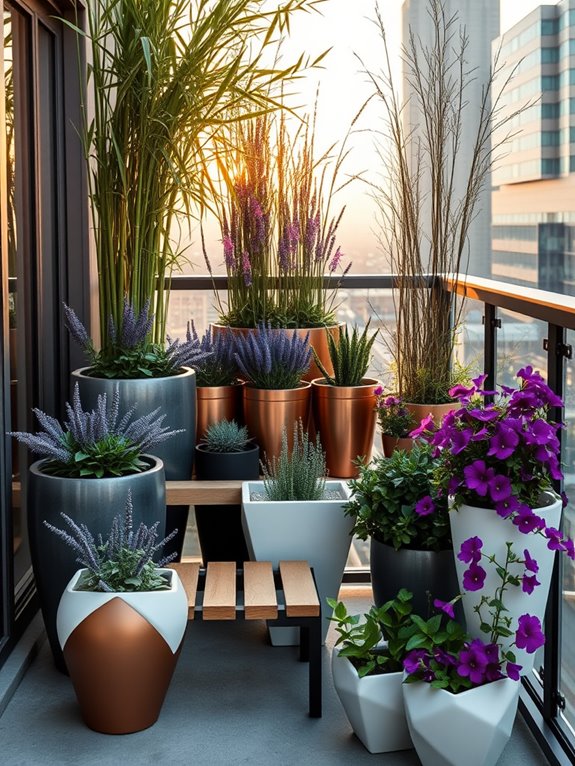
Craft a Bold Color Story With Coordinated Pots
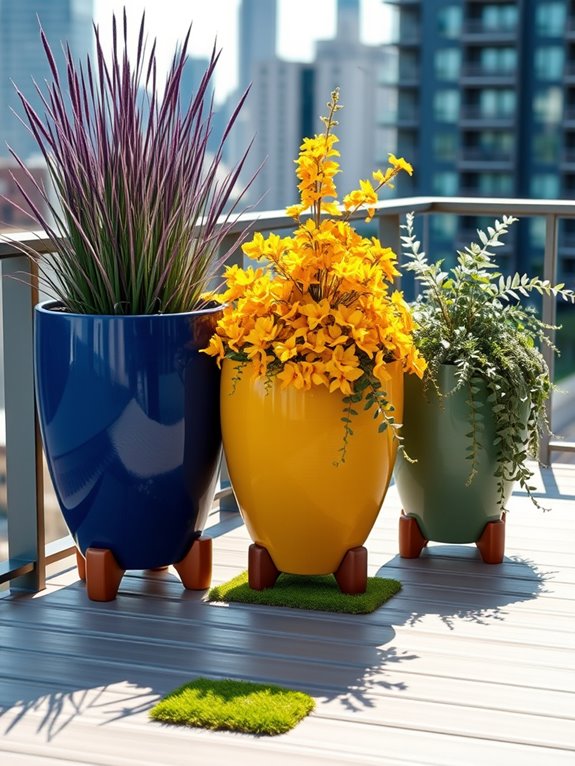
Transform your garden into a vibrant masterpiece by orchestrating a symphony of coordinated statement pots that tell a cohesive color story. Imagine a collection of bold ceramic containers in complementary hues – perhaps deep cobalt blues paired with sunny yellows, or sophisticated terra cotta tones accented with sage green glazed pots.
These carefully chosen vessels become artistic elements themselves, elevating simple plants into dramatic focal points while creating a sophisticated, unified outdoor space. The magic lies in how these coordinated pots guide the eye through the garden, creating rhythm and flow with their repeated colors and varying heights.
Tall cylindrical containers might showcase dramatic purple fountain grass, while shorter, wide bowls burst with cascading petunias in harmonizing shades. The pots themselves become a canvas, with finishes ranging from glossy to matte, textured to smooth, all working together to amplify your chosen color palette.
Key Elements:
- Statement pots in 3-4 coordinating colors
- Variety of pot sizes and shapes
- Plants with complementary foliage and flowers
- Pot risers and stands of varying heights
- Quality potting soil
- Adequate drainage materials
- Coordinating mulch or top dressing
- Accent lighting options
Position your largest statement pots first as anchor points, typically in corners or as central focal pieces. Create depth by arranging medium-sized containers in clusters of odd numbers, varying their heights using pot feet or decorative stands.
Place smaller coordinating pots as transitional elements between larger groupings, ensuring all containers have proper drainage and are filled with appropriate potting mix for their intended plants.
Design Tips: Consider your viewing angles when planning pot placement, particularly for elevated spaces like balconies or terraces. For compact areas, choose fewer, larger pots rather than many small ones to avoid a cluttered look. Weather-resistant materials are essential for longevity, and self-watering containers can help maintain consistent moisture levels.
Scale your pot sizes to your space – apartment balconies might use 24-inch maximum diameter pots, while spacious patios can accommodate containers up to 36 inches or larger.
Transform Corners With Statement Pot Clusters
Corner spaces burst with life and drama when transformed by artfully arranged clusters of statement pots. Towering ceramic vessels in rich earth tones stand alongside sleek modern planters, creating a dynamic interplay of heights, textures, and forms. Tall architectural plants like bamboo and bird of paradise emerge from larger containers, while cascading specimens such as trailing ivy and string of pearls spill elegantly from elevated pots, drawing the eye through multiple levels of greenery.
The layered arrangement brings depth to otherwise unused corners, turning them into focal points that anchor the entire garden space. Bold tropical foliage contrasts with delicate flowering plants, while varying pot sizes create rhythm and movement. The interplay of materials – glazed ceramics, weathered terracotta, and contemporary metal finishes – adds rich visual texture and interest throughout the seasons.
Key Elements:
- 3-5 large statement pots (minimum 24″ diameter)
- 4-6 medium complementary containers
- Several small accent pots
- Mix of pot materials and finishes
- Tall architectural plants
- Medium height flowering plants
- Trailing or cascading plants
- Pot feet or risers
- Quality potting soil
- Adequate drainage materials
Begin the arrangement by positioning the largest statement pot in the corner as an anchor piece, angled slightly for visual interest. Layer additional large and medium pots in a loose triangular formation, ensuring each container is visible from the primary viewing angle.
Create height variation by using pot feet or decorative risers under selected containers. Plant selection should follow a “thriller, filler, spiller” approach in each pot cluster, with tall dramatic plants in the back, full medium-height plants in the middle, and trailing varieties in the front and edges.
Consider weight distribution and access for maintenance when positioning pots. Ensure adequate spacing between containers for air circulation and plant growth. Permanent larger pots should have proper drainage and be placed on appropriate surfaces to prevent water damage.
Install irrigation systems or group plants with similar water needs together for easier maintenance. For smaller spaces, reduce the number of pots but maintain the principle of varying heights and sizes. Balconies can accommodate vertical arrangements using wall-mounted planters or tiered stands to maximize corner space.
Consider lightweight composite containers for upper-floor applications, and choose dwarf varieties of architectural plants for contained growth. Weather exposure should influence both pot and plant selection, with wind-resistant species and sturdy containers necessary for exposed corners.
Style Your Patio With Sculptural Container Gardens

Transform your patio into a living art gallery with sculptural container gardens that command attention and create visual intrigue. Towering ceramic vessels in bold geometrics or flowing organic shapes become the focal points, while cascading plants and architectural foliage create dynamic layers of interest. Statement containers in metallic finishes, weathered terracotta, or sleek modern materials serve as pedestals for carefully curated plant collections, turning your outdoor space into a sophisticated botanical display.
The interplay of container shapes and sizes creates rhythm and movement across the patio, while thoughtfully selected plants add texture and dimension. Combine tall, structural plants like New Zealand flax or snake plants with trailing specimens such as silver falls dichondra or string of pearls. The contrast between rigid container lines and fluid plant forms creates an artistic tension that draws the eye and invites exploration of the space.
Key Elements:
- Large sculptural containers (minimum 24″ height)
- Mixed container materials (ceramic, metal, concrete)
- Architectural plants
- Trailing plants
- Container risers or stands
- Accent lighting
- Complementary smaller pots
- Various container heights
- Plant specimen varieties
- Quality potting soil
Position your largest statement containers first, creating anchor points in corners or along walls. Arrange additional containers in decreasing sizes, forming natural groupings of three to five pots. Ensure proper drainage in all containers and use high-quality potting mix suitable for container gardens. Layer plants within each pot, positioning taller specimens toward the back or center, surrounded by medium-height plants and trailing varieties at the edges.
Consider your patio’s exposure when selecting plants and positioning containers. Keep maintenance manageable by installing drip irrigation systems or placing containers near water sources. Group plants with similar water needs together, and establish a regular feeding schedule during growing seasons. Monitor soil moisture levels carefully, as sculptural containers may have different watering requirements based on their materials and sizes.
For smaller patios or balconies, focus on fewer, more impactful containers rather than numerous smaller ones. Choose lightweight materials for upper-story applications, and consider vertical gardening options using wall-mounted containers or tiered stands. Maximize impact by selecting containers with bold colors or interesting patterns that complement your existing outdoor décor, and ensure all containers are properly secured against wind on elevated spaces.