
7 Garden Ideas With Recycled Materials
In a world where environmental consciousness meets creative expression, you’ll find endless opportunities to transform everyday castoffs into stunning garden features. Your outdoor space can showcase vibrant tire planters bursting with flowers, vertical bottle gardens climbing walls, and rustic pallet beds filled with fresh vegetables. These seven clever recycling projects won’t just save money and reduce waste – they’ll help you craft a unique garden that tells your personal sustainability story. Let’s explore how to bring these eco-friendly ideas to life.
Contents
Transform Old Tires Into Colorful Planters
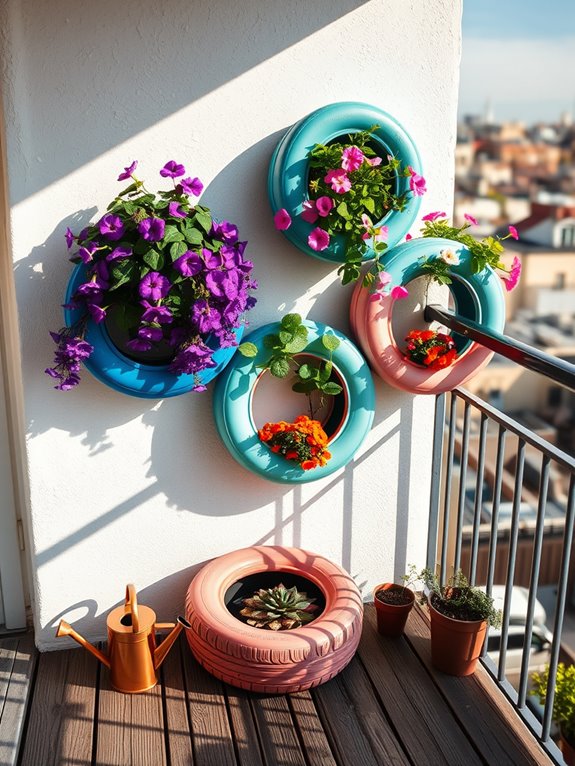
Vibrant rings of color burst from repurposed tires, their once-industrial forms now softened by cascading waves of petunias, marigolds, and trailing vines. Each tire, painted in cheerful hues of turquoise, yellow, and coral, creates a striking contrast against lush greenery while adding whimsical charm to any outdoor space.
The varied heights, achieved by stacking or individual placement, create an eye-catching vertical garden that transforms a mundane area into an artistic display. The layered arrangement allows for a diverse mix of plants, from sturdy succulents to delicate flowering species. Deep purple trailing lobelia spills over painted white tire edges, while drought-resistant sedums and hens-and-chicks cluster in the centers.
The industrial-meets-garden aesthetic brings a modern, eco-conscious element to traditional gardening, proving that sustainability can be both beautiful and functional.
Key Elements:
- Used car tires of various sizes
- Exterior paint in bright colors
- Drainage materials (gravel, stones)
- Quality potting soil
- Mix of trailing and upright plants
- Paint brushes and primers
- Power drill for drainage holes
- Landscape fabric
- Garden tools
Begin implementation by thoroughly cleaning the tires and drilling several drainage holes in the bottom rim. Apply primer specifically designed for rubber surfaces, followed by two coats of exterior paint in your chosen colors.
Once dry, line the inside with landscape fabric and add a layer of gravel for drainage. Fill with quality potting soil, leaving appropriate space for root growth. Position larger tires at the base of your display, gradually decreasing size if stacking, ensuring stability and proper weight distribution.
Extra Tips: Consider your climate when selecting plants and paint colors, as darker colors absorb more heat. For small spaces or balconies, use single tires as statement pieces or create mini-stacks of two.
Ensure weight restrictions are considered for elevated spaces. Save space by mounting tires on walls using sturdy brackets, or arrange them in a spiral pattern for a more compact design. Regular maintenance should include checking drainage holes for clogs and touching up paint as needed to maintain the vibrant appearance.
Create Vertical Gardens From Plastic Bottles
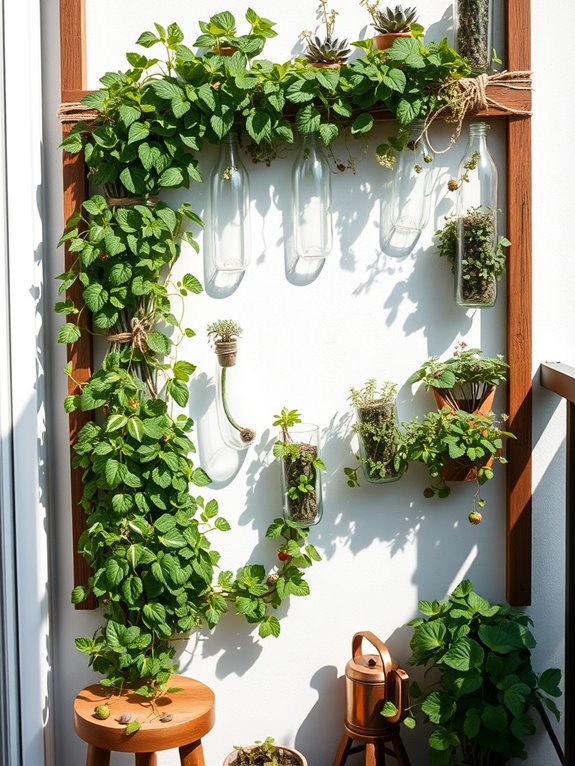
Transform your outdoor space into a living tapestry with a vertical garden crafted from repurposed plastic bottles. Cascading tendrils of pothos, vibrant herbs, and delicate succulents create an enchanting green wall that defies traditional gardening boundaries.
The translucent bottles catch sunlight, creating a mesmerizing interplay of shadows while trailing plants like string of pearls and spider plants dance in the breeze, adding movement and life to once-bare walls.
This eco-friendly garden solution brings a modern, artistic element to any space while maximizing growing area in even the smallest locations. The vertical arrangement allows for creative plant combinations – imagine purple sweet potato vines contrasting with silver-leaved dichondra, or strawberry plants producing fruit at eye level alongside aromatic herbs like basil and mint, creating both a visual feast and a practical kitchen garden.
Essential Elements:
- Clean plastic bottles (2-liter size recommended)
- Strong mounting wire or cord
- Drill or sharp scissors
- Potting soil
- Small rocks for drainage
- Selected plants (herbs, succulents, trailing varieties)
- Wall anchors and screws
- UV-resistant paint (optional)
- Wire mesh backing
- Water-resistant wood strips
Create your vertical garden by first preparing the bottles – cut a large side opening and drill drainage holes.
Mount horizontal support beams to your wall, ensuring they’re properly anchored. Attach wire mesh backing to create a sturdy framework. Space bottles evenly, securing them to the mesh using strong wire or cord. Consider arranging bottles in a staggered pattern for optimal plant exposure and easy watering access.
Design your planting scheme with weight distribution in mind – place larger plants at the bottom and lighter ones toward the top.
Ensure each bottle contains adequate drainage material before adding soil and plants. Incorporate an irrigation system or remember to water regularly, as vertical gardens can dry out more quickly than traditional beds.
For balcony adaptations, consider creating modular sections that can be easily moved or adjusted. Smaller spaces might focus on compact herbs or miniature succulent varieties, while larger areas can accommodate more ambitious plantings.
Use light-colored bottles in hot climates to prevent root overheating, and consider painting exterior-facing sides to protect against UV degradation. Always ensure your mounting surface can support the weight of your garden when fully saturated with water.
Build Raised Beds Using Wooden Pallets
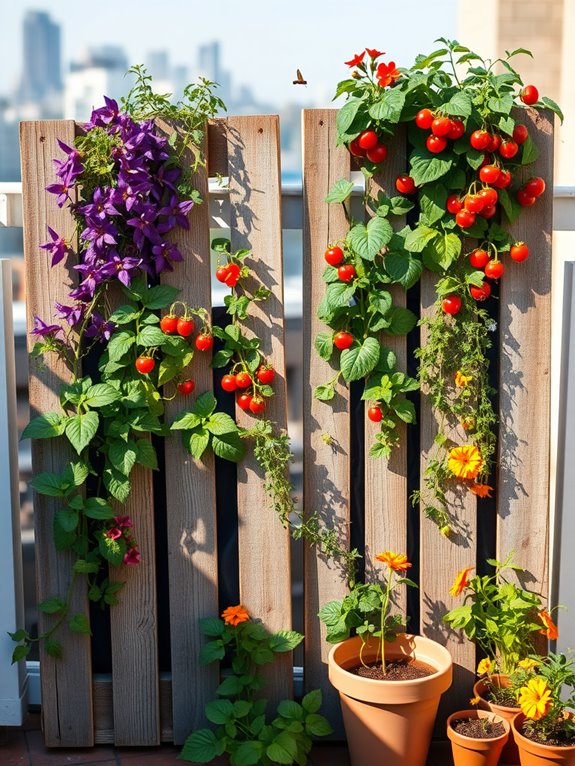
Transform your outdoor space into a charming and sustainable oasis with raised beds crafted from reclaimed wooden pallets. These rustic garden beds create an appealing layered look, with cascading flowers and climbing vines intertwining through the natural wood slats. The weathered gray tones of aged pallet wood provide a perfect backdrop for vibrant herbs, trailing strawberries, and climbing vegetables, creating a beautiful contrast between cultivated plants and repurposed materials.
The vertical elements of pallet beds add architectural interest while maximizing growing space in small areas. Imagine purple clematis winding through the slats, while compact tomato plants flourish in the deep soil pockets. Sweet peas and nasturtiums can spill over the edges, softening the geometric lines of the wood and creating a lush, cottage garden feel even in urban settings.
Key Elements:
- Wooden pallets (heat-treated, chemical-free)
- Heavy-duty landscape fabric
- Quality potting soil
- Garden staples or U-nails
- Power tools (saw, drill)
- Sandpaper
- Weather-resistant screws
- Corner brackets
- Plants suitable for vertical growing
Start by selecting pallets marked “HT” (heat-treated) and free from chemical treatments. Thoroughly clean and sand the pallets to prevent splinters.
Create the bed structure by securing pallets vertically with corner brackets, forming a rectangle or square. Line the interior with landscape fabric, stapling it securely to prevent soil loss. Fill with high-quality potting mix, ensuring proper drainage through strategic placement of drainage holes.
Essential Tips: Consider weight distribution when positioning your pallet beds, as soil-filled beds become quite heavy. For balcony gardens, create smaller modular units that can be moved easily.
In limited spaces, focus on vertical growing by utilizing both the horizontal planting surface and vertical pallet slats. Include native plants to support local pollinators and consider incorporating a simple irrigation system to maintain consistent moisture levels in the raised bed structure.
Design Plant Markers From Wine Corks
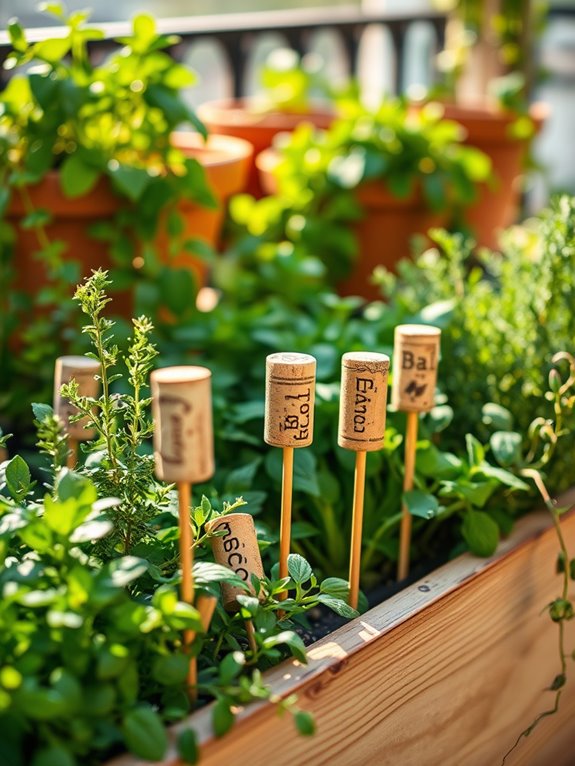
Wine cork plant markers bring a charming, rustic sophistication to any garden bed while embodying eco-conscious gardening principles. These elegant markers rise gracefully between herbs and vegetables, their natural cork texture harmonizing perfectly with the organic environment. The warm, honey-colored corks create delightful visual punctuation marks throughout the garden, helping to organize plant sections while adding an artisanal touch that speaks of sustainability and creative reuse.
Whether marking delicate herb gardens or robust vegetable plots, cork markers add both functionality and whimsy. Their natural water resistance makes them ideal for outdoor use, while their organic appearance blends seamlessly with soil, mulch, and greenery. The subtle variations in cork coloring and texture create visual interest, especially when grouped among plants like thyme, sage, or young tomato seedlings.
Essential Elements:
- Used wine corks
- Waterproof markers or paint pens
- Bamboo skewers or wooden dowels
- Clear sealant or outdoor mod podge
- Small drill or awl
- Sandpaper
- Plant identification list
Implementation involves first collecting and cleaning used wine corks, then carefully drilling a small hole lengthwise through each cork’s center. The bamboo skewer or dowel should be inserted securely into this hole, creating a stake that can be pushed into the soil.
Write plant names clearly on the cork’s surface using waterproof markers or paint pens, then seal with outdoor-safe sealant to protect against weather damage. Position markers at the front of each plant group, angling them slightly forward for better visibility.
The most successful cork markers are positioned 2-3 inches deep in the soil, with the written portion clearly visible above plant foliage. For small spaces or container gardens, use shorter stakes and smaller corks to maintain proportion.
Consider creating a color-coding system using different colored inks for various plant families, or arrange markers in decorative patterns that complement your garden’s design. In wet climates, apply multiple layers of sealant and replace markers every two seasons to maintain their appearance and functionality.
Repurpose Mason Jars as Herb Gardens
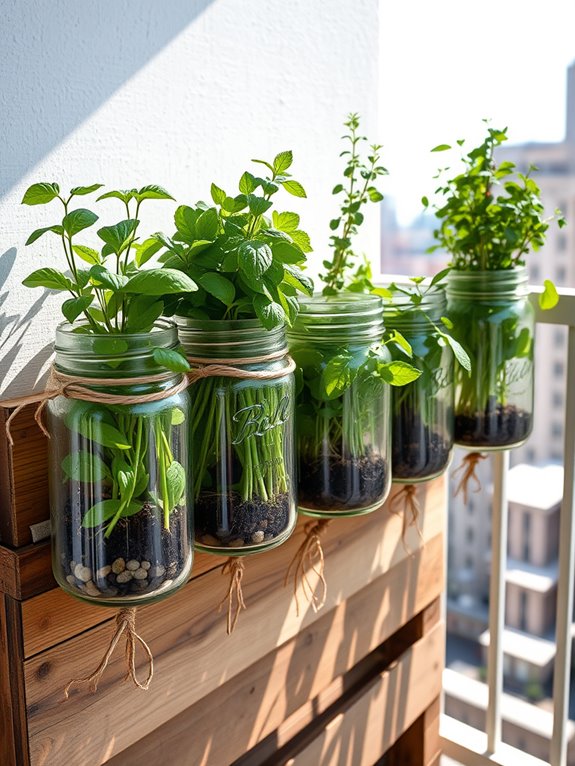
Transform your windowsill or kitchen counter into a charming indoor herb garden by repurposing vintage mason jars into miniature botanical havens. The clear glass vessels create an enchanting display as sunlight filters through, highlighting the vibrant greens of fresh herbs while allowing you to observe the fascinating root systems developing beneath the soil.
When arranged in clusters of varying heights, these herb-filled jars become a living art installation that adds both beauty and functionality to your space. The rustic appeal of mason jars perfectly complements the natural growth of herbs like basil, mint, thyme, and oregano, creating an aesthetic that bridges farmhouse charm with modern minimalism.
Whether positioned along a sunny window or mounted on a reclaimed wood board with industrial-style pipe clamps, these transparent gardens bring life to any corner while providing fresh herbs within arm’s reach for cooking.
Key Elements:
- Mason jars (various sizes)
- Activated charcoal
- Small stones or pebbles
- Well-draining potting soil
- Herb seedlings or seeds
- Decorative twine or ribbon
- Plant markers
- Drainage material
- Mounting hardware (optional)
- Grow lights (optional)
Begin by preparing your mason jars with a layer of activated charcoal at the bottom, followed by a generous layer of small stones for drainage. Fill the remaining space with quality potting soil, leaving room for your chosen herbs.
When planting, ensure each herb has adequate space for root development, typically using one plant per jar. Position your jars in areas receiving at least 6 hours of sunlight daily, rotating them regularly to promote even growth.
Proper maintenance includes monitoring soil moisture carefully, as mason jars lack drainage holes. Water sparingly but consistently, allowing the top layer of soil to dry between waterings. Harvest herbs regularly to encourage bushier growth and prevent them from becoming too tall for their containers.
For optimal growth, supplement natural light with grow lights during darker months or in spaces with limited sunlight. For those working with limited space, consider wall-mounted designs using jar-holding brackets or create tiered displays using repurposed ladders or shelving units.
Small balconies can accommodate vertical garden systems made from mason jars attached to wooden pallets, while larger spaces might feature multiple groupings at different heights.
Remember to choose herbs that match your light conditions and cooking preferences, and consider starting with easy-to-grow varieties like mint or basil before advancing to more challenging herbs.
Turn Broken Pots Into Fairy Gardens
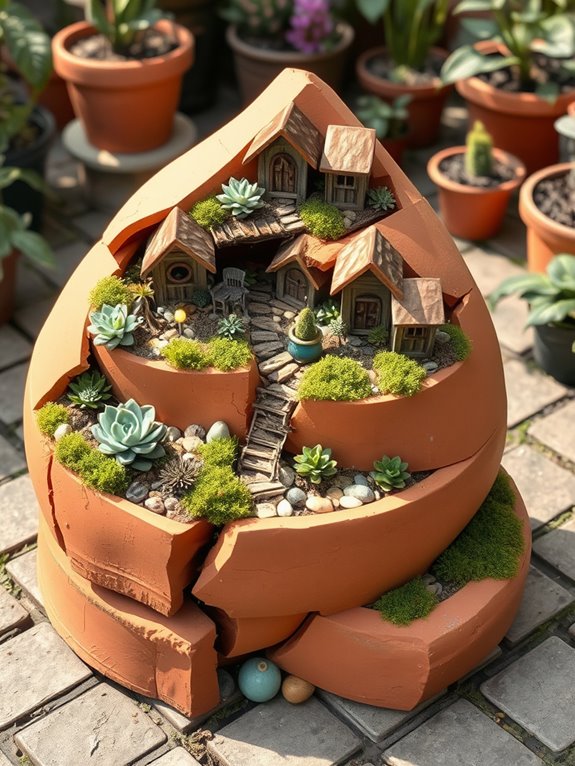
Transform a broken terracotta pot into an enchanted miniature world where tiny fairy dwellings nestle among delicate moss and diminutive plants. The fractured edges of the pot create natural levels and walkways, while small succulents and miniature ground covers cascade over the edges like secret gardens. Twinkling solar lights, miniature furniture, and tiny doors painted in whimsical colors bring life to this magical creation, making it seem as though tiny woodland creatures might emerge at any moment.
The layered design incorporates different textures and heights, from creeping thyme and Irish moss forming soft carpets to small variety sedums providing pops of color. Miniature garden accessories like tiny bridges, benches, and pathways made from pebbles or twigs add depth and interest to the scene. The broken pot‘s jagged edges become an artistic element, creating the perfect backdrop for this imaginative display.
Key Elements:
- Broken terracotta pot
- Small succulents
- Creeping thyme
- Irish moss
- Miniature furniture
- Tiny fairy houses
- Decorative pebbles
- Small twigs
- Solar fairy lights
- Potting soil
- Sand or gravel for drainage
- Miniature decorative elements
Begin by cleaning the broken pot pieces and arranging them in a stable configuration, using the largest piece as the base. Layer gravel at the bottom for drainage, then add potting soil mixed with sand. Position the largest plants first, typically succulents or small perennials, then add ground covers and moss between them.
Create paths and defined areas using small pebbles or crushed shells. Install fairy houses and furniture, securing them with waterproof adhesive if necessary.
Design Tips: Consider scale when selecting plants and decorative elements – nothing should overwhelm the space. For smaller balconies, use just one broken pot section as a vignette rather than the entire arrangement.
Choose drought-tolerant plants to reduce maintenance, and position the garden where it can receive morning sun but afternoon shade to protect delicate accessories. Weather-resistant sealer on wooden elements will extend their life, and rotating seasonal decorations keeps the display fresh and engaging year-round.
Make Compost Bins From Shipping Crates
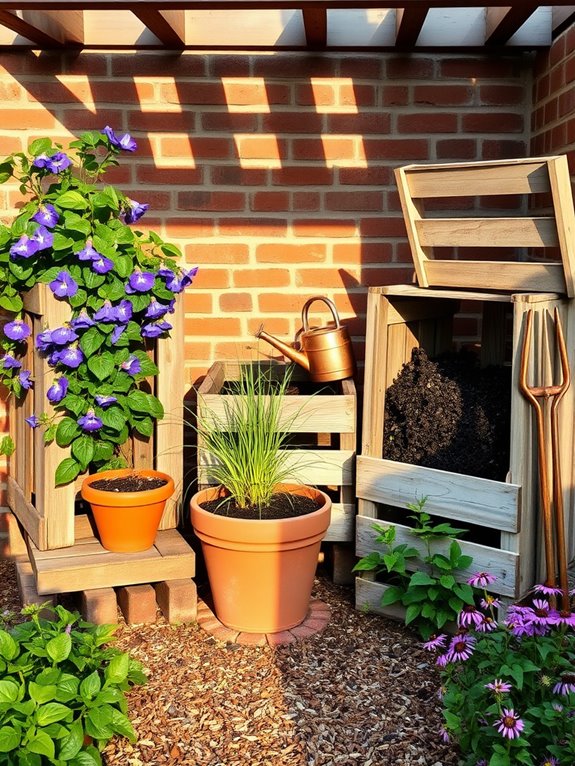
Transform humble shipping crates into an eco-friendly composting station that adds rustic charm to your garden space. Weathered wooden crates, stacked thoughtfully and enhanced with climbing vines like jasmine or morning glory, create an attractive and functional focal point. The natural aging of the wood combines beautifully with the lush greenery, while strategically placed herbs like mint and lemon balm near the bins help manage any potential odors.
The composting area becomes a testament to sustainable gardening, where fallen leaves, kitchen scraps, and garden trimmings transform into black gold for your plants. Surrounding the bins with drought-resistant ornamental grasses creates movement and texture, while hardy perennials like echinacea and black-eyed susans add splashes of color. This thoughtful arrangement transforms a utilitarian space into an environmental statement piece.
Key Elements:
- Wooden shipping crates (minimum 3)
- Hardware cloth or wire mesh
- Hinges and latches
- Weather-resistant screws
- Drainage materials (gravel, broken pottery)
- Climbing vines
- Ornamental grasses
- Perennial flowers
- Ground cover plants
- Garden tools
Position the crates in a partially shaded area with good drainage, arranging them side by side or in a U-shape for easy access. Install hardware cloth along the bottom and sides to prevent pests while maintaining airflow. Create hinged lids using additional crate boards, and ensure each bin has adequate drainage holes.
Stack the crates slightly elevated on gravel or bricks to prevent wood rot and improve air circulation. For optimal results, dedicate one bin for fresh materials, another for actively decomposing matter, and a third for finished compost. This three-bin system allows for efficient composting rotation while maintaining an organized appearance.
Plant climbing vines along the back of the bins, and establish ornamental grasses and perennials around the sides to soften the utilitarian look. Small-space gardeners can adapt this design by using single crates or splitting larger crates into smaller compartments. Consider vertical gardening opportunities on the sides of the bins, and use compact varieties of screening plants.
In particularly small areas, focus on one active composting bin with complementary container gardens, ensuring the space remains both functional and aesthetically pleasing while maintaining proper airflow and access for maintenance.