
10 Garden Ideas Using Reclaimed Wood
Did you know that nearly 40% of landfill waste comes from construction materials, including perfectly usable wood? You’ll find endless opportunities to transform discarded lumber into stunning garden features that add character while reducing environmental impact. From weathered barn boards to retired shipping pallets, reclaimed wood brings warmth, texture, and sustainable style to your outdoor space. These 10 creative projects will help you turn cast-off timber into functional garden elements that tell a unique story.
Contents
- 1 Building Raised Garden Beds
- 2 Crafting a Vertical Herb Wall
- 3 Creating Rustic Garden Pathways
- 4 Designing a Pallet Potting Station
- 5 Making Charming Garden Benches
- 6 Installing a Decorative Garden Fence
- 7 Constructing a Compost Bin System
- 8 Building Garden Tool Storage Solutions
- 9 Assembling Outdoor Planter Boxes
- 10 Designing Garden Art and Sculptures
Building Raised Garden Beds

Weathered planks and rustic charm come alive in raised garden beds crafted from reclaimed wood, creating an eco-friendly haven that combines vintage character with modern functionality. The rich, aged patina of salvaged lumber frames neat rows of thriving vegetables, aromatic herbs, and edible flowers, while the elevated growing space adds architectural interest to any garden layout.
Linear patterns of weathered gray and brown timbers create natural divisions between plantings, allowing strawberries to cascade over the edges while tomatoes reach skyward on recycled trellis supports. These raised beds transform ordinary growing spaces into organized, productive gardens that tell a story through their repurposed materials.
Each knot and grain pattern in the reclaimed wood adds character, while the raised design creates clear pathways between growing areas. Purple sage, trailing thyme, and climbing nasturtiums soften the geometric edges, bringing life and movement to the structured design.
Key Elements:
- Reclaimed wooden boards or timbers
- Galvanized screws and brackets
- Landscape fabric
- Quality topsoil and compost mix
- Corner posts
- Hardware cloth (for gopher protection)
- Drainage material
- Edge caps or trim pieces
- Irrigation system components
- Plant support materials
Construction begins with selecting stable, untreated reclaimed wood pieces of similar heights, typically 12-18 inches tall. Create a level foundation by removing grass and weeds, then align corner posts and secure boards using galvanized hardware.
Layer the bottom with hardware cloth for pest protection, followed by drainage material and a barrier of landscape fabric. Fill with a rich growing medium, incorporating plenty of organic matter and compost to ensure proper drainage and fertility.
Maximize growing space by incorporating vertical elements along the north side of beds to avoid shading other plants. Consider installing drip irrigation during construction for efficient watering. Group plants with similar water needs together, and maintain pathways between beds at least 24 inches wide for comfortable access.
For smaller spaces or balcony gardens, create modular raised beds that can be reconfigured as needed. Use shallower depths (8-12 inches) for herbs and leafy greens, while reserving deeper sections (18-24 inches) for root crops and larger plants.
Consider incorporating hinged covers or cold frames for season extension, and ensure adequate drainage for container growing situations. Mobile raised beds can be mounted on casters for flexibility in tight spaces.
Crafting a Vertical Herb Wall

Transform your outdoor space into a living tapestry with a vertical herb wall crafted from reclaimed wood. Weathered planks arranged in a geometric pattern create rustic charm while housing an array of aromatic herbs in varying shades of green. The natural patina of aged wood provides a perfect backdrop for cascading rosemary, delicate thyme, and bushy basil plants, creating a dynamic interplay of textures and heights that draws the eye upward.
This functional art piece brings the kitchen garden to eye level, filling the air with fragrant herbs while maximizing space efficiency. The vertical design allows herbs to spill over their wooden compartments, creating a lush, living wall that changes with the seasons. Mint and oregano provide deep green accents, while variegated sage and purple basil add striking color variations against the weathered wood backdrop.
Key Elements:
- Reclaimed wooden pallets or boards
- Wood mounting brackets
- Plant containers or pouches
- Drainage system
- Selection of herbs (minimum 6 varieties)
- Waterproof backing
- Soil mix for herbs
- Drip irrigation system
- Wire mesh for climbing varieties
- Wood sealant (food-safe)
Install the herb wall by first treating the reclaimed wood with food-safe sealant to protect against moisture. Mount the structure securely to a weight-bearing wall, ensuring proper drainage channels behind the planters. Create varying depths of planting pockets to accommodate different root systems, with deeper sections for larger herbs like sage and shallower areas for spreading varieties like thyme.
Install a simple drip irrigation system with adjustable flows to provide consistent moisture without oversaturation. Design considerations should include sun exposure, weight distribution, and accessibility for harvesting.
For smaller balconies, create modular sections that can be rearranged or expanded over time. Consider incorporating fold-down shelves for maintenance access, and group herbs with similar water needs together. Mediterranean herbs work best in full sun locations, while shade-tolerant varieties like mint and parsley can thrive in less sunny spots.
Remember to leave room for herbs to grow and spread, as many varieties will expand significantly during the growing season.
Creating Rustic Garden Pathways
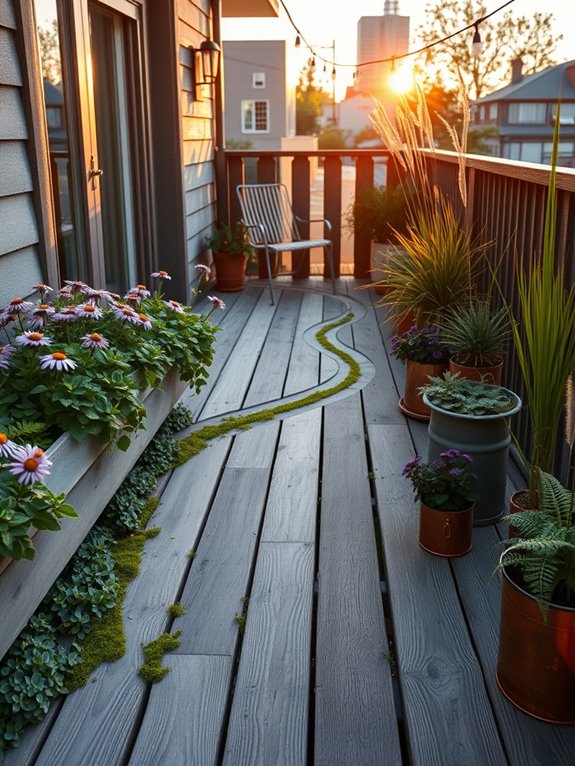
Weathered wooden planks meander through lush greenery, creating an enchanting pathway that beckons visitors deeper into the garden. These reclaimed wood pathways, fashioned from old barn boards and timbers, provide a warm, natural contrast against creeping thyme, moss, and delicate groundcover that softens their edges. Native wildflowers like black-eyed susans and purple coneflowers peek through the gaps, while ornamental grasses sway gently alongside the rustic walkway.
The pathways wind through the garden like a story waiting to be told, each weathered board holding its own history. Weather-silvered cedar and pine pieces create a patchwork of natural tones, complemented by clusters of woodland ferns and shade-loving hostas.
This combination of reclaimed wood and thoughtfully placed vegetation transforms a simple garden path into an immersive journey that feels both designed and wonderfully wild.
Key Elements:
- Reclaimed wooden planks and boards
- Creeping groundcover plants
- Native wildflowers
- Ornamental grasses
- Woodland ferns
- Stone or gravel for path foundation
- Garden edging materials
- Landscape fabric
- LED path lighting
- Moss specimens
Begin by clearing and leveling your chosen pathway area, then laying a proper foundation of compacted gravel or stone. Arrange reclaimed wood pieces in a pattern that allows for natural spacing between boards, securing them firmly to prevent shifting.
Consider varying the width of the pathway between 2-4 feet to create visual interest and accommodate practical passage. Install landscape fabric beneath the boards to prevent weed growth while allowing proper drainage.
Integration of plants should be strategic, with low-growing specimens placed near path edges and taller varieties positioned further back. Select vegetation that can withstand foot traffic and maintain a natural balance between the hardscape and living elements.
Regular maintenance includes trimming encroaching plants, replacing any deteriorating wood pieces, and ensuring proper drainage around the pathway.
When designing your rustic pathway, consider your climate and adjust wood selections accordingly – cedar and redwood naturally resist decay in humid environments. For smaller spaces, create abbreviated paths using shorter wood sections or incorporate stepping stones between wood elements to maximize space.
In wet areas, elevate the pathway slightly and ensure gaps between boards for proper water flow. Remember that reclaimed wood may need periodic sealing to extend its lifespan, though many gardeners prefer the naturally weathered appearance that develops over time.
Designing a Pallet Potting Station
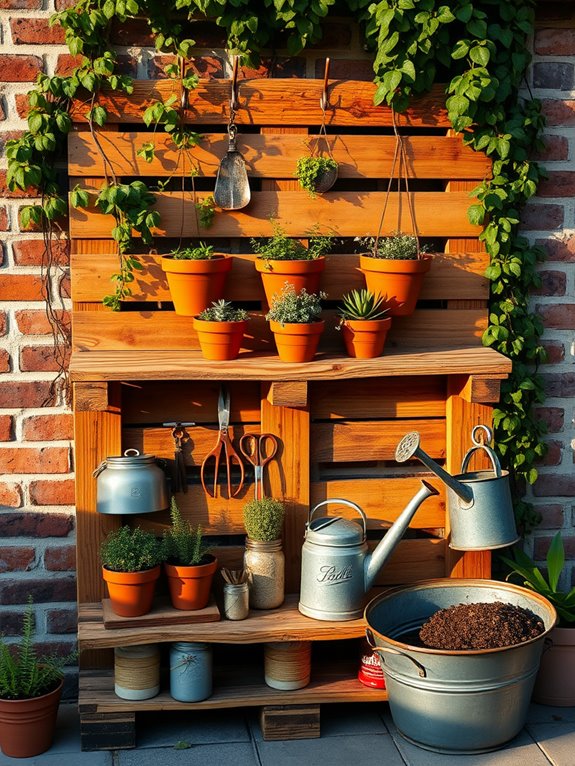
A pallet potting station transforms an ordinary garden corner into a charming, functional workspace that feels like it belongs in a rustic cottage garden. The weathered wood creates a perfect backdrop for terracotta pots, vintage gardening tools, and cascading herbs that spill over the edges of repurposed containers.
Mason jars filled with garden twine and pruning shears add practical touches while contributing to the station’s authentic, lived-in appeal. Climbing vines like jasmine or clematis can be trained to weave through the pallet’s slats, softening the wooden structure with delicate blooms and fresh greenery.
The natural aging of the wood combines beautifully with moss-covered pots and vintage metal containers, creating an organic workspace that appears to have evolved naturally over time. Small succulents tucked into pallet openings add unexpected bursts of color and texture.
Key Elements:
- Reclaimed wooden pallets (2-3)
- Potting soil storage container
- Tool organization system
- Work surface area
- Plant pot storage shelves
- Small container garden space
- Water-resistant surface treatment
- Drainage system
- Storage hooks and hangers
- Weather protection elements
Begin by selecting sturdy pallets free from chemical treatment, cleaning them thoroughly, and applying a weather-resistant sealant. Create the main workstation by securing two pallets vertically as support posts, then attach another horizontally as the tabletop.
Add shelving using pallet slats at various heights for storing pots and tools. Install a simple drainage system beneath the work surface to manage water runoff and prevent wood rot. Incorporate a soil storage solution using a covered container that fits within the station’s dimensions.
Essential tips include positioning the station in a partially sheltered location to extend its lifespan, and incorporating modular elements that can be easily rearranged. For smaller spaces, create a fold-down workspace that can be tucked away when not in use, or design a compact corner unit using a single pallet.
Consider adding wheels to the base for mobility, and always treat the wood with eco-friendly sealants to prevent deterioration while keeping your gardening activities environmentally conscious.
Making Charming Garden Benches
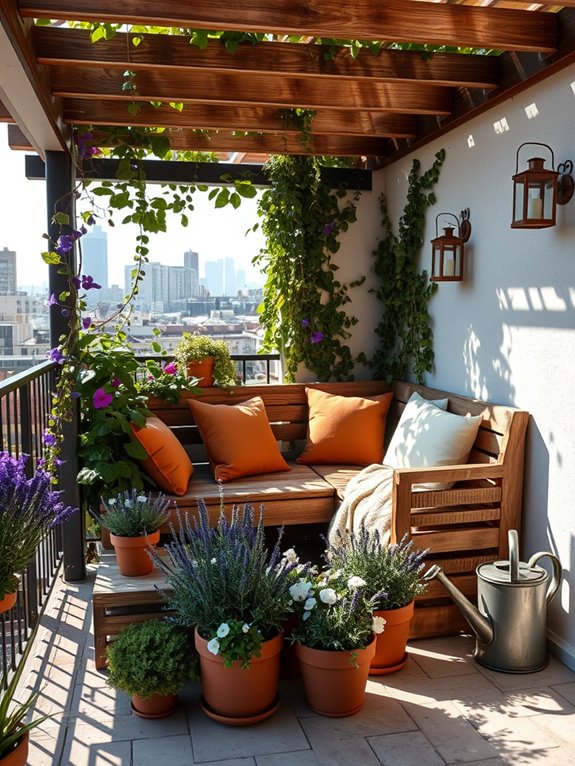
Weathered wooden benches nestled among blooming perennials create intimate seating areas that transform any garden into a storybook retreat.
Reclaimed timber, with its rich patina and character-filled knots, provides the perfect foundation for crafting rustic yet elegant garden benches. These handcrafted seats become natural focal points, especially when surrounded by climbing roses, trailing jasmine, or clusters of lavender that soften their edges and infuse the air with gentle fragrance.
The combination of aged wood and verdant plant life creates a harmonious balance between structure and nature.
Simple bench designs, from straightforward plank seating to more elaborate pieces with curved armrests, offer comfortable resting spots while adding architectural interest to the landscape. When positioned thoughtfully, these benches create intimate conversation nooks or peaceful meditation spaces beneath the dappled shade of overhead pergolas or tree canopies.
Key Elements:
- Reclaimed wooden planks or beams
- Weather-resistant wood sealant
- Decorative brackets or supports
- Climbing plants or vines
- Cushions or pillows made from outdoor fabric
- Ground cover plants
- Solar-powered accent lighting
- Complementary container plants
- Mulch or gravel for surrounding areas
Position benches where they’ll receive partial shade during the hottest parts of the day, creating inviting destinations within the garden landscape.
Install them on level ground, preferably on a solid surface like pavers or gravel to prevent water damage and ensure stability. Surround the seating area with plants at varying heights – low-growing ground covers at the base, medium-height perennials alongside, and climbing varieties behind – to create a layered, enveloping effect.
Essential Tips:
Consider the bench’s orientation to maximize views of garden features while protecting users from prevailing winds. For smaller spaces, opt for corner benches or fold-down designs that can be tucked away when not in use.
In urban settings, create privacy screens using tall container plants or trellised climbers behind the bench. Always select wood that’s naturally rot-resistant or properly treated for outdoor use, and ensure adequate drainage around the seating area to extend the bench’s lifespan.
Installing a Decorative Garden Fence

A decorative garden fence crafted from reclaimed wood brings rustic charm and natural character to any outdoor space. Weather-worn planks and vintage boards create a living tapestry that tells a story, with each knot and grain pattern adding unique personality to the boundary line.
Climbing roses, honeysuckle, and clematis weave through the weathered slats, while morning glories reach skyward, their vibrant blooms contrasting beautifully against the aged timber. The fence becomes more than just a boundary – it transforms into an architectural focal point that frames the garden like a living canvas.
Vintage hardware, old door hinges, and antique metal findings can be incorporated as artistic accents, while mason jar lanterns hung from repurposed hooks cast magical evening lighting. The natural patina of the wood develops deeper character with each passing season, creating an evolving backdrop for your garden’s beauty.
Key Elements:
- Reclaimed wooden boards and planks
- Vintage hardware and metal accents
- Post hole digger and concrete
- Galvanized screws and brackets
- Climbing plant varieties
- Solar-powered or electric garden lights
- Weather-resistant sealant
- Hand tools for assembly
- Level and measuring tape
Begin installation by plotting your fence line and marking post locations every 6-8 feet. Dig holes 2 feet deep, setting posts in concrete and ensuring they’re perfectly level.
Once posts are secure, attach horizontal support beams, then create your design using various reclaimed wood pieces. Consider different board widths and textures to add visual interest. Install the boards vertically or horizontally, leaving small gaps for climbing plants to weave through.
Planning Tips: Consider your climate when selecting wood types and sealants. In wet areas, ensure proper drainage around fence posts and treat wood accordingly. For small spaces or balconies, create a free-standing panel system that can be moved or modified.
Incorporate built-in planter boxes or shelving for additional greenery, and remember to leave access points for garden maintenance. Weather-resistant storage solutions can be integrated into the fence design, maximizing functionality in limited spaces.
Constructing a Compost Bin System
A well-crafted compost bin system made from reclaimed wood adds rustic charm and sustainable functionality to any garden space. The weathered planks, ranging from silver-gray to deep brown, create an appealing natural aesthetic that blends seamlessly with climbing vines like Virginia creeper or English ivy. The multi-bin structure becomes a living element of the garden, with small ferns and moss naturally establishing themselves in the wood’s crevices, while beneficial insects and birds are drawn to this thriving ecosystem.
The composting area transforms into a productive garden feature, where fallen autumn leaves and garden trimmings evolve into rich, dark soil. Surrounding the bins, strategic plantings of aromatic herbs like sage and lavender help manage any potential odors, while nasturtiums and marigolds add splashes of color. The entire setup creates an efficient workspace that feels both organized and harmonious with nature.
Key Elements:
- Reclaimed wooden pallets or boards
- Hardware cloth or wire mesh
- Hinges and latches
- Corner posts
- Removable front slats
- Cover or lid material
- Ground anchors
- Weather-resistant screws
- Tool storage hooks
- Drainage material
The construction begins with creating three adjacent bins, each approximately 3×3 feet, using reclaimed wooden pallets or boards. Install corner posts first, then attach the side walls, leaving the front accessible with removable slats for easy turning and transfer of materials. Include wire mesh at the base and between boards to contain materials while allowing proper airflow. The middle bin serves for turning active compost, while outer bins store fresh materials and finished compost.
Essential maintenance involves organizing the bins in a way that supports the composting cycle: one bin for fresh materials, one for active decomposition, and one for mature compost. Position the system in a partially shaded area to maintain optimal moisture levels, and ensure good drainage by elevating the base slightly off the ground using gravel or recycled brick.
When adapting this design for different spaces, consider scaling the bins according to available area – smaller urban gardens might use a single bin system with dividers, while larger properties can expand to four or more bins. For balcony composting, create a modified version using smaller, modular boxes that can be easily rearranged.
Pay attention to local regulations regarding composting structures, and consider adding a lockable lid if wildlife is a concern. Remember to position the bins where they’re easily accessible during all seasons, and incorporate a tool storage area into the design for convenience.
Building Garden Tool Storage Solutions
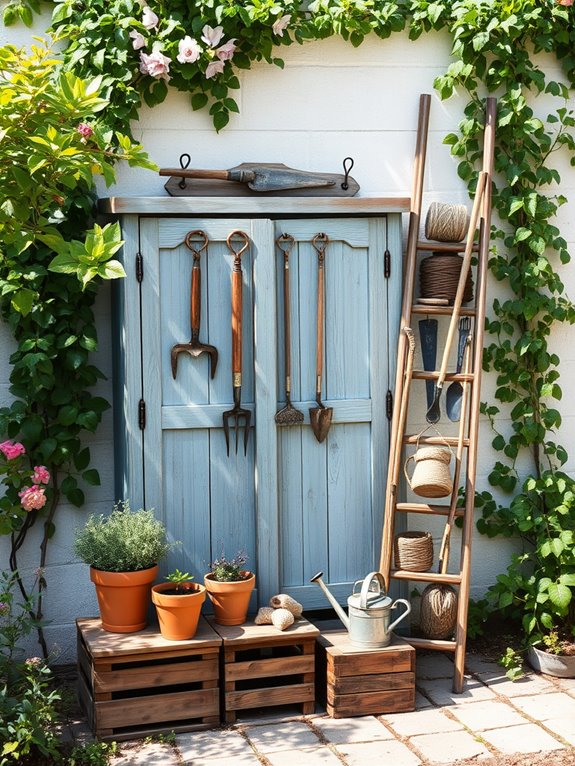
Transform your garden workspace with a charming and functional tool storage area crafted from weathered barn wood and vintage lumber. Picture a rustic wooden cabinet standing proudly against a garden wall, its reclaimed boards telling stories through their aged patina and natural imperfections. Climbing jasmine or Virginia creeper gracefully frames the structure, while nearby herb planters made from old wooden crates add both practicality and vintage charm to the space.
The tool storage area becomes a focal point rather than an eyesore, with carefully arranged vintage garden implements displayed on weathered board walls. Repurposed wooden ladders serve as vertical storage solutions, while salvaged window frames create protected display areas for smaller tools. Metal hooks and brackets contrast beautifully against the warm wood tones, creating an aesthetic that bridges functionality with rustic garden style.
Essential Elements:
- Reclaimed wooden boards and planks
- Vintage barn wood or weathered lumber
- Metal brackets and hooks
- Hinges and door hardware
- Weather-resistant sealant
- Tool hanging systems
- Salvaged window frames
- Wooden crates
- Climbing plant supports
- Drainage materials
Begin implementation by selecting a level area with good drainage, preferably against an existing wall or fence. Create a simple foundation using concrete blocks or gravel to elevate the wood off the ground. Build the main storage cabinet using the largest reclaimed boards for the frame and smaller pieces for walls and doors, ensuring all wood is properly treated for outdoor use.
Install a sloped roof with adequate overhang to protect tools from rain, and incorporate ventilation gaps to prevent moisture buildup. Design considerations should include height accessibility, weight distribution for hanging tools, and protection from direct weather exposure.
When adapting this project for smaller spaces, consider wall-mounted fold-down options or modular units that can be expanded over time. Include strategic placement of hooks at various heights, magnetic strips for small metal tools, and adjustable shelving to maximize storage capacity while maintaining visual appeal.
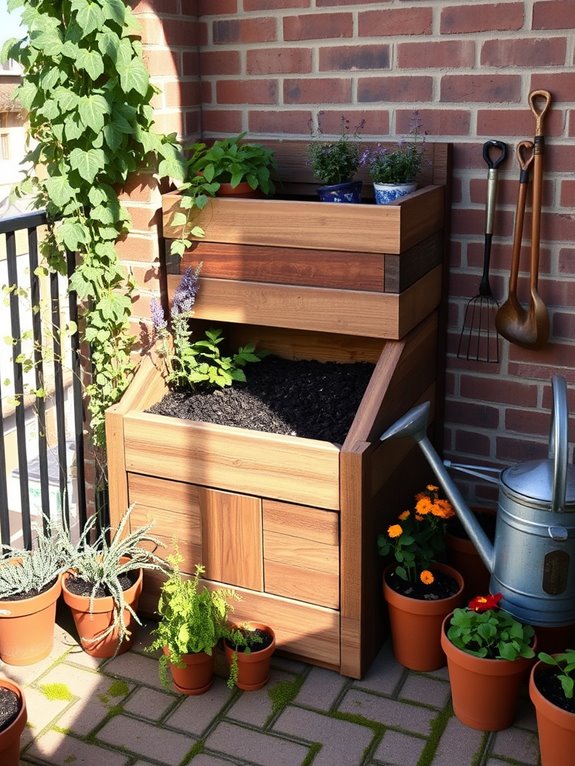
Assembling Outdoor Planter Boxes
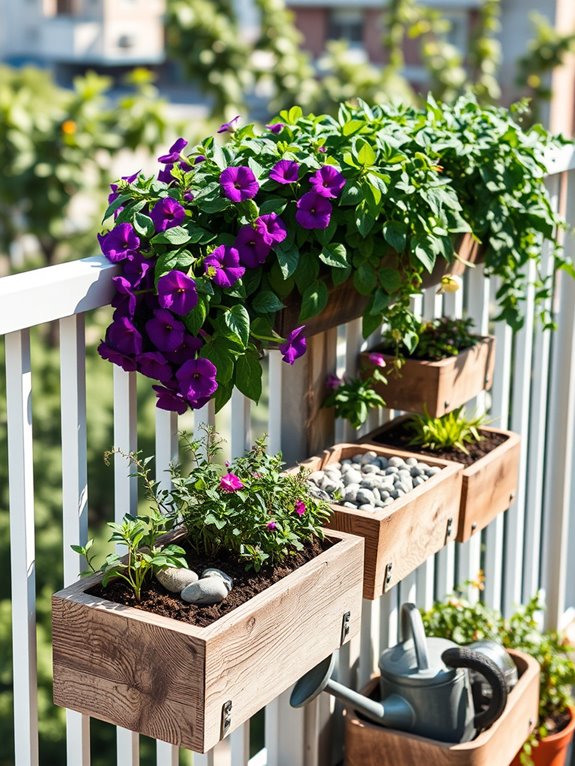
Rustic charm meets sustainable gardening in a collection of weathered wooden planter boxes that tell stories through their aged patina and natural character. Reclaimed wooden planters, whether crafted from old fence boards, barn wood, or salvaged timber, create an authentic farmhouse aesthetic while providing the perfect home for cascading herbs, vibrant flowers, and climbing vines.
The varying heights and natural wood tones create a visually dynamic display that draws the eye upward and outward across your garden space. These handcrafted planter boxes become natural focal points, especially when filled with a thoughtful mix of trailing plants like ivy, purple petunias, and silver falls dichondra.
The contrast between the weathered wood and fresh greenery creates an engaging interplay of textures, while strategically placed boxes can define garden zones or create natural privacy screens when combined with climbing plants.
Key Elements:
- Reclaimed wooden boards or pallets
- Weather-resistant screws and brackets
- Drainage holes and gravel
- Quality potting soil
- Mix of trailing and upright plants
- Wood sealant or protective finish
- Corner braces
- Landscape fabric liner
- Casters (optional for mobility)
- Various-sized planter boxes
Construction begins with selecting sturdy reclaimed wood pieces and treating them for outdoor use. Create a basic box structure using weather-resistant screws, ensuring proper drainage holes are drilled into the bottom.
Line the interior with landscape fabric to protect the wood and add a layer of gravel before filling with soil. Position larger boxes as anchor points in your garden design, with smaller planters arranged to create visual flow and accessibility for maintenance.
Extra Tips: Consider your planter boxes’ weight when filled with soil and plan accordingly for your space’s structural limitations. For smaller balconies, utilize vertical arrangements and ensure boxes are secured against wind.
Mix shallow-rooted plants with deeper ones to maximize growing space, and incorporate self-watering systems for easier maintenance. Paint or stain can protect the wood while maintaining its character, but ensure any finishes are plant-safe and non-toxic.
Designing Garden Art and Sculptures
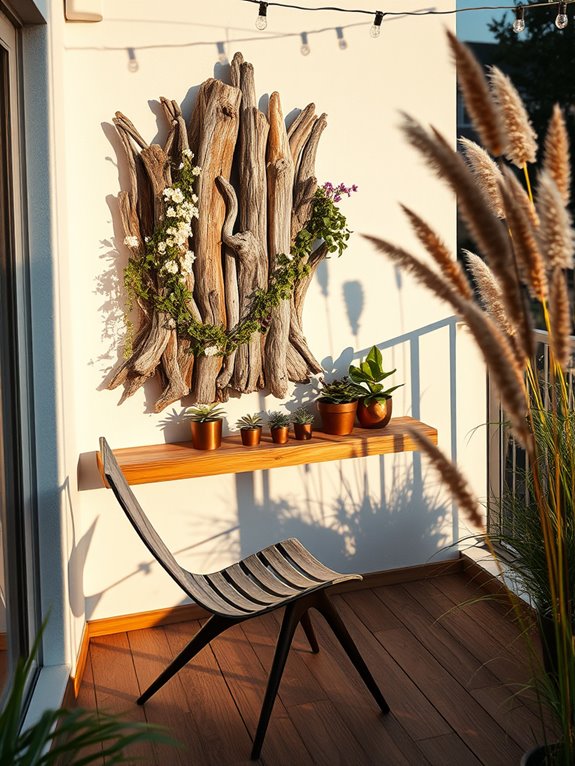
Transform your garden into an enchanting outdoor gallery by incorporating artistic elements crafted from reclaimed wood. Weathered fence posts become abstract sculptures reaching skyward, while twisted branches and driftwood pieces create natural focal points among flowering perennials.
The organic shapes and textures of wooden art installations contrast beautifully with soft plantings like ornamental grasses, creating a dynamic interplay between structured art and flowing botanical elements.
Rustic wooden sculptures take on new life as they weather naturally, developing rich patinas that complement garden colors throughout the seasons. Position these artistic pieces to catch morning light or create dramatic shadows, turning your garden into an ever-changing exhibition.
Climbing vines like clematis or jasmine can be trained to weave through larger wooden structures, blending the line between art and nature.
Key Elements:
- Reclaimed wooden beams and posts
- Driftwood pieces
- Weathered fence sections
- Natural twine or metal wire
- Weather-resistant fasteners
- Foundation materials (concrete, gravel)
- Complementary plants
- Solar lighting
- Protective sealants
- Basic woodworking tools
Implementation begins with selecting sturdy pieces of reclaimed wood that show interesting grain patterns or natural weathering. Create stable foundations for larger sculptures using concrete footings or gravel beds to prevent shifting.
Arrange wooden elements at varying heights and angles to create visual interest, ensuring each piece is properly secured and sealed against moisture. Consider the viewing angles from different areas of the garden and position pieces to create sight lines that draw the eye through the space.
When designing your garden art space, consider the mature size of surrounding plants and plan for seasonal changes. For smaller areas or balconies, focus on wall-mounted wooden sculptures or compact free-standing pieces that can be easily relocated.
Include proper drainage around wooden elements, and regularly inspect for any signs of deterioration. Choose plants that won’t overshadow your artistic pieces but will enhance them through complementary colors and textures.