
7 Garden Ideas Using Mulch Creatively
Just when you thought mulch was merely a functional ground cover, you’ll discover it’s actually an artist’s medium waiting to transform your garden. You can shape this versatile material into stunning geometric patterns, craft colorful borders, and design eye-catching pathways that guide visitors through your outdoor space. From layered textures to themed zones, mulch offers endless creative possibilities that’ll elevate your garden from ordinary to extraordinary. Let’s explore seven innovative ways to turn simple mulch into garden magic.
Contents
Create Striking Geometric Patterns
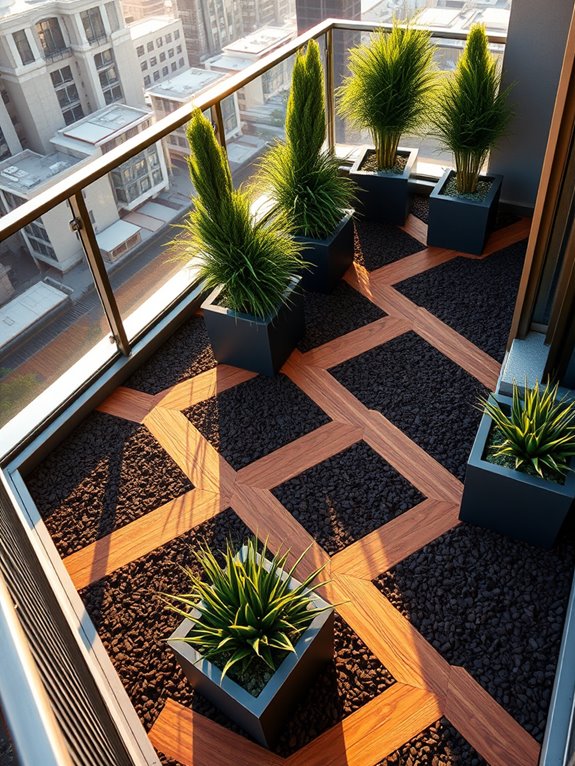
Modern elegance meets natural beauty in geometric mulch patterns that transform ordinary garden spaces into sophisticated outdoor galleries. Clean lines of contrasting mulch colors create bold diamonds, chevrons, and interlocking squares, while carefully positioned plants serve as living accents at strategic points.
Dark brown bark mulch alongside warm cedar tones forms striking patterns that draw the eye through the landscape, creating an artistic foundation for architectural plants like ornamental grasses and sculptural succulents. The geometric design brings order and intentionality to the garden, establishing a contemporary feel that works particularly well in urban settings and formal gardens.
Japanese forest grass and black mondo grass provide textural contrast along pattern edges, while upright evergreens like Italian cypress mark key intersections in the design. The precise lines of the mulch patterns create a meditative quality, especially when viewed from above or through windows overlooking the space.
Key Elements:
- Contrasting mulch colors (minimum 2 varieties)
- Metal or plastic edging
- String line or garden hose for layout
- Landscape fabric
- Architectural plants
- Ground cover plants
- Garden rake
- Measuring tape
- Garden stakes
- Level
Begin implementation by sketching your desired pattern on paper, then transfer it to the garden using stakes and string to outline the design. Install landscape fabric to prevent weed growth and maintain crisp lines between different mulch types.
Create solid borders using metal or plastic edging to separate different mulch colors, ensuring each section is level and well-contained. Apply mulch in 2-3 inch layers, working systematically from one section to the next to maintain clean lines and prevent mixing of materials.
When adapting geometric patterns for different spaces, scale is crucial. Small areas benefit from simple patterns like alternating squares or single diamond shapes, while larger spaces can accommodate more complex designs with multiple intersecting patterns.
Consider your viewing angles – patterns should be oriented to be appreciated from primary viewing locations like patios or windows. Maintain pattern definition by refreshing mulch annually and trimming plants to prevent overgrowth that could blur the geometric lines.
Design Multi-Colored Mulch Borders
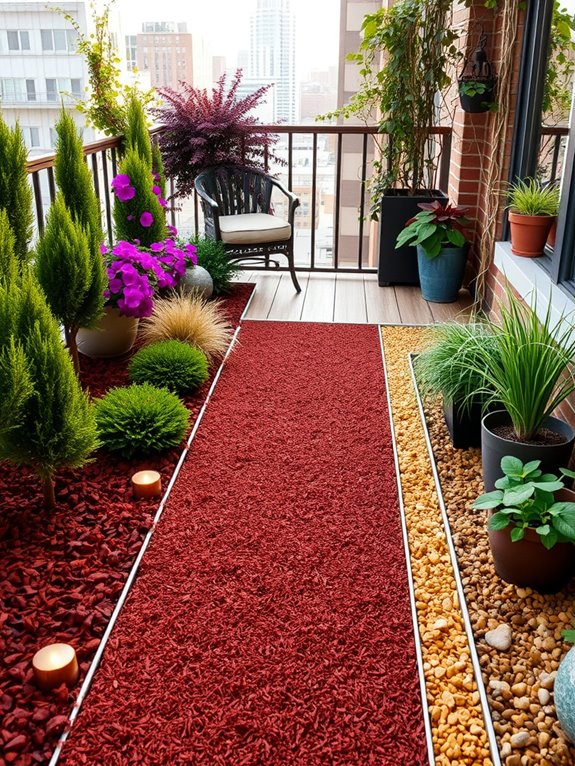
Multi-colored mulch borders transform ordinary garden spaces into vibrant, dimensional landscapes that draw the eye and create visual interest throughout the seasons. Rich burgundy mulch can define elegant formal paths, while golden cypress mulch highlights flowering perennial beds, and natural cedar tones provide a neutral backdrop for showstopping ornamental grasses.
The layered effect of different colored mulches creates depth and structure, similar to an artist’s canvas where each shade serves to enhance and frame the living elements within. These artistic borders become even more striking when complemented by carefully selected plants that echo the mulch colors – purple fountain grass against wine-colored mulch, or golden Japanese forest grass against amber-hued ground cover.
Stone elements like light gray pavers or warm sandstone benches add another layer of contrast, while garden art pieces become focal points amidst the thoughtfully arranged color blocks of mulch.
Key Elements:
- Multiple colors of organic mulch (minimum 2-3 varieties)
- Border edging materials
- Complementary plants for each mulch zone
- Landscape fabric or weed barrier
- Garden tools for installation
- Decorative stones or pavers
- Garden art or focal points
- Lighting elements
Implementation begins with sketching your design on paper, mapping out distinct zones for each mulch color while ensuring the overall pattern flows naturally. Install sturdy edging materials between different mulch sections to prevent mixing, and lay down quality landscape fabric to suppress weeds.
Apply mulch in 2-3 inch layers, creating clean lines between color transitions. Position plants strategically within each zone, considering their mature size and how their colors will interact with the mulch beneath them.
Design adaptations and maintenance tips: For smaller spaces, reduce the number of color transitions and focus on two contrasting mulch tones for maximum impact. Consider vertical elements like climbing vines or tall grasses to add height without sacrificing ground space.
Refresh mulch colors annually, and monitor edges between different colored sections to maintain crisp lines. In shadier areas, choose lighter-colored mulches to brighten the space, while sunny spots can handle darker, more dramatic tones without appearing gloomy.
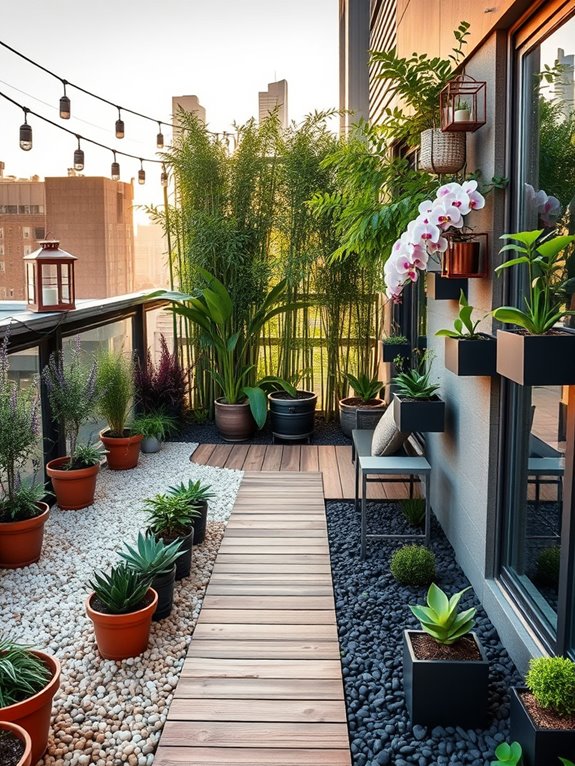
Build Artistic Pathway Designs
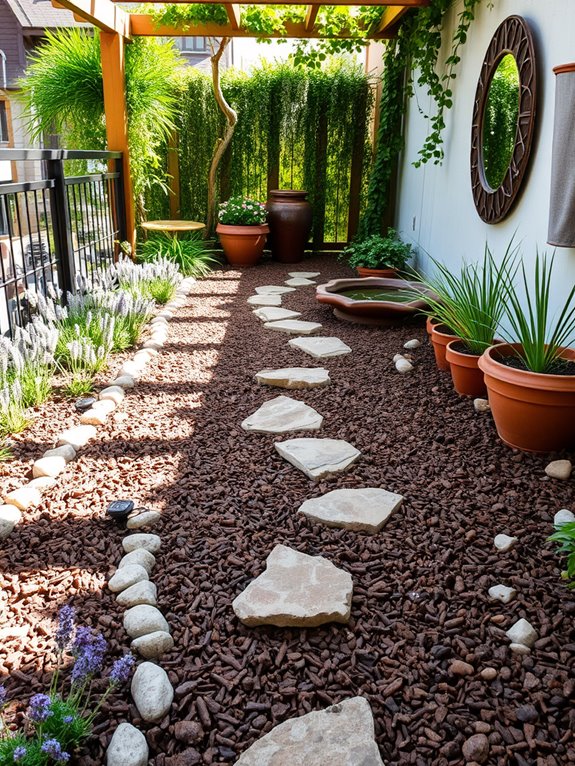
Transform your garden into a whimsical journey with artistic mulch pathways that wind and meander through your outdoor space. Dark brown or reddish mulch creates striking contrast against lighter stone elements, while natural cedar mulch adds warmth and earthiness to the path design. Curved paths bordered by flowering perennials like lavender, Russian sage, or ornamental grasses create an enchanting atmosphere that beckons visitors to explore further into the garden.
These artistic pathways can incorporate geometric patterns, spirals, or flowing curves using different colored mulches, stepping stones, or river rocks as accent pieces. The combination of textures and materials creates visual interest while maintaining a natural, organic feel. Small solar lights nestled along the path edges illuminate the way during evening hours, casting subtle shadows that enhance the artistic elements.
Key Elements:
- Various types of mulch (bark, cedar, dyed)
- Decorative stepping stones
- Border plants
- Solar pathway lights
- Landscape edging
- River rocks or pebbles
- Ground cover plants
- Landscape fabric
- Garden tools
- Design template
Begin implementation by sketching your pathway design on paper, considering natural flow and garden focal points. Install landscape fabric along the planned route to prevent weed growth, then establish clear borders using plastic or metal edging.
Layer different mulch types according to your design, using stepping stones or pavers as anchoring elements. Create depth by varying mulch colors and textures, and install plants along the borders to soften edges and provide seasonal interest.
Extra Design Tips: Consider your climate when selecting mulch types, as some materials break down faster than others. For small spaces, use lighter-colored mulch to create an illusion of more space, and opt for miniature versions of border plants. Incorporate curves rather than straight lines to make the space feel larger, and use mirrors or garden art strategically to extend visual perspectives.
Regular maintenance, including mulch replenishment and edge trimming, will keep your artistic pathway looking fresh and inviting throughout the seasons.
Layer Different Mulch Materials
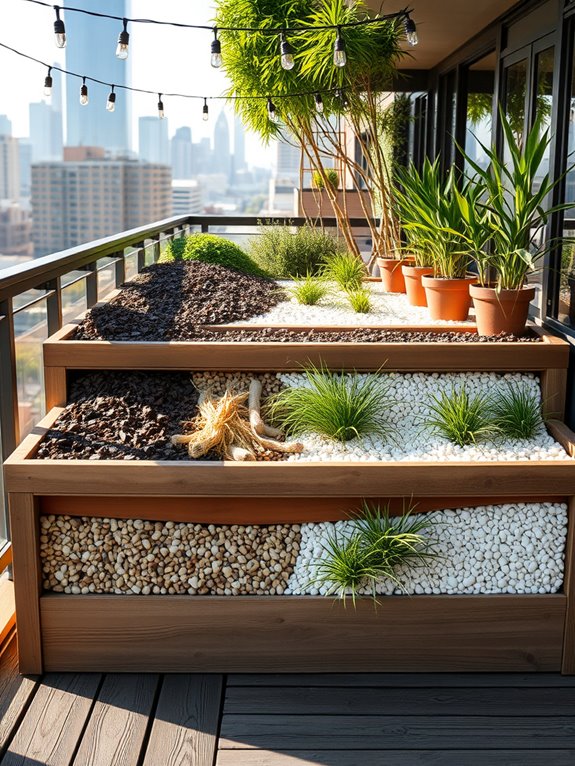
Creating depth and visual intrigue through layered mulch materials transforms an ordinary garden into a striking landscape that catches the eye and guides it through the space. Dark wood chips fade into lighter pine straw, while decorative river rocks create striking borders that separate different planting zones. Ornamental grasses sway above russet-colored cocoa hulls, while purple coral bells and creeping thyme peek through pristine white pebbles, creating a tapestry of textures that changes with every step.
The layered approach creates natural transitions between garden rooms, with each mulch type complementing specific plant groupings. Cedar mulch provides a rich backdrop for shade-loving hostas and ferns, while crushed seashells illuminate sunny Mediterranean herb gardens. The contrasting materials create informal pathways that invite exploration, while strategically placed landscape lighting highlights the varied textures after dark.
Key Elements:
- Various mulch types (wood chips, pine straw, cocoa hulls)
- Decorative stones and pebbles
- Border materials
- Complementary plants for each zone
- Landscape lighting
- Edging materials
- Weed barrier fabric
- Garden tools
- Plant markers
- Drainage materials
Start by creating a detailed plan that divides your garden into distinct zones, considering light requirements and plant groupings. Install proper drainage and lay weed barrier fabric before adding any materials.
Create clean, curved borders between different mulch sections using plastic, metal, or stone edging installed several inches deep. Apply mulch materials in 2-3 inch layers, starting with larger areas first and working toward smaller sections, ensuring materials don’t mix at the boundaries.
When planning mulch transitions, consider practical aspects like water flow, maintenance requirements, and seasonal changes. Shell mulch works best in well-draining areas, while wood chips are ideal for slopes and areas prone to erosion. Choose materials that complement your home’s architecture and existing landscape features, and consider using heavier materials in areas affected by wind.
For smaller spaces like balconies or courtyard gardens, scale down the concept by using miniature zones with contrasting materials in containers. Use shallow decorative trays filled with different mulches as bases for container groupings, or create raised beds with distinct mulch sections.
Consider vertical elements like wall-mounted planters with cascading plants to maximize space while maintaining the layered mulch aesthetic.
Establish Themed Garden Zones
Transform your garden into a captivating journey through distinct themed zones, each telling its own story through carefully chosen mulch colors and textures. Picture walking from a serene Japanese-inspired meditation area with dark brown cedar mulch and carefully placed rocks, into a vibrant butterfly garden where terra cotta-colored mulch complements bright flowering plants and artistic elements.
Each zone creates its own micro-environment, unified by thoughtful pathways and transitional spaces. The magic of themed garden zones lies in their ability to create multiple destinations within a single space. A Mediterranean herb garden featuring light-colored stone mulch flows seamlessly into a woodland retreat with rich, dark pine mulch beneath shade-loving ferns.
These distinct areas not only showcase different plant collections but also create unique emotional experiences, from energizing to calming, as visitors move through the space.
Key Elements:
- Different colored mulches for each zone
- Zone-specific plants and flowers
- Decorative borders or edging
- Themed garden accessories
- Transitional pathways
- Focal points for each zone
- Zone-appropriate seating
- Lighting elements
- Water features
- Signage or markers
Start by sketching your garden layout, dividing it into distinct zones based on sunlight, moisture levels, and desired themes. Install permanent hardscaping elements first, such as pathways and borders, to define each zone clearly.
Layer different mulch types within their designated areas, keeping a 2-3 inch depth for optimal moisture retention and weed control. Position larger plants first, followed by smaller specimens, ensuring each zone maintains its unique character while blending naturally with adjacent areas.
For maintenance, refresh mulch annually and maintain clear boundaries between zones using physical barriers or distinctive plantings. Regular pruning and cleanup keep each themed area looking its best, while seasonal adjustments to plant arrangements can highlight different aspects of each zone throughout the year.
Small space adaptation tip: Even modest gardens can incorporate themed zones by using vertical elements and container groupings. Balcony gardens can feature miniature versions of different themes using varied container sizes and strategic placement of plants at different heights.
Consider using hanging elements and wall-mounted planters to maximize space, and choose dwarf varieties of plants to maintain proper scale in smaller areas. Multi-functional elements, such as storage benches with built-in planters, help maximize limited space while maintaining distinct themed areas.
Craft Natural Transitions Between Spaces
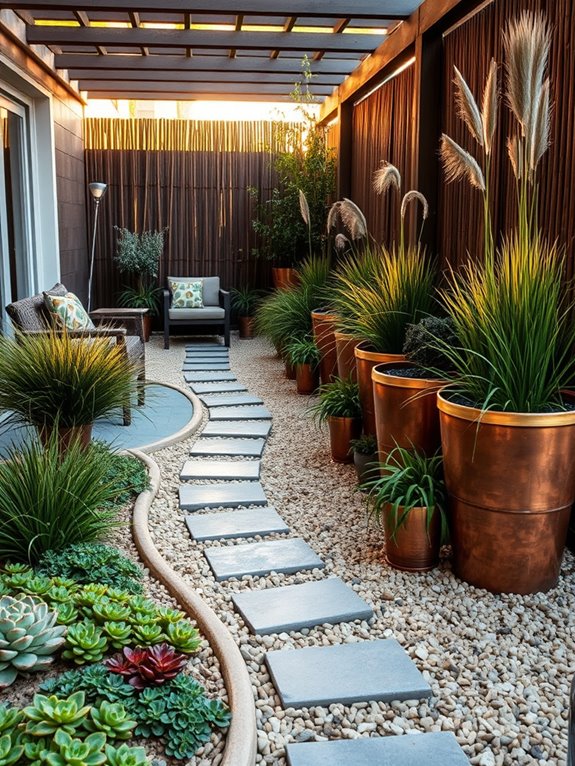
Creating seamless transitions between distinct garden spaces transforms your outdoor areas into a harmonious journey of discovery. Natural mulch pathways wind gracefully between flower beds and seating areas, while graduated heights of plants create gentle slopes that draw the eye from one space to the next.
The organic flow of curved mulch borders, punctuated by ornamental grasses like fountain grass and maiden grass, softens hard edges and creates a sense of movement throughout the landscape. The transition zones come alive with layers of texture and color, featuring stepping stones partially submerged in mulch, surrounded by creeping thyme and moss.
Japanese forest grass and low-growing sedums blur the lines between different garden rooms, while strategically placed boulders and architectural plants like bamboo create natural screening that reveals each new area gradually, building anticipation for what lies beyond.
Key Elements:
- Curved mulch pathways
- Stepping stones
- Ornamental grasses
- Ground covers
- Decorative boulders
- Mixed-height plants
- Natural screening plants
- Multiple mulch types
- Border plants
- Lighting elements
Begin implementing transitions by mapping out the flow between spaces using rope or garden hoses to create smooth curves. Layer different types of mulch to define distinct areas while maintaining visual continuity – perhaps cedar mulch for meditation spaces transitioning to pine straw under shade gardens.
Install taller plants and screening elements at the back of each space, then gradually decrease plant heights toward pathways and gathering areas. Edge your transitions with low-growing plants that spill slightly onto paths, creating soft boundaries.
Design Adaptations and Tips: Consider your climate and maintenance capacity when selecting transition plants and mulch types. For smaller spaces, use miniature varieties of ornamental grasses and compact evergreens to create the same transitional effect without overwhelming the area.
Incorporate lighting at different heights to illuminate pathways and highlight key transitional elements after dark. In confined spaces, use vertical elements like climbing vines or tall grasses to create the illusion of separate rooms without consuming valuable ground space.
Form Living Art With Mulch Mandalas
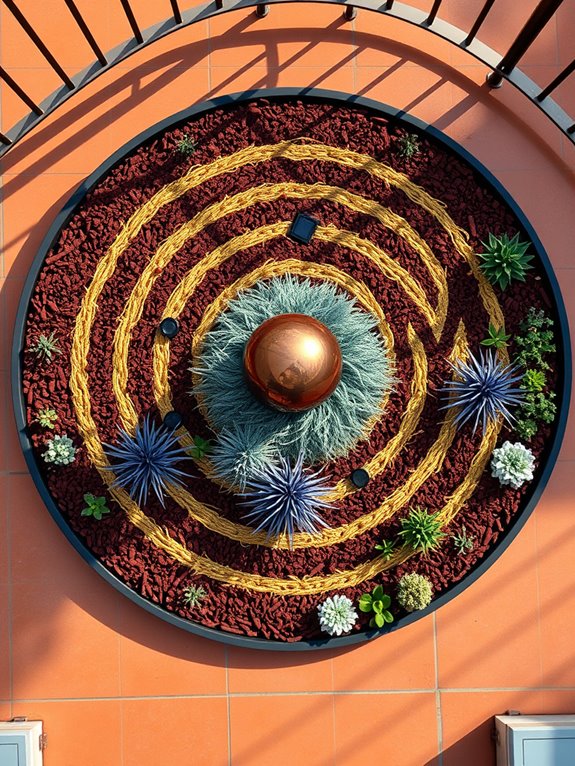
Transform your garden into a mesmerizing sanctuary with mulch mandalas, where intricate circular patterns radiate outward in harmonious designs. These living works of art combine different colored mulches – deep chocolate browns, rich auburn reds, and golden straws – arranged in concentric circles or flowing patterns.
Ornamental grasses like Blue Fescue and Japanese Forest Grass create soft, natural boundaries between mulch sections, while low-growing succulents add textural elements throughout the design. The mandala garden becomes a meditative focal point, drawing the eye inward toward its center where a striking feature such as a carved stone fountain or metallic garden sphere can anchor the design.
Purple Fountain Grass and Black Mondo Grass provide dramatic contrast against lighter mulch tones, while patches of white alyssum or creeping thyme soften edges and add delicate blooms to the organic geometry.
Key Elements:
- Multiple colors of organic mulch
- Ornamental grasses of varying heights
- Low-growing ground covers
- Central focal point (fountain, sculpture, or specimen plant)
- Garden edging materials
- Landscape fabric
- Garden rope or string
- Measuring tape
- Rake and shovel
- Decorative stones or pebbles
Begin implementation by clearing and leveling your chosen area, then laying landscape fabric to prevent weed growth. Use rope to mark your mandala’s circular outline and internal sections, measuring carefully to maintain symmetry.
Create defined borders using garden edging materials to separate different mulch colors and prevent mixing. Layer mulch sections carefully, working from the center outward, maintaining a consistent 2-3 inch depth. Plant ornamental grasses and ground covers strategically at intersection points or along pattern lines.
Add subtle lighting to enhance your mandala garden’s nighttime appeal. Solar-powered accent lights placed strategically around the pattern’s edge create dramatic shadows and highlight the textural contrasts between materials.
Consider installing a drip irrigation system beneath the landscape fabric to maintain plant health without disturbing the mulch pattern. Refresh mulch colors annually and trim plants regularly to maintain crisp design lines.
For smaller spaces or balconies, create micro-mandalas using containers filled with different colored gravel or mulch, arranged in concentric patterns. Use miniature plants like sedums and moss to achieve the same effect in a compact area.
Weather-resistant paint can mark pattern lines on concrete surfaces, creating a permanent template for seasonal mulch arrangements. Consider vertical elements by incorporating climbing plants on trellises that echo the mandala’s circular motifs.