
8 Garden Ideas to Transform a Small Backyard
If your backyard feels a bit cozy (rather than cramped), you’ll love discovering how to transform it into an enchanting outdoor retreat. You don’t need sprawling acreage to create a stunning garden space that combines style and function. From clever vertical plantings that reach toward the sky to multi-level container gardens that maximize every inch, these eight creative solutions will help you reimagine your modest outdoor area into a lush, inviting sanctuary that’ll make your neighbors wonder how you did it.
Contents
- 1 Embrace Vertical Gardening Solutions
- 2 Design Multi-Level Container Gardens
- 3 Create Zones With Smart Space Planning
- 4 Incorporate Mirror and Light Elements
- 5 Choose Space-Saving Plant Varieties
- 6 Install a Living Wall Feature
- 7 Maximize Corner Spaces With Built-In Planters
- 8 Add Strategic Pathways and Focal Points
Embrace Vertical Gardening Solutions
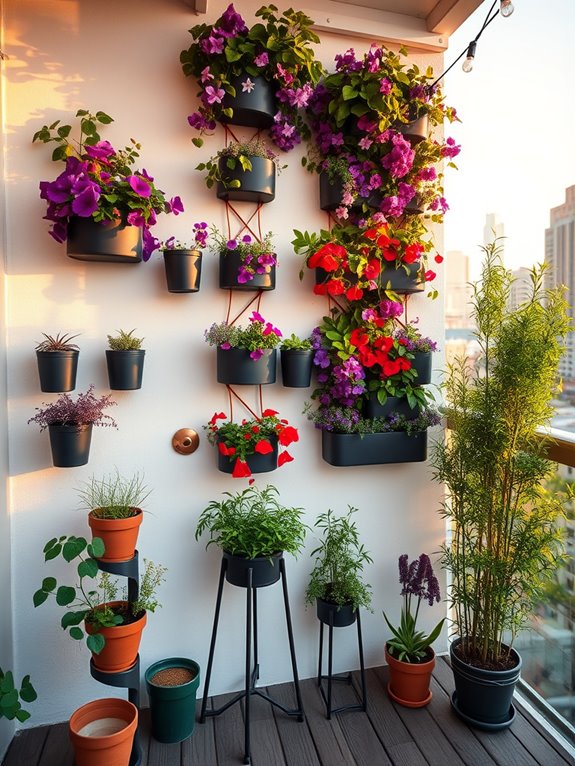
Vertical Gardening Solutions transform ordinary walls and fences into living tapestries of color and texture. Cascading vines of jasmine and clematis intertwine with climbing roses, creating a lush vertical canvas that draws the eye upward, making even the smallest space feel expansive and enchanting. Mounted containers burst with trailing herbs like thyme and oregano, while pocket planters showcase vibrant waves of petunias, lobelia, and sweet alyssum.
The architectural elements of vertical gardens add depth and dimension to limited spaces, turning blank surfaces into productive growing areas. Metal trellises and wooden lattices provide sturdy frameworks for flowering vines, while repurposed pallets house strawberry plants and succulents in their slats. Living walls fitted with self-watering systems support lush ferns and tropical foliage, creating a sense of natural abundance in a compact setting.
Key Elements:
- Wall-mounted planters or pocket systems
- Trellises and lattice panels
- Climbing plant supports
- Self-watering irrigation systems
- Cable or wire systems
- Plant hooks and brackets
- Growing medium and fertilizers
- Drought-resistant climbing plants
- Trailing flowers and vines
- Container plants for vertical stacking
Installation begins with securing sturdy mounting systems to walls or fences, ensuring proper weight distribution and water drainage. Position trellises and support structures at appropriate heights and angles, considering mature plant size and growth patterns.
Install an efficient irrigation system that reaches all levels of the vertical garden, potentially incorporating automatic timers and drip lines for consistent watering. Maintenance requires regular pruning to keep climbing plants in check and prevent overwhelming weight on support structures.
Monitor soil moisture levels carefully, as vertical gardens can dry out more quickly than traditional beds. Fertilize according to each plant’s needs, using slow-release options for consistent nutrition.
When designing vertical gardens, consider sun exposure at different heights and plan plant placement accordingly. For smaller balconies, focus on lightweight systems and compact varieties of climbing plants.
Incorporate modular elements that can be easily rearranged or expanded as needed, and always verify weight restrictions for mounted elements, especially in rental properties or on balconies with structural limitations.
Design Multi-Level Container Gardens
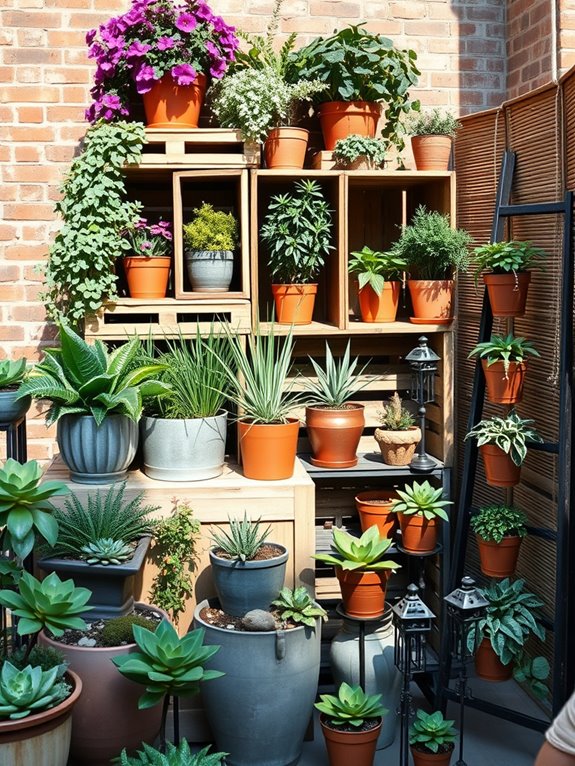
Multi-level container gardens transform modest outdoor spaces into enchanting vertical wonderlands that draw the eye upward and create depth through carefully staged layers of greenery. Wooden crates, wrought iron stands, and weathered ladder shelves hold an array of containers bursting with cascading petunias, compact herbs, and architectural succulents. The varied heights create natural movement throughout the space, while different-sized pots in complementary materials like terracotta, ceramic, and metal add visual interest and texture.
The strategic placement of containers allows for a stunning mix of colors and textures, from trailing sweet potato vines spilling over upper levels to compact lavender and thyme creating aromatic middle layers. Lower levels feature shade-loving ferns and hostas, while sun-loving marigolds and zinnias brighten upper tiers. This thoughtful arrangement creates distinct garden zones while maximizing growing space in a limited area.
Essential Elements:
- Container assortment (varying sizes and materials)
- Plant stands of different heights
- Wooden crates or boxes
- Vertical shelving units
- Drainage materials
- Quality potting soil
- Plant selection for different light levels
- Drip irrigation system or watering can
- Decorative stones or mulch
- Support stakes or trellises
Position the tallest elements against walls or fences, creating a backdrop for your garden display. Start with larger containers at ground level, ensuring proper drainage holes and elevated slightly on pot feet or stones.
Layer smaller containers on sturdy shelving units or stepped displays, considering weight distribution and stability. Group plants with similar water and light requirements together, and maintain adequate spacing for air circulation and growth.
Design Tips:
Consider your balcony’s weight restrictions and ensure all containers are securely anchored. For tiny spaces, focus on lightweight containers and incorporate hanging elements to maximize vertical space.
Adapt the number of levels based on available space – even two or three tiers can create impressive impact. Choose drought-resistant plants for upper levels that are harder to reach for watering, and incorporate self-watering containers where possible to reduce maintenance needs.
Create Zones With Smart Space Planning
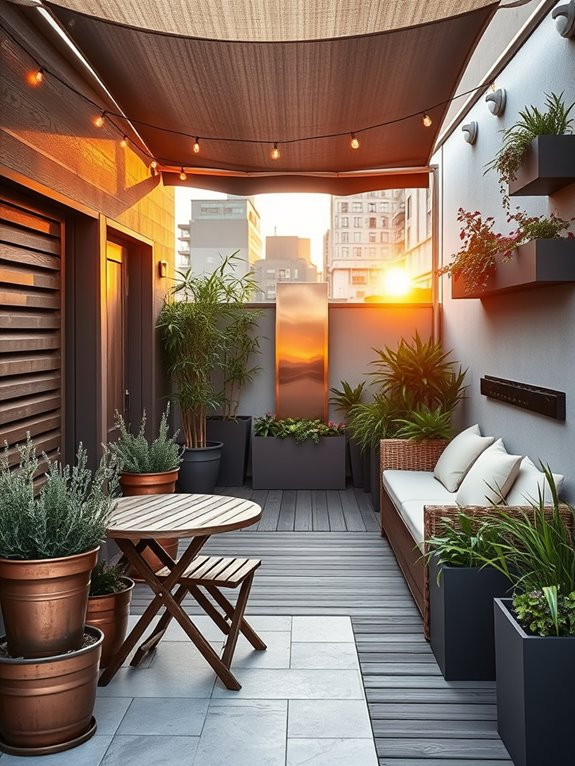
Transform your compact backyard into a multi-functional oasis by strategically dividing it into distinct zones that flow seamlessly into one another. Picture a cozy dining nook nestled beneath a pergola draped with climbing jasmine, transitioning into a peaceful meditation corner wrapped in tall ornamental grasses and bamboo screens.
Each zone maintains its own identity through thoughtful placement of container gardens, architectural plants, and varying ground materials, from smooth pavers to crushed gravel. The magic lies in how these zones create the illusion of a larger space while serving different purposes throughout the day. A morning coffee area might feature a small bistro set surrounded by aromatic herbs in vertical planters, while an evening entertainment space showcases built-in bench seating with plush cushions, illuminated by string lights and bordered by potted citrus trees.
The transitions between zones are marked by changes in elevation, decorative screens, or strategically placed focal points like water features or sculpture.
Key Elements:
- Portable or built-in seating arrangements
- Varied paving materials
- Vertical planters and living walls
- Screening plants or decorative panels
- Multi-functional furniture pieces
- Container gardens
- Lighting elements
- Water features
- Level changes (raised platforms or sunken areas)
- Space-defining structures (pergolas, arbors)
To implement effective zone planning, start by mapping your space and identifying natural transition points. Establish a primary pathway that connects all zones while maximizing usable space. Use container gardens and vertical elements to create subtle boundaries without solid walls.
Position larger elements like pergolas or water features as anchor points, then work outward with smaller elements. Consider sight lines from inside your home and ensure each zone serves a specific purpose while maintaining visual harmony with adjacent areas.
The key to successful maintenance lies in selecting appropriate plants for each zone based on sun exposure and intended use. Choose low-maintenance, drought-resistant varieties for areas with less accessibility, and place high-maintenance plants where they’re easily reached. Incorporate automated irrigation systems where possible to ensure consistent care across all zones.
Design Tip: For extremely small spaces or balconies, focus on creating mini-zones using portable elements that can be easily rearranged. Use lightweight, weather-resistant furniture and containers on wheels for flexibility.
Consider fold-down tables or modular seating that can be adjusted based on needs. Vertical space becomes crucial in smaller areas – utilize walls, railings, and overhead spaces for hanging gardens or retractable shade solutions. Remember that even the smallest space can accommodate multiple zones when planned thoughtfully.
Incorporate Mirror and Light Elements
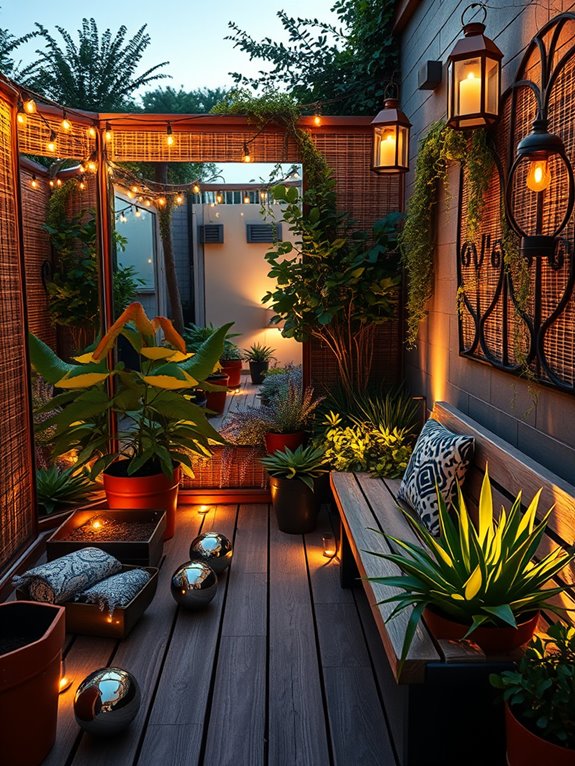
Transform your compact garden into an enchanting wonderland by strategically incorporating mirrors and lighting elements. Carefully positioned mirrors create the illusion of expanded space while reflecting colorful blooms, climbing vines, and ornamental grasses, effectively doubling their visual impact.
Solar-powered lanterns nestled among foliage cast gentle shadows during evening hours, while wall-mounted mirrors capture and amplify natural daylight, making even the shadiest corners feel bright and inviting.
The interplay between mirrors and light brings dynamic energy to the garden throughout the day. Morning sun catches mirror edges, creating sparkles among dewdrops, while evening solar lights illuminate pathways and highlight architectural plants like bamboo or ornamental grasses.
Metallic wind chimes and mirrored gazing balls add movement and reflection, while LED strip lighting beneath benches or along walkways creates a magical atmosphere after sunset.
Key Elements:
- Outdoor-rated mirrors in various sizes
- Solar-powered garden lanterns
- LED strip lighting
- Mirrored gazing balls
- Metal wind chimes
- Glass or mirror mosaic tiles
- Solar stake lights
- Reflective planters
- Weather-resistant mirror panels
- Motion-sensor spotlights
Position mirrors to reflect appealing garden features while avoiding direct sunlight that could create harsh glare or heat pockets. Install larger mirrors on sturdy garden walls or fences, ensuring proper mounting for safety.
Layer lighting at different heights, combining ground-level solar lights with elevated lanterns and overhead string lights. Create paths of light that guide the eye through the garden while illuminating key features. Weather-proof all electrical connections and choose solar options when possible for easy maintenance.
When designing with mirrors and light, consider seasonal changes and sun patterns throughout the year. Select mirrors with beveled edges for safety, and position them away from bird flight paths.
For balcony gardens, use lightweight acrylic mirrors and battery-operated lights. Small spaces benefit from corner mirrors that create the illusion of depth, while vertical gardens can incorporate mirror strips between plantings to maximize the effect.
Regular cleaning of mirrors and light fixtures ensures optimal reflection and illumination year-round.
Choose Space-Saving Plant Varieties

Transform your petite backyard into a lush paradise by selecting space-saving plant varieties that maximize every inch of growing space. Climbing vines like jasmine and clematis reach skyward along trellises, while compact dwarf fruit trees and columnar plants create vertical interest without overwhelming the area. Herbs like upright rosemary and cascading thyme spill from wall-mounted planters, adding both beauty and functionality to your garden sanctuary.
The careful selection of space-efficient plants creates an intimate atmosphere where every plant serves multiple purposes. Dwarf varieties of traditionally large plants, such as compact hydrangeas and miniature roses, provide abundant blooms without dominating the space. Japanese maples in slim containers offer dramatic foliage, while espaliered fruit trees flatten against walls to produce harvests without consuming precious ground space.
Key Elements:
- Vertical growing structures (trellises, wall planters, hanging baskets)
- Dwarf plant varieties
- Columnar trees and shrubs
- Multi-tiered container systems
- Climbing vines
- Space-saving herbs
- Espaliered fruit trees
- Compact flowering perennials
Begin implementation by mapping your available vertical spaces, including walls, fences, and potential areas for hanging containers. Install sturdy support systems for climbing plants and wall-mounted planters, ensuring proper anchoring and weight distribution.
Group plants according to their growing needs, placing sun-loving varieties in appropriate locations and creating layered heights with taller plants at the back and compact varieties in front. When selecting plants, focus on varieties bred specifically for small spaces, such as patio tomatoes or dwarf berry bushes. Consider the mature size of each plant and plan accordingly, allowing proper spacing for growth while maintaining accessibility for maintenance.
Regular pruning and training of climbing plants will help maintain their compact form and prevent overcrowding. Extra Tips: Incorporate plants with multiple seasons of interest to maintain visual appeal throughout the year. For extremely limited spaces, consider using fold-down or movable planters that can be adjusted based on seasonal needs.
Container gardens can be rearranged as needed, and self-watering systems can help maintain consistent moisture levels in vertical plantings. When dealing with varying balcony sizes, focus on lightweight containers and ensure all structures comply with weight restrictions and building regulations.
Install a Living Wall Feature
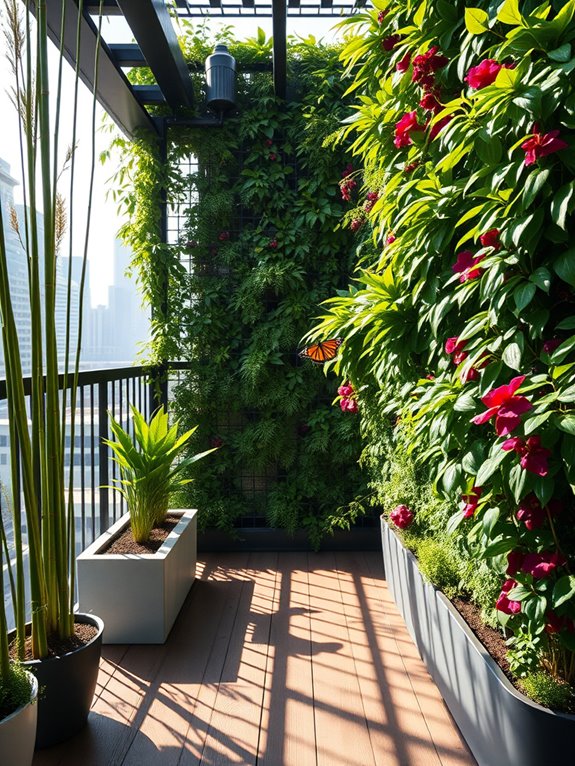
Transform your compact backyard into a lush vertical oasis with a living wall feature that maximizes space while creating a stunning visual focal point. Imagine cascading ferns, vibrant pothos, and delicate air plants arranged in a tapestry of greens, creating depth and dimension where flat walls once stood.
The vertical garden brings nature to eye level, with trailing vines and compact flowering plants like begonias and peace lilies adding splashes of color throughout the seasons. This innovative gardening approach turns unused vertical space into a dynamic ecosystem that attracts butterflies and creates a sense of enclosed tranquility.
The living wall can incorporate various textures and shapes, from the rounded leaves of peperomia to the striking architectural forms of bromeliads. When properly lit, the wall creates enchanting shadows and movement, transforming your small backyard into an immersive green sanctuary.
Essential Elements:
- Vertical garden mounting system or frame
- Irrigation system with timer
- Growing medium or soil pockets
- Selection of shade-tolerant plants
- LED grow lights (for low-light areas)
- Drainage collection system
- Moisture-resistant backing
- Plant anchoring materials
- Fertilizer delivery system
- Maintenance tools
Installation begins with securing a sturdy mounting system to your wall, ensuring proper waterproofing and weight distribution. Layer the growing medium within individual pockets or modules, installing the irrigation system as you build upward.
Plant selection should follow a strategic pattern, placing larger specimens at the bottom and lighter, trailing varieties toward the top. Position plants with similar water needs together to maintain efficient irrigation zones, and establish a regular feeding schedule through the irrigation system.
Extra Tips: Consider your wall’s weight-bearing capacity and ensure proper drainage to protect your home’s structure. For smaller spaces, create modular sections that can be easily maintained or modified.
Incorporate seasonal plants in accessible spots for simple replacement, and install a maintenance platform or secure ladder system for easy access to higher areas. In particularly sunny locations, choose heat-tolerant species and consider installing shade cloth during peak summer months. For balcony adaptations, use lightweight materials and consider a self-contained system that can be moved if needed.
Maximize Corner Spaces With Built-In Planters
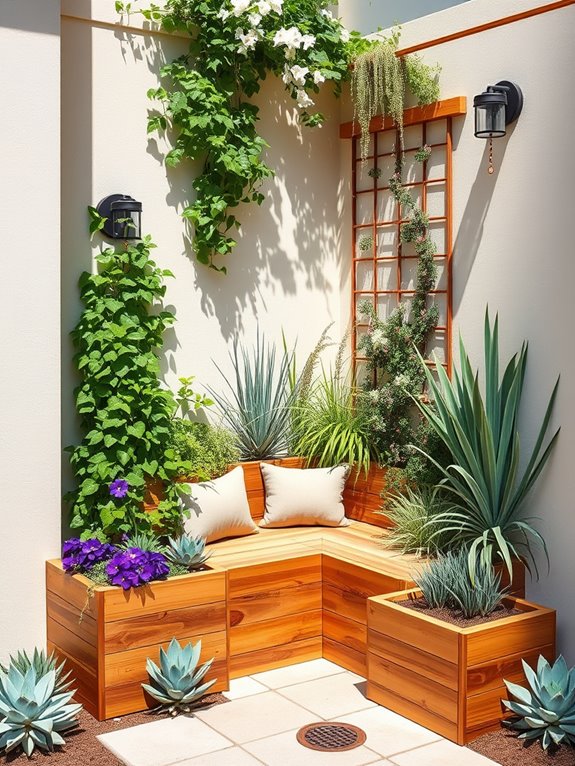
Transform those forgotten corner spaces into lush, layered sanctuaries with built-in planters that seem to grow naturally from the ground up. Corner planters create a seamless transition between walls and garden space, utilizing triangular or L-shaped areas that might otherwise remain bare.
Cascading plants like trailing ivy, creeping phlox, and vibrant petunias spill over wooden or stone planter edges, while taller specimens like ornamental grasses and climbing jasmine add vertical interest against the walls.
The multi-level design of corner planters creates an intimate garden nook that draws the eye upward while maximizing growing space in minimal square footage. Strategic placement of drought-resistant succulents alongside flowering perennials ensures year-round visual interest, while built-in seating incorporated into the planter design transforms the corner into a cozy retreat. Solar-powered accent lights nestled among the foliage extend enjoyment into evening hours.
Key Elements:
- Weather-resistant planter materials (cedar, stone, or composite)
- Proper drainage system
- Multi-level planting tiers
- Mix of trailing and upright plants
- Integrated seating (optional)
- Garden lighting
- Trellis or wall supports for climbers
- Quality potting soil
- Drip irrigation system
Construction begins with measuring the corner space and creating a design that maximizes vertical growing area while maintaining proportion with the yard size. Install a proper drainage system first, then build the planter structure using weather-resistant materials.
Create multiple planting levels, stepping back from the corner, with each tier approximately 8-12 inches in height. Ensure the soil depth accommodates your chosen plants’ root systems, typically 12-18 inches for most perennials.
For successful long-term growth, install an efficient drip irrigation system before adding soil and plants. Position taller plants against the walls, medium-height plants in the middle tier, and trailing varieties along the edges. Group plants with similar water and sunlight needs together, and incorporate slow-release fertilizer into the soil during planting.
Consider your corner’s specific light conditions when selecting plants – north-facing corners suit shade-loving species like hostas and ferns, while south-facing corners accommodate sun-loving Mediterranean herbs and flowering perennials.
For smaller spaces, choose compact varieties and limit the planter depth to 18-24 inches. In larger areas, incorporate deeper tiers and more dramatic architectural plants. Always ensure your design includes access points for maintenance and that the overall height complements rather than overwhelms your outdoor space.
Add Strategic Pathways and Focal Points
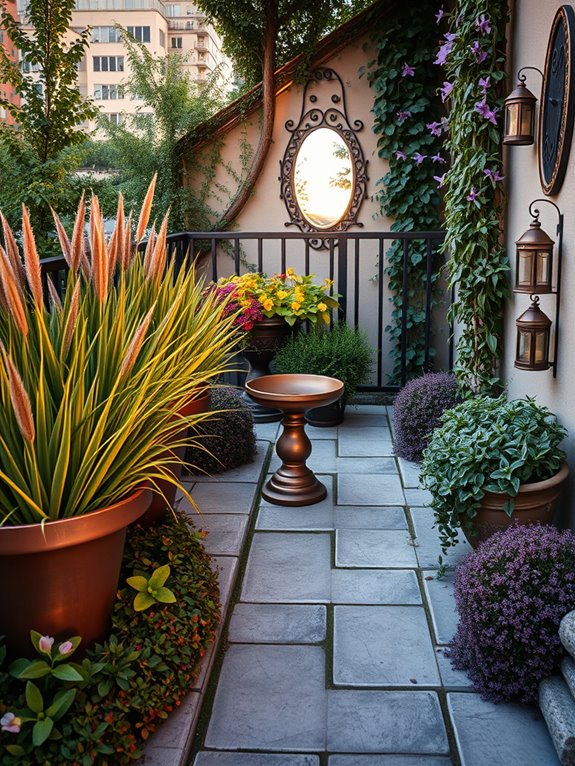
Strategic pathways and focal points transform a small backyard into an engaging journey of discovery. Winding stepping stones lead through clusters of ornamental grasses and compact flowering shrubs, while carefully positioned art pieces, water features, or architectural plants draw the eye through the space. The interplay of textures and heights creates depth, with Japanese Forest Grass softening pathway edges and upright Purple Fountain Grass providing vertical interest alongside weathered stone lanterns or metal sculptures.
The pathways create natural movement through garden rooms, each revealing its own surprise. A copper bird bath might anchor one corner, surrounded by bright Coral Bells and creeping Thyme, while a vintage garden gate covered in climbing Clematis marks another destination. These focal points work together to make the space feel larger and more dynamic, encouraging exploration while maintaining a sense of peace and purpose.
Key Elements:
- Stepping stones or pavers
- Focal point pieces (sculptures, fountains, or architectural plants)
- Path-edging plants
- Ornamental grasses
- Climbing vines
- Garden art or structures
- Accent lighting
- Varied textures and heights
- Ground covers
- Natural materials (stone, wood, metal)
Begin implementation by mapping your primary pathway, ensuring it curves gently rather than running straight. Position focal points at path bends or endpoints, using the rule of thirds to create visual balance.
Layer plants around these features, starting with larger specimens at focal points and transitioning to shorter varieties along path edges. Install pathway materials first, then add larger structural elements, followed by plants and finally lighting to highlight key features.
Additional Tips: Scale is crucial in small spaces – choose slim vertical elements rather than wide spreading features. For tiny yards or balconies, use container gardens to create mini focal points and portable pathways made from decorative tiles or removable stepping stones.
Consider incorporating mirrors strategically to double the visual impact of focal points and create the illusion of multiple pathways. Weather-resistant materials are essential for long-term durability, and proper spacing between pavers will allow for plant growth while maintaining safe footing.