
6 Garden Ideas for a Low-Budget Makeover
Did you know that transforming your garden doesn’t require expensive landscaping or premium materials? You’ll be amazed at how everyday items like wooden pallets, recycled containers, and budget-friendly plants can create a stunning outdoor space. Whether you’re working with a tiny balcony or a sprawling backyard, these six creative approaches will help you design an inviting garden that reflects your style without emptying your wallet. Let’s explore how to turn your outdoor dreams into reality.
Contents
Create DIY Planters From Recycled Materials
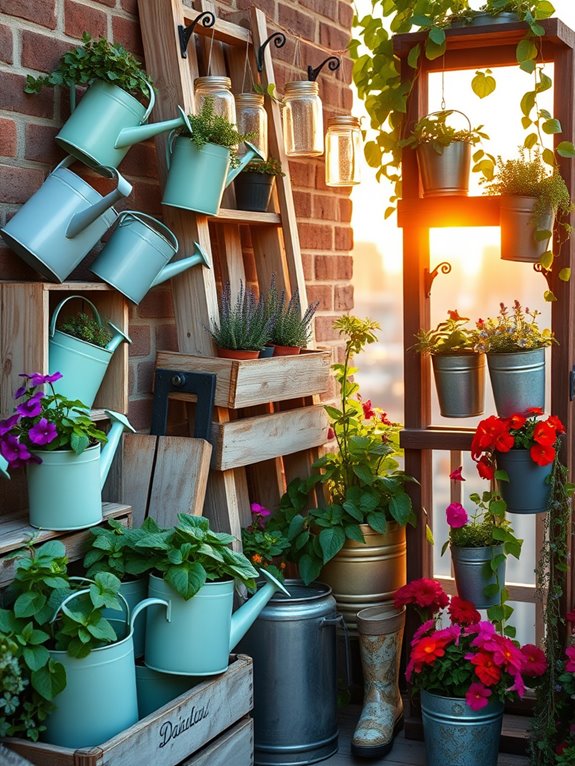
Imagine a charming garden space where vibrant flowers bloom from vintage wooden crates, old teapots spill over with cascading succulents, and former rain boots burst with colorful petunias. These DIY planters, crafted from recycled materials, create an eclectic and personal atmosphere that tells a story through each unique container.
Trailing vines emerge from repurposed metal watering cans, while painted tin cans house aromatic herbs, transforming everyday objects into conversation pieces.
The garden takes on a whimsical quality as ordinary items find new life as plant homes. Mason jars suspended from wooden pallets create vertical herb gardens, while old wheelbarrows overflow with bright marigolds and zinnias.
Weather-worn wooden ladders become tiered displays for potted plants, and bicycle baskets mounted on fences cradle trailing lobelia and sweet alyssum, adding depth and interest at every level.
Key Elements:
- Wooden crates or pallets
- Old teapots, boots, or watering cans
- Mason jars and tin cans
- Vintage ladders or shelving
- Bicycle baskets or metal containers
- Rope or wire for hanging
- Drainage materials (gravel, broken pottery)
- Potting soil
- Assorted plants suitable for container growing
- Weather-resistant paint or sealant
To implement this garden style, begin by collecting and preparing your containers. Ensure all vessels have adequate drainage holes and are cleaned thoroughly.
Apply weather-resistant sealant to wooden items and rust-resistant paint to metal containers. Position larger items like pallets and ladders first, creating the garden’s framework. Layer containers at various heights, ensuring each plant receives appropriate sunlight.
Consider weight distribution when hanging containers, using sturdy mounting hardware. When designing your recycled container garden, consider microclimates created by surrounding structures and adjust plant placement accordingly.
For smaller spaces, focus on vertical arrangements and wall-mounted options. Ensure easy access to all plants for watering and maintenance. Choose drought-tolerant plants for hard-to-reach containers and group plants with similar water needs together.
For balcony gardens, use lightweight containers and secure all elements against wind, selecting compact varieties that won’t overwhelm the space.
Design a Vertical Garden Using Pallets
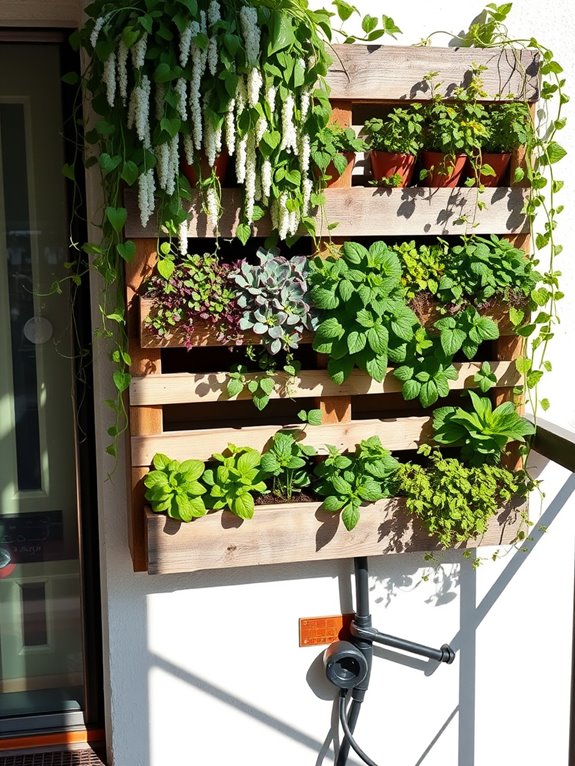
Transform a simple wooden pallet into a stunning living wall that cascades with vibrant greenery and delicate blooms. Picture lush ferns nestled between weathered wooden slats, trailing vines spilling over the edges, and compact herbs creating a tapestry of textures.
This vertical masterpiece maximizes limited space while adding an artistic, industrial-chic element to any outdoor area, from tiny balconies to spacious patios. The vertical pallet garden creates an enchanting focal point that draws the eye upward, making even the smallest spaces feel larger and more dynamic.
Imagine strawberry plants peeking out between succulents, while aromatic herbs like thyme and oregano release their fragrance with every gentle breeze. The natural aging of the wood combined with the organic growth patterns creates a perfect balance between structured design and wild garden charm.
Key Elements:
- Wooden pallet (heat-treated)
- Landscape fabric
- Potting soil
- Small plants (herbs, succulents, trailing plants)
- Staple gun and staples
- Wood sealant
- Mounting brackets
- Drainage tray
- Irrigation system or watering can
- Hand tools
Begin by thoroughly cleaning and sanding the pallet, then applying wood sealant to protect against moisture. Line the back and sides with landscape fabric, creating individual pockets between the slats for planting.
When selecting plants, arrange them by water needs, placing drought-resistant varieties at the top and moisture-loving plants at the bottom. Secure the pallet to a sturdy wall using proper mounting brackets, ensuring it can support the weight of soil and mature plants.
Install a simple irrigation system or plan for regular hand-watering to maintain consistent moisture levels.
Pro Tips: Consider your pallet garden’s exposure to sun and wind when selecting plants. For smaller balconies, use half-pallets or create modular sections that can be rearranged.
Install a drip tray beneath the pallet to catch excess water, and incorporate slow-release fertilizers into the soil at planting time. In colder climates, choose cold-hardy perennials or plan to replant seasonally.
Remember that newly planted specimens need more frequent watering until established, typically 4-6 weeks after planting.
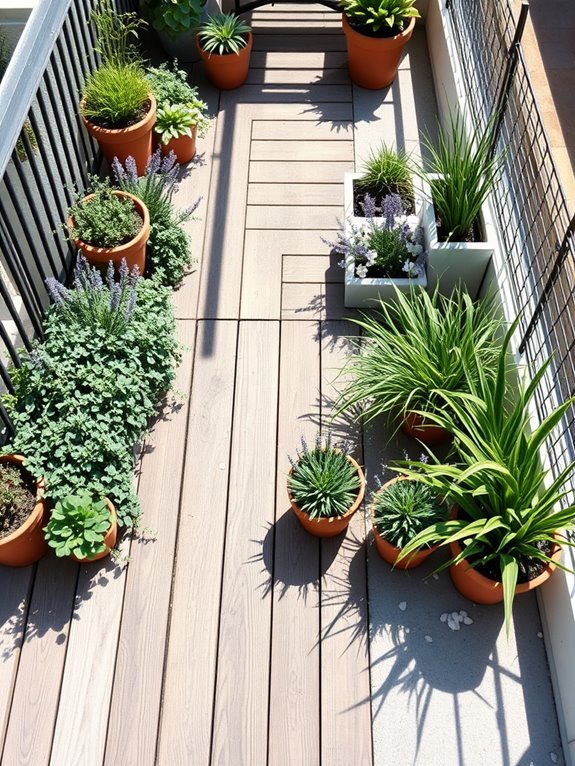
Add Color With Budget-Friendly Plants
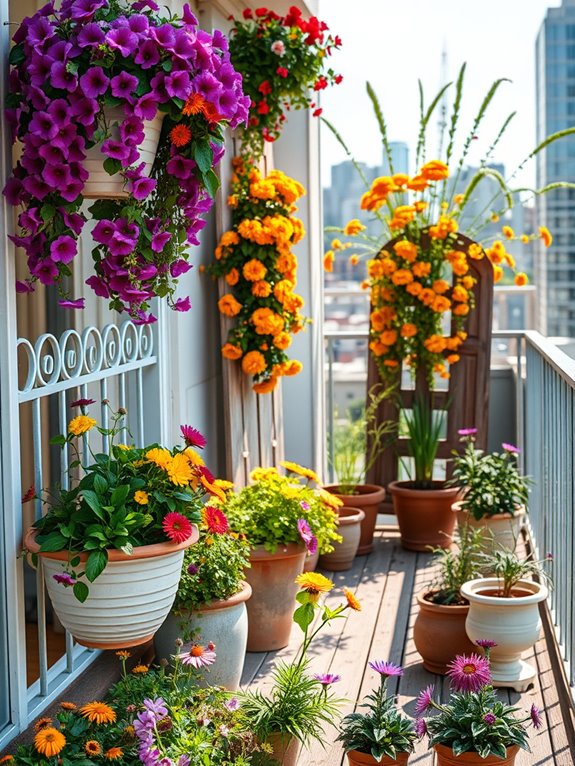
Vibrant splashes of color transform any garden space into a cheerful oasis without breaking the bank. Clusters of marigolds burst with sunny yellows and oranges, while hardy zinnias add pops of pink, red, and purple throughout the landscape. Petunias cascade from hanging baskets and window boxes, creating waves of color that catch the eye and invite closer inspection.
These budget-friendly bloomers provide continuous color from spring through fall, ensuring your garden remains a dynamic display of nature’s palette. Native wildflowers like black-eyed susans and coneflowers add both visual interest and ecological value, attracting butterflies and bees while requiring minimal maintenance.
Drought-resistant lantana spreads its multicolored blooms across garden beds, while fast-growing cosmos sway gracefully in the breeze. These affordable plants create a cottage garden feel that looks naturally abundant rather than carefully curated, allowing you to achieve maximum impact with minimal investment.
Key Elements:
- Annual flowers (marigolds, zinnias, petunias)
- Native wildflowers
- Container plants
- Hanging baskets
- Window boxes
- Mulch
- Basic gardening tools
- Watering can or hose
- Plant fertilizer
- Seeds or seedlings
Begin by preparing your garden space with well-draining soil and organic matter. Group plants according to their water and sunlight needs, placing taller varieties toward the back of beds and shorter ones in front.
Start with small plants or seeds, spacing them according to mature size recommendations, and use mulch to retain moisture and prevent weed growth. Incorporate containers at varying heights to create visual interest and maximize growing space.
For ongoing maintenance, establish a regular watering schedule, deadhead spent blooms to encourage continued flowering, and fertilize monthly during the growing season. Consider succession planting of quick-growing annuals to ensure continuous color throughout the season.
Many budget-friendly plants readily self-seed, allowing you to expand your garden naturally over time. When adapting this garden style to different spaces, focus on vertical elements for small areas by using wall-mounted planters, trellises, or tiered containers.
For balconies, choose compact varieties and trailing plants that create impact without overwhelming the space. Mix in foliage plants like coleus or sweet potato vine for color when flowers are between blooms, and incorporate fast-growing climbers to create privacy screens that double as living art.
Transform Your Space With Mulch and Ground Cover
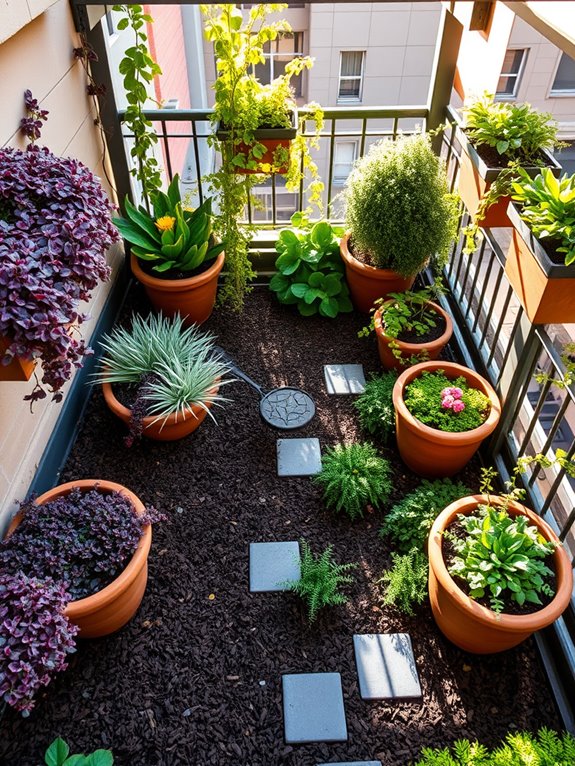
A well-mulched garden adorned with strategic ground cover creates a polished, low-maintenance landscape that draws the eye across flowing swaths of texture and color. Rich burgundy pine bark mulch contrasts beautifully with emerald creeping thyme and silvery lamb’s ear, while patches of hardy sedum add bursts of yellow and pink blooms throughout the seasons. The layered effect creates natural transitions between garden spaces, eliminating harsh borders and creating a seamless, professional appearance.
The combination of mulch and ground cover plants transforms ordinary spaces into peaceful retreats where maintenance needs are minimal, and visual interest is maximum. Purple ajuga spreads beneath taller perennials, while golden creeping jenny cascades over retaining walls. The varied textures and heights create movement and interest, while the mulch provides a clean, uniform backdrop that makes every plant stand out.
Key Elements:
- 2-3 inches of organic mulch (pine bark, cedar, or hardwood)
- Low-growing ground covers (thyme, sedum, ajuga)
- Stepping stones or pavers
- Landscape fabric (optional)
- Border edging
- Drought-resistant spreading plants
- Mulch rake and garden tools
Begin implementation by clearing the intended area of weeds and debris, then laying landscape fabric if desired. Install border edging to contain the mulch, and arrange stepping stones or pavers as needed for access.
Plant ground covers in groups, spacing them according to their mature spread. Apply a 2-3 inch layer of mulch between plantings, keeping it slightly away from plant stems and tree trunks. Water thoroughly to help settle the mulch and give plants a strong start.
Design adaptations can accommodate any space size or configuration. For small areas, choose miniature varieties of ground covers and use finer-textured mulch to maintain proper scale. In larger spaces, create islands of ground cover within mulched areas, or alternate wide swaths of different ground covers for dramatic effect.
Consider your local climate when selecting plants, and remember that some ground covers can be aggressive spreaders requiring containment. For balcony gardens, use containers filled with cascading ground covers positioned at different heights, with mulch as top dressing to retain moisture and create a unified look.
Install Solar Lighting for Ambiance
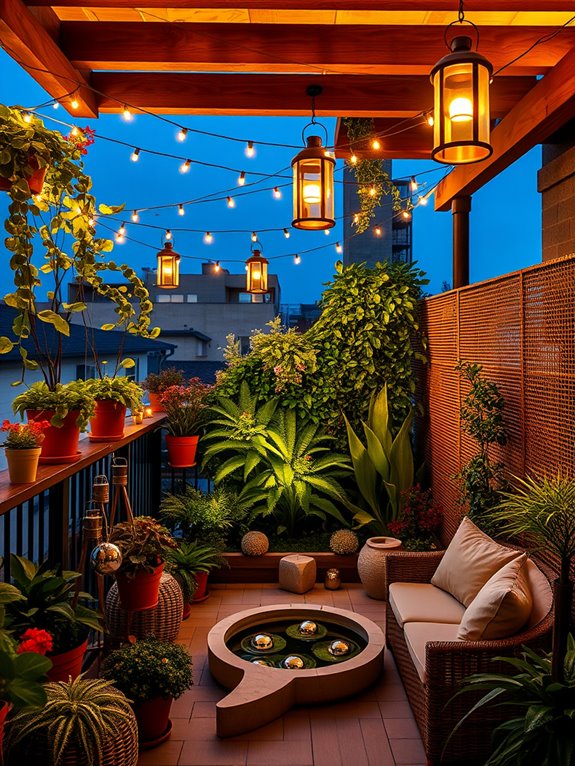
Transform your garden into a magical evening retreat with strategically placed solar lighting that creates a warm, enchanting atmosphere. Soft glows illuminate winding pathways while delicate string lights dance overhead between trees and fence posts, casting gentle shadows that make the space feel larger and more mysterious after sunset. The ambient lighting brings out the silver-toned foliage of plants like lamb’s ear and artemisia, while highlighting the architectural features of ornamental grasses and flowering shrubs.
The combination of different solar lighting styles – from stake lights marking garden borders to floating orbs in water features – creates layers of illumination that draw the eye through the landscape. During daylight hours, decorative solar fixtures add visual interest as garden art, while solar-powered hanging lanterns become focal points when suspended from shepherd’s hooks or tree branches. This lighting scheme transforms your garden into an enchanting nighttime destination perfect for evening entertainment or peaceful relaxation.
Key Elements:
- Solar string lights
- Path lights/stakes
- Hanging solar lanterns
- Floating solar lights
- Shepherd’s hooks
- Light-reflecting plants
- Solar spotlight fixtures
- Timer controls
- Light-colored hardscaping materials
- Reflective garden ornaments
Begin installation by mapping out your garden’s key features and pathways that need illumination. Place taller solar lights at garden entrance points and major intersections, then use shorter path lights to guide movement through the space.
String lights should be secured to sturdy supports at varying heights, creating a canopy effect. Ensure solar panels receive adequate sunlight during the day by positioning them away from dense shade. Clean panels regularly and replace rechargeable batteries annually for optimal performance.
Extra Considerations: For small spaces and balconies, focus on vertical lighting opportunities using wall-mounted solar fixtures and hanging lights. Consider using solar-powered LED strip lighting under railings or along planter edges for space-efficient illumination.
In areas with limited direct sunlight, opt for higher-quality solar fixtures with more efficient panels and longer-lasting batteries. Remember that lighting placement should highlight your garden’s best features while avoiding light pollution that could disturb neighbors or wildlife.
Build Simple Garden Pathways
Simple garden pathways transform an ordinary backyard into an enchanting journey of discovery. Winding trails of natural materials like gravel, mulch, or stepping stones create an organic flow through the landscape, guiding visitors past blooming perennials and aromatic herbs. The paths meander between butterfly bushes and ornamental grasses, offering glimpses of hidden garden features while maintaining a sense of mystery and anticipation.
These budget-friendly pathways serve both practical and aesthetic purposes, defining distinct garden zones while preventing soil compaction and protecting delicate plants. The informal borders of native wildflowers and ground covers soften the path edges, creating a seamless transition between walking spaces and garden beds. During rainfall, these permeable surfaces allow proper drainage while providing stable footing for garden maintenance and enjoyment.
Key Elements:
- Path materials (gravel, mulch, stepping stones, or recycled pavers)
- Edge materials (bricks, stones, or landscape edging)
- Ground cover plants
- Border plants
- Solar path lights
- Landscape fabric
- Garden tools
- Level and measuring tape
Creating simple garden pathways begins with plotting the route using garden hoses or rope to visualize the flow. Clear the chosen path area, remove existing vegetation, and level the ground.
Layer landscape fabric to prevent weed growth, then add your chosen path material to a depth of 2-3 inches for gravel or mulch, or place stepping stones at comfortable walking intervals. Install edging materials to contain loose materials and define path boundaries.
When designing garden pathways, consider the walking experience by maintaining a minimum width of 30 inches for comfortable passage. Path materials should complement your home’s architecture and existing garden features.
For small spaces or balcony gardens, create the illusion of a pathway using container plants arranged in a curved line, or install decking strips to define walking areas while maximizing limited space.