
10 Garden Ideas for a Functional Entryway
When your entryway lacks that special something, it’s time to transform it into an inviting garden oasis. You’ll want to blend practical storage solutions with eye-catching design elements that work year-round. Picture weather-resistant deck boxes nestled among vibrant container gardens, while wall-mounted planters and climbing vines maximize your vertical space. By combining these smart features with strategic lighting and comfortable seating, you’ll create a functional entrance that’s both beautiful and practical. Let’s explore how to make this vision come to life.
Contents
- 1 Install Weather-Resistant Storage Solutions
- 2 Design a Multi-Purpose Seating Area
- 3 Create Strategic Lighting Placement
- 4 Incorporate Low-Maintenance Plant Selections
- 5 Build an All-Season Walkway System
- 6 Establish a Welcoming Entry Point
- 7 Add Smart Organization Elements
- 8 Plan for Year-Round Visual Appeal
- 9 Implement Practical Water Management
- 10 Maximize Vertical Space Usage
Install Weather-Resistant Storage Solutions
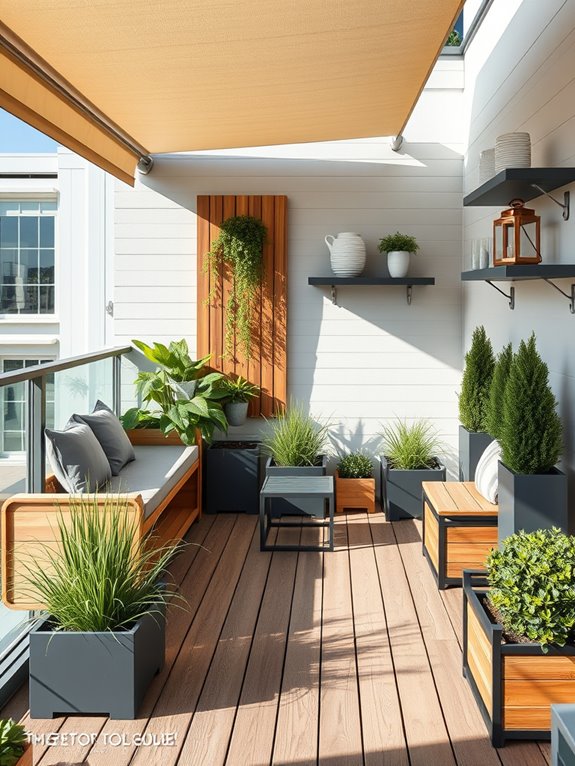
A well-designed entryway storage solution transforms your garden’s functionality while maintaining its aesthetic appeal. Sleek wooden deck boxes nestled among climbing jasmine and evergreen shrubs create a seamless blend of practicality and beauty. Weather-resistant cabinets in soft sage or natural cedar tones complement the surrounding greenery, while providing essential protection for gardening tools, outdoor cushions, and seasonal decorations.
The storage area becomes a design feature itself, with wall-mounted units adorned with trailing plants like ivy or pothos, creating a living wall effect. Strategically placed benches with hidden storage compartments offer both seating and space-saving solutions, while decorative ceramic pots and vintage metal containers serve dual purposes as both storage and visual elements.
Key Elements:
- Weather-resistant deck boxes
- Wall-mounted storage cabinets
- Multi-functional bench seating
- Decorative waterproof containers
- Overhead shelter or awning
- Moisture-resistant shelving
- Storage-integrated planters
- Lidded wicker baskets
- Tool hooks and hangers
- Weatherproof locks and hinges
Position larger storage units against walls or fences, ensuring they’re elevated slightly off the ground to prevent water damage. Install wall-mounted units at varying heights to create visual interest and maximize vertical space. Incorporate proper drainage around ground-level storage, and apply weather-resistant sealants to wooden elements annually.
Group similar items together in designated zones, using clear labeling systems for easy access. When designing your storage solution, consider seasonal accessibility and the natural flow of foot traffic. Create a combination of closed and open storage options, allowing frequently used items to remain within easy reach while protecting sensitive equipment from the elements.
For smaller entryways, focus on vertical storage solutions and multi-purpose furniture pieces that maximize limited space. Consider incorporating retractable or folding elements that can be adjusted based on seasonal needs and available space.
Design a Multi-Purpose Seating Area
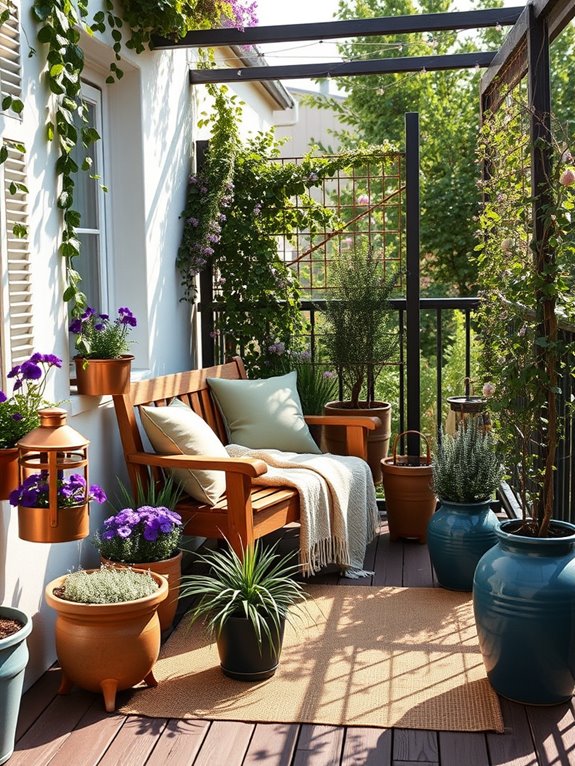
A welcoming multi-purpose seating area transforms your entryway garden into an inviting outdoor living room, where climbing roses and fragrant jasmine create natural walls around comfortable benches or chairs. Lush container gardens featuring colorful annuals like petunias and verbena add splashes of color, while ornamental grasses provide gentle movement and sound.
The arrangement combines both beauty and functionality, offering a perfect spot to greet guests or enjoy quiet moments outdoors. Strategic lighting enhances the space as dusk falls, with solar-powered path lights illuminating the walkway and delicate string lights draped overhead creating a magical atmosphere.
A small water feature provides gentle background sounds, while weatherproof cushions and throws add comfort and style to the seating. Potted herbs placed near the seating area offer both fragrance and practicality, making the space engaging for all senses.
Key Elements:
- Weather-resistant seating (bench, chairs, or built-in options)
- Container plants in various heights
- Climbing plants and support structures
- Outdoor lighting solutions
- Weather-resistant cushions and throws
- Small water feature
- Decorative containers
- Stepping stones or pavers
- Low-maintenance plants
- Storage solutions for cushions
Creating this versatile space begins with establishing a solid foundation using pavers or decking material to define the seating area. Position the main seating piece against a wall or fence, then layer the space with containers of varying heights, placing larger plants behind seating and smaller ones in front.
Install support structures for climbing plants early in the process, allowing them to grow and create natural privacy screens over time. The key to maintaining this garden space lies in selecting the right combination of plants that thrive in your specific light conditions and climate zone.
Choose low-maintenance, drought-resistant varieties for containers, and implement a simple irrigation system to ensure consistent watering. Regular pruning of climbing plants and seasonal rotation of container plants keeps the space looking fresh and managed.
When adapting this design for different spaces, consider vertical gardening solutions for smaller areas, such as wall-mounted planters or tiered container systems. For tight spaces, opt for fold-away seating or built-in benches that maximize space efficiency.
In larger areas, create distinct zones within the seating area using plant groupings or multiple seating arrangements. Weather protection can be added through retractable awnings or large umbrellas, making the space usable in various conditions while maintaining its welcoming atmosphere.
Create Strategic Lighting Placement
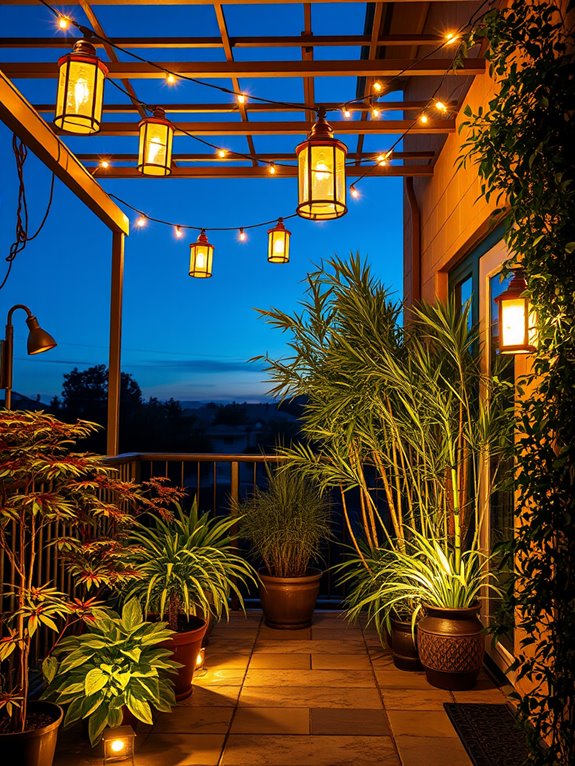
Strategic lighting transforms an entryway garden from a simple passage into a magical nighttime destination. Soft, warm lights nestled among flowing ornamental grasses create dancing shadows, while uplighting on architectural plants like Japanese maples or tall bamboo produces dramatic silhouettes against walls or fences.
Solar-powered path lights guide visitors along stone walkways, complemented by the gentle glow of copper lanterns hanging from shepherd’s hooks among flowering perennials like lavender and salvia.
The layered lighting approach creates depth and dimension, turning the garden into an enchanting evening retreat. Low-voltage spotlights illuminate water features, creating mesmerizing reflections, while string lights draped through climbing vines or pergolas add a whimsical canopy overhead.
Strategic placement of lighting also highlights textural elements like ornamental bark, stone walls, and architectural features, extending the garden’s usefulness well into the evening hours.
Key Elements:
- Solar-powered path lights
- Low-voltage spotlights
- Copper or brass lanterns
- LED string lights
- Motion-sensor security lights
- Timer controls
- Weather-resistant electrical boxes
- Landscape lighting cables
- Light-reflecting plants (variegated foliage)
- Metallic garden accents
Implementation begins with creating a lighting plan that identifies key focal points and pathways requiring illumination. Install main power sources and underground cables before placing fixtures, ensuring all electrical components are properly weatherproofed.
Position path lights at 4-6 foot intervals along walkways, while uplights should be placed 12-18 inches from plant bases for optimal dramatic effect. Layer lighting by combining ground-level illumination with elevated sources, creating a three-dimensional lighting scheme that provides both safety and ambiance.
When designing illuminated garden spaces, consider seasonal changes and plant growth patterns. Select fixtures that can be adjusted or relocated as plants mature, and use warm white bulbs (2700-3000K) for a more natural appearance.
For smaller entryways, focus on fewer, well-placed fixtures rather than numerous small lights, and utilize wall-mounted sconces or hanging fixtures to maximize space. Consider light pollution and neighboring properties by using directional shields and avoiding overly bright installations.
Incorporate Low-Maintenance Plant Selections
A low-maintenance entryway garden creates an elegant, welcoming atmosphere without demanding constant attention. Evergreen shrubs like boxwood and dwarf holly form the backbone of the design, providing year-round structure and rich green foliage. These are complemented by hardy perennials such as lavender, sedum, and ornamental grasses that sway gracefully in the breeze, offering texture and subtle movement.
The garden’s simplicity becomes its strongest asset, with drought-resistant plants arranged in repeating patterns that create visual harmony. Gravel pathways wind between strategic groupings of hardy succulents and native plants, while weather-resistant containers showcase compact specimens like Japanese forest grass or spreading juniper. Solar-powered path lights illuminate the space at night, requiring no additional maintenance while extending the garden’s enjoyment into evening hours.
Key Elements:
- Evergreen foundation shrubs
- Drought-resistant perennials
- Hardy ornamental grasses
- Weather-resistant containers
- Gravel or stone pathways
- Solar lighting fixtures
- Mulch or rock ground cover
- Automated irrigation system
- All-weather garden art
- Native plant species
Implementation begins with preparing well-draining soil and installing a simple irrigation system with a timer. Group plants according to their water needs, placing drought-resistant varieties together to maximize irrigation efficiency. Create defined planting zones using larger evergreens as anchors, then fill spaces between them with lower-growing perennials and groundcovers that naturally suppress weeds.
Maintain the garden’s easy-care nature by applying a thick layer of mulch or decorative gravel to minimize weed growth and retain moisture. Choose slow-growing varieties that won’t require frequent pruning, and install edging materials to keep grass from encroaching into beds. Consider incorporating self-seeding annuals that naturally replenish themselves each year for periodic bursts of color.
For varying entryway sizes, scale the design accordingly while maintaining the low-maintenance principle. Small spaces might focus on vertical elements with wall-mounted planters and compact varieties, while larger areas can include more extensive groupings and additional hardscape features.
Choose plants rated for your specific climate zone to ensure they thrive with minimal intervention, and consider incorporating smart irrigation technology to further reduce maintenance requirements while conserving water.
Build an All-Season Walkway System
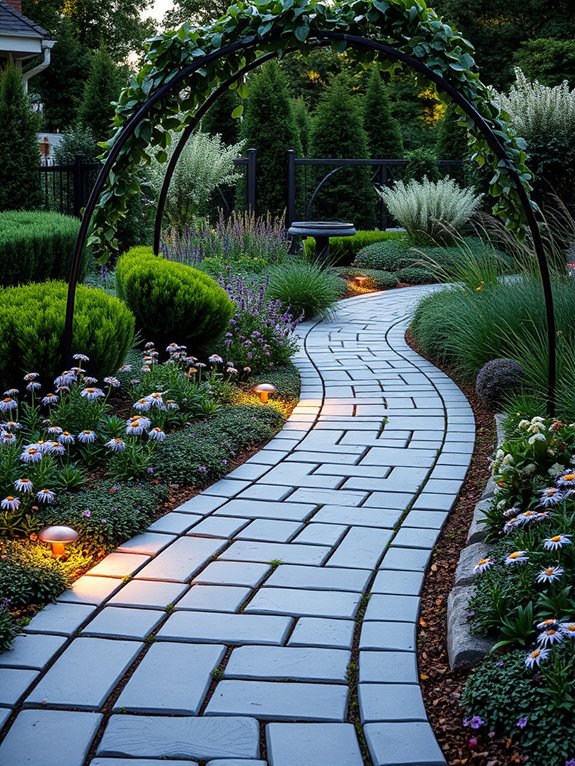
Transform your entryway into a stunning year-round showcase with a thoughtfully designed walkway system that guides visitors through an ever-changing botanical display.
A well-planned path featuring sturdy pavers flanked by seasonal blooms creates an inviting journey from the street to your door. Weather-resistant materials like natural stone or textured concrete integrate seamlessly with carefully chosen border plants, offering visual interest through texture and color variations that evolve with each passing season.
The magic of an all-season walkway lies in its layered design approach, combining permanent structural elements with dynamic plantings. Evergreen shrubs like boxwood or holly provide year-round structure, while perennials such as hellebores, coneflowers, and autumn sedums offer rotating seasonal color.
Incorporate lighting elements that illuminate the path during darker months, and add architectural features like decorative posts or arbors to create vertical interest and support climbing plants.
Key Elements:
- Weather-resistant pavers or natural stone
- LED path lights
- All-season groundcover plants
- Evergreen shrubs
- Seasonal perennials
- Drainage system
- Edging materials
- Mulch or gravel
- Structural elements (arbors, posts)
- Winter-hardy ornamental grasses
Begin implementation by establishing a clear path layout, ensuring proper width for comfortable passage and gentle curves for visual appeal.
Install a solid foundation with proper drainage, laying pavers or stones with adequate spacing for ground cover plants. Create planting zones on both sides of the walkway, positioning taller elements toward the back and shorter plants near the path’s edge. Maintain clear sight lines and ensure plants won’t overgrow the walking space when mature.
Design considerations should include regional climate patterns, maintenance requirements, and safety features. Choose salt-tolerant plants if winter de-icing is necessary, and select materials that provide adequate traction in wet conditions.
For smaller spaces, focus on vertical elements and compact plant varieties that deliver maximum impact without overwhelming the area. Consider incorporating container gardens that can be easily switched out as seasons change, and use mirrors or artistic elements to create the illusion of a larger space while adding personal style to your entryway.
Establish a Welcoming Entry Point
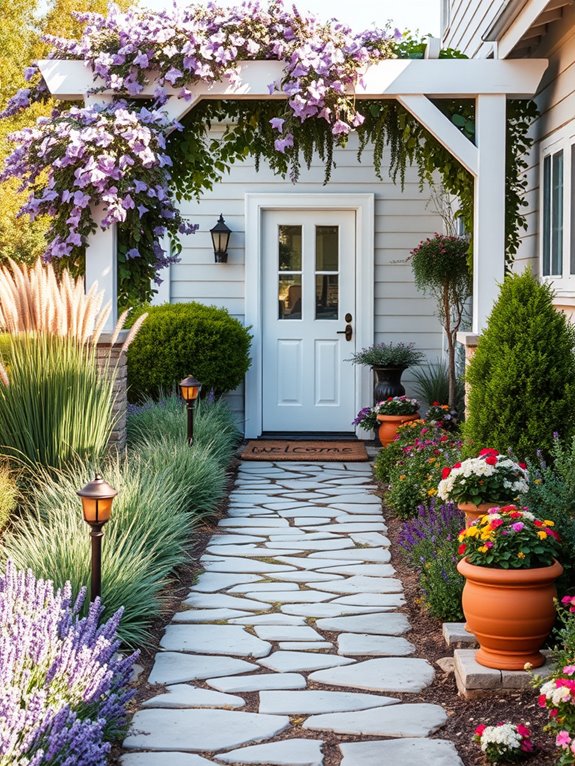
A welcoming garden entry point sets the tone for your entire outdoor space, creating an inviting first impression that draws visitors naturally toward your door. Lush borders of cheerful flowers like lavender and salvia frame the pathway, while ornamental grasses add gentle movement and texture. Classic climbing plants such as clematis or jasmine can adorn an entry arch or trellis, creating a magical portal effect that transitions visitors from the outside world into your personal sanctuary.
The entryway garden combines both structure and softness, utilizing varying heights and depths to create visual interest. A mix of evergreen shrubs provides year-round appeal, while seasonal blooming plants offer changing colors throughout the year. Strategic lighting, whether through solar-powered path lights or elegant wall sconces, extends the welcoming atmosphere into evening hours, highlighting key features and ensuring safe passage.
Key Elements:
- Defined pathway (stone, brick, or gravel)
- Entry arch or trellis
- Climbing vines
- Border plants of varying heights
- Evergreen foundation plants
- Outdoor lighting
- Decorative containers
- Welcome mat or landing stone
- House number display
- Weather-resistant seating (optional)
Implementation begins with establishing a clear path at least 4 feet wide, using materials that complement your home’s architecture.
Position taller plants and structures toward the back of the garden beds, graduating to shorter plants near the path’s edge. Install lighting first, followed by hardscape elements, then add soil amendments before planting. Ensure proper spacing between plants to allow for growth, and consider bloom times to maintain year-round interest.
When selecting plants, choose species suited to your climate zone and the specific light conditions of your entryway. Group plants with similar water needs together, and incorporate automatic irrigation if possible. For maximum impact, repeat key plants or colors throughout the design to create rhythm and cohesion.
Design adaptations can accommodate various space constraints. Small entryways might focus on vertical elements and container gardens, while larger areas can incorporate seating areas or water features.
Consider using dwarf varieties of plants in tight spaces, and opt for multi-functional elements like planter boxes with built-in lighting. For north-facing entrances, emphasize bright colors and reflective elements to maximize light, while south-facing areas might benefit from shade-creating structures and heat-tolerant plants.
Add Smart Organization Elements
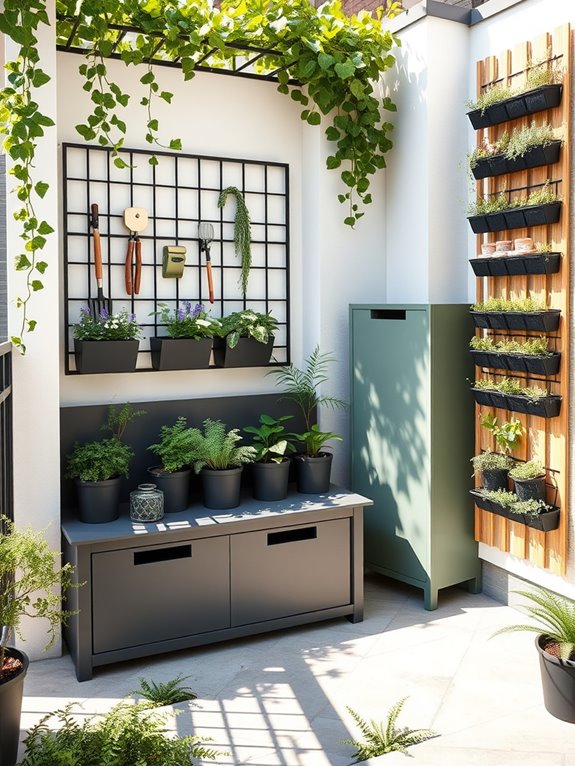
A well-organized entryway garden creates an inviting first impression while serving practical storage and organizational needs. Vertical storage solutions seamlessly blend with climbing jasmine and wall-mounted planters, while sleek modern containers house both greenery and essential outdoor items.
Weather-resistant cabinets and shelving units, painted in sophisticated neutrals or classic garden greens, provide concealed storage while doubling as pedestals for potted herbs and flowering perennials.
The space maintains its garden charm through strategic placement of organizational elements, with trellis systems supporting both storage hooks and flowering vines like clematis or morning glory. Built-in benches featuring hidden storage compartments sit beneath overhanging plants, while designated zones for shoes, gardening tools, and seasonal items keep the entrance clutter-free and visually appealing throughout the year.
Key Elements:
- Weather-resistant storage cabinets
- Wall-mounted planters with integrated hooks
- Multi-functional bench seating with storage
- Vertical trellis systems
- Labeled containers and bins
- Boot and shoe storage solutions
- Tool organizing racks
- Climbing plants and vines
- All-weather storage boxes
- Decorative hooks and hangers
Implementation begins with mapping out zones for different storage needs while ensuring easy access to frequently used items.
Install weather-resistant cabinetry and shelving units first, positioning them to create natural flow and maintaining clear pathways. Add vertical elements like trellises and wall-mounted organizers, ensuring they’re securely anchored and can support both storage items and climbing plants.
Layer in plantings strategically, using them to soften organizational elements while maintaining functionality.
When selecting storage solutions and organizing elements, consider your local climate and protect items accordingly.
For smaller entryways, focus on vertical storage and multi-purpose pieces that maximize space efficiency. Choose weather-resistant materials like powder-coated metal, treated wood, or high-quality resin that can withstand outdoor conditions while maintaining an attractive appearance.
Regularly assess storage needs and adjust seasonal items to keep the space functioning optimally year-round.
Plan for Year-Round Visual Appeal
A year-round entryway garden transforms your home’s welcome with an ever-changing display of natural beauty through every season. Spring brings forth delicate bulbs like snowdrops and crocuses, followed by cheerful daffodils and tulips.
Summer showcases lush evergreen shrubs interspersed with flowering perennials like lavender and salvia, while autumn dazzles with ornamental grasses and late-blooming sedums in rich copper and burgundy tones.
Winter reveals the garden’s structural elements: architectural evergreens like boxwood and holly stand sentinel, while bare branches of deciduous shrubs create striking silhouettes.
Berries from winterberry holly add vibrant red accents, and frost-kissed ornamental grasses catch morning light. Strategic lighting illuminates paths and highlights key plants, ensuring the space remains inviting even on the darkest days.
Essential Elements:
- Evergreen foundation plants
- Mixed flowering bulbs
- Four-season perennials
- Ornamental grasses
- Path lighting
- Weather-resistant containers
- Structural elements (arbor, trellis, or fence)
- Year-round seating or focal point
- Hardy ground cover
- Winter-interest plants
Creating a year-round entryway garden begins with establishing strong foundational elements. Position larger evergreens toward the back, creating layers with medium-sized shrubs and perennials in the middle ground.
Edge the walkway with low-growing plants that maintain interest across seasons. Install lighting early in the design process, ensuring proper placement for both safety and aesthetic appeal.
Maintain the garden’s year-round appeal through regular pruning of evergreens, deadheading spent blooms, and dividing perennials as needed. Schedule bulb planting in fall for spring displays, and incorporate late-blooming plants for autumn interest.
Consider using containers that can be easily switched out seasonally to add fresh color and texture while maintaining the garden’s core structure.
When designing a year-round entry garden, consider your local climate and adjust plant selections accordingly. For smaller spaces, focus on dwarf varieties of evergreens and use vertical elements like climbing vines on trellises.
Container gardens can be particularly effective in limited areas, allowing for seasonal rotations while maintaining permanent structural elements. Ensure proper spacing between plants to accommodate mature sizes and prevent overcrowding as the garden develops.
Implement Practical Water Management
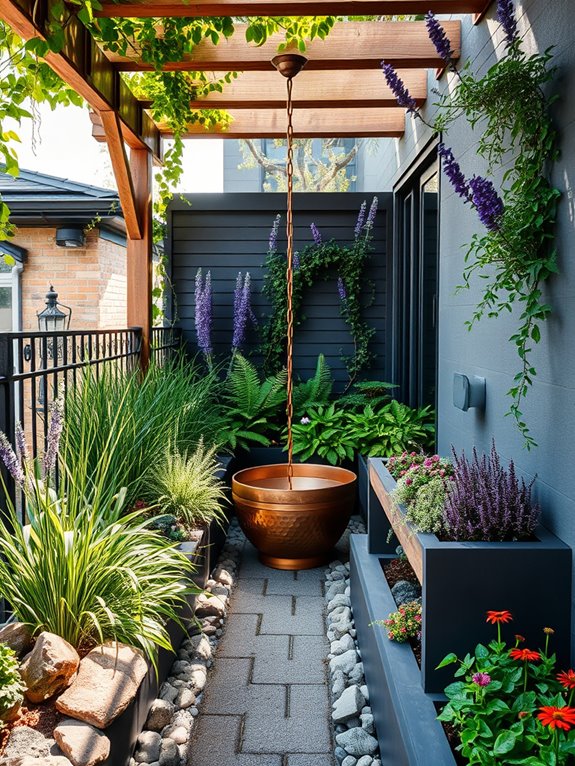
A thoughtfully designed water management system transforms an entryway garden into both a sustainable oasis and a stunning visual display. Rain chains cascade gracefully from the eaves, directing water into decorative copper basins nestled among moisture-loving ferns and astilbe.
Strategic placement of river rocks and permeable pavers creates an elegant path that naturally channels rainfall away from the foundation while appearing as an intentional design element.
Japanese forest grass and native sedges wave gently along the borders, their flowing forms echoing the movement of water through the space. Raised beds filled with drought-tolerant plants like lavender and Russian sage provide striking contrast, while rain gardens populated with black-eyed susans and cardinal flowers create vibrant pockets of color.
The overall effect is one of natural harmony, where every element serves both practical and aesthetic purposes.
Key Elements:
- Rain chains
- Decorative catch basins
- Permeable pavers
- River rocks of varying sizes
- Rain garden depressions
- Moisture-loving perennials
- Drought-resistant plants
- French drain system
- Directional slopes
- Water-storing containers
Implementation begins with grading the space to direct water flow away from structures and into designated collection areas. Install a French drain system beneath permeable pavers, connecting it to rain garden depressions positioned at strategic points throughout the garden.
Layer these depressions with gravel, amended soil, and appropriate plants that can handle both wet and dry conditions. Create raised areas using berms and elevated planters to establish clear boundaries between wet and dry zones.
Position rain chains at downspout locations, ensuring they feed into decorative basins or directly into the rain garden system. Install permeable pavers in a slight gradient, allowing water to seep through while providing stable footing.
For smaller entryway spaces, consider vertical solutions like wall-mounted rain chains and compact rain gardens. Incorporate modular permeable pavers that can be easily adjusted or removed as needed.
In tight spaces, use container gardens with built-in reservoirs to capture rainfall, and consider installing a slim-line water storage system that can be disguised with climbing plants or decorative screens. Remember to check local building codes regarding water management and ensure all drainage solutions direct water away from neighboring properties.
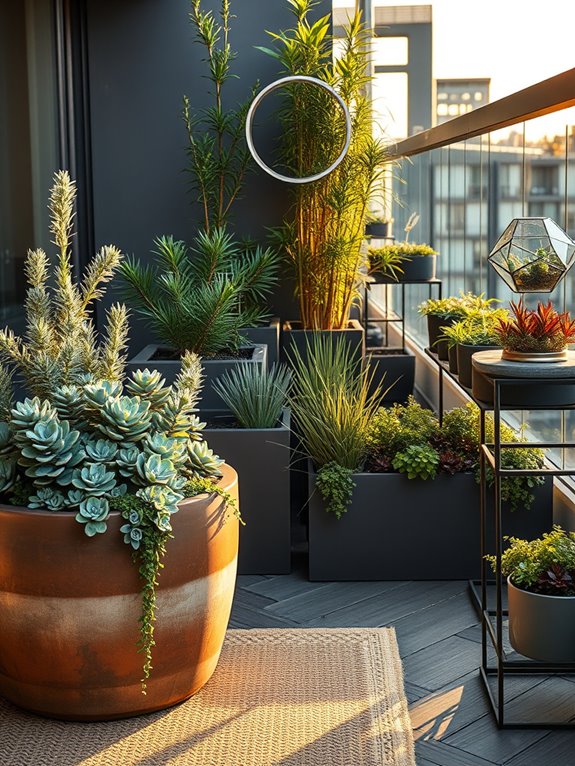
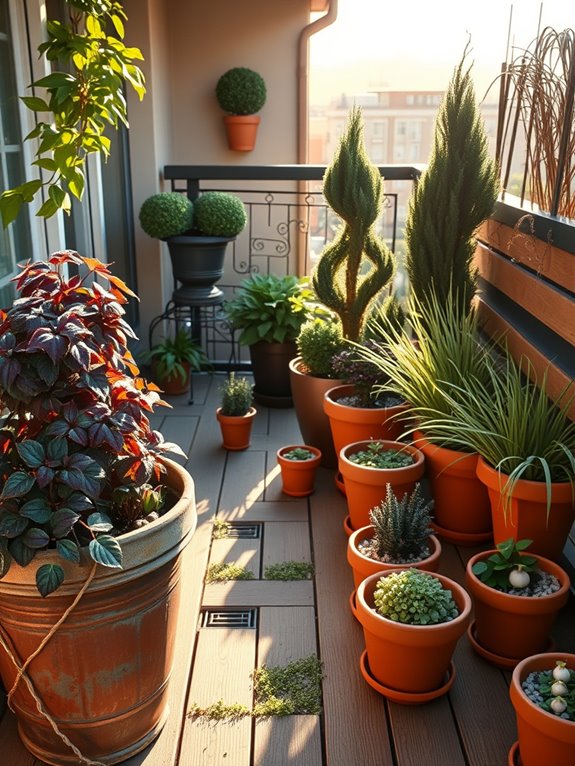
Maximize Vertical Space Usage
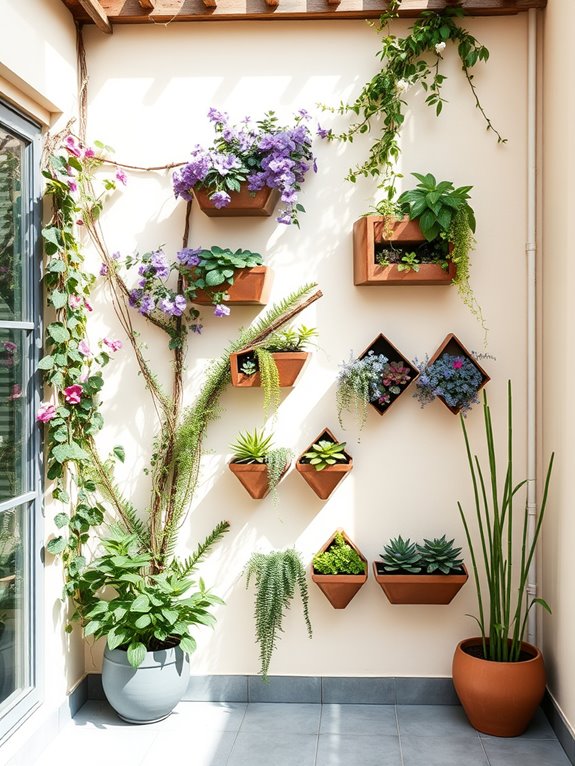
Transform your entryway into a lush vertical oasis by taking advantage of every inch of available height. Climbing vines like jasmine and clematis create enchanting green curtains along trellises, while cascading plants such as trailing petunias and ivy spill gracefully from mounted planters and hanging baskets. Multiple layers of greenery draw the eye upward, creating an impressive natural entrance that makes even the smallest space feel like a secret garden.
Strategically placed wall-mounted planters showcase a vibrant mix of ferns, succulents, and flowering plants, adding depth and dimension to previously unused vertical surfaces. The combination of different heights and textures creates a dynamic visual interest, while carefully selected plant varieties ensure year-round color and appeal. This vertical garden style maximizes limited ground space while creating an impressive botanical display that welcomes visitors with natural beauty.
Key Elements:
- Wall-mounted planters
- Trellises or garden screens
- Hanging baskets
- Climbing plant varieties
- Support structures and brackets
- Drip irrigation system
- Plant hooks and mounting hardware
- Weather-resistant containers
- Mixed foliage plants
- Flowering vines
Begin implementation by assessing your wall space and sun exposure, then install sturdy mounting brackets and supports that can handle the weight of mature plants and wet soil. Create a planting plan that positions sun-loving plants in bright spots and shade-tolerant varieties in darker areas.
Install an automatic drip irrigation system to ensure consistent watering across all levels, as vertical gardens can dry out quickly. Consider maintenance access when positioning plants, ensuring you can reach each container for pruning and care. Group plants with similar water needs together on the same irrigation line, and use lightweight, weather-resistant containers to reduce strain on mounting hardware.
Layer plants strategically, placing taller growing varieties at the bottom and cascading plants at the top for optimal visual impact. When designing your vertical garden, factor in seasonal changes and plan for plant replacement access. For smaller entryways, focus on compact varieties and consider using folding or modular systems that can be adjusted as needed.
Choose plants that match your local climate and available maintenance time, and remember that vertical gardens typically require more frequent watering than traditional gardens due to increased exposure to wind and sun.