
10 Garden Ideas for Year-Round Harvests
You don’t need to limit your gardening passion to just spring and summer anymore. With some smart planning and the right setup, you’ll discover how to harvest fresh vegetables, herbs, and microgreens throughout all four seasons. From building simple cold frames to creating vertical growing systems, there’s a world of possibilities waiting in your backyard or even on your windowsill. Let’s explore ten practical ideas that’ll transform your garden into a year-round food-producing paradise.
Contents
- 1 Plan Your Garden With Succession Planting
- 2 Install Cold Frames and Row Covers
- 3 Create an Indoor Growing Station
- 4 Choose Four-Season Perennial Vegetables
- 5 Build a Simple Greenhouse
- 6 Master Season Extension Techniques
- 7 Design a Vertical Growing System
- 8 Establish a Root Cellar Storage Area
- 9 Incorporate Winter-Hardy Herbs
- 10 Set Up a Microgreens Station
Plan Your Garden With Succession Planting
A succession planted garden is a living, breathing tapestry that evolves through the seasons, offering waves of color and texture as different crops mature and transition. Neat rows of leafy lettuce give way to climbing pea tendrils, while sturdy kale plants stand sentinel alongside fresh carrot tops emerging from recently harvested beds. The garden pulses with life as each carefully timed planting reaches its peak, creating an ever-changing landscape of edible abundance.
The space feels purposeful and dynamic, with trellises ready to support future climbing beans while current crops flourish below. Markers and labels dot the beds, tracking planting dates and succession schedules. The overall effect is one of organized productivity, where every square foot tells the story of past, present, and future harvests through different stages of growth.
Key Elements:
- Garden planning calendar
- Raised beds or defined growing zones
- Plant markers and labels
- Vertical growing supports
- Soil amendment supplies
- Variety of seeds for different seasons
- Row covers or cold frames
- Irrigation system
- Composting area
- Tool storage solution
Creating a successful succession garden requires careful planning and organization. Start by dividing your growing space into distinct zones that can be planted in rotation.
Map out your growing calendar, considering the days to maturity for each crop and local climate patterns. Install permanent structures like trellises and irrigation systems first, then prepare beds with rich, well-amended soil that can support multiple plantings throughout the season.
For maintenance, keep detailed records of planting dates and locations, and prepare new seedlings 2-3 weeks before preceding crops are finished. Maintain soil fertility between plantings by adding compost and organic matter, and use cover crops in periods between main plantings to protect and enrich the soil.
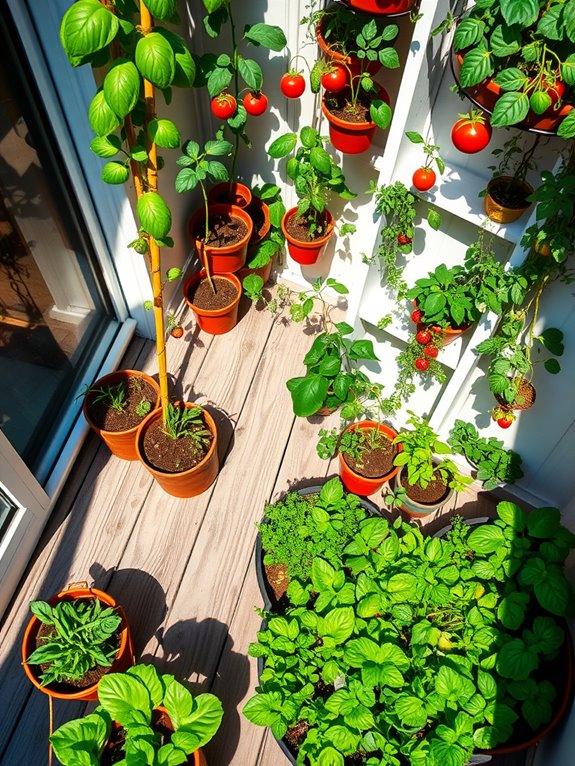
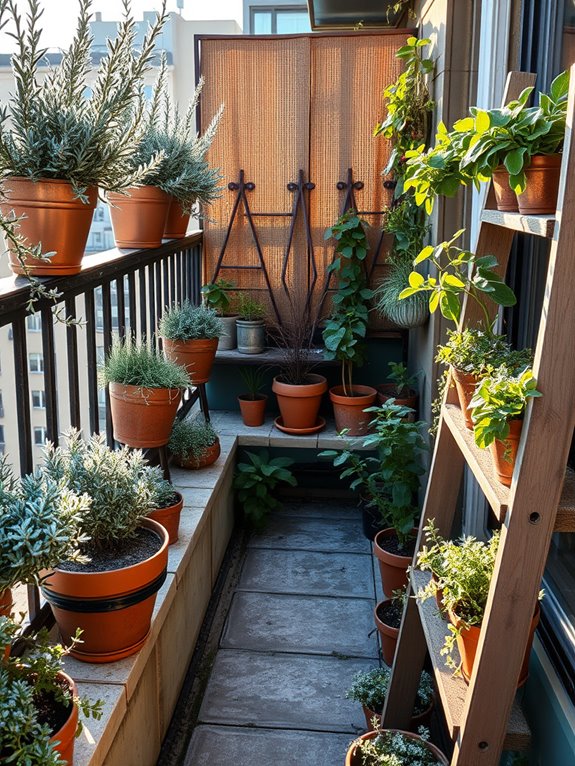
For smaller spaces or balcony gardens, focus on quick-growing crops like leafy greens and herbs that can be harvested continuously. Use vertical space efficiently with hanging planters and wall-mounted systems, and consider self-watering containers to maintain consistent moisture levels.
Multi-tiered growing systems can maximize limited space while maintaining the principles of succession planting on a smaller scale.
Install Cold Frames and Row Covers
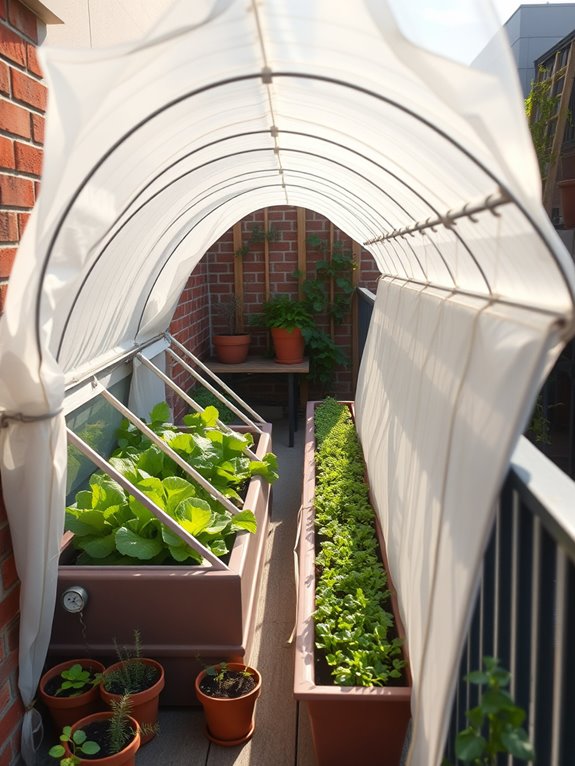
Stepping into a garden equipped with cold frames and row covers feels like discovering nature’s secret workshop. Glass and polycarbonate panels catch the sunlight, creating protected havens where tender greens and early vegetables thrive long past their typical seasons. The geometric shapes of cold frames dot the landscape like miniature greenhouses, their tops hinged skyward to welcome warm spring breezes or snugged down tight against winter’s chill.
Row covers float ethereally above garden beds, their white fabric rippling gently in the breeze like gossamer wings. Beneath these protective layers, neat rows of lettuce, spinach, and Asian greens flourish, while early peas climb delicate trellises and root vegetables push deep into the protected soil. The overall effect is one of organized abundance, where every square foot holds potential for extended harvests.
Essential Elements:
- Cold frames with transparent tops
- Row cover fabric (lightweight and heavyweight options)
- Support hoops or frames for row covers
- Hinges and props for cold frame ventilation
- Thermal mass materials (water jugs, stones)
- Weather-resistant lumber or recycled windows
- Wire stakes or fabric pins
- Temperature monitoring devices
Creating an effective season-extension system begins with strategic placement. Position cold frames against a south-facing wall or fence to maximize heat retention and shelter. Space multiple frames far enough apart to prevent shadowing, typically 3-4 feet.
Install row covers in straight lines along existing beds, securing hoops every 4-6 feet and ensuring fabric edges are thoroughly anchored to prevent wind damage.
For maintenance, establish a daily routine of monitoring temperatures and ventilation needs. During sunny days, even in winter, cold frames may require partial opening to prevent overheating. Row covers should be lifted periodically to check plant health, provide irrigation, and harvest mature crops.
Replace damaged fabric promptly and clean cold frame glass regularly to maintain optimal light transmission.
Adaptability Considerations: Balcony gardeners can utilize mini cold frames or create vertical growing spaces with attached row cover systems. For limited spaces, focus on modular designs that can be easily moved or stored. Consider collapsible row cover frames and stackable cold frames for efficiency.
In urban settings, lightweight materials and clear panels that meet building codes are essential. Remember that even a small protected growing space can significantly extend the growing season and increase yield in any setting.
Create an Indoor Growing Station
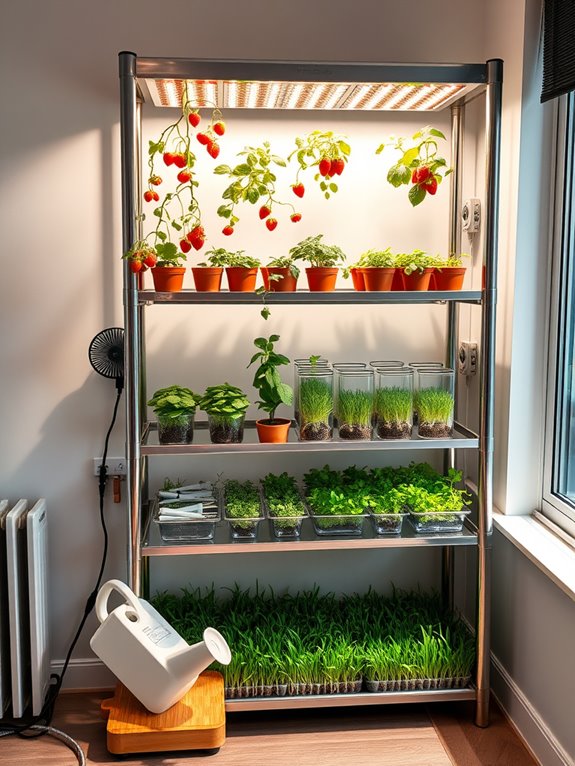
Transform a corner of your home into a lush, productive oasis with an indoor growing station that brings the magic of gardening inside. Sleek metal shelving adorned with LED grow lights creates a modern botanical display, where vibrant herbs like basil, mint, and cilantro thrive alongside compact leafy greens. The gentle hum of small fans circulating air mingles with the fresh, earthy scent of growing plants, making this space both functional and atmospheric.
Cascading tendrils of cherry tomatoes and strawberry plants add visual interest while maximizing vertical space, their fruits providing splashes of color against the organized grid of containers. Clear glass containers filled with propagating plants and sprouting microgreens create an additional layer of visual interest, while small trays of wheatgrass add a carpet of vibrant green beneath the larger specimens.
Essential Elements:
- Multi-tier metal shelving unit
- Full-spectrum LED grow lights
- Small oscillating fans
- Timer systems for lights
- Waterproof trays or mats
- Growing containers of various sizes
- Potting soil and fertilizers
- Basic gardening tools
- Temperature/humidity gauge
- Watering can or spray bottle
- Plant markers or labels
Position your growing station near an electrical outlet but away from heating vents or cold drafts. Assemble the shelving unit and install grow lights approximately 6-12 inches above each shelf, adjusting height as plants grow. Place waterproof trays on each level to catch excess water and protect surfaces. Arrange plants according to their light needs, with sun-loving herbs and vegetables on upper shelves closer to lights, and shade-tolerant plants below.
Monitor temperature and humidity levels daily, maintaining temperatures between 65-75°F and humidity around 50-60%. Group plants with similar water needs together, and establish a regular feeding schedule using appropriate nutrients for each type of plant. Rotate containers periodically to ensure even growth, and prune regularly to maintain desired size and shape.
For smaller spaces, focus on compact varieties and utilize vertical growing techniques like wall-mounted planters or hanging baskets. Consider self-watering containers to reduce maintenance time, and choose plants that thrive in your specific indoor conditions. In apartments with limited natural light, supplement with additional grow lights or concentrate on shade-loving species.
Remember that successful indoor growing stations require consistent monitoring and adjustment of environmental conditions to maintain optimal growth.
Choose Four-Season Perennial Vegetables
A four-season perennial vegetable garden transforms the traditional growing space into a living tapestry that evolves throughout the year. Walking through the garden, you’ll discover robust artichoke plants with their silvery-blue leaves standing sentinel alongside clusters of bright green sorrel and spreading patches of Egyptian walking onions. Asparagus fronds wave like delicate green feathers in the breeze, while hardy herbs like thyme and sage create aromatic borders that buzz with beneficial insects.
The garden takes on different personalities as seasons shift, offering both visual interest and consistent harvests. In spring, rhubarb unfurls its massive leaves while sea kale produces delicate white flowers. Summer brings the architectural beauty of globe artichokes, while autumn showcases the deep purple leaves of perennial kale. Even in winter, the garden maintains structure through strategically placed evergreen herbs and the sculptural dried stems of Jerusalem artichokes.
Key Elements:
- Deep, well-prepared soil beds
- Permanent pathways
- Support structures for climbing plants
- Irrigation system
- Plant markers
- Mulching materials
- Wind protection
- Cold frames or row covers
- Companion flowering plants
- Composting area
The implementation begins with creating dedicated zones based on plant height and spread. Tall perennials like Jerusalem artichokes and globe artichokes should anchor the northern edge to prevent shading shorter plants.
Create wide, accessible paths between beds, using materials like wood chips or gravel to maintain year-round access. Install irrigation systems before planting, ensuring each zone can be watered independently. Group plants with similar water needs together, and incorporate companion flowers to attract pollinators and beneficial insects.
When designing a four-season perennial garden for different spaces, consider vertical growing solutions for small areas. Balcony gardeners can focus on compact perennials like bunching onions and herbs in containers, while utilizing wall space for climbing varieties.
In regions with harsh winters, incorporate more cold-hardy varieties and plan for protective measures like thick mulching or temporary covers. Succession planning is crucial – stagger plantings of different varieties to ensure continuous harvests and maintain soil fertility through regular organic matter additions and crop rotation where possible.
Build a Simple Greenhouse
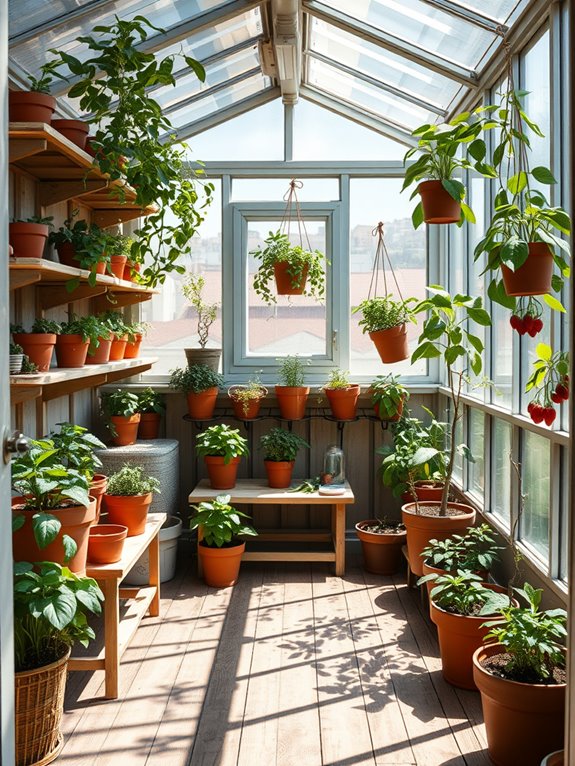
A simple greenhouse transforms any garden into a year-round oasis of productivity and verdant beauty. Polycarbonate or glass panels create a crystalline structure that captures sunlight and warmth, while sheltering delicate plants from harsh weather.
Inside, tomato vines climb toward the ceiling, leafy greens flourish in neat rows, and herbs release their aromatic essence into the humid air, creating a microclimate that feels like stepping into a tropical paradise.
The greenhouse interior evokes a sense of organized abundance, with potted citrus trees nestled between raised beds of vegetables, and hanging baskets dripping with strawberry runners.
Wooden shelving units lined with seed trays and young seedlings showcase the promise of future harvests, while clever vertical growing systems maximize every inch of space. The filtered sunlight creates a peaceful atmosphere perfect for both nurturing plants and finding moments of gardening zen.
Key Elements:
- Greenhouse frame (aluminum or wood)
- Clear panels (polycarbonate or glass)
- Ventilation system
- Irrigation setup
- Growing benches and shelving
- Thermal mass materials
- Ground cover or flooring
- Temperature control mechanisms
- Storage solutions
- Potting station
Begin implementation by selecting a level site with maximum sun exposure and good drainage. Install a solid foundation using concrete blocks or pressure-treated lumber, ensuring the structure will be stable and level.
Assemble the frame according to manufacturer specifications, taking care to properly seal all joints and connections. Install panels systematically, working from bottom to top, and incorporate ventilation points at strategic locations.
Create organized zones within the greenhouse for different growing needs: propagation areas, mature plant sections, and workspace for maintaining your garden.
Final considerations should include adapting your greenhouse design to available space and local climate. For smaller yards, lean-to greenhouses attached to existing structures can provide ample growing space while minimizing footprint.
Consider incorporating automated ventilation systems and shade cloth for temperature regulation in warmer climates, or additional insulation and heating options for colder regions. Remember that proper air circulation is crucial, so plan for adequate spacing between plants and install fans if natural airflow is insufficient.
Master Season Extension Techniques
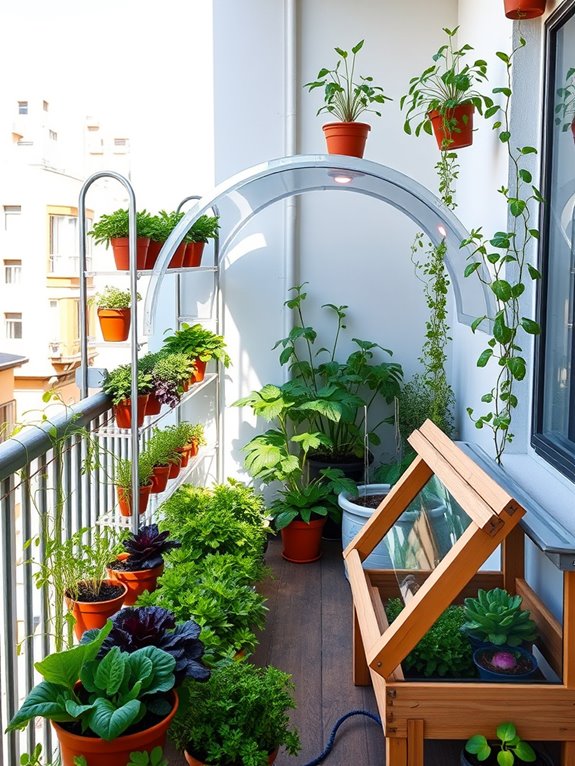
A masterfully planned season extension garden transforms the traditional growing timeline into a year-round spectacle of productivity and innovation. Glass cloches sparkle like crystalline domes protecting tender seedlings, while sturdy cold frames create geometric patterns across the landscape. Row covers billow gently in the breeze like translucent waves, sheltering thriving crops of spinach, kale, and winter lettuce varieties that paint the garden in shades of deep green even during the coldest months.
The garden’s architectural elements merge functionality with visual appeal through a thoughtful arrangement of hoop houses and polytunnels. These structures create a greenhouse effect while adding height and dimension to the space. Hardy herbs and cold-tolerant flowers border the protective structures, while climbing peas and vines embrace the frames, softening their utilitarian appearance with natural growth patterns.
Key Elements:
- Cold frames with hinged lids
- Hoop houses (PVC or metal)
- Row covers (floating and supported)
- Glass or plastic cloches
- Thermal mass materials (stone, water barrels)
- Mulching materials
- Temperature monitoring devices
- Ventilation systems
- Cold-hardy plant varieties
- Support structures and frames
Implementation begins with positioning season extension structures to maximize southern exposure. Cold frames should be installed at a 45-degree angle facing south, with the back slightly higher than the front to capture optimal sunlight. Hoop houses require secure anchoring and should be positioned perpendicular to prevailing winds.
Layer protection systems strategically, using row covers inside larger structures for additional temperature control. The key to successful maintenance lies in vigilant temperature monitoring and ventilation management. During sunny days, even in winter, structures must be vented to prevent overheating. Establish a daily routine of opening and closing protective covers based on temperature fluctuations.
Install automated ventilation systems where possible, and maintain proper moisture levels through strategic watering and mulching schedules. Design adaptations can accommodate various spaces, from expansive gardens to compact balconies. For small areas, focus on vertical growing systems with attached mini-greenhouse panels.
Balcony gardeners can utilize tiered shelving with removable clear covers or create micro-greenhouses using clear storage containers. Window-mounted cold frames offer another space-saving solution, while collapsible covers provide flexibility for changing weather conditions.
Remember to consider weight restrictions for elevated gardens and ensure all structures are securely fastened against wind.
Design a Vertical Growing System
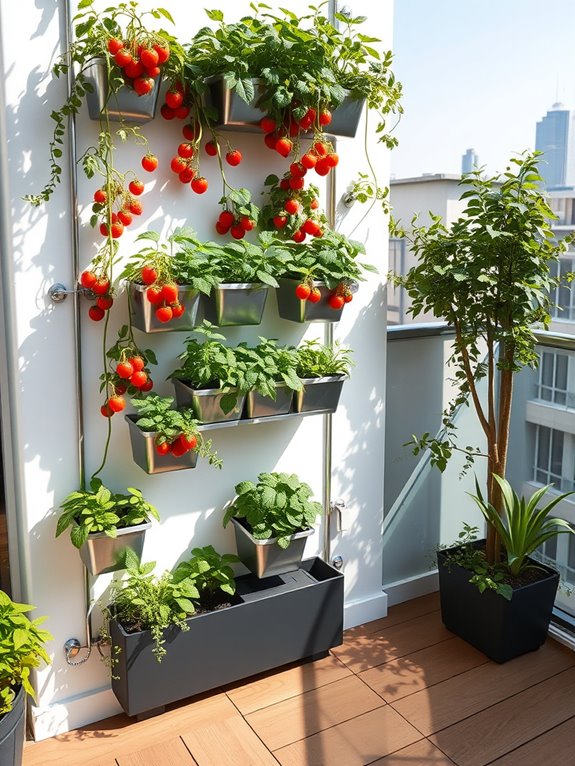
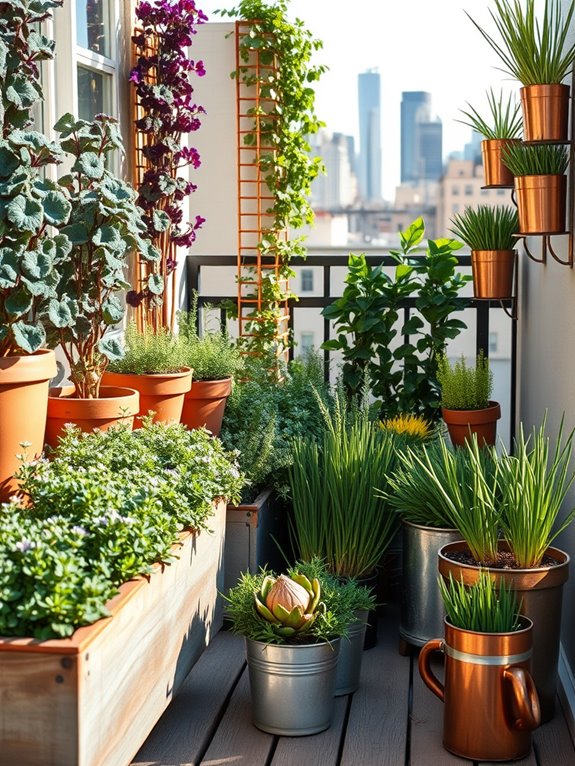
A vertical growing system transforms ordinary walls and fences into living tapestries of edible abundance. Cascading strawberry planters spill over the edges of tiered containers, while compact tomato vines climb gracefully upward on space-saving trellises.
Herbs like basil, thyme, and oregano create aromatic green patches at varying heights, their different textures and shades adding visual interest to the vertical landscape.
The system’s architectural elements blend seamlessly with the plants, featuring sleek metal gridwork, repurposed wooden pallets, or modern hydroponic towers. Trailing pea shoots wind their way up strings, creating natural curtains of greenery, while compact lettuce varieties nestle into pocketed growing bags, their varying colors creating a mesmerizing patchwork effect against the wall.
Key Elements:
- Mounting hardware and brackets
- Vertical growing containers or pocket planters
- Trellises or support grids
- Irrigation system with drip lines
- Light-weight growing medium
- Plant support ties
- Moisture meters
- Timer-controlled watering system
- Fertilizer injection system
- Collection tray for excess water
Install the main support structure first, ensuring it can bear the weight of fully mature plants and wet soil. Position the growing containers or pockets with adequate spacing for root development and plant growth, typically 12-18 inches apart vertically.
Install the irrigation system starting from the top, allowing water to flow downward naturally, with collection trays at the bottom to prevent waste and mess. Position stronger plants like tomatoes and cucumbers at the bottom, with lighter herbs and leafy greens toward the top.
The soil mixture should be lightweight and well-draining to prevent excess weight on the structure. Consider using a blend of coconut coir, perlite, and organic compost. Regular maintenance includes checking support ties weekly, pruning to maintain appropriate size, and adjusting irrigation as seasons change.
For different spaces, adapt the system’s size and complexity accordingly. Smaller balconies might focus on a single wall with modular containers, while larger areas can incorporate multiple growing walls and hydroponic towers.
Consider sun exposure carefully – east or south-facing walls typically work best. For areas with limited natural light, integrate grow lights into the design, positioning them at different heights to ensure even coverage.
Remember that vertical systems dry out more quickly than traditional gardens, so monitoring moisture levels is crucial for success.
Establish a Root Cellar Storage Area
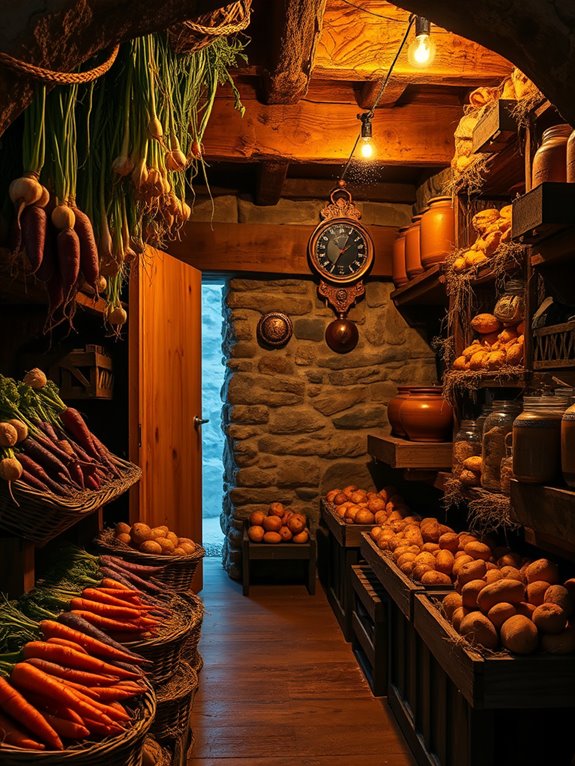
Descending into a well-designed root cellar feels like stepping into nature’s own refrigerator, where earthen walls and cool darkness create the perfect environment for storing your garden’s bounty.
Stone or concrete walls line the underground space, while wooden shelves and woven baskets hold an array of colorful root vegetables, from deep purple beets to orange carrots and russet potatoes. The natural humidity and consistently cool temperatures maintain the fresh-from-the-garden quality of your harvest.
The entryway, marked by a charming wooden door set into a hillside or basement wall, often features potted herbs or climbing vines that soften the transition from garden to storage space. Inside, the organization system transforms utility into beauty, with labeled bins, traditional crocks for fermented vegetables, and neat rows of preserved goods that tell the story of seasons past.
The subtle earthy aroma mixed with the scent of stored apples creates an atmospheric reminder of autumn’s abundance.
Essential Elements:
- Insulated walls and ceiling
- Ventilation system with adjustable vents
- Wooden shelving units
- Storage containers and baskets
- Temperature and humidity gauges
- LED or motion-sensor lighting
- Drainage system
- Heavy-duty door with proper sealing
- Root vegetable bins
- Apple storage crates
Creating a functional root cellar begins with selecting the right location, ideally in a north-facing hillside or basement area that naturally maintains temperatures between 32-40°F (0-4°C).
Install proper insulation in the walls and ceiling, ensuring the space remains consistently cool and humid. The ventilation system should include both intake and exhaust vents to regulate air flow and prevent produce spoilage.
Organize the space by installing sturdy wooden shelves along the walls, keeping them slightly away from the walls to promote air circulation. Place temperature and humidity gauges at different heights to monitor conditions throughout the cellar.
Install a simple drainage system in the floor to manage any excess moisture, and ensure proper lighting that won’t generate excess heat.
Adaptation Tips: For those without access to traditional cellar space, consider creating a modified storage system using insulated cabinets in a cool garage or basement.
Small-space gardeners can utilize mini root cellars built from buried garbage cans or converted chest freezers. In apartments, dedicate a closet space against an exterior wall for storing shorter-term root vegetables, using insulation and careful temperature monitoring to create a micro-climate suitable for storage.
Incorporate Winter-Hardy Herbs
A winter herb garden brings life and vibrancy to the coldest months, with silvery sage leaves dancing alongside deep green rosemary and the delicate stems of thyme spilling over rustic stone borders. The hardy herbs create an enchanting tapestry of textures and subtle colors, punctuated by the occasional purple flowers of winter-blooming varieties. Weathered terracotta pots and natural stone pathways complement the resilient plants, creating an elegant yet practical space that remains productive throughout the year.
The garden takes on a magical quality during frosty mornings when crystalline formations highlight each leaf and stem, transforming everyday herbs into sparkling sculptures. Strategic placement of evergreen herbs like bay laurel and winter savory provides natural windbreaks, while oregano and mint create ground-hugging patches that protect the soil and provide convenient harvesting zones even in cold weather.
Essential Elements:
- Winter-hardy herb varieties (sage, thyme, rosemary, oregano)
- Raised beds or well-draining soil
- Stone or gravel pathways
- Protective walls or fencing
- Terracotta or frost-resistant containers
- Mulching materials
- Cold frames or cloches
- South-facing location
- Wind barriers
- Water-resistant plant markers
Implementation requires careful attention to drainage and sun exposure. Create elevated beds or mounded areas to ensure proper water flow, and position taller herbs like rosemary and bay laurel along the northern edge to protect smaller plants.
Layer mulch around plant bases to insulate roots, and group herbs with similar water needs together. Consider installing permanent pathways that allow easy access during wet conditions, and position containers where they can be easily moved if severe weather threatens.
Additional Tips: Adapt the garden’s scale by using vertical growing techniques for small spaces – wall-mounted planters and tiered containers work well on balconies.
For wind protection on exposed sites, create temporary screens using burlap or horticultural fleece, or install permanent trellises that can support both protective materials and climbing herbs.
Consider incorporating heat-absorbing materials like dark stones or brick walls to create beneficial microclimates, and always leave extra space between plants to promote air circulation and prevent fungal issues during damp winter weather.
Set Up a Microgreens Station
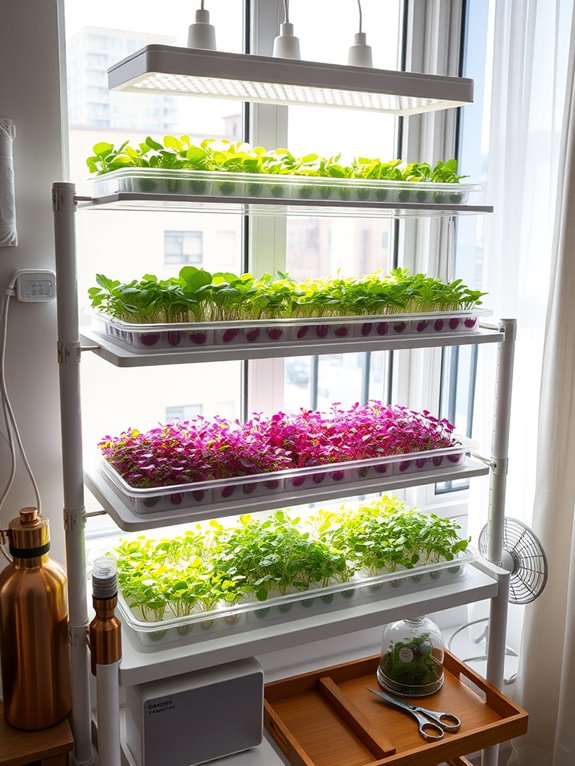
A microgreens station transforms any corner into a living tapestry of vibrant seedlings, where tender shoots of basil, radish, and amaranth create a miniature forest of emerald, purple, and crimson hues. The delicate leaves catch light differently throughout the day, casting intricate shadows across your growing trays while providing a constant reminder of nature’s ability to thrive in small spaces.
The setup itself becomes an artistic display, with neat rows of shallow trays creating a modern, geometric pattern that appeals to both minimalist and traditional aesthetics. Clear plastic dome covers add a greenhouse-like quality, creating an atmosphere of perpetual spring while protecting the delicate seedlings beneath. The combination of practical growing equipment and fresh, living greens brings a professional culinary feel to any kitchen or sunny windowsill.
Essential Elements:
- Growing trays with drainage holes
- Catchment trays
- High-quality growing medium
- LED grow lights
- Spray bottle or mister
- Seeds (variety pack)
- Sharp scissors
- Clear dome covers
- Timer for lights
- Small fan for air circulation
Position your microgreens station on a sturdy surface that can support multiple trays and handle occasional water spillage. Install LED grow lights 4-6 inches above the growing surface, mounting them on adjustable chains or stands to maintain optimal distance as plants grow.
Arrange trays in a way that maximizes light exposure while allowing easy access for daily maintenance and harvesting. Layer your growing medium about 1-2 inches deep in each tray, creating a uniform surface for even seed distribution.
Maintain organization by implementing a rotation system, where new trays are started weekly to ensure continuous harvest. Keep growing supplies nearby in labeled containers, and establish a designated cleaning area for used trays. This systematic approach allows for efficient space utilization and consistent production.
For smaller spaces, consider vertical stacking systems or wall-mounted shelving units to maximize growing area. Balcony gardeners can use tiered stands or window-mounted shelves, while those with limited counter space might opt for rolling carts that can be moved as needed.
Temperature control becomes crucial in these setups, so position your station away from heating/cooling vents and consider using a humidity dome during germination. Successful microgreens cultivation often depends more on consistent care than space availability, making it adaptable to virtually any setting.