
8 Garden Ideas for Waterwise Planting
You’ll discover that creating a waterwise garden doesn’t mean sacrificing beauty for practicality. Whether you’re working with a sprawling backyard or a modest patio space, these eight innovative approaches will help you design a stunning, drought-resistant landscape that thrives in any climate. From selecting hardy native plants to incorporating eye-catching rock gardens, each strategy offers a perfect blend of form and function. Let’s explore how you can transform your outdoor space into a sustainable oasis that conserves water while captivating visitors.
Contents
- 1 Choose Native and Drought-Resistant Plants
- 2 Design a Rock Garden With Succulents
- 3 Add Mulch and Ground Cover Strategically
- 4 Install a Smart Drip Irrigation System
- 5 Create a Mediterranean-Style Garden
- 6 Group Plants by Water Needs
- 7 Replace Lawn Areas With Hardscaping
- 8 Build Raised Beds With Water-Retaining Soil
Choose Native and Drought-Resistant Plants
Transform your outdoor space into a stunning celebration of local flora with a drought-resistant garden that captures the authentic beauty of your region. Graceful native grasses sway in the breeze while clusters of resilient wildflowers paint the landscape in waves of purple, yellow, and orange.
Desert-adapted succulents create living sculptures, their geometric forms adding architectural interest alongside weather-worn rocks and natural pathways. The garden becomes a peaceful sanctuary where butterfly-attracting lantana mingles with fragrant sage and lavender, creating a sensory experience that changes with the seasons.
Ornamental bunch grasses catch the morning light, while compact evergreen shrubs provide year-round structure. The natural arrangement mimics local landscapes, requiring minimal water while maximizing visual impact through thoughtful layering of heights, textures, and colors.
Essential Elements:
- Native perennial flowers
- Drought-tolerant ornamental grasses
- Local rock specimens
- Desert-adapted succulents
- Indigenous shrubs
- Permeable pathways
- Mulch or gravel groundcover
- Rain-catchment system
- Drip irrigation components
- Plant identification markers
Begin implementation by conducting a site analysis to understand sun exposure and natural drainage patterns. Group plants with similar water needs together, positioning taller species at the back or center of beds.
Install an efficient drip irrigation system before planting, and apply a thick layer of mulch or decorative gravel to retain moisture and suppress weeds. Space plants according to their mature size, allowing room for natural growth patterns.
Design Considerations and Adaptations:
For balcony gardens, focus on container-friendly native plants and vertical growing solutions. Small spaces benefit from grouping plants in odd-numbered clusters, using varied container heights to create visual interest.
Consider using self-watering planters and moisture-retaining potting mix specifically formulated for drought-resistant plants. Remember that even native plants require regular watering during their establishment period, typically the first growing season, before becoming truly drought-tolerant.
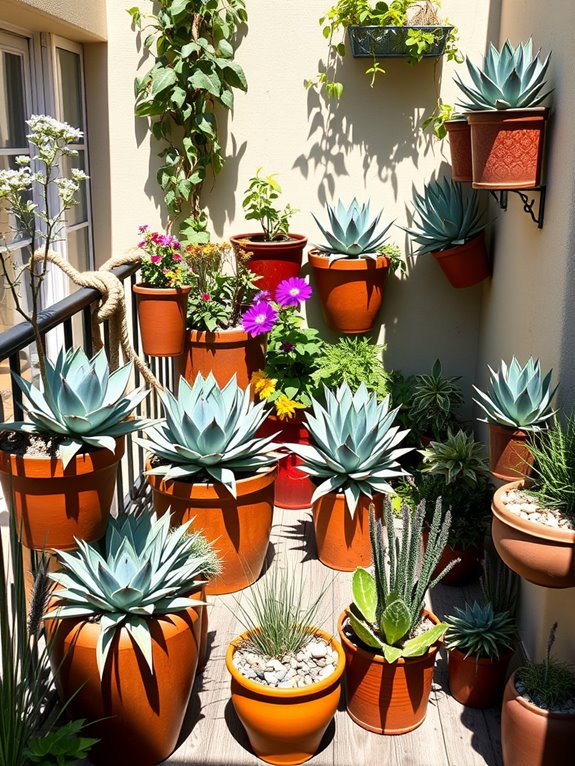
Design a Rock Garden With Succulents
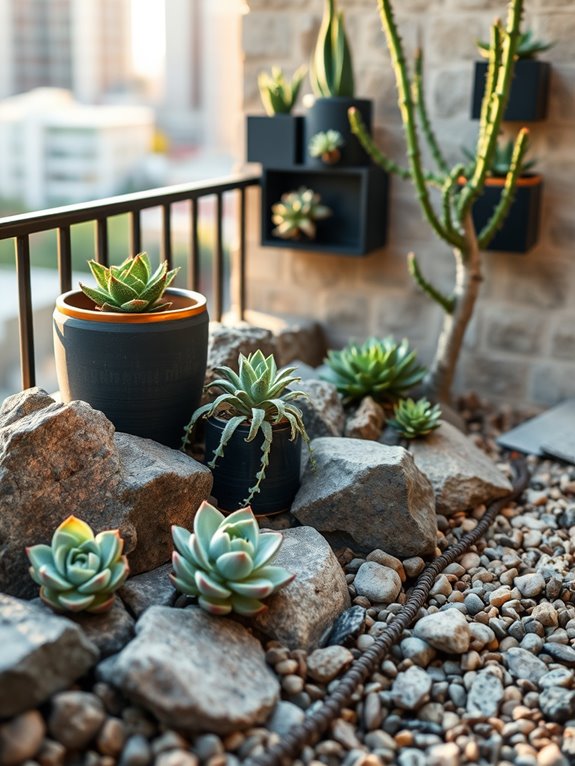
Transform your outdoor space into a striking desert oasis by combining the sculptural beauty of succulents with the timeless appeal of natural stone. Picture a harmonious arrangement of smooth river rocks, jagged boulders, and cascading pebbles creating a dramatic backdrop for rosettes of echeveria, spiraling aloe vera, and towering jade plants.
The contrast between rough stone textures and the fleshy, geometric forms of succulents creates an artistic composition that appears both ancient and contemporary. This low-maintenance landscape brings a sense of zen-like tranquility while celebrating the fascinating diversity of drought-resistant plants.
Varied heights of rock formations provide natural terracing that allows trailing varieties like string of pearls to spill over edges, while architectural agaves and barrel cacti stand as bold focal points. The subtle color palette of blues, silvers, and greens is punctuated by occasional bursts of coral, yellow, or purple blooms, creating year-round visual interest.
Key Elements:
- Various sizes of rocks and boulders
- Succulent plants in different heights and forms
- Well-draining soil mix
- Landscape fabric
- Decorative gravel or pebbles
- Solar-powered accent lighting
- Drip irrigation system
- Stone edging or border materials
Begin implementation by sketching your design and preparing the site with proper drainage. Layer landscape fabric to prevent weed growth, then arrange larger boulders and rocks to create elevation changes and visual anchors.
Fill spaces between rocks with specialized succulent soil mix, positioning larger specimen plants first. Add clusters of smaller succulents, considering their mature sizes and growth patterns. Install drip irrigation lines before adding the final layer of decorative gravel.
When adapting this design for different spaces, focus on scale-appropriate elements. Balcony gardens can utilize lightweight containers and smaller rocks, while larger yards might incorporate seating areas or water features.
Choose plants that match your specific light conditions and climate zone. Consider vertical opportunities by mounting succulent planters on walls or creating terraced containers for small spaces. Remember that proper spacing is crucial – succulents need room to spread and establish strong root systems.
Add Mulch and Ground Cover Strategically
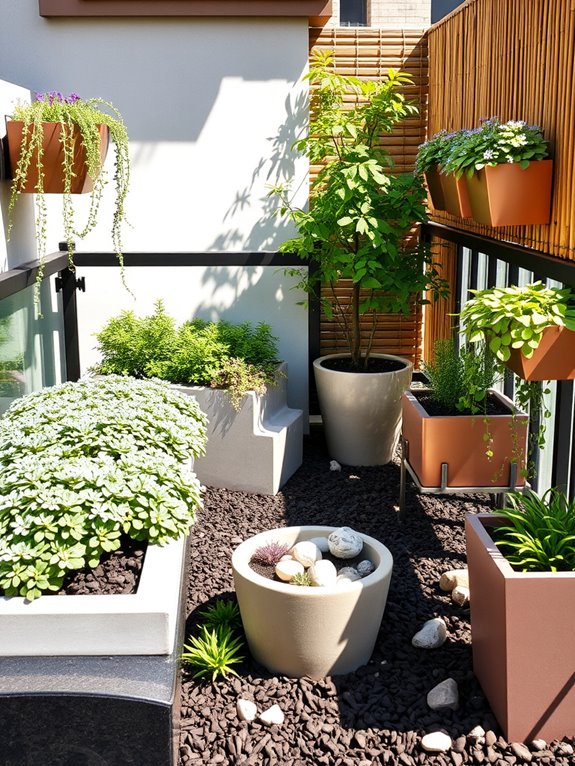
A strategic blend of mulch and ground cover creates a tapestry of textures that transforms any garden into a water-efficient oasis. Rich bark mulch in deep chocolate hues provides a striking backdrop for low-growing sedums, creeping thyme, and silvery artemisia that weave together like a living carpet. The varied heights and spreading patterns create visual movement across the landscape, while naturally suppressing water-hungry weeds and reducing evaporation from the soil beneath.
The combination of organic mulch and drought-tolerant ground covers produces a serene, low-maintenance environment that changes with the seasons. Spring brings tiny flowers from creeping phlox and ice plant, while summer showcases the hardy beauty of woolly thyme and Turkish veronica. The mulched areas between plantings create natural pathways and define garden zones, offering both practical function and aesthetic appeal.
Key Elements:
- Organic mulch (bark, wood chips, or pine straw)
- Drought-resistant ground covers
- Landscape fabric
- Edging materials
- Stone or gravel pathways
- Native spreading perennials
- Decorative rocks
- Soil amendments
Begin implementation by clearing the designated area of weeds and debris, then amending the soil with organic matter to improve drainage. Layer landscape fabric in areas designated for pure mulch coverage, securing edges firmly. Plant ground covers in strategic groups, allowing space for spread, and apply a 2-3 inch layer of mulch between plantings.
Create clear boundaries between mulched areas and ground cover sections using natural stone or commercial edging to prevent migration.
Design adaptations can accommodate any space, from expansive yards to compact gardens. For smaller areas, focus on one or two types of ground cover with contrasting mulch pathways. Balcony gardens can utilize container-friendly ground covers like sedum or creeping jenny in shallow planters, topped with decorative mulch.
Consider vertical elements like trailing ground covers in wall-mounted planters to maximize limited space while maintaining the water-wise benefits of this gardening approach.
Extra Tips: Choose ground covers based on your local climate and sun exposure patterns. In hot regions, opt for light-colored mulch to reflect heat and reduce water evaporation. For sloped areas, use tackifier-treated mulch to prevent washing, and select ground covers with strong root systems.
Container gardens should use a mix of fine and medium mulch for better moisture retention, and incorporate drip irrigation systems beneath the mulch layer for optimal water efficiency.
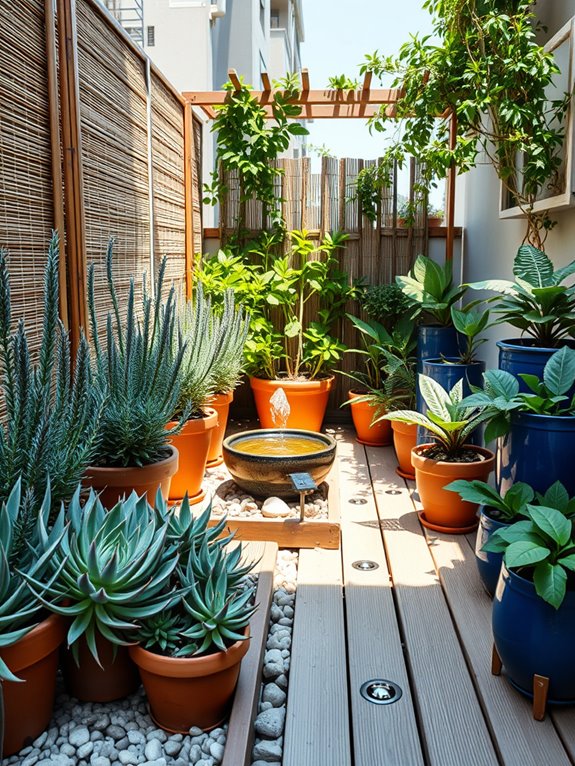
Install a Smart Drip Irrigation System
A smart drip irrigation system transforms an ordinary garden into a model of modern efficiency, where sleek black tubing winds discreetly beneath lush foliage like a hidden lifeline. Drought-tolerant plants like lavender, sage, and native grasses thrive under the precise water delivery, creating a tapestry of textures that sway gracefully in the breeze. Small copper stakes marking irrigation zones add subtle metallic accents throughout the landscape, while moisture sensors nestled among the greenery provide an invisible layer of technological sophistication.
The garden maintains its vibrancy even during the hottest months, with perfectly hydrated flowering perennials and ornamental shrubs showcasing nature’s resilience. Mediterranean herbs cluster in terracotta pots, their aromatic leaves glistening with morning moisture from targeted drippers. The quiet efficiency of the system creates a peaceful atmosphere, free from the sound of spraying water, allowing visitors to focus on the natural beauty of the carefully curated plant collection.
Key Elements:
- Smart irrigation controller
- Drip tubing and emitters
- Moisture sensors
- Filter and pressure regulator
- Zone valves
- Timer system
- Compatible smart device/app
- Weather station (optional)
- Backflow preventer
- Micro-sprayers for specific zones
Installation begins with creating a detailed irrigation plan, mapping out distinct watering zones based on plant water needs and sun exposure. Connect the main water supply to a backflow preventer, then install the smart controller in a protected location. Run primary irrigation lines along major garden paths, connecting secondary lines with appropriate emitters to serve specific plants or beds.
Position moisture sensors in representative locations within each zone to provide accurate feedback to the controller.
The system requires regular maintenance checks to ensure optimal performance. Inspect emitters monthly for clogs, adjust watering schedules seasonally, and clean the filter system quarterly. Monitor plant health and soil moisture levels to fine-tune zone settings, and update the controller’s programming as garden needs change.
For smaller spaces or balcony gardens, consider using a compact controller with fewer zones and specialized micro-irrigation components. Install vertical irrigation lines for wall-mounted planters, and use adjustable drippers for container gardens.
Position the controller near a power source and ensure good WiFi connectivity for smart features. In areas with hard water, install a water softener or clean emitters more frequently to prevent mineral buildup, and consider adding a rain barrel system to supplement water supply during dry periods.
Create a Mediterranean-Style Garden
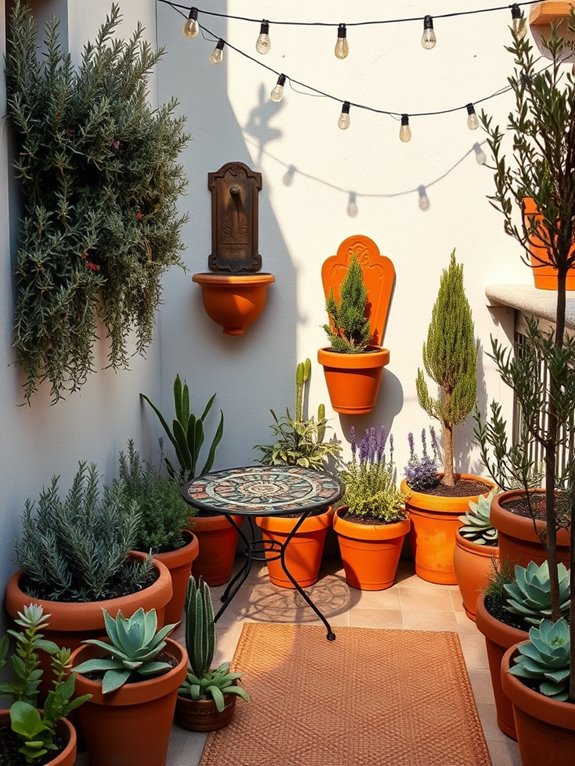
Transport yourself to the sun-drenched coasts of Southern Europe with a Mediterranean-style garden that combines drought-resistant beauty with casual elegance. Silvery olive trees cast dappled shade over clusters of fragrant lavender and rosemary, while terracotta pots overflow with cascading geraniums in vibrant reds and pinks. Gravel pathways weave between architectural cypresses and sculptural agaves, creating an atmosphere of timeless sophistication and natural harmony.
The Mediterranean garden captivates with its sensory richness – the gentle rustle of ornamental grasses, the aromatic hints of herb gardens, and the subtle interplay of textures from smooth stones to feathery santolina. Weathered stone walls draped with climbing vines provide backdrop structure, while drought-tolerant salvias and euphorbias add bursts of color throughout the seasons. This garden style embraces the casual refinement of outdoor living, perfect for creating an oasis of calm.
Key Elements:
- Drought-resistant plants (lavender, rosemary, sage, thyme)
- Ornamental grasses
- Olive trees or similar silvery-leaved trees
- Terra cotta pots and planters
- Gravel or decomposed granite pathways
- Natural stone walls or features
- Mediterranean cypress or similar vertical elements
- Herbs and aromatic plants
- Water features (fountains or small pools)
- Outdoor seating areas
- Iron or wooden garden furniture
- Climbing vines
Implementation begins with establishing proper drainage through raised beds or slope modification, incorporating gravel or sandy soil mixtures ideal for Mediterranean plants.
Create distinct zones using gravel pathways and low walls, positioning larger elements like trees and architectural plants first to establish structure. Group plants with similar water needs together, placing drought-tolerant specimens in full sun and more delicate herbs in areas receiving afternoon shade.
The success of a Mediterranean garden relies on proper plant spacing to allow for mature growth while maintaining visual harmony. Incorporate hardscaping early in the design process, using materials that reflect heat and provide good drainage.
Layer plants by height, with taller specimens at the back and shorter ones in front, creating pockets of interest throughout the space.
Design Tips and Adaptations: For smaller spaces or balconies, focus on container gardening with key Mediterranean plants in terra cotta pots of varying sizes. Use vertical elements like wall-mounted planters or trellises for climbing plants, and create the illusion of space with strategically placed mirrors.
Consider dwarf varieties of classic Mediterranean plants, and group containers to create distinct areas for herbs, ornamentals, and seating. Even the smallest space can capture Mediterranean charm by focusing on essential elements like fragrant herbs, textural contrast, and appropriate hardscaping materials.
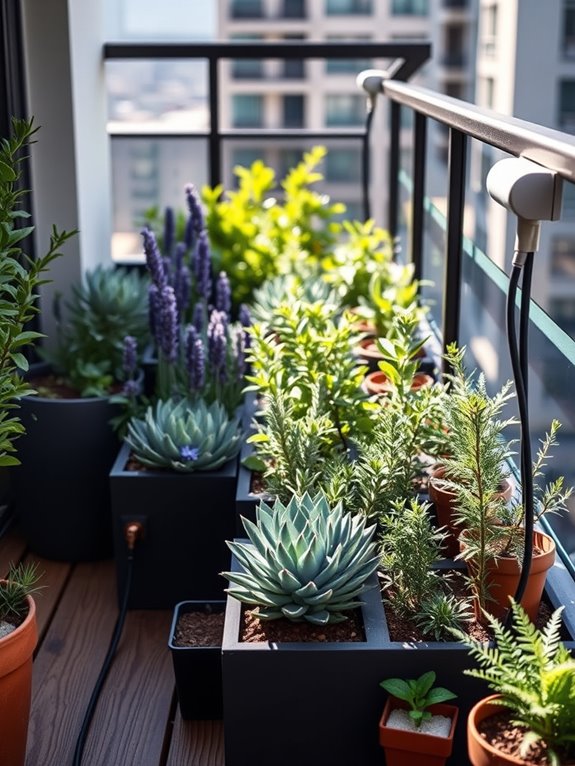
Group Plants by Water Needs
Clustering plants with similar water requirements creates a stunning tapestry of textures and colors while maximizing water efficiency. Lush, water-loving plants like hostas, ferns, and astilbe create a verdant oasis in one area, their foliage dancing in gentle breezes.
Adjacent spaces transition to drought-tolerant Mediterranean herbs and native wildflowers, where lavender, sage, and yarrow paint the landscape in soothing purples and silvers. The garden naturally flows from one hydro-zone to another, with thoughtfully placed rocks and stepping stones marking the transitions. Each zone tells its own story – from the rich, moisture-loving shade garden to the sun-baked xeriscape filled with resilient succulents and ornamental grasses.
This intelligent design not only conserves water but creates distinct micro-environments that attract diverse wildlife.
Key Elements:
- Plant markers or tags for identifying water needs
- Irrigation zones with separate controls
- Soil amendments specific to each zone
- Mulch appropriate for different moisture levels
- Border materials (rocks, pavers, or edging)
- Water-wise plant varieties
- Moisture meters
- Zone mapping materials
Implementation begins with a thorough site analysis to identify natural moisture patterns, sun exposure, and soil conditions.
Create a detailed map dividing your garden into distinct hydro-zones, typically ranging from high to low water usage. Install appropriate irrigation systems for each zone, ensuring plants with similar water needs are grouped together and can be watered efficiently.
Layer plants within each zone, placing taller specimens at the back and shorter ones in front, while maintaining adequate spacing for mature growth. Your high-water zone should be located in naturally moist areas or near water sources, while drought-tolerant plants should occupy elevated or naturally dry spots.
Use thick mulch layers appropriate to each zone – organic materials for moisture-loving areas and inorganic materials like gravel for drought-tolerant sections.
For smaller spaces or balcony gardens, create miniature versions of each zone using containers with different watering requirements. Use self-watering containers for moisture-loving plants and terracotta pots for drought-tolerant specimens.
Consider vertical gardening options to maximize space, and install a drip irrigation system with multiple zones to maintain proper moisture levels for each plant grouping. Remember to position high-water-need plants near your water source and drought-tolerant plants in areas that receive more sun and wind exposure.
Replace Lawn Areas With Hardscaping
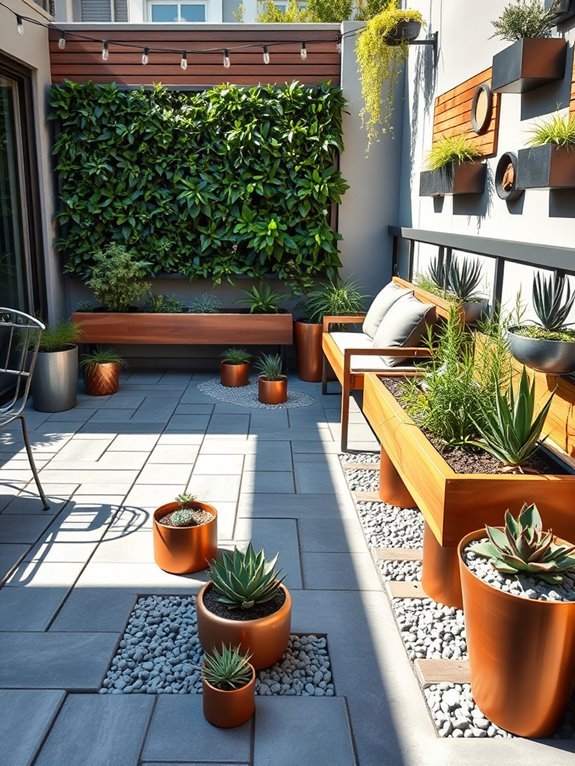
Transform your thirsty lawn into an elegant, water-conscious oasis by incorporating thoughtfully designed hardscaping elements. Imagine a serene courtyard where smooth stone pavers create winding pathways, interspersed with decorative gravel that sparkles in the sunlight.
Strategic placement of large boulders and architectural elements like stone benches or water features creates focal points, while drought-resistant ornamental grasses soften the edges, their feathery plumes dancing in the breeze.
The harmonious blend of materials – perhaps slate, decomposed granite, and river rock – creates visual interest through texture and color variation. Small pocket gardens nestled within the hardscaping showcase carefully selected drought-tolerant plants like lavender, sage, and native succulents, providing bursts of color and life among the stone elements. This design not only dramatically reduces water consumption but also creates a sophisticated, low-maintenance outdoor living space that can be enjoyed year-round.
Key Elements:
- Pavers or flagstone for pathways
- Decorative gravel or crushed stone
- Large feature boulders
- Outdoor seating areas
- Drought-resistant border plants
- Solar-powered lighting
- Ground cover succulents
- Permeable materials for drainage
- Decorative containers
- Rock gardens
Implementation begins with careful planning and mapping of the space, ensuring proper drainage away from structures and creating zones for different activities.
Remove existing lawn completely, install landscape fabric to prevent weed growth, and establish clear borders for different hardscaping materials. Create slight variations in elevation to add visual interest and help direct water flow. Install larger elements first, such as patios or seating areas, followed by pathways and smaller decorative features.
When selecting materials, consider your local climate and how the materials will weather over time. Choose permeable materials where possible to allow proper drainage and prevent water pooling.
Group plants with similar water needs together, and install an efficient drip irrigation system for any planted areas.
Extra Tips: Scale your hardscaping elements appropriately for your space – smaller spaces benefit from using fewer materials in larger sections rather than many small elements that can appear cluttered.
For balcony gardens, focus on container plantings and portable hardscaping elements like modular decking or removable pavers. Consider incorporating vertical elements such as wall fountains or climbing plants on trellises to maximize limited space.
Always check local regulations regarding permeable surface requirements and weight restrictions for elevated spaces before beginning your hardscaping project.
Build Raised Beds With Water-Retaining Soil
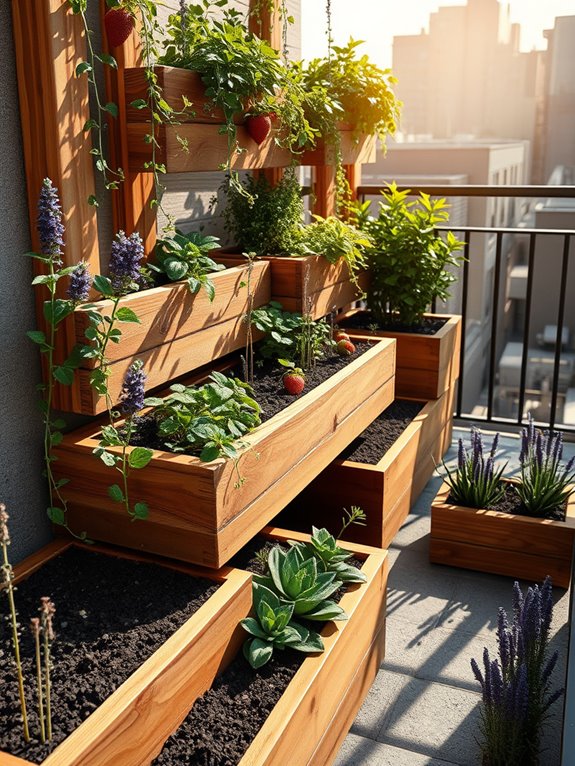
Stepping into a garden of raised beds is like entering an organized sanctuary where geometric wooden structures rise from the ground like architectural elements in nature. The rich, dark soil within these elevated platforms creates a striking contrast against cedar or redwood frames, while carefully planned collections of drought-resistant herbs, compact vegetables, and flowering perennials cascade over the edges, creating an abundant display of textures and colors.
These elevated garden spaces transform an ordinary yard into an efficient and beautiful growing environment. Lavender and sage brush against tomato vines, while compact strawberry plants trail downward, their bright fruits dangling like jewels. The raised design creates natural pathways between beds, allowing gardeners to tend their plants without compacting soil, while the enhanced drainage and specialized soil mixture maximize water efficiency.
Key Elements:
- Wooden boards (cedar, redwood, or treated lumber)
- Corner posts and support stakes
- Water-retaining soil mix
- Organic matter (compost, coconut coir)
- Drip irrigation system
- Mulch materials
- Landscape fabric
- Hardware (screws, brackets)
- Root vegetables, herbs, and compact plants
- Decorative stones or pavers for pathways
Construction begins with selecting a level site and assembling frames at least 12 inches deep, ensuring proper depth for root development. The specialized soil mix should combine high-quality topsoil, organic matter, and water-retaining amendments like vermiculite or coconut coir in roughly equal parts.
Install landscape fabric beneath beds to prevent weed growth, then layer in the soil mix, leaving two inches at the top for mulch. Position drip irrigation lines before planting, ensuring even water distribution throughout each bed.
Extra Design Tips: Consider bed width carefully – no wider than 4 feet ensures easy reach from both sides. For small spaces or balconies, create modular beds that can be reconfigured as needed.
Incorporate vertical growing elements like trellises on the north side of beds to maximize growing space without shading other plants. In windy areas, position beds against existing structures or create windbreaks with strategic plantings.
For maximum water efficiency, group plants with similar water needs together and maintain a consistent 2-3 inch layer of organic mulch.