
7 Garden Ideas for Vertical Flower Gardens
Studies show that 68% of urban gardeners struggle with limited outdoor space, but that shouldn’t stop you from creating a flourishing garden oasis. You’ll find that vertical gardening transforms blank walls and unused corners into vibrant, living tapestries of color and texture. From repurposed wooden pallets to sophisticated living wall systems, these seven innovative approaches help you maximize every square foot while adding dramatic visual interest to your outdoor space. Let’s explore how you can turn your vertical dreams into blooming reality.
Contents
- 1 Repurposed Pallet Gardens: A DIY Vertical Paradise
- 2 Living Wall Systems for Stunning Floral Displays
- 3 Hanging Pocket Planters: Maximize Small Spaces
- 4 Trellis and Climbing Rose Gardens
- 5 Vertical Container Gardens With Tiered Planters
- 6 Upcycled Gutter Gardens for Cascading Blooms
- 7 Stack and Grow: Tower Garden Solutions
Repurposed Pallet Gardens: A DIY Vertical Paradise
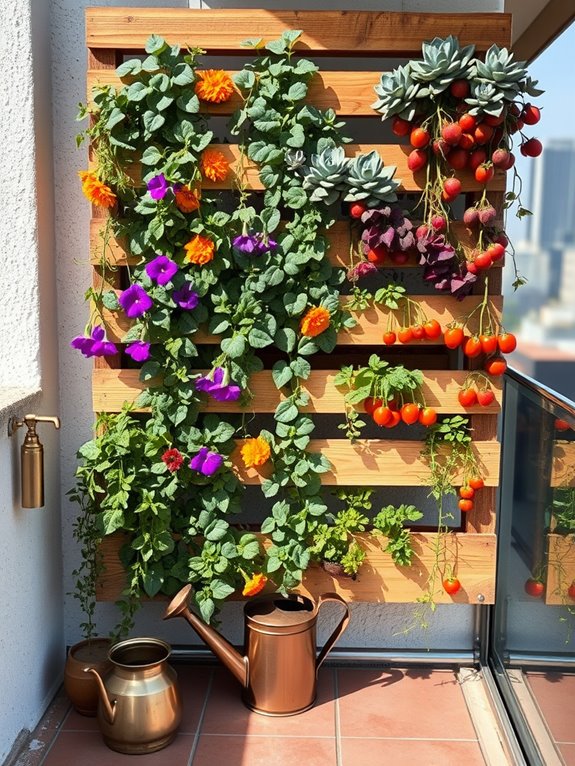
Transform an ordinary wooden pallet into a lush, verdant masterpiece that brings life to vertical spaces. Cascading herbs like trailing rosemary and creeping thyme spill over weathered wood slats, while compact flowering plants such as petunias, pansies, and marigolds create vibrant pockets of color throughout the structure.
The natural grain of the reclaimed wood adds rustic charm, creating an organic backdrop that complements the greenery while maximizing growing space in even the smallest areas. This living wall becomes a conversation piece that merges sustainability with style, turning industrial cast-offs into an eco-friendly garden feature.
Succulents nestle in upper pockets, their geometric forms contrasting beautifully with delicate strawberry plants that dangle temptingly from middle rows. Mediterranean herbs like basil, oregano, and sage fill the air with their aromatic presence, while compact vegetables such as lettuce and cherry tomatoes transform the palette into a productive vertical feast.
Essential Elements:
- Wooden pallet (heat-treated, food-grade)
- Landscape fabric
- Potting soil
- Plant selection (herbs, flowers, vegetables)
- Hardware cloth or mesh backing
- Wood stain or weather sealant
- Mounting brackets
- Irrigation system or watering can
- Drainage tray
Creating a pallet garden begins with thorough preparation of the wooden structure. Sand rough edges and treat the wood with a plant-safe sealant to prevent rot. Line the back with hardware cloth, followed by landscape fabric to contain soil while allowing drainage.
Create individual pockets by securing the fabric between slats, filling each with quality potting mix. Plant selection should follow a “thriller, filler, spiller” approach, positioning taller plants at the top, bushy varieties in the middle, and trailing plants along the bottom rows.
When customizing for different spaces, consider light exposure and weight limitations. For sunny balconies, incorporate drought-resistant plants and install a simple drip irrigation system. Smaller spaces might benefit from a half-pallet design or mounting the garden at an angle to maximize growing area while minimizing footprint.
Remember to leave adequate air circulation between the pallet and wall to prevent moisture damage, and establish a regular feeding schedule to maintain plant health in the confined growing spaces.
Living Wall Systems for Stunning Floral Displays
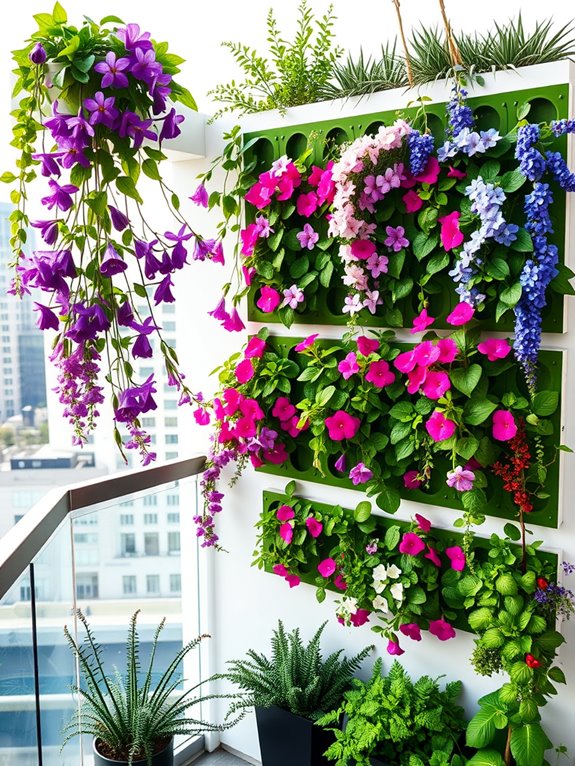
Transform any vertical space into a breathtaking living tapestry with a professionally designed living wall system. Cascading waves of colorful blooms create a stunning natural artwork, as trailing fuchsias spill downward while upright salvias and delphiniums reach skyward.
The carefully planned arrangement of flowering vines, compact perennials, and seasonal annuals produces a dynamic display that changes throughout the growing season, offering an ever-evolving canvas of nature’s finest hues.
The living wall becomes a focal point that draws the eye upward, making even modest spaces feel larger and more dramatic. Imagine purple clematis intertwining with climbing roses, while pockets of bright petunias and verbena add bursts of color at various heights.
The vertical garden creates a sense of lush abundance without sacrificing valuable floor space, while the gentle movement of foliage adds a soothing kinetic element to the environment.
Essential Elements:
- Professional-grade living wall panel system
- Irrigation system with timer
- Growing medium designed for vertical gardens
- Support structure or mounting hardware
- Plant selection suitable for vertical growth
- Drainage collection system
- Lighting (natural or supplemental)
- Maintenance tools and equipment
- Plant nutrients and fertilizers
- Access point for maintenance
Installation begins with securing a robust mounting system to a load-bearing wall, ensuring proper waterproofing and structural integrity. The modular panels are then installed systematically, incorporating the irrigation system between layers.
Plant placement follows a careful design plan, considering growth habits and mature sizes, with drought-tolerant species positioned at the top and moisture-loving varieties toward the bottom. Regular maintenance includes monitoring the irrigation system, trimming overgrowth, and replacing plants as needed.
When designing your living wall, consider the microclimate created by your specific location’s sun exposure and wind patterns. For smaller balconies, choose compact varieties and implement a simplified irrigation system with manual watering options.
Larger installations benefit from automated systems and professional maintenance schedules. Include a mix of flowering periods to ensure year-round interest, and incorporate both shallow-rooted and deep-rooted species for structural stability and visual depth.
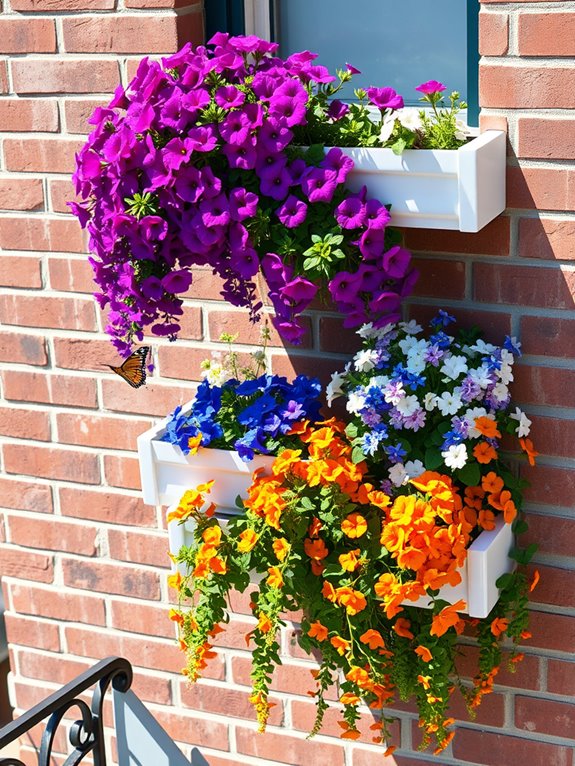
Hanging Pocket Planters: Maximize Small Spaces
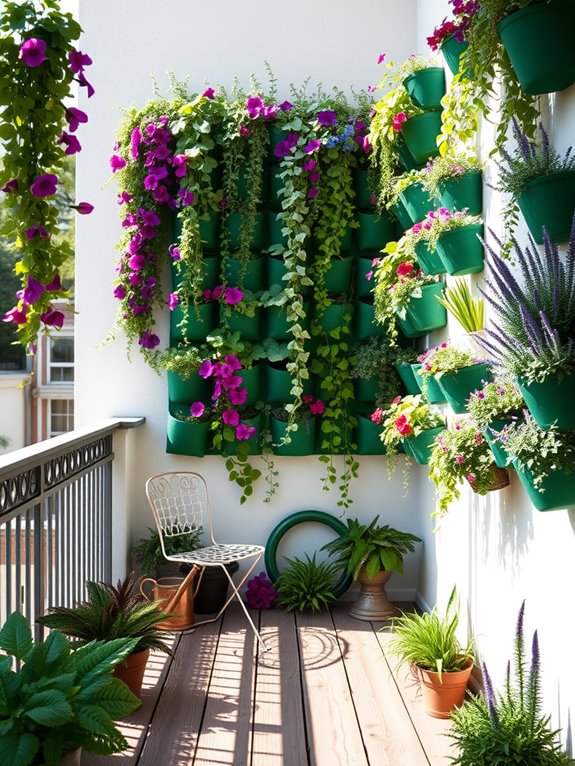
Transform your compact outdoor space into a lush cascading oasis with hanging pocket planters that turn empty vertical spaces into vibrant living walls. Imagine fabric or plastic pouches bursting with cascading petunias, trailing ivy, and delicate ferns, creating a tapestry of colors and textures that dance in the breeze. The multi-tiered arrangement allows plants to spill gracefully downward, while upright flowers like salvias and compact marigolds add height and dimension to each pocket.
The magic of hanging pocket planters lies in their ability to create intimate garden nooks in even the smallest spaces. Whether mounted on a balcony wall or suspended from overhead beams, these living curtains of greenery provide privacy while softening harsh architectural lines. The combination of flowering plants like lobelia and calibrachoa with herbs such as trailing thyme and oregano creates a multi-sensory experience, filling the air with gentle fragrance and bringing natural movement to static spaces.
Key Elements:
- Hanging pocket planters (fabric or plastic)
- Strong mounting hardware
- Lightweight potting mix
- Drip irrigation system or water reservoir
- Trailing plants (ivy, pothos, vinca)
- Compact flowering plants
- Herbs
- Plant food
- Moisture meters
- Pruning shears
Install the pocket planters by securing them firmly to the wall or hanging structure, ensuring each pocket can support the weight of soil and mature plants. Start with the highest row and work downward, filling each pocket with lightweight potting mix enriched with slow-release fertilizer. Plant selection is crucial – position drought-tolerant plants at the top where conditions are drier, and moisture-loving varieties in lower pockets where water naturally accumulates.
Establish an efficient watering system, whether automated drip irrigation or manually watering each pocket, ensuring proper drainage to prevent water logging. When designing your pocket garden, consider sun exposure and wind conditions at different heights. For sunny balconies, incorporate heat-resistant plants like succulents in upper pockets, while shade-loving coleus and ferns thrive in lower, shadier spots.
Adapt the number of pocket rows to your space – small balconies might accommodate 2-3 rows, while larger areas can support 5-6 rows. Regular pruning and fertilizing will keep plants compact and healthy, preventing them from overwhelming their designated pockets.
Trellis and Climbing Rose Gardens
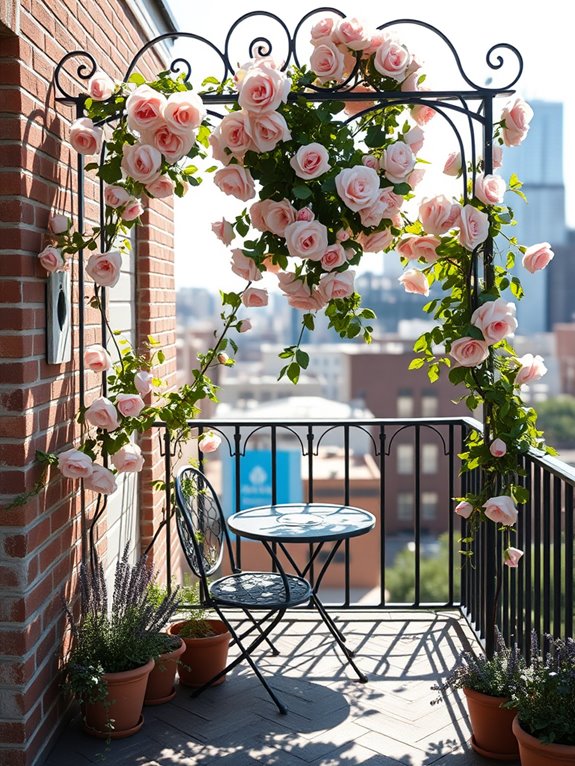
Transform your vertical space into a romantic oasis with a trellis and climbing rose garden that reaches gracefully toward the sky. Delicate roses in shades of pink, red, and white weave their way up intricate lattice patterns, creating a living wall of color and fragrance. The architectural elements of wrought iron or wooden trellises provide a sturdy backbone for these climbing beauties, while their natural growth patterns create an organic, almost wild appearance that softens harsh vertical lines.
As the seasons progress, this garden style evolves from tender spring growth to abundant summer blooms, culminating in a spectacular display of cascading flowers. The combination of climbing roses like ‘New Dawn,’ ‘Climbing Iceberg,’ and ‘Lady of Shalott’ with decorative trellis designs creates an enchanting backdrop that draws the eye upward while providing privacy and structure to your outdoor space.
Essential Elements:
- Sturdy trellis system (metal, wood, or vinyl)
- Climbing rose varieties
- Support ties and garden twine
- Rich, well-draining soil
- Plant supports and anchors
- Decorative finials or trellis toppers
- Garden tools for maintenance
- Fertilizer specifically for roses
- Mulch
- Pruning shears
Begin installation by securing your trellis firmly to a wall or creating a freestanding structure with proper anchoring systems. Plant roses approximately 18-24 inches from the base of the trellis, ensuring adequate soil preparation with organic matter and proper drainage.
Train young shoots horizontally along lower trellis sections to promote more blooms, gradually guiding them upward as they grow. Establish a regular maintenance schedule including pruning, fertilizing, and monitoring for disease or pests.
Creating a successful climbing rose garden requires careful attention to spacing and support systems. Allow approximately 6-8 feet between major climbing varieties to prevent overcrowding as plants mature. Ensure your chosen trellis can support the eventual weight of mature roses, which can become quite substantial over time.
For smaller balconies or limited spaces, consider using compact climbing varieties like ‘Climbing Pinkie’ or ‘Jeanne Lajoie,’ and implement space-saving techniques such as fan-training or espalier methods.
Install modular trellis panels that can be adjusted or expanded as needed, and incorporate container gardening techniques with proper drainage systems. Remember to position roses where they’ll receive at least 6 hours of direct sunlight daily, and create access points for easy maintenance and deadheading throughout the growing season.
Vertical Container Gardens With Tiered Planters
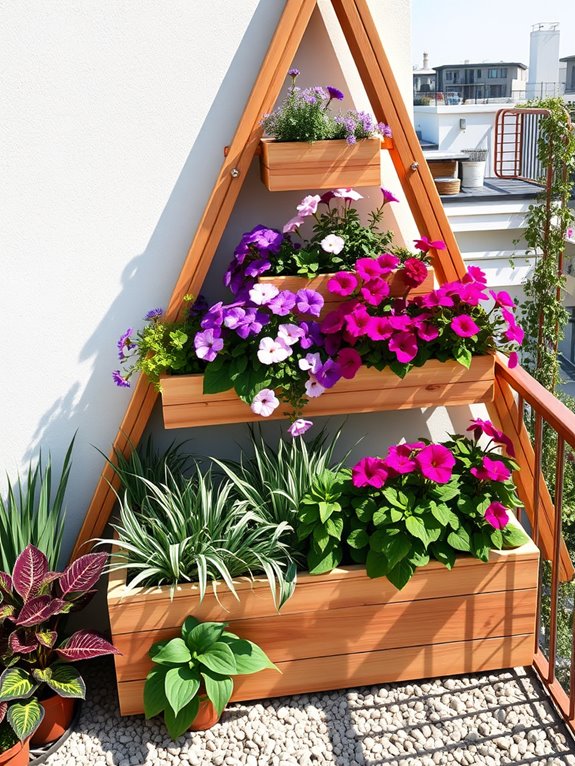
Transform your outdoor space into a living masterpiece with cascading tiers of vibrant blooms and lush greenery. Tiered planters create a stunning vertical display where trailing plants like wave petunias, ivy geraniums, and cascading lobelia spill gracefully from each level, while upright flowers like salvias, lantana, and verbena add height and structure.
The graduated levels create depth and dimension, drawing the eye upward while maximizing growing space in a compact footprint. This architectural approach to container gardening combines form and function, with each tier contributing to a cohesive visual story.
Mix in ornamental grasses for movement, coleus for bold foliage patterns, and seasonal bloomers like calibrachoa and bacopa for continuous color. The varied heights create natural microclimates, allowing you to position sun-loving plants on upper tiers while shade-tolerant varieties thrive below.
Essential Elements:
- Multi-level tiered planter system
- Drainage holes in each container
- Quality potting soil
- Slow-release fertilizer
- Drip irrigation system or self-watering mechanisms
- Selection of trailing and upright plants
- Decorative mulch or toppers
- Support stakes or trellises
- Weather-resistant plant markers
Begin installation by selecting a sturdy tiered planter system that suits your space, ensuring each level can support adequate soil depth for your chosen plants.
Position the structure against a wall or railing, considering sun exposure throughout the day. Fill containers with lightweight, well-draining potting mix, incorporating slow-release fertilizer. Plant larger specimens in back positions of each tier, with trailing varieties near edges.
Install an irrigation system that reaches all levels evenly, as upper tiers typically require more frequent watering. When designing your tiered garden, consider weight distribution and stability, particularly for balcony installations.
Plastic or lightweight composite materials offer durability without excess weight. Adapt the size and number of tiers based on available space – narrow balconies benefit from tall, slim configurations, while wider spaces can accommodate broader, pyramid-style arrangements.
Include a mix of seasonal and permanent plantings to maintain visual interest year-round, and position scented plants at eye level for maximum enjoyment.
Upcycled Gutter Gardens for Cascading Blooms
Transform your outdoor space into a whimsical cascade of colors with repurposed rain gutters, creating an eye-catching vertical display that makes the most of limited space. Trailing petunias in vibrant purples and pinks spill over the edges, while calibrachoa and lobelia add pops of yellow and deep blue, creating a living tapestry that dances in the breeze. The white vinyl gutters provide a clean, modern backdrop that allows the flowers to take center stage, while their linear arrangement adds architectural interest to otherwise plain walls.
This innovative garden style combines functionality with aesthetic appeal, turning ordinary drainage materials into extraordinary growing spaces. The vertical arrangement creates multiple layers of visual interest, with plants at different heights catching light throughout the day. Sweet alyssum releases its honey-like fragrance at the lower levels, while cascading verbena and trailing nasturtiums create dramatic curtains of foliage and blooms above, attracting butterflies and hummingbirds to your vertical oasis.
Key Elements:
- Vinyl rain gutters
- End caps and mounting brackets
- Potting soil with good drainage
- Cascading annual flowers
- Drainage holes
- Wall anchors and screws
- Wire mesh for drainage holes
- Garden tools
- Leveling tool
- Electric drill
Install the gutter garden by first determining optimal placement on your wall, ensuring adequate sunlight exposure and easy maintenance access. Mark mounting points at slight angles for proper drainage, drill holes in the gutters approximately every 4 inches, and cover with mesh to prevent soil loss.
Secure end caps and mount brackets at 24-inch intervals, ensuring each gutter is level but with a slight tilt for water flow. Fill gutters with lightweight potting mix and plant your chosen cascading varieties at recommended spacing.
During maintenance, monitor soil moisture carefully as elevated gardens can dry out quickly. Consider installing a drip irrigation system along the top gutter, allowing water to naturally flow down through the system. Replace annuals seasonally to maintain vibrant displays, and check mounting brackets periodically for security.
Extra Tips: For smaller balconies, use shorter gutter sections or create a corner installation to maximize space. Consider incorporating herbs among the flowers for a functional twist, and group plants with similar water needs in the same gutter level.
In windy locations, choose more compact trailing varieties and ensure extra-secure mounting. For year-round interest, mix in evergreen trailing plants like creeping jenny or ivy, especially in temperate climates where they can survive winter.
Stack and Grow: Tower Garden Solutions
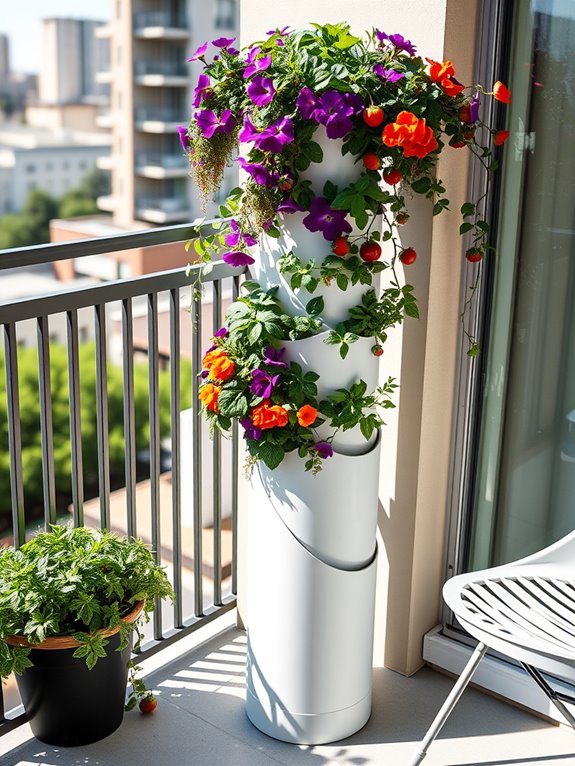
Transform your limited outdoor space into a living masterpiece with a tower garden that reaches skyward in a stunning display of botanical beauty. Stacked planters burst with cascading herbs, vibrant flowers, and lush greens, creating a vertical tapestry that maximizes growing space while minimizing footprint.
Trailing nasturtiums and wave petunias spill over edges, while compact herbs like thyme and basil fill middle layers, crowned by upright strawberry plants and compact vegetables.
The tower arrangement creates a natural focal point that draws the eye upward, making even the smallest balcony or patio feel like an enchanted garden sanctuary. Each level offers a different perspective, with plants carefully chosen to complement each other in color, texture, and growth habit.
The vertical design allows for easy access to all plants while creating a natural privacy screen and a cooling effect through strategic placement.
Key Elements:
- Stackable container system or tiered planter
- Drainage plates for each level
- Quality potting soil
- Drip irrigation system
- Plant support structures
- Weather-resistant containers
- Selection of cascading and upright plants
- Fertilizer appropriate for container growing
- Timer for irrigation system
- Root barriers between levels
Setting up a tower garden begins with selecting a sturdy base and ensuring proper drainage at each level.
Stack containers securely, with slightly larger diameters at the bottom and gradually decreasing sizes moving upward. Install a drip irrigation system that runs from top to bottom, ensuring even water distribution.
Position plants strategically, with sun-loving varieties at the top and shade-tolerant species below. Consider weight distribution and secure each level properly to prevent shifting.
When designing your tower garden, consider your specific growing conditions and adjust accordingly. For sunny balconies, incorporate shade-creating elements like umbrellas or taller plants on the south side.
For smaller spaces, opt for compact varieties and utilize corner spaces effectively. Monitor soil moisture carefully, as vertical gardens can dry out quickly, and consider incorporating water-retaining crystals into your potting mix.
Adjust plant selection based on season and light exposure to maintain year-round interest and productivity.