
9 Garden Ideas for Tiny Wildlife Sanctuaries
You don’t need a sprawling backyard to create a thriving wildlife sanctuary. With some clever planning and the right elements, even your smallest outdoor space can become a haven for local creatures. From stacking containers filled with native blooms to installing pocket-sized water features, there’s a world of possibilities waiting to transform your tiny garden. Whether you’ve got a petite patio or a modest balcony, these nine creative approaches will help you design a flourishing miniature ecosystem that attracts butterflies, birds, and beneficial insects.
Contents
- 1 Creating a Multi-Level Container Garden
- 2 Installing a Compact Water Feature
- 3 Growing Native Plants in Vertical Spaces
- 4 Building Insect Hotels and Bee Houses
- 5 Designing a Butterfly-Friendly Corner
- 6 Setting Up Bird Feeding Stations
- 7 Planting a Micro Meadow Garden
- 8 Adding Natural Shelter Elements
- 9 Maintaining Year-Round Food Sources
Creating a Multi-Level Container Garden
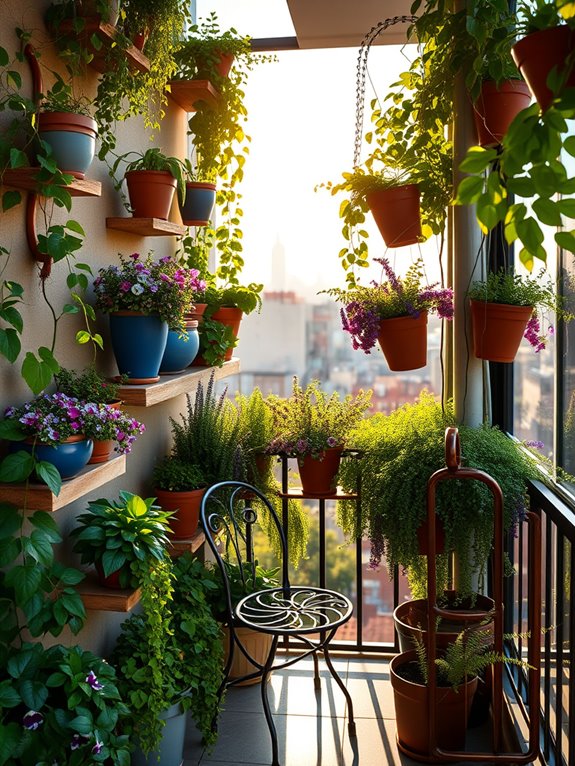
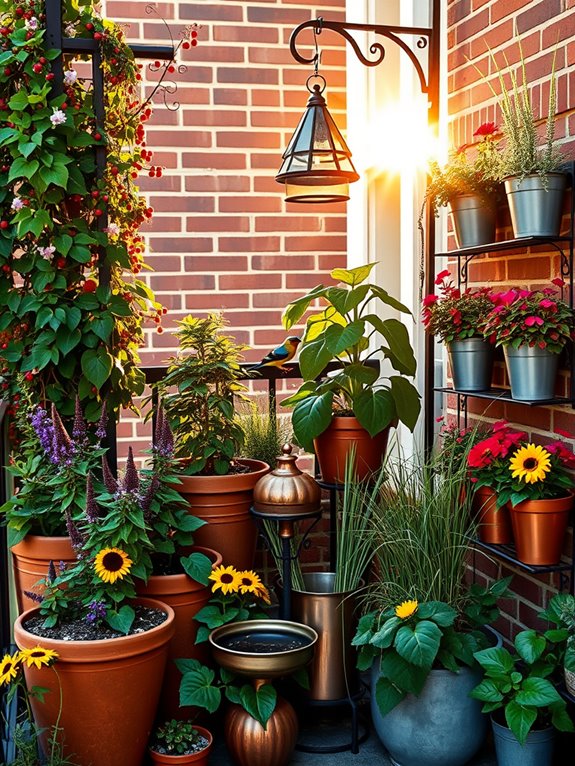
A multi-level container garden transforms even the smallest outdoor space into a lush, living tapestry that draws the eye upward through carefully arranged layers of greenery and blooms.
Tall ceramic pots filled with climbing jasmine and morning glories create the backdrop, while medium-height containers burst with colorful salvias, lavender, and native wildflowers. At ground level, low-profile planters showcase cascading herbs like thyme and oregano, interspersed with cheerful pansies and compact marigolds that spill over the edges.
The vertical arrangement creates a sense of depth and dimension, making visitors feel immersed in nature despite the limited square footage. Copper plant stands elevate some containers, while hanging baskets suspended at varying heights add drama and movement to the space. The resulting environment feels like a secret garden, with each level offering new discoveries and creating valuable habitats for pollinators and small birds.
Key Elements:
- Containers of varying sizes and heights
- Plant stands and shelving units
- Hanging basket systems
- Trellises or wall-mounted planters
- Self-watering containers
- Quality potting soil
- Plants suitable for different light levels
- Drainage materials
- Decorative stones or mulch
- Compact seating
Begin implementation by mapping out the available space and identifying strong support points for hanging elements. Place the largest containers at the back, ensuring they’ve proper drainage and are filled with lightweight, well-draining potting mix.
Create the second tier using plant stands or stepped shelving, positioning medium-sized containers to allow adequate air circulation between plants. Install hanging baskets at staggered heights, ensuring they’re secure and accessible for watering.
For maintenance, establish a consistent watering schedule, paying special attention to containers in direct sunlight or under overhangs. Rotate containers periodically to ensure even growth, and regularly check support structures for stability. Prune and deadhead plants to maintain desired shapes and encourage continuous blooming.
When adapting this garden style, consider weight restrictions for elevated surfaces and choose appropriately sized containers. For extremely small balconies, focus on wall-mounted options and hanging baskets to maximize floor space.
Incorporate collapsible or multi-functional furniture, and select compact plant varieties that won’t overwhelm the space. Use lightweight containers on upper levels and heavier, more stable containers at the base to ensure structural integrity and safety.
Installing a Compact Water Feature
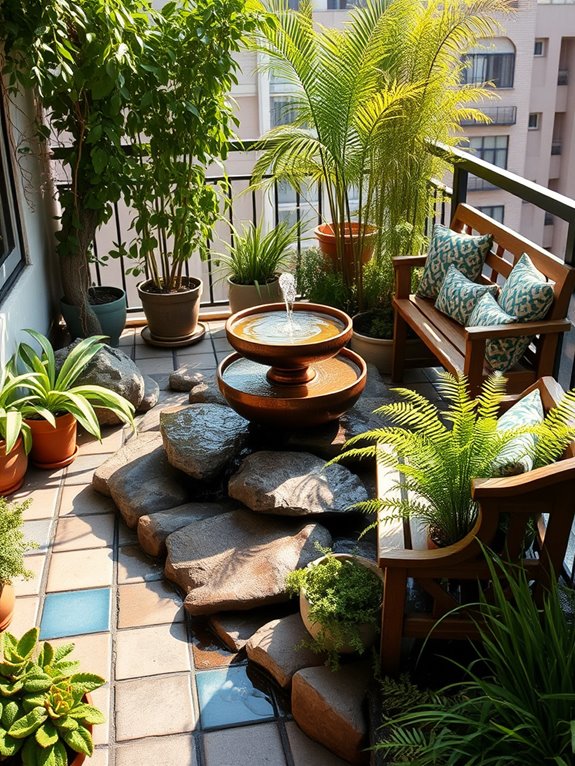
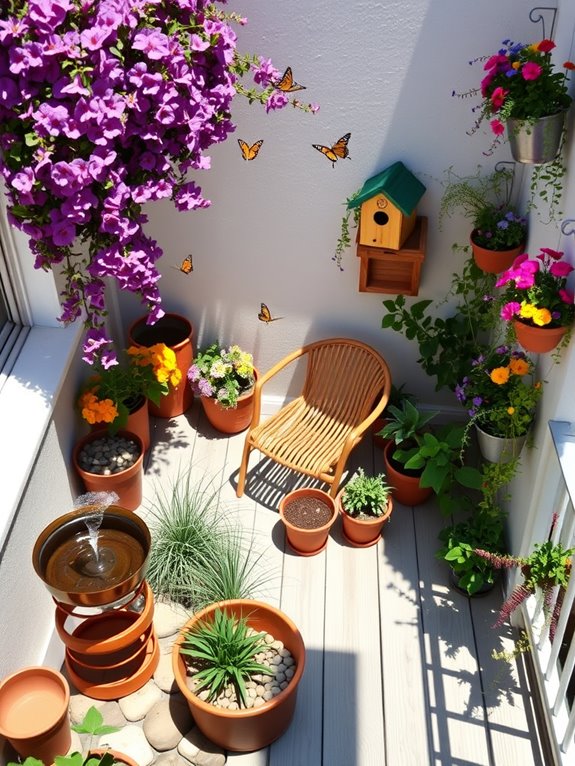
A compact water feature transforms even the tiniest garden space into a peaceful sanctuary where the gentle sound of trickling water creates an oasis of tranquility. Solar-powered fountains nestled among clusters of marsh marigolds and miniature cattails bring life to forgotten corners, while small ceramic bowls or copper basins catch sunlight and attract visiting birds and butterflies.
The interplay of light on water adds a magical dimension to the space, creating dancing reflections that enhance the garden’s natural beauty. Surrounding the water feature, moisture-loving plants like Japanese forest grass and dwarf papyrus create a lush microenvironment that feels both wild and intentional.
Stone paths or small wooden bridges crossing over the water element add architectural interest, while carefully placed river rocks and pebbles create natural-looking transitions between wet and dry areas. The result is a layered, multisensory experience that makes the garden feel larger and more immersive than its actual footprint.
Key Elements:
- Solar-powered fountain or recirculating pump
- Water-resistant container or pre-formed pond liner
- Aquatic plants
- Moisture-loving border plants
- River rocks and pebbles
- Water-safe lighting
- Filter system
- Decorative bridges or stepping stones
- Seating area
Installation begins with selecting a level location that receives partial sunlight and has access to a power source if not using solar options.
Place the water container or liner, ensuring it’s perfectly level, then install the pump and filtering system according to manufacturer specifications. Layer the bottom with varying sizes of rocks, creating deeper areas for plants and shallow edges for wildlife access. Position larger stones around the edges to hide liner edges and create natural-looking transitions.
Once the basic structure is in place, introduce plants in stages, starting with container-grown aquatics in submerged pots filled with aquatic soil. Border plants should be arranged in groups, with taller specimens at the back and creeping varieties near the water’s edge. Regular maintenance includes checking water levels, cleaning filters, and trimming plants to maintain proportions suitable for the space.
For smaller spaces or balconies, consider wall-mounted fountains, tabletop water features, or self-contained water gardens in containers. These can be scaled to fit any space while still providing the benefits of moving water and wildlife attraction.
Choose lightweight materials and ensure your structure can support the weight of water-filled containers. Position the feature where it can be easily maintained and where overflow or splashing won’t damage surrounding areas or disturb neighbors below.
Growing Native Plants in Vertical Spaces
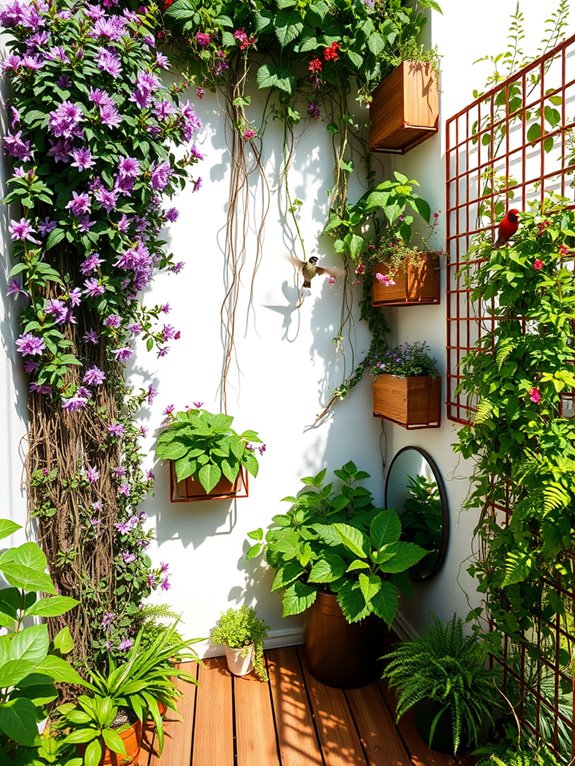
Transform your limited vertical space into a thriving native plant sanctuary where delicate tendrils of Virginia creeper and wild grape vines cascade down trellises, creating natural curtains of green.
Climbing asters burst with purple blooms at eye level, while native honeysuckle attracts hummingbirds and butterflies to its sweet nectar. Mounted planters overflow with wild columbine and coral bells, their foliage dancing in the breeze and creating a living tapestry against walls or fences.
The vertical garden becomes a dynamic ecosystem, with different native species occupying distinct layers from ground to sky. Cardinal flower and blue lobelia reach upward from lower-mounted containers, while woodland phlox and native ferns nestle into wall-mounted pocket planters.
Solar-powered mini lights weave through the greenery, transforming the space into a magical evening retreat where native moths visit night-blooming flowers.
Essential Elements:
- Mounting hardware and brackets
- Vertical growing structures (trellises, lattices, wall grids)
- Hanging planters and wall-mounted containers
- Native vining plants
- Native upright perennials
- Drip irrigation system
- Growing medium suitable for vertical gardens
- Plant support ties and clips
- Weather-resistant plant labels
- Solar lighting elements
Begin installation by securing strong mounting hardware to walls or fence posts, ensuring adequate support for planted containers.
Install a vertical drip irrigation system first, with lines running to each planned planter location. Position larger containers at the bottom to anchor the display and catch water runoff, then work upward with progressively lighter plantings.
Group plants with similar water needs together on the same irrigation lines, and establish proper drainage channels to prevent water damage to walls.
When choosing plants, consider their mature size and growth habits. Place vigorous climbers where they’ve room to spread, and slower-growing specimens in easily accessible spots for maintenance.
Monitor plant growth regularly and trim as needed to maintain desired shapes and prevent overcrowding. Replace seasonal plants as needed to maintain year-round interest.
Adaptation Tips: For tiny balconies, focus on compact native species and use corner spaces effectively by installing diagonal trellises.
Consider retractable or modular growing systems that can be adjusted seasonally. In wind-prone areas, secure all components firmly and choose low-growing or wind-resistant native species.
For maximum impact in minimal space, incorporate plants with multiple seasons of interest, such as species that provide spring flowers, summer berries, and fall color.
Building Insect Hotels and Bee Houses
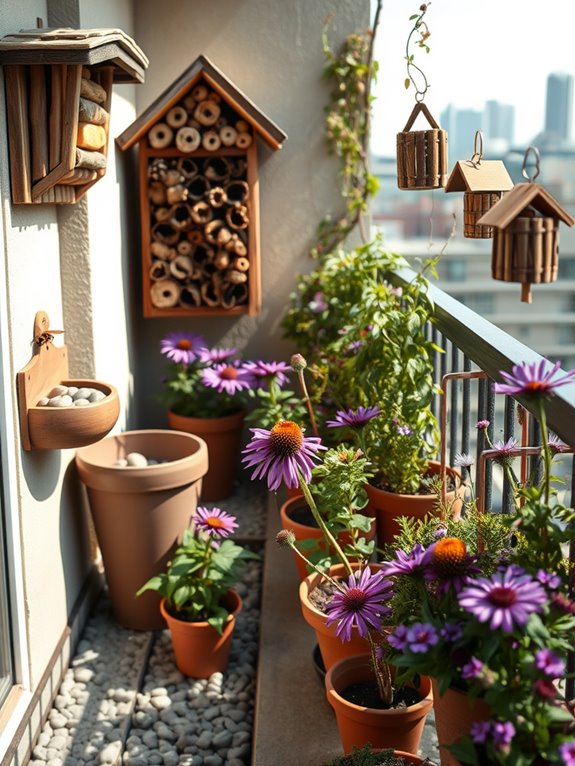
Creating a garden dedicated to insect hotels and bee houses transforms an ordinary outdoor space into a thriving sanctuary of natural activity. Weathered wood structures rise from beds of flowering natives, their intricate chambers and tunnels crafted from bamboo, pine cones, and hollow stems. Purple coneflowers, black-eyed susans, and native asters create a colorful tapestry around these architectural havens, while climbing vines like trumpet honeysuckle add vertical interest and additional nectar sources.
The garden pulses with life as solitary bees dart between their nesting tubes and nearby blooms. Natural materials like bark, straw, and dried leaves add texture and create a rustic aesthetic that blends seamlessly with the landscape. Stone pathways wind between multiple insect habitats of varying heights, each one unique in its construction and purpose, from simple bundle houses to elaborate multi-story hotels adorned with green roofs of sedums and herbs.
Key Elements:
- Insect hotels of various sizes
- Bamboo tubes and hollow stems
- Drilled wooden blocks
- Pine cones and bark pieces
- Native flowering plants
- Water source
- Sunny location
- Dead wood pieces
- Straw and dried leaves
- Clay or mud source
Implementation begins with selecting a sunny location protected from strong winds and rain. Position the main insect hotel facing southeast to catch morning sun, anchoring it firmly to prevent toppling. Create zones around the hotel with different heights of native plants, ensuring continuous blooming throughout the season.
Place smaller bee houses and bundle hotels at varying heights and distances from the main structure to provide diverse nesting options. Maintain the habitat by regularly checking for moisture damage and replacing degraded materials. Clean out unused nesting tubes each spring, and add fresh materials as needed. Remove any moldy sections promptly to prevent disease spread among beneficial insects.
For smaller spaces or balconies, vertical designs maximize limited area – wall-mounted bee houses can be combined with container plantings of native flowers. Consider creating modular units that can be expanded or reduced as space allows.
In urban settings, focus on drought-tolerant plants and include multiple small water sources using shallow dishes filled with pebbles. Always ensure that insect houses are securely fastened and positioned to avoid interference with human traffic patterns.
Designing a Butterfly-Friendly Corner
A butterfly-friendly corner transforms any outdoor space into a vibrant sanctuary of fluttering wings and dancing blooms. Tall purple coneflowers and blazing orange butterfly weed create a dramatic backdrop, while shorter clumps of lantana and verbena carpet the ground in a rainbow of nectar-rich flowers. Stone pathways wind between the plantings, offering perfect perches for butterflies to sun themselves, while a decorative butterfly house adds both whimsy and shelter.
The garden comes alive with layers of texture and movement, from the delicate swaying of native grasses to the bold architectural leaves of butterfly bush and fennel. A small solar-powered fountain provides essential water, creating a gentle tinkling sound that adds to the peaceful atmosphere. The careful mix of both host and nectar plants ensures a constant display of butterfly activity, from egg-laying to emergence, making this corner an entertaining and educational retreat.
Essential Elements:
- Nectar plants (butterfly bush, lantana, verbena, zinnia)
- Host plants (dill, fennel, milkweed)
- Flat stones for basking
- Shallow water source
- Butterfly house or shelter
- Native grasses
- Garden seating
- Mulch
- Plant markers
- Solar lighting
Begin by selecting a sunny location, as butterflies need warmth to fly. Create a windbreak using taller plants or decorative screens on the prevailing wind side. Layer plants by height, with tallest species at the back and shortest at the front. Place flat stones between plantings to create basking spots and maintain clear pathways for maintenance. Install the water source where it’s visible from seating areas but protected from strong winds.
When arranging plants, cluster similar species together in groups of three or five to create impact and make it easier for butterflies to locate food sources. Ensure host plants are positioned where caterpillar activity won’t detract from the garden’s appearance. Maintain organic practices, avoiding pesticides which can harm butterflies and their larvae.
For smaller spaces or balconies, focus on container gardening with compact varieties of butterfly-attracting plants. Use vertical gardening techniques, such as wall-mounted planters or tiered stands, to maximize space. Consider dwarf varieties of butterfly bush and compact zinnias for containers. Even the smallest space can become a butterfly haven by ensuring a mix of both nectar and host plants, and providing a simple water source such as a shallow pebble-filled dish.
Setting Up Bird Feeding Stations
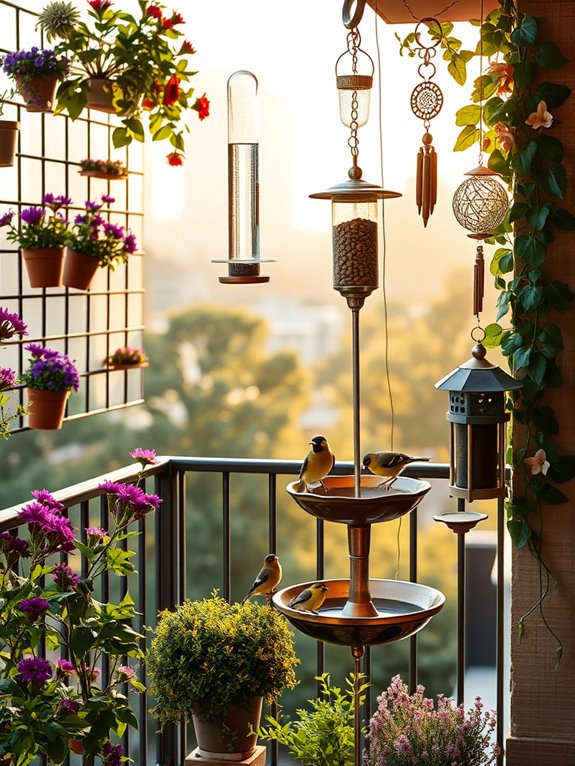
Transform your outdoor space into a vibrant hub of avian activity with a thoughtfully designed bird feeding station that beckons feathered friends throughout the seasons.
Picture a charming arrangement of varied feeders hanging at different heights from a decorative pole or mature tree, complemented by native flowering plants like purple coneflowers, black-eyed susans, and cardinal flowers that provide natural food sources. The gentle tinkling of wind chimes mingles with cheerful birdsong as chickadees, finches, and cardinals flit between feeding spots.
The feeding station creates a mesmerizing display of color and movement, with strategically placed perches and platforms that accommodate different feeding styles. Natural elements like fallen logs and stone borders provide landing spots while adding rustic appeal. Nearby water features, from simple birdbaths to small solar fountains, complete the sanctuary feeling, while surrounding butterfly bushes and native grasses offer shelter and create a seamless blend with the existing landscape.
Key Elements:
- Multiple bird feeder types (tube, platform, suet)
- Sturdy shepherd’s hook or feeding station pole
- Weather-resistant bird bath or fountain
- Native flowering plants for natural food
- Protective shrubs and small trees
- Ground cover plants
- Mounting hardware and hooks
- Squirrel baffles
- Clean-up tools and storage
Position your feeding station about 10-15 feet from protective cover to give birds quick escape routes while maintaining clear viewing lines from your window. Install the main feeding pole securely in the ground, using concrete if necessary, and attach squirrel baffles both below and above the feeders.
Arrange different feeder types at varying heights, with platform feeders lowest and tube feeders highest, ensuring at least 12 inches of space between each to prevent overcrowding. Plant protective shrubs and flowers in a semicircle around the feeding area, creating a natural backdrop that provides shelter and additional food sources.
Clean feeders regularly with a 10% bleach solution, and maintain a consistent feeding schedule once you begin. Remove fallen seed debris weekly to prevent mold and protect ground-feeding birds.
Adaptation Tips: For smaller spaces or balconies, use window-mounted feeders or compact feeding stations that attach to railings. Consider vertical gardening techniques to incorporate protective plants, using wall-mounted planters or tiered containers.
In urban settings, choose feeders with catch trays to minimize mess, and opt for no-waste seed blends to reduce cleanup needs. For winter feeding, ensure your station has adequate coverage from precipitation while maintaining good visibility for both birds and observers.
Planting a Micro Meadow Garden
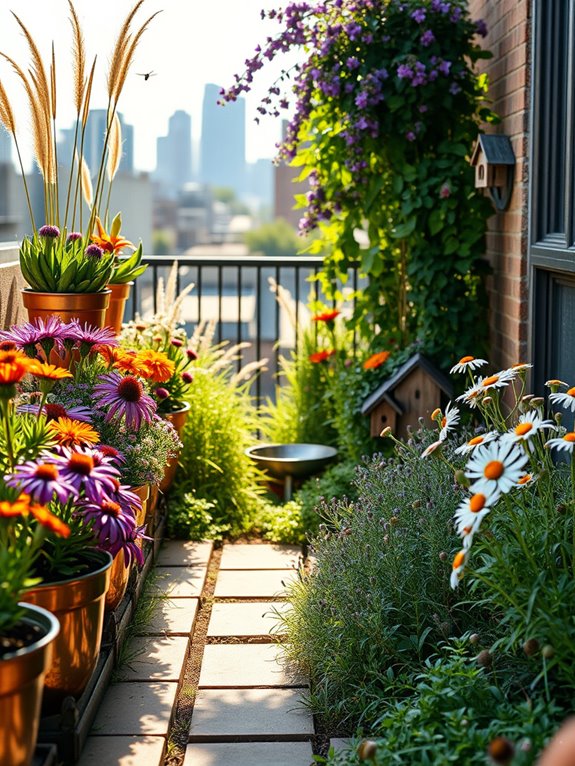
A micro meadow garden transforms even the smallest outdoor space into a slice of wild prairie paradise. Native wildflowers like purple coneflowers, black-eyed susans, and delicate Queen Anne’s lace create a tapestry of colors that sway gently in the breeze. Ornamental grasses, including feather reed grass and blue fescue, add movement and structure while providing essential shelter for small wildlife. The informal arrangement mimics nature’s own design, creating a peaceful retreat that feels both wild and intentional.
Throughout the seasons, this miniature meadow evolves with changing blooms and textures. Spring begins with early bloomers like violets and woodland phlox, transitioning to summer’s butterfly-attracting zinnias and cosmos. Fall brings golden seedheads and russet tones, while winter showcases the architectural beauty of dried stems and grasses glazed with frost. This ever-changing display ensures year-round interest while supporting local pollinators and birds.
Key Elements:
- Native wildflowers (mixed heights)
- Ornamental grasses
- Shallow water source
- Natural stone or log borders
- Mulch or pebble pathways
- Bee houses and bird feeders
- Landing perches for insects
- Seed-bearing plants
- Ground-level access points for wildlife
Creating a micro meadow begins with selecting the right location, ideally in full sun to partial shade. Remove existing turf and prepare the soil by adding organic matter.
Plant taller species at the back or center, working outward with medium and shorter varieties. Space plants closely to minimize weeding but allow room for spread. Incorporate stepping stones or narrow paths for maintenance access, and edge the area with natural materials to contain the wild growth.
Design adaptations can accommodate various space constraints. For tiny balconies, use tiered planters or vertical elements to maximize growing space. Choose compact varieties of meadow plants and focus on species that stay under two feet tall.
Consider using lightweight containers and modular systems that can be rearranged as needed. Success lies in selecting plants that match your specific growing conditions and maintaining a balance between organized chaos and controlled growth.
Adding Natural Shelter Elements
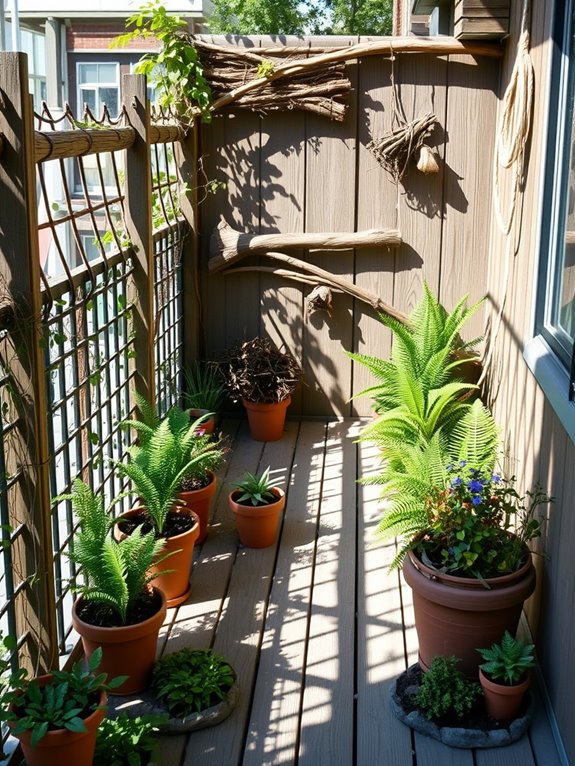
Tucked within even the smallest garden spaces, natural shelter elements create an enchanting refuge for local wildlife. Gnarled branches arch gracefully over moss-covered logs, while clusters of native ferns unfurl beneath weathered rock formations. Small brush piles, artfully arranged with twigs and fallen leaves, blend seamlessly into the landscape, offering secret hideaways for garden visitors like hedgehogs and beneficial insects.
Dense thickets of climbing vines intertwine with sturdy trellises, creating vertical sanctuaries for nesting birds and shelter-seeking butterflies. Natural materials like bark, hollow stems, and dried seed heads add texture and depth while providing essential protection from the elements. The overall effect is a layered, naturalistic haven that appears to have evolved organically over time.
Key Elements:
- Fallen logs and branches
- Rock piles and formations
- Brush piles
- Native climbing vines
- Hollow plant stems
- Bird-friendly shrubs
- Dense ground cover
- Natural mulch materials
- Weathered wood
- Native ferns
- Stone crevices
- Dead tree stumps
To implement these shelter elements, start by positioning larger features like logs and rock formations along the garden’s perimeter, creating a foundational backdrop. Layer smaller elements in front, maintaining clear sight lines while ensuring continuous cover for wildlife movement.
Integrate climbing plants near solid structures, allowing them to naturally create vertical shelter zones. Maintain brush piles seasonally, removing decomposed materials and adding fresh elements to maintain structure.
When designing natural shelter elements, consider seasonal changes and local wildlife needs. Adapt the scale of features to your space – balcony gardens can utilize wall-mounted branch bundles and compact brush corners, while larger areas can accommodate full brush piles and log sections.
Ensure all materials are secured against wind and positioned to prevent water accumulation that could lead to rot.
Maintaining Year-Round Food Sources
A year-round food source garden transforms your outdoor space into a vibrant buffet for local wildlife, with layered vegetation creating a tapestry of colors and textures throughout the seasons.
Early spring brings forth purple coneflowers and black-eyed susans, transitioning to summer’s bright cardinal flowers and bee balm, while autumn ushers in golden sunflowers and sedum. Berry-producing shrubs like winterberry and beautyberry provide splashes of color against winter’s stark backdrop, their fruits sustaining birds during the coldest months.
The garden pulses with life as butterflies drift between nectar-rich blossoms, while chickadees and finches navigate between strategic feeding stations and natural food sources. Native grasses wave their seed heads in the breeze, creating movement and offering shelter to ground-feeding birds.
Climbing vines like native honeysuckle and trumpet creeper scale trellises, providing vertical feeding opportunities for hummingbirds and creating a lush, enclosed feeling in even the smallest spaces.
Key Elements:
- Native flowering plants for multiple seasons
- Berry-producing shrubs
- Seed-heavy grasses
- Bird feeders and suet stations
- Water source or bird bath
- Climbing vines and trellises
- Multi-level planting areas
- Protected feeding zones
- Storage solutions for supplemental feed
Begin by mapping your space into distinct feeding zones, placing taller plants and shrubs along the northern edge to create a backdrop without shading other plants.
Install permanent feeding stations in sheltered areas, protected from prevailing winds and precipitation. Layer the garden with varying heights, incorporating ground-level plants, mid-height perennials, and vertical elements to maximize feeding opportunities in limited space.
Arrange plants in clusters to create visible feeding zones and ensure succession planting so food sources remain available throughout the year. Consider the specific needs of local wildlife when selecting plants and supplemental feeding options.
Install storage solutions that protect bird seed and suet from moisture and pests while remaining easily accessible for regular refilling.
For smaller spaces like balconies, focus on container plantings with high-value food sources such as dwarf sunflowers and compact berry bushes. Use vertical space efficiently by installing wall-mounted planters and hanging baskets.
Ensure all feeding stations have catch trays to prevent seed scatter, and choose plants that provide maximum wildlife benefit while maintaining a manageable size. Consider collapsible or storable elements that can be adjusted based on seasonal needs and space constraints.