
9 Garden Ideas for Tiny Spaces
Studies show that 68% of urban dwellers have less than 100 square feet of outdoor space for gardening. If you’re facing similar space constraints, you don’t have to give up your dreams of creating a lush, green oasis. From vertical wall systems that transform blank walls into living tapestries, to clever balcony solutions that maximize every inch, there’s a garden design that’ll work in your compact space. Let’s explore nine creative approaches that’ll help you cultivate your own mini paradise.
Contents
Vertical Garden Wall Systems
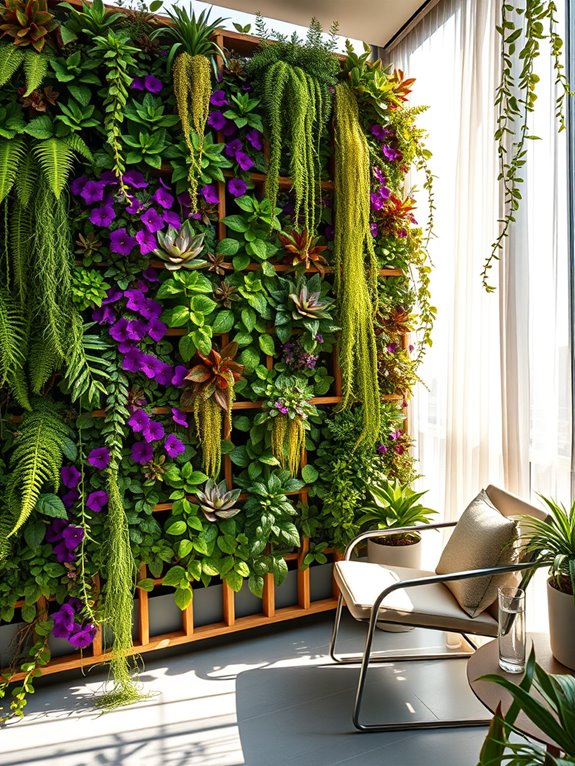
Transform your tiny outdoor space into a lush, living tapestry with a vertical garden wall system that defies spatial limitations. Emerald ferns cascade downward alongside vibrant purple petunias and crimson cardinal flowers, while clusters of hardy succulents add textural interest between climbing vines. The modular arrangement of plants creates a mesmerizing pattern that draws the eye upward, making even the smallest space feel like an enchanted garden sanctuary.
The vertical arrangement allows for an impressive diversity of plant life, from practical herbs like basil, thyme, and mint to ornamental flowers and trailing plants. The living wall becomes not just a garden but an architectural feature, softening harsh urban surroundings while providing a natural privacy screen. The gentle rustle of leaves and the subtle interplay of light and shadow transform a bland wall into a dynamic, ever-changing canvas.
Key Elements:
- Vertical garden mounting system or panels
- Irrigation system with timer
- Growing medium appropriate for vertical cultivation
- Plant selection suitable for vertical growth
- Waterproof backing material
- Support brackets and anchors
- Drainage collection system
- Growth medium retention materials
- Plant nutrition delivery system
- Maintenance tools
Installation begins with securing a waterproof backing to protect the wall structure, followed by mounting the vertical garden system according to manufacturer specifications. The irrigation system should be installed next, ensuring even water distribution throughout the growing areas.
Choose plants based on their light requirements and group them accordingly, with sun-loving plants at the top and shade-tolerant varieties below. Position plants in their modules or pockets, ensuring proper root coverage and stability in the growing medium.
For those with varying balcony dimensions, vertical gardens can be scaled accordingly. Consider incorporating a mix of 60% perennials for structure, 30% seasonal flowers for color, and 10% trailing plants for dynamic movement.
Maintenance involves regular pruning to prevent overcrowding, monitoring irrigation effectiveness, and replacing plants as needed. During winter months, protect tender plants from frost or replace them with cold-hardy varieties to maintain year-round interest.
Hanging Basket Gardens
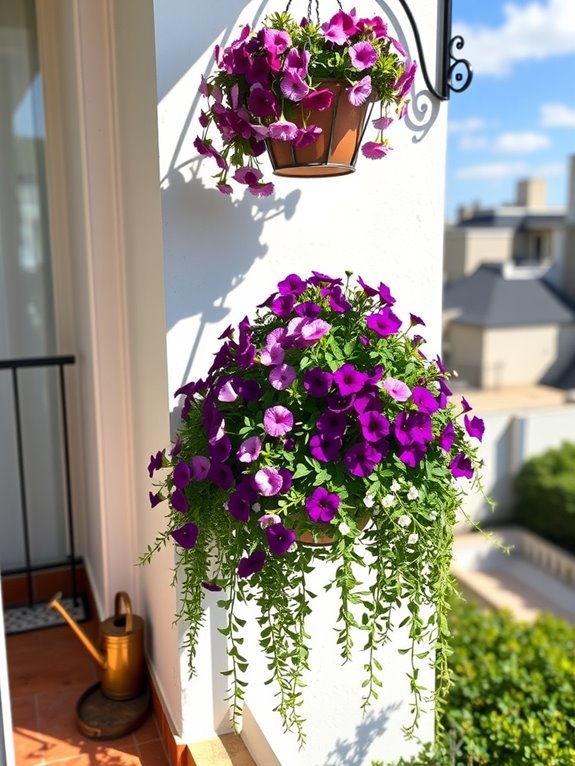
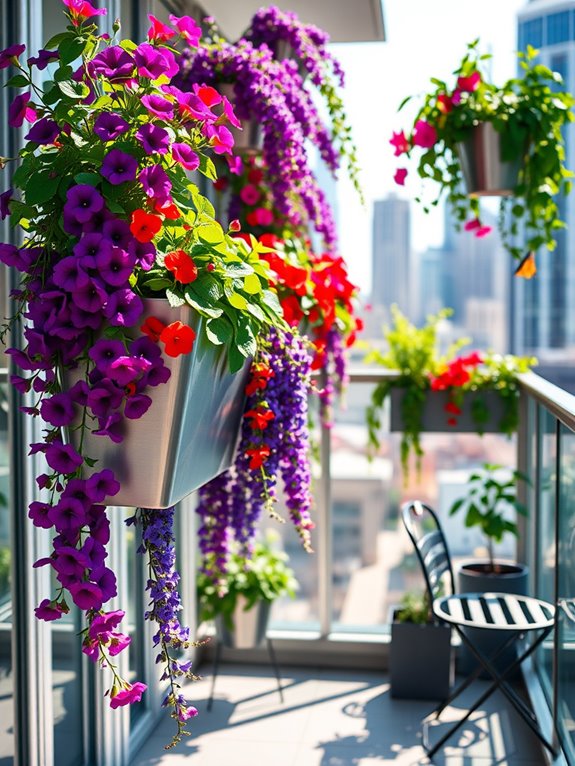
Transform your compact outdoor space into a cascading paradise with hanging basket gardens that create visual intrigue from ground to sky. Vibrant petunias spill over basket edges in waves of purple and pink, while trailing lobelia adds delicate touches of blue between lush green foliage.
Basket arrangements at varying heights create depth and dimension, turning empty vertical space into a living tapestry that changes with the seasons. The gentle movement of trailing plants dancing in the breeze brings life and energy to otherwise unused areas.
Strategic placement of baskets featuring herbs like trailing thyme and cascading rosemary not only adds aesthetic appeal but fills the air with aromatic pleasure. Mixed with flowering specimens like million bells and bacopa, these suspended gardens become a feast for both eyes and nose while maximizing every inch of available space.
Key Elements:
- Sturdy mounting brackets or shepherd’s hooks
- Weather-resistant hanging baskets with drainage
- Quality potting soil mix
- Slow-release fertilizer
- Selection of trailing plants
- Irrigation system or watering can
- Plant food
- Pruning shears
Begin installation by securing strong mounting points that can support fully-watered baskets. Position brackets at varying heights, ensuring each basket receives adequate light and air circulation.
Layer the bottom of each basket with moisture-retaining soil mix, leaving enough space for roots to develop. Plant selection should combine upright “thriller” plants in the center, surrounded by fuller “filler” plants, and trailing “spiller” varieties around the edges for maximum impact.
Regular maintenance is crucial for hanging basket success. Water thoroughly when the top inch of soil feels dry, typically daily during warm weather.
Feed plants every two weeks during the growing season with a balanced liquid fertilizer. Remove spent blooms and trim trailing plants as needed to maintain desired shape and promote continuous flowering.
Adapt your hanging garden to any space by considering exposure conditions and weight limitations. For sunny balconies, choose heat-tolerant varieties and consider installing a drip irrigation system to prevent daily watering chores.
In shadier spots, opt for shade-loving specimens like fuchsias or begonias. Small balconies can accommodate 2-3 strategically placed baskets, while larger spaces might support multiple tiers of plantings.
Remember to rotate baskets quarterly for even growth and install a catchment system to prevent water dripping onto neighbors below.
Stackable Container Solutions
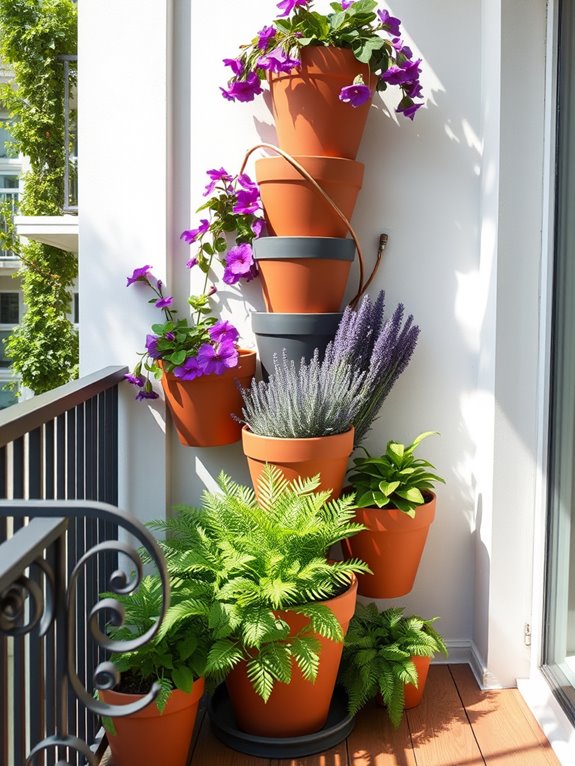
Imagine a vibrant vertical tapestry of cascading flowers and lush greenery, rising gracefully from artfully stacked containers. Terracotta pots, sleek modern planters, and repurposed wooden boxes create a dynamic arrangement that transforms a tiny corner into a living wall of color.
Purple trailing lobelia spills over edges, while compact herbs stand at attention, their varying heights creating natural layers that draw the eye upward. The structured yet organic feel of stackable containers brings order to small spaces while maximizing growing potential. Each level offers a different perspective, with sun-loving marigolds basking on upper tiers while shade-tolerant ferns thrive below.
The arrangement becomes a natural privacy screen, buffering urban views while providing a sense of secret garden seclusion in even the smallest outdoor space.
Essential Elements:
- Variety of containers (different sizes and materials)
- Tiered plant stands or shelving units
- Drainage materials (gravel, pot feet)
- Trailing plants (ivy, nasturtiums, petunias)
- Upright plants (salvias, lavender, compact vegetables)
- Quality potting soil
- Drip irrigation system or self-watering containers
- Support structures (if needed)
- Weather-resistant sealant for wooden elements
Begin implementation by selecting a sturdy base structure, ensuring it can support the weight of multiple filled containers. Place larger containers at the bottom, gradually decreasing size as you build upward.
Create stability by slightly offsetting each layer and securing containers if necessary. Ensure proper drainage by elevating pots and incorporating drainage holes. Consider sun exposure when placing plants, with sun-lovers on top tiers and shade-tolerant species below.
For maintenance, install an efficient watering system that reaches all levels, as stacked arrangements can make manual watering challenging. Check soil moisture frequently, as elevated containers may dry faster than ground-level plantings.
Regularly inspect the stability of your structure and adjust as needed while plants grow and mature.
When adapting this design for different spaces, consider the weight limitations of your balcony or terrace. For extremely tiny areas, focus on vertical growth with narrower containers and employ corner stacking to maximize space usage.
Use lightweight materials like fiber composite pots for upper levels, and incorporate self-watering systems to reduce maintenance demands. Remember that stackable containers can be readily rearranged as seasons change or as different plants require varying light conditions.
Window Box Herb Gardens
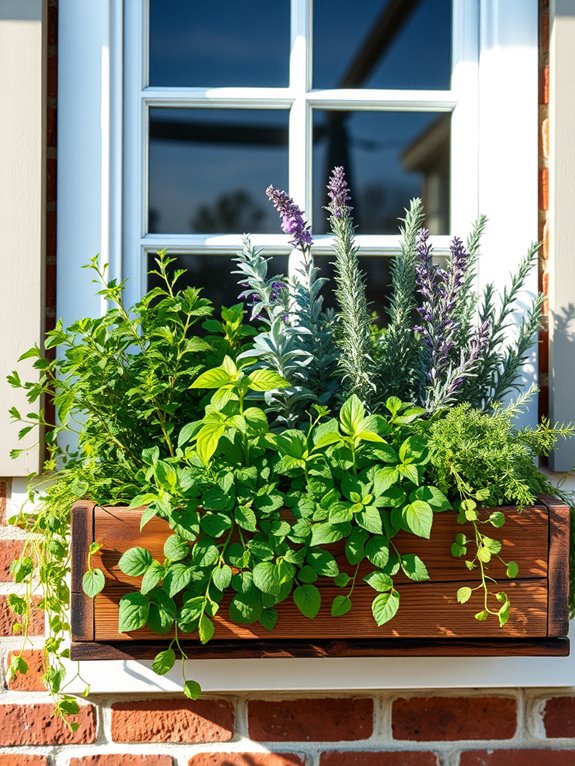
A window box herb garden transforms any ordinary windowsill into a vibrant slice of culinary paradise. Fresh sprigs of rosemary stand like miniature evergreen sentinels alongside delicate stems of flowering thyme and feathery dill, creating a cascading display of varying heights and textures.
The deep greens of sage leaves contrast beautifully with the bright, round leaves of oregano, while purple basil adds dramatic splashes of color to this living tapestry. The gentle morning sun catches dewdrops on tender mint leaves, filling the air with an invigorating fragrance that drifts through open windows.
This aromatic display not only delights the senses but serves as a practical kitchen garden, offering fresh herbs mere steps from your cooking space. The wooden or terra cotta boxes themselves become part of the home’s architectural charm, adding character and life to exterior walls.
Essential Elements:
- Wooden or terra cotta window boxes with drainage holes
- Brackets and mounting hardware
- Quality potting soil with organic matter
- Selection of herb seedlings or seeds
- Pebbles or broken pottery for drainage
- Watering can with fine spray head
- Pruning scissors
- Plant markers
- Organic fertilizer
Installation begins with secure mounting of window boxes using proper brackets and ensuring they’re level. Place a layer of drainage material at the bottom, then fill boxes two-thirds full with potting soil mixed with slow-release organic fertilizer.
Arrange taller herbs like rosemary and sage toward the back, medium-height plants like basil and oregano in the middle, and trailing herbs such as thyme and creeping marjoram toward the front. Leave adequate spacing between plants to allow for growth and air circulation.
When maintaining your window box garden, regular watering is crucial, especially during hot weather. Check soil moisture daily by inserting a finger into the soil – water when the top inch feels dry.
Harvest herbs frequently to encourage bushier growth, and pinch off flower buds to maintain leaf production. Replace soil annually and rotate plant positions to prevent nutrient depletion.
For varying window sizes, adjust box dimensions accordingly, but maintain a minimum depth of 6 inches for proper root development. Consider installing multiple narrow boxes for wider windows, or create a vertical element by adding wall-mounted containers above or below the main window box.
In especially sunny locations, incorporate drought-resistant herbs like lavender and oregano, while shadier spots are better suited for mint and parsley varieties. During extreme weather, temporary shade cloth or frost protection may be necessary to protect your herbal investment.
Pocket Plant Displays
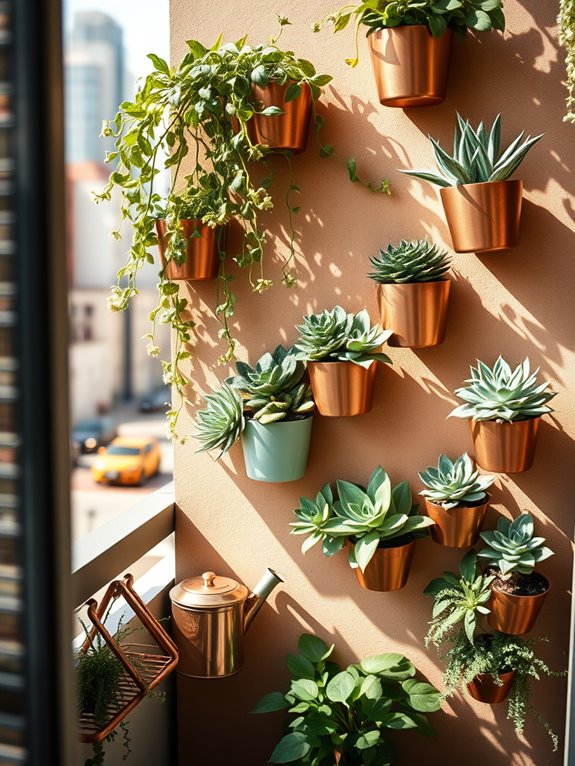
Transform your limited outdoor space into a captivating pocket plant display where carefully curated collections of small plants create an enchanting tapestry of colors and textures. Picture a mix of trailing succulents cascading from mounted wall pockets, delicate ferns nestled in corner brackets, and compact flowering plants arranged in tiered displays. These miniature garden vignettes draw the eye upward, making clever use of vertical space while adding depth and interest to otherwise unused areas.
The beauty of pocket plant displays lies in their versatility and intimate scale, offering close-up views of botanical treasures that might get lost in larger gardens. Imagine copper-toned air plants peeking out from geometric wall-mounted containers, while strings of pearls drape elegantly alongside compact herbs in recycled tin planters. This style creates a living art installation that changes with the seasons and brings nature right to eye level.
Essential Elements:
- Wall-mounted planters or pocket systems
- Lightweight growing medium
- Small-scale plants (succulents, air plants, compact herbs)
- Decorative containers
- Mounting hardware
- Drainage solutions
- Watering tools
- Plant support materials
- Accent lighting
- Weather protection elements
Installing a pocket plant display begins with selecting sturdy mounting points and ensuring proper wall protection. Install the strongest mounting elements at the top, working downward in a planned pattern that allows for both visual appeal and practical maintenance access.
Consider weight distribution and ensure each pocket has adequate drainage to prevent water damage to walls. Layer plants by size and growth habit, placing trailing varieties at the top and more upright specimens below.
When selecting plants, focus on specimens that will maintain proportional size and choose varieties with similar care requirements for each grouping. Establish a regular maintenance schedule that includes checking soil moisture, trimming spent growth, and rotating plants as needed for even light exposure.
Install a simple irrigation system or keep a small watering can nearby for easy care.
For varying balcony sizes, adapt the display by adjusting the number of mounting points and scale of containers. Smaller spaces might focus on a single striking vertical arrangement, while larger areas can accommodate multiple grouped displays.
Consider incorporating fold-down or removable elements for seasonal adjustment, and always ensure weight limitations are respected for elevated installations. Use light-colored containers in sunny spots to prevent root overheating, and install partial shade protection where needed.
Multi-Tiered Plant Stands
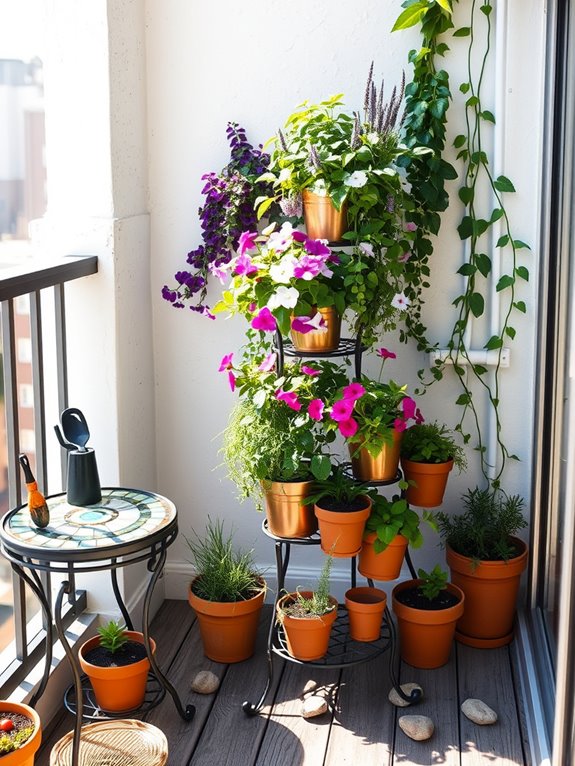
Transform your compact outdoor space into a lush vertical oasis with a multi-tiered plant stand garden that maximizes every inch of available room. Rising gracefully from ground to eye level, these elegant stands create a cascading display of greenery, featuring trailing ivy on upper tiers, vibrant flowering plants in the middle, and sturdy herbs or compact vegetables on lower levels. The staggered arrangement allows sunlight to reach each plant while creating a natural aesthetic flow that draws the eye upward.
The visual impact of a multi-tiered display brings depth and dimension to even the smallest patio or balcony corner. Combine different textures and colors, such as purple sweet potato vine cascading alongside bright pink petunias, while compact succulents add architectural interest between flowing foliage. Metal or wooden stands in antique finishes can add vintage charm, while modern geometric designs create contemporary appeal.
Essential Elements:
- Multi-tiered plant stand (metal, wood, or bamboo)
- Selection of containers with drainage holes
- Potting soil suitable for container gardening
- Mix of trailing plants (ivy, creeping jenny, vinca)
- Compact flowering plants (petunias, marigolds, pansies)
- Small herbs or vegetables
- Decorative stones or moss for top dressing
- Drip tray for bottom tier
- Plant supports or ties
When setting up your multi-tiered garden, begin by positioning the stand where it will receive appropriate sunlight while considering traffic flow around it. Place larger, heavier plants on lower tiers for stability, and ensure containers fit securely on each level. Create proper drainage by elevating pots slightly using pot feet or pebbles in drip trays.
Layer plants by height and growing habit, with trailing varieties positioned to cascade naturally between levels. For maintenance, install a simple drip irrigation system or water carefully by hand, starting from the top tier and allowing excess to trickle down. Regular pruning helps maintain the desired shape and prevents plants from overwhelming neighboring tiers. Rotate containers periodically to ensure even growth, and feed plants with appropriate fertilizers according to their specific needs.
Design Tip: Adapt your multi-tiered garden to different spaces by choosing stands with adjustable shelves or modular units that can be configured to fit your specific area. For narrow balconies, consider corner units or half-moon designs that hug walls. In windy locations, secure the stand to a wall or railing and choose wind-resistant plants. For maximum impact in tiny spaces, incorporate mirrors behind the stand to create the illusion of depth and double the visual greenery.
Space-Saving Hydroponic Systems
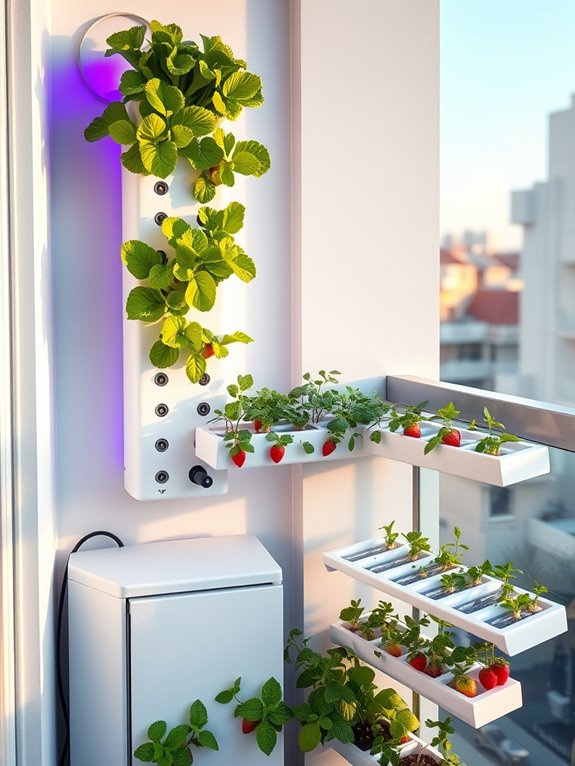
Transform your compact space into a sleek, modern oasis with a space-saving hydroponic system that combines aesthetics with efficient growing technology. Vertical towers of leafy greens cascade down pristine white tubes, while compact nutrient film technique (NFT) channels host vibrant herbs and compact vegetables.
LED grow lights cast a purple-blue glow that creates an almost futuristic ambiance, making your garden both a conversation piece and a productive growing space. The clean lines of hydroponic systems create an organized, minimalist appeal while maximizing growing capacity in tight quarters. Fresh lettuce, basil, mint, and strawberries thrive in carefully arranged growing channels, their roots dangling in nutrient-rich water below.
The gentle sound of circulating water adds a peaceful element to the space, while the vertical arrangement draws the eye upward, making even the smallest area feel larger and more dynamic.
Key Elements:
- Vertical hydroponic towers
- NFT channels or deep water culture containers
- LED grow lights
- Water pump and air stones
- Nutrient solution reservoir
- pH testing kit
- Growing medium (net cups, clay pellets)
- Timer system
- Temperature control system
- Drainage collection system
Setting up a hydroponic system begins with selecting the right location – ideally near an electrical outlet and water source. Mount vertical towers securely to walls or create a freestanding structure, ensuring proper weight distribution. Install the reservoir system at the base, connecting irrigation lines and ensuring proper water flow through all channels.
Position LED grow lights at appropriate distances based on plant types and growth stages. Test and adjust nutrient solutions weekly, maintaining proper pH levels between 5.5-6.5 for optimal growth. The key to success lies in careful monitoring and maintenance. Regular checking of water levels, nutrient concentrations, and pH is essential.
Clean the system monthly to prevent algae growth and maintain proper flow. Consider installing an automatic timer for lights and water circulation to maintain consistent growing conditions. When adapting to different spaces, consider modular systems that can be expanded or reduced as needed.
For extremely small balconies, focus on vertical towers and wall-mounted systems rather than horizontal NFT channels. Install a backup power system for the water pump to prevent system failures, and always keep spare parts on hand. Consider starting with easy-to-grow plants like lettuce and herbs before moving on to more challenging crops, and remember that ambient temperature control is crucial for system success.
Balcony Rail Planters
Transform your ordinary balcony railing into a vibrant, cascading garden that creates the illusion of floating flowers and greenery. Rail planters filled with trailing petunias, bright geraniums, and delicate lobelia create waves of color that dance in the breeze. Compact herbs like thyme and oregano add texture and fragrance to this vertical paradise. The natural flow of climbing plants and hanging blooms softens the harsh lines of urban architecture, creating a living curtain that provides both beauty and privacy.
This elevated garden brings nature right to your fingertips, allowing you to enjoy the therapeutic benefits of gardening while maximizing limited space. The mix of ornamental and edible plants creates a practical yet beautiful sanctuary where you can harvest fresh herbs for cooking while enjoying the visual impact of seasonal flowers. The vertical arrangement draws the eye upward, making your balcony feel more spacious while creating an enchanting outdoor room.
Key Elements:
- Rail-mounted planter boxes
- Bracket systems or mounting hardware
- Trailing flowering plants
- Compact herbs
- Container soil mix
- Irrigation system or watering can
- Plant supports or ties
- Decorative pot covers
- Weather-resistant containers
- Drainage trays
Begin installation by selecting sturdy, weather-resistant planters specifically designed for railing attachment. Secure each container using proper mounting brackets, ensuring they’re level and leaving adequate space between planters for plant growth. Fill containers with lightweight, well-draining potting mix, and arrange plants with trailing varieties at the edges and more upright specimens toward the back.
Install a simple drip irrigation system or plan for regular hand watering, as elevated planters can dry out quickly. When selecting plants, consider the weight capacity of your railing and containers. Group plants with similar water needs together, and establish a balanced feeding schedule to maintain healthy growth throughout the season. Rotate containers periodically to ensure even growth, and prune trailing plants as needed to maintain desired length and fullness.
For smaller balconies, focus on compact varieties and consider using corner brackets to maximize space. Larger balconies can accommodate multiple tiers of planters or alternating heights for added visual interest. Consider incorporating lightweight climbing trellises for vertical growth, and choose plants based on your balcony’s sun exposure and local climate conditions.
Remember to check building regulations regarding balcony weight restrictions and attachment methods before installation.
Compact Corner Gardens
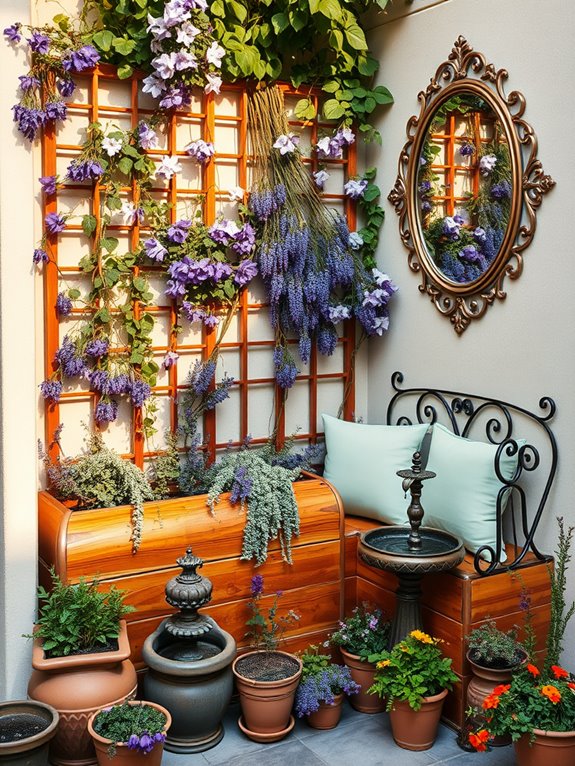
Transform a neglected corner into a lush, vertical oasis where climbing vines, cascading flowers, and compact shrubs create a harmonious tapestry of green.
A compact corner garden maximizes every inch of space by building upward, utilizing trellises and wall-mounted planters to create depth and visual interest. Delicate fairy lights wrapped around bamboo stakes or trailing down from hanging baskets add a magical ambiance, while strategically placed mirrors amplify light and create the illusion of additional space.
The layered approach combines low-growing ground covers like creeping thyme or sedum with mid-height flowering perennials such as lavender or compact salvias, crowned by climbing jasmine or clematis reaching toward the sky. A small water feature tucked into the corner provides gentle ambient sound, while weathered terracotta pots and vintage metal containers add character and charm to this intimate garden retreat.
Key Elements:
- Vertical trellises or wall-mounted garden panels
- Corner-shaped planter boxes
- Climbing plants and vines
- Compact perennials and ground covers
- Solar-powered fairy lights
- Decorative mirrors
- Small water feature
- Weather-resistant containers
- Drip irrigation system
- Corner bench or small seating element
Begin implementation by securing sturdy trellises or wall-mounted panels to create the vertical framework, ensuring proper anchoring for plant weight. Install a corner-shaped raised planter box at the base, filled with well-draining potting soil mixed with slow-release fertilizer. Position larger plants toward the back and corner, with cascading varieties at the edges.
Install an efficient drip irrigation system before adding plants to ensure consistent watering in hard-to-reach areas. Layer the plantings by starting with climbing varieties against the vertical supports, then add mid-height plants, and finish with ground covers at the front edge.
Maintain the garden by regular pruning to keep plants compact and healthy, especially climbing varieties that may become overwhelming in tight spaces. Implement a feeding schedule during growing seasons and check irrigation systems weekly.
Design adaptations can accommodate various corner configurations by adjusting the scale of elements. For extremely tight spaces, focus on one dramatic climbing plant with minimal understory plantings.
Larger corners can incorporate built-in seating or multiple planting tiers. Consider removable trellises for rental properties, and select plant varieties based on available light – shade-loving varieties for north-facing corners, sun-loving species for brighter exposures.
Install protective covers or windbreaks in exposed locations to shield delicate plants from harsh elements.