
7 Garden Ideas for Sustainable Living
You’ll find beauty in sustainability and purpose in every plant when you transform your garden into an eco-friendly sanctuary. With thoughtful planning and creative solutions, you can build a thriving outdoor space that nourishes both your family and the environment. From setting up a simple compost bin to creating vibrant habitats for local wildlife, there’s an exciting world of sustainable gardening waiting for you to explore. Let’s discover how these seven practical ideas can help you make a lasting difference in your backyard.
Contents
Start Your Own Compost System
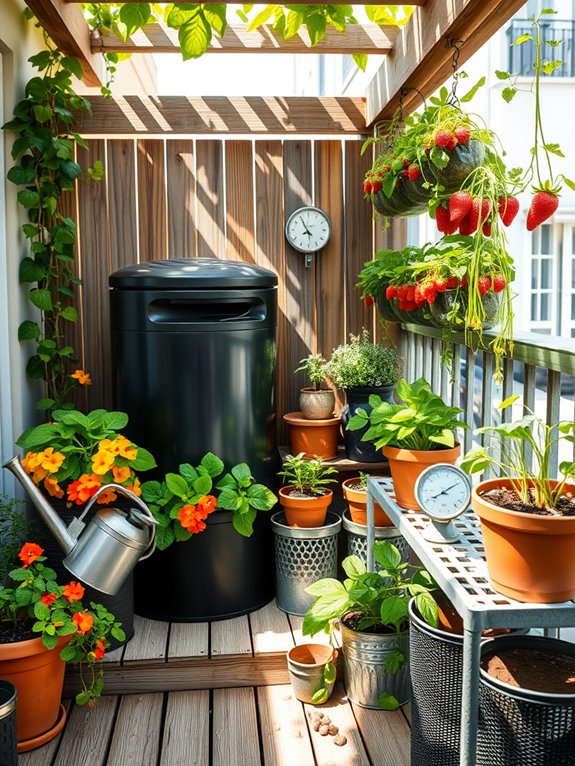
A flourishing compost system transforms an ordinary garden corner into a testament to nature’s recycling prowess. Rich, dark soil teeming with beneficial organisms creates an earthy tapestry, while strategically placed wooden bins blend seamlessly with the natural environment.
Climbing vines like nasturtiums or pole beans can be trained to soften the structure’s edges, creating an attractive screen that masks the composting process while adding vibrant pops of color to the space.
The area around your composting station becomes a hub of garden activity, where wheelbarrows, pitchforks, and collection bins become artistic elements in their own right. A small bench nearby provides a spot for rest and reflection, while nearby herb gardens benefit from the nutrient-rich soil the system produces. The space emanates a sense of purposeful sustainability, connecting gardeners to the ancient practice of soil building.
Key Elements:
- Wooden or wire mesh compost bins
- Collection containers for kitchen scraps
- Pitchfork or turning tool
- Carbon materials (dry leaves, straw, paper)
- Nitrogen materials (food scraps, grass clippings)
- Moisture meter
- Screening system for finished compost
- Garden hose or watering can
- Thermometer
- Cover or tarp
Setting up an effective composting system requires careful planning and layering. Position bins in a partially shaded area with good drainage, ensuring easy access for adding materials and turning the pile.
Create a three-bin system: one for fresh materials, one for actively decomposing matter, and one for finished compost. Start with a layer of coarse materials like twigs for drainage, then alternate between green (nitrogen-rich) and brown (carbon-rich) materials in roughly 3:1 ratio of browns to greens.
Maintain proper moisture levels similar to a wrung-out sponge, and turn the pile every few weeks to accelerate decomposition. Monitor internal temperatures, aiming for 130-150°F in the active pile’s center.
When materials in the active bin turn dark and crumbly with no recognizable scraps, screen it into the finishing bin for final curing.
For smaller spaces or balcony gardens, consider a compact tumbler system or bokashi composting method. These alternatives require less space while still producing valuable compost. In urban settings, focus on collecting dry browns during autumn months, storing them in bags for year-round use.
To minimize odors in confined spaces, bury fresh scraps deeper in the pile and maintain strict carbon-to-nitrogen ratios. Container gardens can benefit from compost tea made by steeping finished compost in water, providing concentrated nutrients in a space-efficient form.
Create a Rain Garden and Water Collection
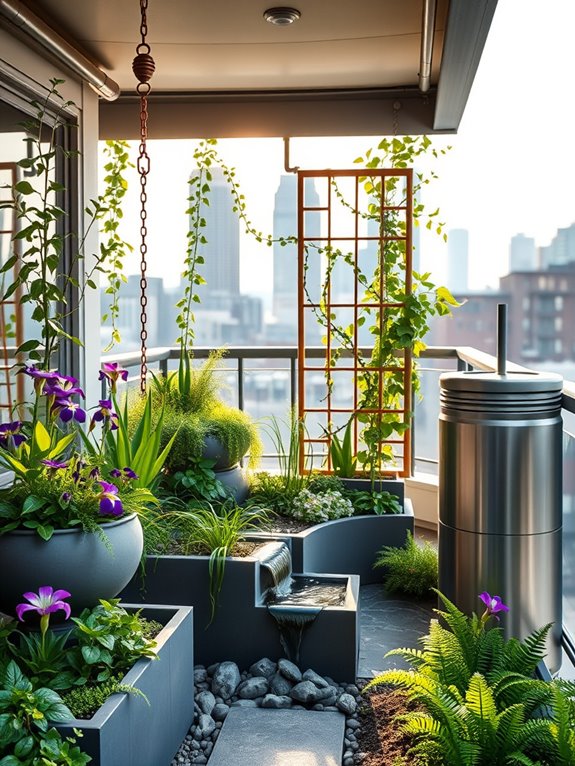
Gentle rivulets of rainwater cascade through carefully arranged river rocks, creating a mesmerizing natural symphony in your sustainable rain garden.
Native wetland plants like purple coneflowers, black-eyed susans, and swaying ornamental grasses frame the shallow depression, while vibrant blue iris and joe-pye weed add bursts of color throughout the seasons.
Strategically placed rain barrels, adorned with climbing vines and artistic water chains, transform ordinary downspouts into elegant water features.
The space serves both function and beauty, managing stormwater runoff while providing a sanctuary for local wildlife.
Butterflies and birds flock to the moisture-loving plants, while decorative stepping stones wind through the garden, offering peaceful moments of contemplation.
The subtle sound of water trickling through the rock-lined channels creates a peaceful atmosphere, making this eco-friendly garden a natural retreat.
Key Elements:
- Rain barrels or cisterns
- Downspout redirectors
- River rocks and gravel
- Native moisture-loving plants
- Permeable pavers or stepping stones
- Drainage pipes
- Rain chains
- Deep-rooted perennials
- Organic mulch
- Water-resistant garden edging
Creating a rain garden begins with selecting a natural depression or creating one approximately 6-10 feet from your home’s foundation.
The area should be excavated to form a shallow basin, typically 4-8 inches deep, with gently sloping sides.
Install a layer of gravel beneath amended soil to improve drainage, then arrange larger rocks to create attractive water channels from your downspouts or rain chains to the garden basin.
Position rain barrels at downspouts, ensuring proper overflow connections to the garden area.
Plant selection and arrangement follows a simple rule: position the most water-tolerant species in the center or lowest point, with increasingly drought-tolerant plants toward the edges.
Create layers of height, with taller plants like switchgrass or native shrubs at the back, medium-height flowering perennials in the middle, and ground covers around the edges.
Maintain proper spacing between plants to allow for growth and adequate air circulation.
Adaptability Tips: For smaller spaces or balconies, consider creating a modified rain garden using containers with water reservoirs and overflow systems.
Use vertical rain chains and wall-mounted rain barrels to maximize space efficiency.
Multiple small basins can be interconnected rather than creating one large depression, and container gardens can be arranged in tiers to manage water flow effectively.
In urban settings, focus on compact varieties of moisture-loving plants and consider incorporating a small water feature to maintain the aesthetic appeal while managing reduced water quantities.
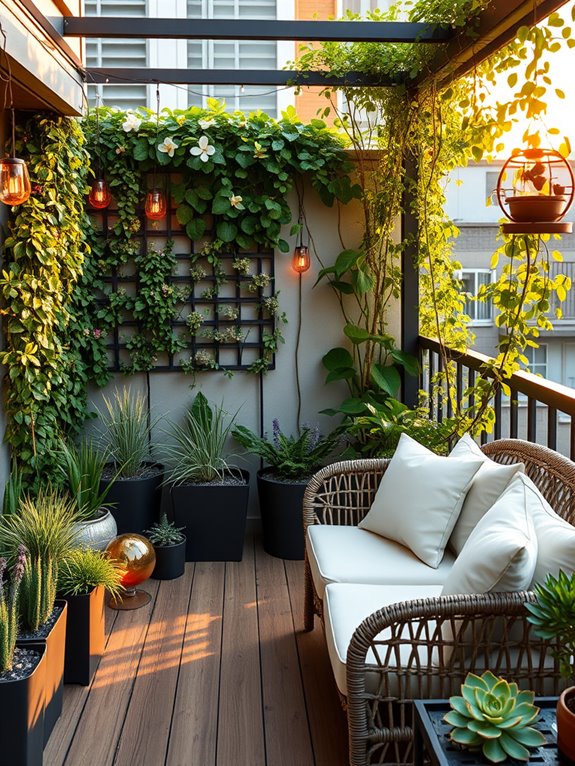
Plant Native Species for Local Wildlife
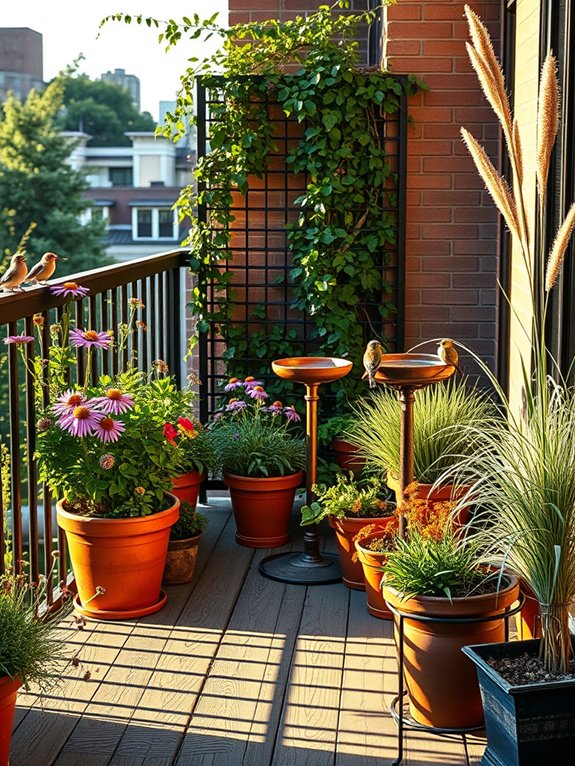
Transform your garden into a vibrant sanctuary by embracing the natural beauty of native species. Swaying patches of purple coneflowers dance alongside golden black-eyed susans, while delicate butterfly weed adds splashes of bright orange. Native grasses create gentle movement, their seedheads catching the morning light as chickadees and finches dart between the stems.
Flowering dogwoods and serviceberry trees provide vertical interest, offering crucial shelter and food sources for local birds throughout the seasons. The garden hums with life as native bees buzz among the blooms, and monarch butterflies gracefully float between patches of milkweed. Natural stone pathways wind through the plantings, leading to a small water feature where birds gather to drink and bathe.
Berry-producing shrubs like elderberry and winterberry holly create year-round interest while supporting wildlife through the lean winter months. The garden feels wild yet intentional, celebrating the natural heritage of your region while creating a peaceful retreat.
Key Elements:
- Native flowering perennials
- Indigenous grasses
- Local tree and shrub species
- Natural stone pathways
- Small water feature or bird bath
- Brush piles for wildlife shelter
- Nesting boxes
- Berry-producing plants
- Dead wood features
- Native ground cover
Begin by researching plants native to your specific region and their growing requirements. Group plants with similar water and sunlight needs together, placing taller species toward the back of borders and shorter ones in front.
Create layers of vegetation by incorporating ground covers, mid-height perennials, and taller woody plants. Install water features early in the process, ensuring they’re easily accessible for wildlife but protected from predators by nearby plantings. Maintain natural spacing between plants to allow for mature growth while minimizing the need for future division.
For successful implementation, start small and expand gradually. Remove invasive species completely before introducing native plants, and use organic mulch to suppress weeds while maintaining soil moisture. Water deeply but infrequently to encourage deep root growth, and avoid chemical pesticides that could harm beneficial insects and wildlife.
Adapt your native garden to any space by focusing on appropriate scale and local species. Balcony gardeners can use containers for native wildflowers and grasses, while smaller yards might emphasize vertical elements like climbing vines on trellises.
Consider sight lines and seasonal interest when selecting plants, and remember that even small native gardens can create valuable wildlife corridors when connected with other natural areas in your neighborhood.
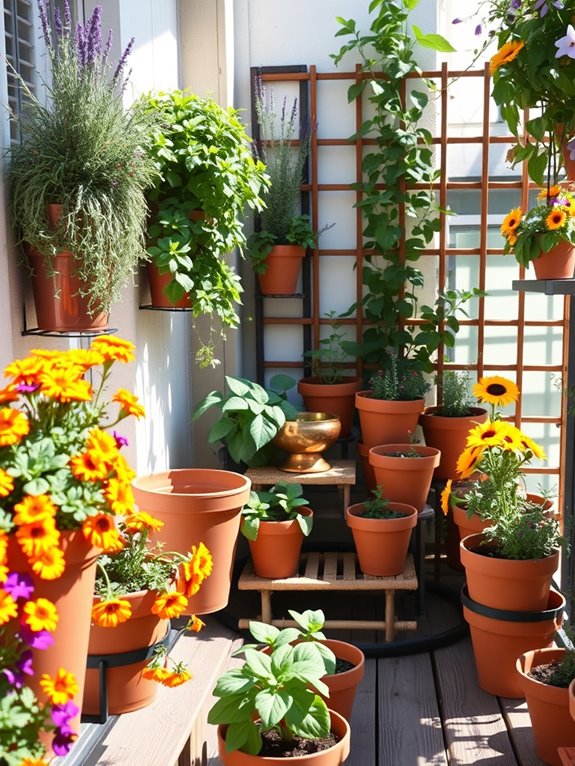
Design a Year-Round Kitchen Garden
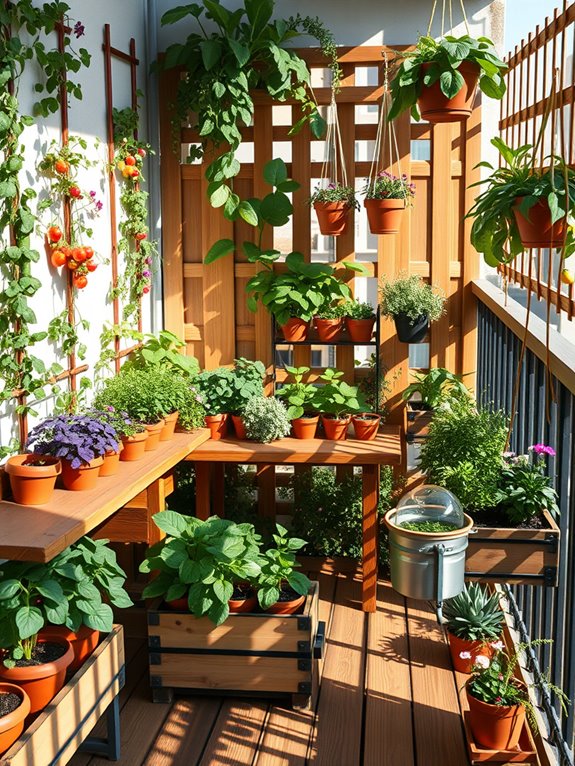
A Year-Round Kitchen Garden transforms your outdoor space into a living pantry, where neat rows of vegetables, herbs, and edible flowers create a tapestry of colors and textures that change with each season. Raised beds filled with rainbow chard, climbing pea trellises, and flowering herbs form geometric patterns that are both productive and visually striking.
Stone pathways wind between plots of leafy greens, while permanent features like espaliered fruit trees along fences provide structural beauty even in winter months. The garden pulses with life throughout the year, from the first spring shoots of garlic and early peas to the late autumn harvest of squashes and root vegetables.
Cold frames and cloches dot the landscape like miniature greenhouses, extending the growing season and adding architectural interest. Perennial herbs form aromatic borders, while vertical elements like bean towers and grape-covered arbors draw the eye upward, creating a sense of abundance in every direction.
Essential Elements:
- Raised beds (minimum 4)
- Irrigation system
- Compost bins
- Tool storage
- Vertical growing structures
- Cold frames or cloches
- Permanent herb beds
- All-weather pathways
- Season extension materials
- Fruit trees or bushes
- Storage area for supplies
- Seating/work area
Implementation begins with a thorough site analysis to maximize sun exposure and create efficient circulation patterns. Position raised beds in north-south orientation for optimal light distribution, with primary paths wide enough for wheelbarrow access.
Install irrigation before planting, ensuring each bed has individual water control. Establish permanent plantings like herbs and fruit trees first, then organize annual rotation spaces in quadrants for proper crop rotation.
The garden requires systematic organization to maintain year-round productivity. Create a planting calendar divided into seasons, with succession planting schedules and crop rotation plans.
Incorporate season extension techniques like row covers and cold frames to protect plants during shoulder seasons. Maintain dedicated areas for starting seedlings and storing harvested crops.
For smaller spaces or balconies, focus on vertical growing systems and container combinations that maximize productivity per square foot. Use wall-mounted planters, hanging baskets, and tiered containers to grow herbs and compact vegetables.
Consider dwarf fruit varieties in containers and climbing plants on balcony railings. Install a micro-irrigation system with timers to maintain consistent moisture levels, and choose varieties bred specifically for container growing to ensure success in limited spaces.
Build Natural Pest Control Methods
Imagine stepping into a vibrant garden where nature’s own defense system creates a harmonious balance. Marigolds border garden beds with their cheerful orange and yellow blooms, while purple lavender sways gently in the breeze, attracting beneficial insects. Fragrant herbs like rosemary and thyme create aromatic barriers between vegetable rows, their silvery-green foliage adding texture and natural protection against unwanted pests.
The garden pulses with life as ladybugs patrol leaves for aphids, and birds flit between native flowering plants, hunting for caterpillars. Companion planting creates a tapestry of colors and heights, with tall sunflowers acting as natural stakes for climbing beans, while nasturtiums cascade over bed edges, their peppery blooms deterring numerous garden pests. Stone pathways wind through the beds, providing habitat for beneficial ground beetles and other helpful insects.
Key Elements:
- Companion plants (marigolds, nasturtiums, calendula)
- Aromatic herbs (lavender, rosemary, thyme, mint)
- Native flowering plants
- Water feature for beneficial insects
- Bird-attracting plants and feeders
- Stone or wood mulch
- Diverse plant heights
- Insectary plants (dill, fennel, yarrow)
- Natural barriers (hedges or tall grasses)
Implementation begins with mapping your garden to create diverse plant communities. Position taller pest-repelling plants like sunflowers and artemisia along the north side to avoid shading, then layer shorter companions throughout the beds. Create dedicated herb sections near vulnerable plants, ensuring even distribution of protective species.
Install a small pond or water feature to attract beneficial insects and provide bird baths to encourage natural pest control from above.
Maintain the garden’s protective qualities by regularly pruning herbs to promote strong growth and essential oil production. Rotate annual pest-deterrent plants seasonally to prevent pest adaptation, and maintain healthy soil through organic mulching and compost application. This creates a robust ecosystem where beneficial insects thrive and harmful ones struggle to gain foothold.
For smaller spaces or balconies, focus on container groupings of compatible plants, using vertical elements like wall-mounted herbs and hanging nasturtiums. Consider dwarf varieties of pest-repelling plants and create mini-diversity islands in container gardens. Even the smallest balcony can support a mixture of aromatic herbs and flowers in stackable planters or railing boxes, providing effective natural pest control while maximizing limited space.
Install Solar-Powered Garden Features
Transform your garden into an enchanting eco-friendly retreat with solar-powered features that create a magical atmosphere day and night. Gleaming solar lanterns cast warm, gentle light along winding pathways, while delicate string lights twinkle overhead like stars through climbing jasmine and wisteria. Solar-powered fountains provide soothing water music, their gentle bubbling attracting birds and butterflies while creating peaceful focal points throughout the space.
During daylight hours, solar panels discretely positioned among ornamental grasses and flowering perennials collect energy, seamlessly blending with the natural landscape. As dusk approaches, motion-activated pathway lights illuminate automatically, creating safe passage through garden rooms while highlighting architectural plants like bamboo and Japanese maples. The combination of sustainable technology and natural elements produces an environmentally conscious space that remains magical around the clock.
Key Elements:
- Solar-powered pathway lights
- Solar fountain with backup battery
- LED string lights with solar collectors
- Motion-activated security lights
- Solar-powered decorative orbs
- Weather-resistant solar panels
- Battery storage units
- Light-sensitive automatic timers
- Weatherproof wiring conduits
- Solar-powered bug zappers
Begin installation by mapping your garden’s sunny areas to determine optimal solar panel placement. Install the main solar collectors where they receive 6-8 hours of direct sunlight daily, typically facing south in the Northern hemisphere. Create a comprehensive lighting plan that includes layers of illumination: ground-level path lights, mid-height feature lighting, and overhead ambient lighting.
Position water features near seating areas for maximum enjoyment, ensuring the solar panels for fountains receive adequate sunshine. For successful implementation, consider seasonal sun patterns and shadow movements when positioning solar elements. Incorporate backup battery storage systems to maintain lighting during cloudy periods.
Clean solar panels monthly to maintain optimal efficiency, and check wire connections seasonally for weather damage or loose connections. Install water features on level surfaces with proper drainage to prevent overflow issues.
When adapting solar features for different spaces, smaller balconies can utilize vertical solar installations and wall-mounted panels to maximize limited space. Consider multi-functional solar elements, such as planter boxes with built-in lighting or railing-mounted solar lights.
For shaded areas, use extended solar collectors connected to remote panels placed in sunny locations. Always check weight restrictions for balcony installations and local regulations regarding exterior modifications in urban settings.
Establish a Seed Saving Program
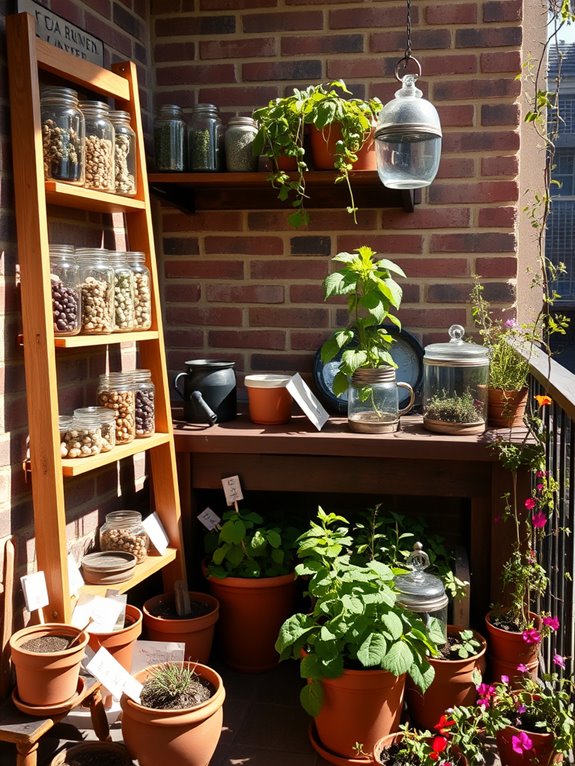
A seed saving garden radiates thoughtful intentionality, with carefully spaced plants allowed to fully mature and produce seeds. Towering sunflowers stand as natural centerpieces, their massive heads bowing with ripening seeds, while heritage tomato vines climb rustic trellises, their fruits showing the beautiful diversity of shapes and colors that open-pollinated varieties offer.
Scattered throughout are traditional wooden seed drying racks and antique glass collection jars that catch the sunlight, adding both functionality and charm to the space. The garden pulses with life through all seasons, transforming from spring’s tender seedlings to summer’s abundant blooms, and finally to autumn’s seed-laden stems left standing proud against the cooling air.
Herbs like cilantro, dill, and basil are allowed to flower and set seed, creating delicate umbels that dance in the breeze while attracting beneficial pollinators. Vintage plant markers identify each variety, ensuring accurate documentation of the genetic heritage being preserved.
Key Elements:
- Open-pollinated vegetable varieties
- Heirloom flowers and herbs
- Seed drying racks
- Glass collection jars
- Plant markers and labels
- Garden journal
- Paper bags for seed collection
- Mesh screens for cleaning seeds
- Storage containers
- Temperature-controlled storage area
To establish a successful seed saving garden, begin by selecting open-pollinated varieties and spacing them according to recommended isolation distances to prevent cross-pollination. Create designated areas for different plant families, making it easier to track and maintain pure seed lines.
Install sturdy trellises and supports early in the season, anticipating the full growth of seed-producing plants. Set up a dedicated workspace with proper ventilation for seed processing, complete with drying racks and cleaning screens.
Organize your garden to accommodate the full lifecycle of plants, allowing adequate space for them to complete their seeding phase. Label everything meticulously, recording planting dates, flowering times, and seed collection dates in your garden journal.
Consider succession planting to ensure continuous seed production throughout the growing season. For smaller spaces like balconies, focus on self-pollinating plants or single varieties of cross-pollinating species to maintain seed purity. Use vertical growing techniques and container gardens specifically designated for seed saving.
Install adjustable shelving for seed drying and processing equipment, and invest in space-saving storage solutions that maintain proper temperature and humidity levels. Remember that even a small seed saving garden can contribute significantly to preserving genetic diversity and creating a self-sustaining garden cycle.