
10 Garden Ideas for Steep or Sloped Yards
If you’re facing the challenge of a steep yard, you’ll find that transforming this tricky terrain into a stunning garden space isn’t just possible—it’s an opportunity for creative design. Your sloped landscape can become a showcase of cascading flowers, winding pathways, and functional outdoor rooms that capture attention from every angle. From terraced beds that prevent erosion to strategic water features that turn drainage issues into assets, there’s a world of clever solutions waiting to reshape your challenging slope into your dream garden.
Contents
- 1 Terraced Garden Beds and Retaining Walls
- 2 Natural Stone Steps and Pathways
- 3 Cascading Water Features and Fountains
- 4 Multi-Level Decking Solutions
- 5 Ground Cover Plants for Erosion Control
- 6 Strategic Planting Zones and Rock Gardens
- 7 Hillside Seating Areas and Viewing Points
- 8 Rain Gardens and Drainage Solutions
- 9 Vertical Gardens and Living Walls
- 10 Low-Maintenance Landscaping Techniques
Terraced Garden Beds and Retaining Walls
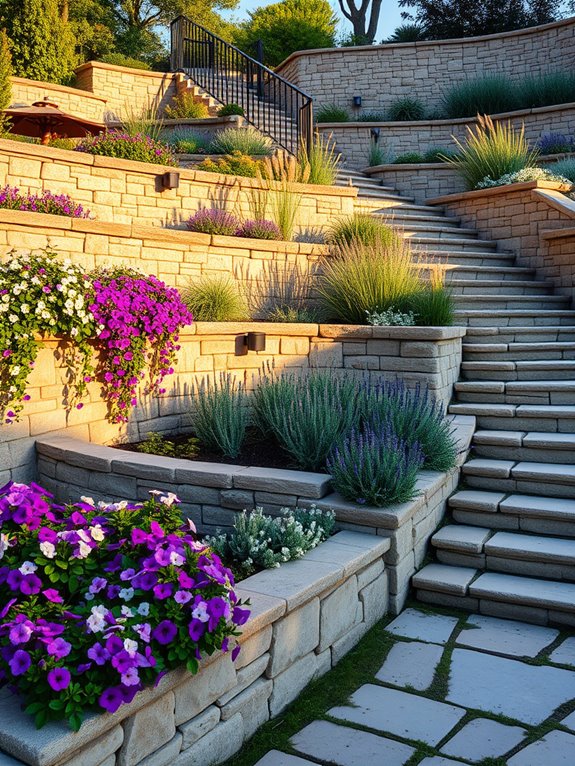
Transform your challenging hillside into a dramatic cascade of living layers with terraced garden beds and retaining walls. Stone or timber walls create multiple levels that appear to float above one another, each filled with verdant plantings that spill over the edges. Trailing plants like creeping phlox and wave petunias cascade down the walls’ faces, while upright specimens like ornamental grasses and lavender stand sentinel at each level, creating a rhythmic vertical garden that draws the eye upward through the space.
Each terrace offers a unique opportunity to create distinct garden rooms and microclimates. Mediterranean herbs thrive in the upper, sun-drenched tiers, while shade-loving ferns and hostas flourish in the cooler lower levels. Natural stone steps weave between the terraces, allowing easy access for maintenance and creating an inviting journey through the garden. The walls themselves become architectural features, especially when illuminated at night, casting dramatic shadows and highlighting the garden’s dimensional qualities.
Key Elements:
- Retaining wall materials (stone, timber, or concrete blocks)
- Proper drainage system
- Multi-level planting areas
- Access stairs or pathways
- Soil retention mechanisms
- Edge protection
- Irrigation system
- Various plant types for different levels
- Lighting fixtures
- Stabilizing ground cover
Implementation requires careful planning and often professional expertise for structural elements. Begin by surveying the slope and marking terrace locations, ensuring each level has adequate depth for planting.
Install proper drainage behind each wall, using gravel and perforated pipes to direct water away from the structure. Build walls from the bottom up, ensuring each is level and properly backfilled. Create planting beds with good-quality topsoil mixed with organic matter, and install irrigation systems before adding plants.
Extra Tips: Consider the viewing angles from both above and below when planning plant placement. For smaller spaces, use mini-terraces with shorter walls, perhaps just 12-18 inches high.
Incorporate built-in seating on wider terraces to create usable outdoor living space. Choose wall materials that complement your home’s architecture, and remember that darker materials absorb more heat, which can affect plant choices.
In areas with heavy rainfall, include additional drainage features and select plants with strong root systems to prevent soil erosion.
Natural Stone Steps and Pathways
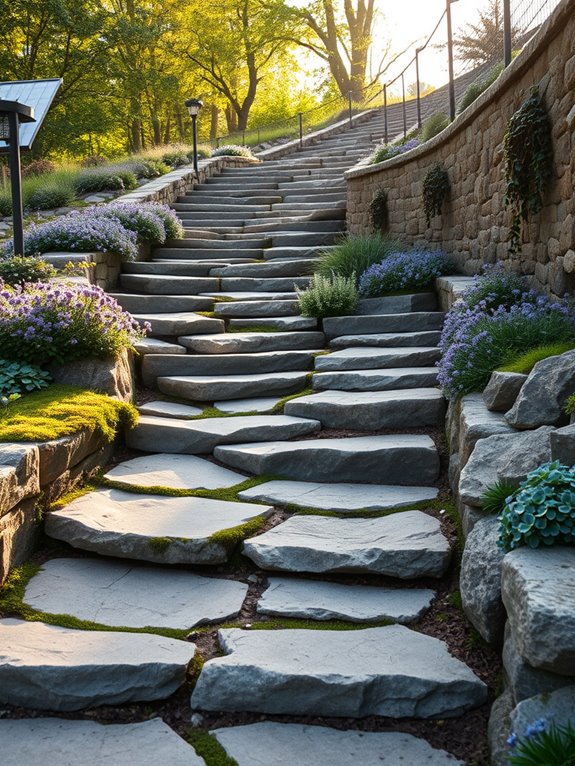
Transform your challenging hillside into a stunning natural showcase with winding stone steps that seem to emerge organically from the landscape. Weather-worn granite, slate, or limestone steps create an enchanting journey through your garden, while native groundcovers like creeping thyme and moss peek through the crevices, softening the edges and adding natural charm. The meandering pathway draws the eye upward, creating intrigue and invitation to explore what lies beyond each turn.
These natural stone elements blend seamlessly with strategic plantings of cascading perennials and ornamental grasses that spill over the edges, creating a romantic, established feel. Alpine plants and succulents tucked between rocks add texture and year-round interest, while small flowering bushes like dwarf rhododendrons or compact hydrangeas provide anchor points along the journey. The overall effect is one of timeless beauty that appears to have always been part of the landscape.
Key Elements:
- Natural stone slabs or steps (varying sizes)
- Gravel or crushed stone for path base
- Landscape fabric for weed control
- Edge restraints or larger stones for borders
- Ground cover plants
- Alpine or rock garden plants
- Small shrubs for anchor points
- Drainage materials
- Landscape lighting
- Hand tools and leveling equipment
Begin implementation by carefully planning your path’s route, considering natural contours and desired destination points. Start at the bottom of the slope, installing proper drainage systems and creating a stable base using crushed stone and landscape fabric.
Each step should be set slightly forward into the hill at a slight angle for water runoff, with approximately 6-8 inches of rise between steps. Ensure each stone is level and stable before moving to the next, using smaller stones and gravel to fill gaps and create proper support.
Create planting pockets along the sides of steps and pathways as you progress upward. These spaces will host your chosen plants and help stabilize the soil. Install irrigation systems or soaker hoses during construction to ensure proper plant maintenance, and consider incorporating landscape lighting for safety and evening ambiance.
When adapting this design to different spaces, consider the slope’s grade and available width. Steeper slopes may require shorter runs between switchbacks, while gentler slopes can accommodate longer stretches.
For narrow areas, focus on a single, well-designed path with minimal plantings, while wider spaces can support multiple branching paths and more elaborate planting schemes. Always factor in local climate and drainage patterns when selecting materials and plants, and remember that proper foundation work is crucial for long-term stability and success.
Cascading Water Features and Fountains
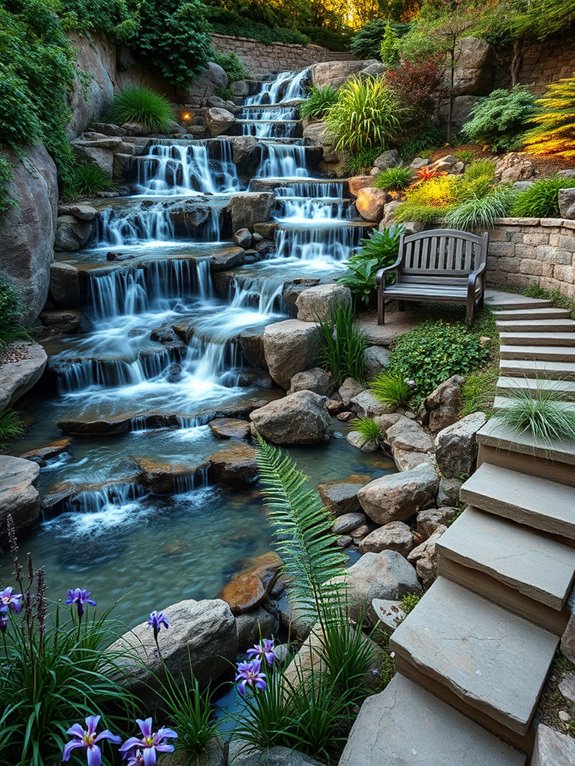
Transform your steep yard into a mesmerizing oasis with cascading water features and fountains that create a symphony of flowing water. Multiple levels of natural stone waterfalls tumble down the hillside, while strategically placed catch basins create tranquil pools surrounded by moisture-loving ferns, Japanese forest grass, and delicate astilbe. The sound of water dancing from tier to tier masks urban noise while providing a soothing backdrop that attracts songbirds and creates a peaceful retreat.
Illuminated water features become even more dramatic after sunset, with subtle lighting highlighting the water’s movement and creating shimmering reflections on surrounding foliage. Hardy water plants like creeping Jenny and water iris soften the edges of each pool, while weathered copper spouts and natural boulder arrangements provide architectural interest. The vertical movement of water draws the eye upward, making the space feel larger while celebrating the natural slope of the terrain.
Key Elements:
- Tiered retaining walls
- Multiple water collection basins
- Submersible pumps and filtration systems
- Natural stone or precast concrete spillways
- Underground plumbing and electrical
- Moisture-tolerant plants
- Low-voltage lighting system
- Weather-resistant spouts or fountainheads
- Landscape fabric and gravel for drainage
- Remote control system for water flow
Begin installation by establishing a solid foundation with properly engineered retaining walls and ensuring adequate drainage throughout the system. Install the main collection basin at the bottom of the slope, then work upward with subsequent pools and connecting waterways, using flexible PVC pipe to connect the pump system. Incorporate flat stones or concrete ledges between tiers to allow for maintenance access, and install lighting simultaneously with the water features to avoid disturbing the finished landscape.
Layer plants from largest to smallest, placing moisture-loving specimens near water sources and drought-tolerant options at the outer edges. When designing your cascading water feature, consider seasonal maintenance requirements and local water restrictions. Install shut-off valves at key points for easier repairs, and incorporate an auto-fill system to maintain consistent water levels.
Scale your water feature to match your yard’s proportions, using smaller interconnected fountains for narrow spaces or larger dramatic falls for broader slopes. Include seating areas where visitors can enjoy the water’s sound and movement, and consider installing a backup power system to maintain water circulation during outages.
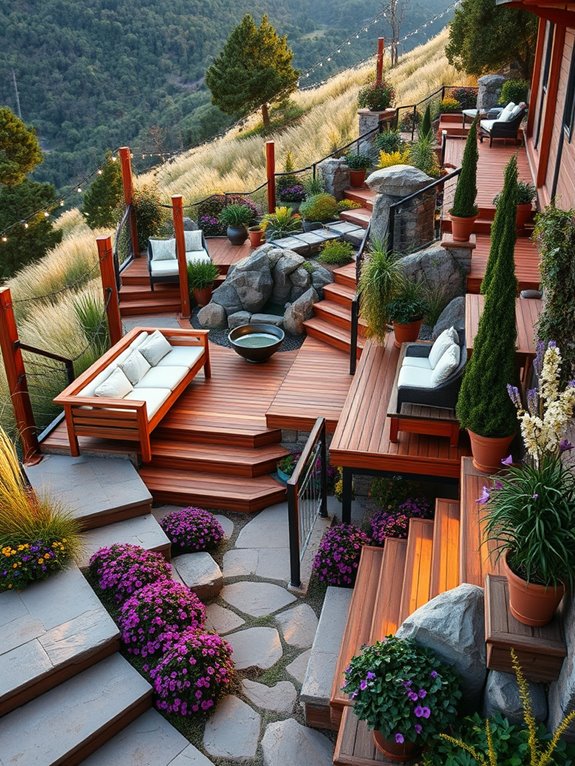
Multi-Level Decking Solutions
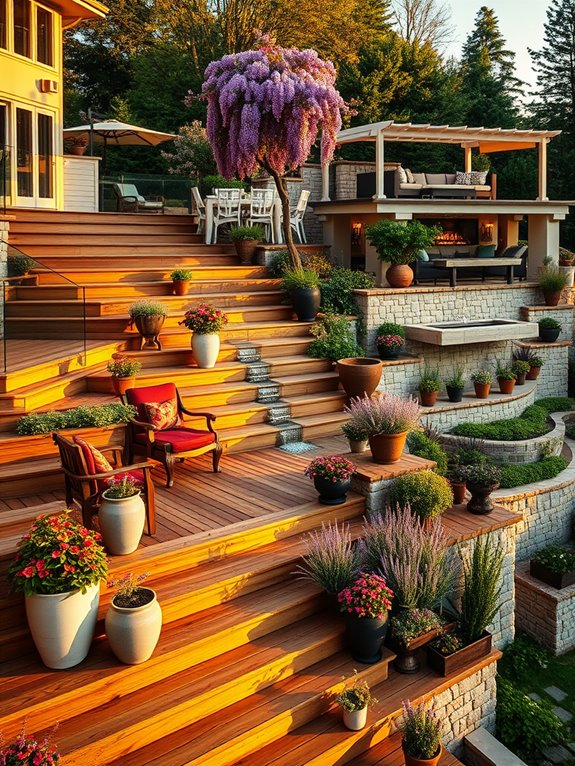
Multi-level decking transforms a challenging steep yard into an architectural masterpiece, creating a cascade of living spaces that seem to float above the slope. Each level presents its own distinct atmosphere, from intimate dining nooks surrounded by potted herbs to expansive lounging areas adorned with trailing wisteria and climbing roses.
The natural wood tones of cedar or ipe decking create a warm, organic foundation that complements the surrounding landscape while providing functional flat spaces for entertainment and relaxation.
The varying heights offer unique perspectives of the garden, with each tier showcasing different plant collections and design elements. Lower levels might feature shade-loving ferns and hostas nestled beneath the overhanging structure, while upper decks capture sunlight for Mediterranean herbs and flowering perennials.
Built-in planters along deck edges soften architectural lines with cascading plants like creeping thyme and wave petunias, creating a seamless blend between hardscape and landscape.
Essential Elements:
- Pressure-treated lumber foundation
- Decorative decking material (cedar, ipe, or composite)
- Multi-level structural supports
- Built-in benches and planters
- Railing systems
- Stairways connecting levels
- Lighting fixtures
- Drainage systems
- Container gardens
- Climbing plant supports
- Weather-resistant furniture
- Shade structures or pergolas
Implementation begins with careful site analysis and professional engineering to ensure proper support and drainage for each deck level. Start with the lowest tier, establishing a strong foundation with concrete footings, then work upward, maintaining consistent rises between levels for comfortable navigation.
Incorporate both straight and curved staircases to create visual interest while ensuring safe passage between spaces. Install proper lighting along stairs and level changes, and integrate automatic irrigation systems for built-in planters.
Design Tips: Consider incorporating multiple access points to each level to improve flow and functionality. For smaller slopes, reduce the number of tiers but maintain varied heights to create visual interest.
Weather protection becomes increasingly important at higher elevations, so include retractable awnings or pergolas for shelter. Ensure each level has a distinct purpose – dining, lounging, or gardening – to maximize the use of space.
For maintenance, choose rot-resistant materials and establish clear drainage paths to prevent water accumulation on any level.
Ground Cover Plants for Erosion Control
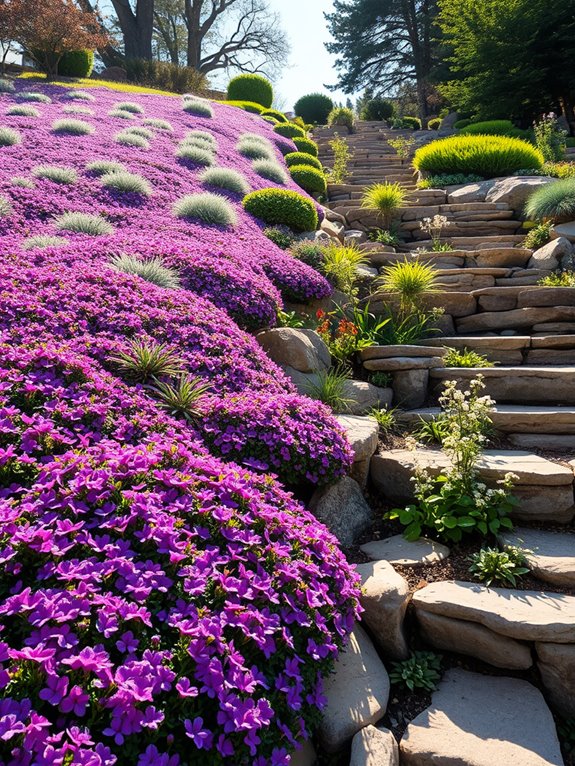
Transform your challenging slope into a living tapestry with a ground cover garden that combines beauty with functional erosion control. Cascading waves of creeping phlox spill down the hillside in vibrant sheets of pink, purple, and white blooms, while hardy sedum varieties create evergreen carpets in varying shades of silver, green, and burgundy.
Ornamental grasses like blue fescue add texture and movement, their slender blades dancing in the breeze while their robust root systems work tirelessly to stabilize the soil. The layered planting creates a natural, low-maintenance masterpiece that changes with the seasons. Spring brings forth the delicate flowers of sweet woodruff nestled beneath established shrubs, while summer showcases the golden blooms of creeping Jenny brightening shaded areas.
Wintergreen provides year-round interest with glossy leaves and bright red berries, making the slope an attractive feature even during colder months.
Key Elements:
- Fast-spreading ground covers (creeping phlox, sedum, creeping Jenny)
- Ornamental grasses
- Shade-tolerant plants for under trees
- Erosion control mesh or jute netting
- Terracing materials (timber or stone)
- Mulch or river rock
- Drip irrigation system
- Strategic drainage channels
- Root-stabilizing shrubs
- Stepping stones or pathways
Begin implementation by installing terracing or erosion control mesh to stabilize the slope immediately. Plant robust ground covers in a diagonal pattern across the slope, spacing them according to their mature spread. Start at the bottom of the slope and work upward, ensuring each new row overlaps slightly with the plants below.
Incorporate deeper-rooted shrubs at regular intervals to create anchoring points throughout the slope. Install a drip irrigation system before planting to ensure consistent moisture without causing soil washout.
Additional Considerations: For particularly steep slopes, consider incorporating retaining walls or tiers to create more manageable planting areas. In urban settings, utilize containers or terraced planters filled with trailing plants to achieve a similar effect on smaller scales.
Pay special attention to drainage patterns and adjust plant selection based on your specific soil type and sun exposure. For slopes facing heavy rainfall, incorporate water-loving plants like rushes or sedges in natural swales to help manage water flow while maintaining aesthetic appeal.
Strategic Planting Zones and Rock Gardens
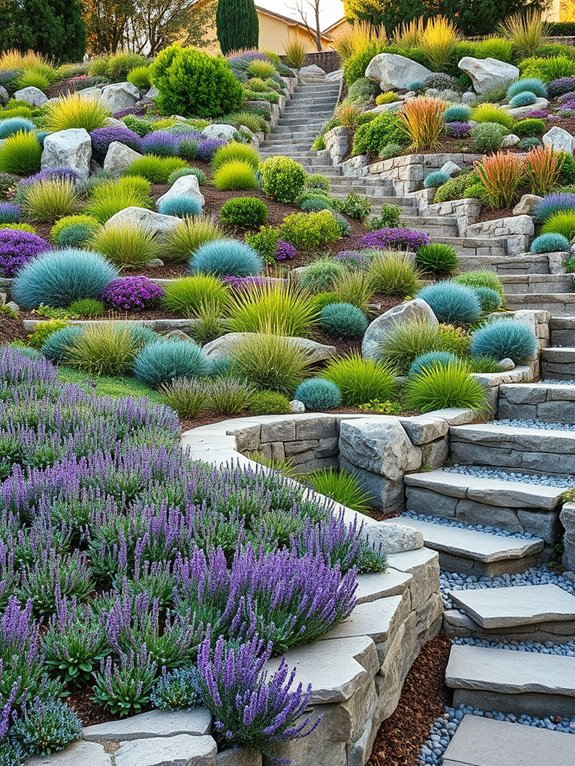
Transform your challenging hillside into a cascading wonderland of strategic planting zones that create a living tapestry across multiple levels. Deep-rooted ornamental grasses sway gracefully alongside hardy succulents, while compact evergreens anchor key points throughout the slope.
Stone retaining walls divide the space into manageable terraces, each hosting different plant communities that thrive at their specific elevation and exposure levels. The natural flow of a strategic hillside garden draws the eye upward through a thoughtful progression of textures and colors.
Low-growing sedums and creeping thyme spill over rock walls, while mid-height salvias and lavender create aromatic middle layers. Taller grasses like Miscanthus and Pennisetum add vertical interest, dancing in the breeze against a backdrop of dwarf conifers that provide year-round structure.
Key Elements:
- Terraced retaining walls
- Large accent rocks
- Ground cover plants
- Drought-resistant perennials
- Ornamental grasses
- Dwarf evergreen shrubs
- Erosion control fabric
- Drip irrigation system
- Stepping stones or pathways
- Strategic drainage channels
Begin implementation by establishing primary terraces using properly engineered retaining walls, ensuring each level has adequate drainage.
Install irrigation systems before adding 12-18 inches of quality soil amended with organic matter. Plant larger specimens first, positioning them slightly toward the back of each terrace, then work forward with progressively shorter plants.
Create clear maintenance paths between planting zones using stepping stones or gravel walkways.
Extra Tips: Consider incorporating self-seeding plants that will naturally fill spaces over time, reducing maintenance needs. For smaller slopes, focus on creating mini-terraces using stacked stone rather than full retaining walls.
Ensure all hardscaping materials complement your home’s architecture and consider incorporating built-in seating areas at key viewing points. In particularly steep areas, use ground covers with strong root systems that can help prevent soil erosion while requiring minimal maintenance.
Hillside Seating Areas and Viewing Points
Transform your steep yard into a stunning outdoor retreat by creating strategically placed seating areas that capitalize on your property’s natural elevation. Wooden decking platforms nestled into the hillside, connected by winding stone steps and adorned with ornamental grasses like Miscanthus and Pennisetum, create intimate conversation spaces with breathtaking views.
Weather-resistant furniture in natural tones, accented with colorful outdoor cushions, invites relaxation while native flowering plants like Black-Eyed Susans and Purple Coneflowers add vibrant pops of color around the perimeter.
The multi-level design incorporates built-in benches that follow the natural contours of the slope, creating cozy nooks perfect for contemplation or socializing. String lights draped between posts cast a warm glow over evening gatherings, while strategically placed container gardens featuring cascading plants like Creeping Jenny and Wave Petunias soften the edges of each seating area.
A small water feature provides gentle background sounds, making the space feel like a private mountain retreat.
Key Elements:
- Wooden decking platforms
- Built-in benches
- Weather-resistant furniture
- Stone steps or pathways
- Ornamental grasses
- Native flowering plants
- String lighting
- Container gardens
- Water feature
- Safety railings
- Retaining walls
- Drainage systems
Begin implementation by conducting a thorough site analysis to identify the most stable areas for platform construction.
Install proper drainage systems and retaining walls first, ensuring the integrity of your hillside.
Build platforms using pressure-treated lumber, securing them firmly to concrete footings and incorporating safety railings where necessary.
Create accessible pathways between levels using non-slip materials and gentle gradients when possible.
Connect different seating areas with a cohesive planting scheme, using deep-rooted plants to help prevent soil erosion.
Ensure all furniture is properly anchored, and install lighting at various heights to create depth and ensure safety during evening use.
Regular maintenance should include checking structural integrity, clearing drainage systems, and trimming plants to maintain desired sight lines.
Design adaptations can accommodate various slope severities and space constraints.
For gentle slopes, consider terraced gardens with wider platforms, while steeper inclines may require multiple smaller, interconnected spaces.
Incorporate removable shade structures for sunny exposures, and use vertical gardening techniques on retaining walls to maximize planting space.
Consider wind exposure at higher elevations when selecting plants and furniture, and ensure all installations meet local building codes for hillside construction.
Rain Gardens and Drainage Solutions
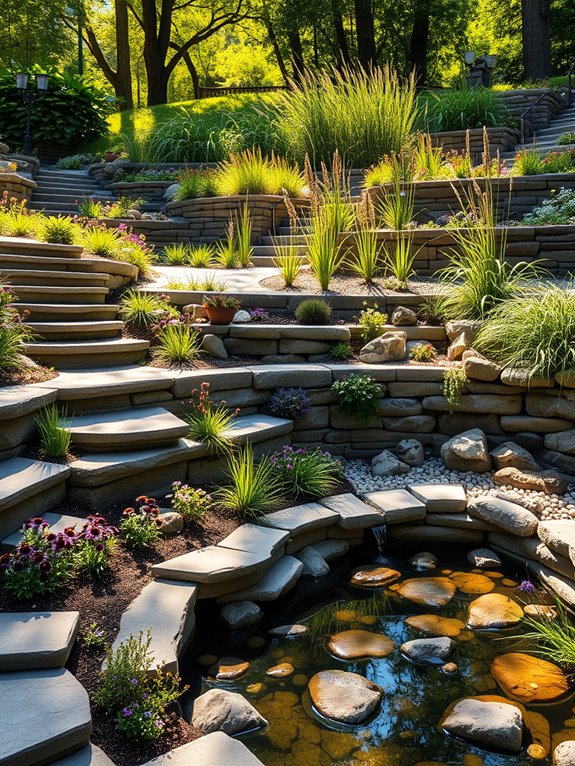
Transform your challenging slope into a mesmerizing rain garden where water becomes a natural artist, carving beautiful pathways through carefully planned layers of vegetation. Native grasses sway gracefully alongside deep-rooted perennials like Black-Eyed Susans and Purple Coneflowers, while Japanese Forest Grass cascades down the terraced levels. Stone-lined channels guide rainwater through the garden, creating melodic streams during rainfall that feed moisture-loving ferns and sedges nestled in the lower portions.
The garden transitions from drought-tolerant plants at the top to water-loving species at the bottom, creating a stunning visual gradient that mirrors nature’s own design. Decorative river rocks and locally sourced boulders form natural-looking basins and retention areas, while weathered copper rain chains guide water from roof downspouts into collection points. The space becomes both functional and enchanting, managing water flow while providing a sanctuary for native wildlife and pollinators.
Essential Elements:
- Terraced retaining walls
- Permeable gravel pathways
- Deep-rooted native plants
- River rocks and boulders
- Rain chains or decorative downspouts
- Drainage pipes and catch basins
- Water-resistant ground cover
- Strategic soil amendments
- Erosion control fabric
- Multi-level planting zones
Begin implementation by surveying water flow patterns during rainfall and marking primary drainage routes. Install a series of gradually descending terraces using natural stone or timber retaining walls, ensuring each level has a slight backward slope to slow water flow.
Create a network of French drains lined with gravel and perforated pipes beneath the surface, leading to a final collection point or rain garden basin at the bottom of the slope.
Position plants strategically, with deep-rooted species along the steepest sections to prevent soil erosion. Layer the soil with organic matter and water-retaining amendments, installing erosion control fabric in areas of concentrated water flow.
Incorporate stepped pathways using permeable materials that allow water to seep through while providing safe access to all garden areas. When designing your rain garden, consider incorporating adjustable features such as movable rock arrangements and modular planting containers that can be reconfigured as drainage patterns change over time.
For smaller spaces, focus on vertical elements like wall-mounted rain chains and cascading plants, while larger areas can accommodate multiple collection basins and more elaborate drainage systems. Always factor in local rainfall patterns and soil composition when selecting plants and determining the depth of water retention areas.
Vertical Gardens and Living Walls

Transform your steep yard into a stunning living tapestry with a vertical garden that defies gravity and maximizes space. Cascading waves of lush foliage create a mesmerizing display, where trailing vines like Virginia creeper and Boston ivy intertwine with vibrant flowering plants such as petunias, verbena, and fuchsia.
The multi-layered arrangement adds depth and dimension, turning an otherwise challenging slope into an artistic masterpiece of textures and colors. The living wall becomes a natural sanctuary, attracting butterflies and hummingbirds while providing a cooling effect to your outdoor space.
Herbs like thyme, oregano, and mint release their aromatic essences with each gentle breeze, while sturdy succulents add architectural interest with their bold shapes and patterns. The vertical design creates an immersive experience, surrounding visitors with a symphony of natural elements that transform an ordinary yard into an extraordinary garden retreat.
Key Elements:
- Modular wall-mounted planters
- Irrigation system with timer
- Strong support structure
- Growing medium suitable for vertical placement
- Mix of trailing and upright plants
- Water-resistant backing material
- Drainage system
- Plant anchoring materials
- Fertilizer injection system
- Maintenance access points
Begin implementation by installing a robust support structure that can bear the weight of soil, plants, and water. Mount modular planters in a grid pattern, ensuring proper spacing for plant growth and maintenance access.
Install an efficient drip irrigation system with multiple zones to deliver water and nutrients evenly throughout the vertical space. Layer different plant varieties strategically, placing drought-resistant species at the top and moisture-loving plants at the bottom to work with natural water flow.
Extra tips for success: Consider your wall’s sun exposure when selecting plants, as this will significantly impact their growth and maintenance needs. For smaller spaces, focus on compact varieties and incorporate fold-down maintenance platforms.
Use lightweight growing media specifically designed for vertical gardens to reduce structural stress. Install a moisture monitoring system to prevent overwatering, and plan for seasonal rotations of plants to maintain year-round interest.
Adapt the scale of your vertical garden based on available space, using miniature varieties for intimate areas or creating bold statements with larger specimens in expansive spaces.
Low-Maintenance Landscaping Techniques

A thoughtfully designed low-maintenance garden transforms a challenging steep yard into a serene, self-sustaining landscape that requires minimal upkeep while maximizing visual impact. Drought-resistant ornamental grasses sway gracefully in the breeze, while hardy groundcovers like creeping thyme and sedum spread across terraced levels, creating a tapestry of textures that naturally prevent soil erosion.
Strategic placement of evergreen shrubs like juniper and boxwood provides year-round structure and stability to the slope. Native perennials such as coneflowers, black-eyed susans, and Russian sage dot the landscape with bursts of color that return reliably each season without requiring replanting.
Natural stone retaining walls, interspersed with drought-tolerant succulents and alpine plants, create striking vertical interest while controlling erosion. A simple drip irrigation system, hidden beneath a layer of organic mulch, ensures plants receive consistent moisture with minimal water waste.
Key Elements:
- Drought-resistant ornamental grasses
- Hardy groundcovers
- Evergreen shrubs
- Native perennials
- Stone retaining walls
- Succulents and alpine plants
- Drip irrigation system
- Organic mulch
- Erosion control matting
- Low-maintenance hardscaping materials
Implementation begins with establishing proper drainage and erosion control through terracing and retaining walls. Install erosion control matting on exposed soil areas, then layer with drought-resistant plants starting with larger specimens at the bottom of the slope.
Space plants closely enough to create full coverage when mature, reducing weed growth and maintenance needs. Install a drip irrigation system before adding a thick layer of organic mulch to conserve moisture and suppress weeds.
Design adaptations can accommodate various slope angles and yard sizes. For steeper inclines, increase the number of terraces and incorporate more structural elements like boulder groupings or stepped pathways.
Smaller spaces benefit from vertical gardening techniques using wall-mounted planters or cascading varieties that maximize limited ground space. Consider incorporating self-watering containers in areas where traditional irrigation might be challenging, and select compact plant varieties that won’t outgrow their designated spaces.