
9 Garden Ideas for Small Front Yards
Your small front yard holds untapped potential as a stunning outdoor sanctuary. Even with limited space, you’ll find endless possibilities to transform that modest patch into an eye-catching landscape that reflects your style. From vertical gardens climbing with vibrant vines to space-smart container arrangements, there’s a perfect solution waiting to enhance your home’s curb appeal. Let’s explore nine creative approaches that’ll help you maximize every square foot of your front yard paradise.
Contents
- 1 Create a Vertical Garden Wall
- 2 Design a Low-Maintenance Container Garden
- 3 Install a Charming Pathway With Border Plants
- 4 Maximize Space With Tiered Planters
- 5 Add a Cozy Sitting Area With Built-In Planters
- 6 Incorporate Strategic Lighting Elements
- 7 Plant a Compact Water Feature Garden
- 8 Build a Space-Saving Herb Garden
- 9 Layer Mixed-Height Native Plants
Create a Vertical Garden Wall
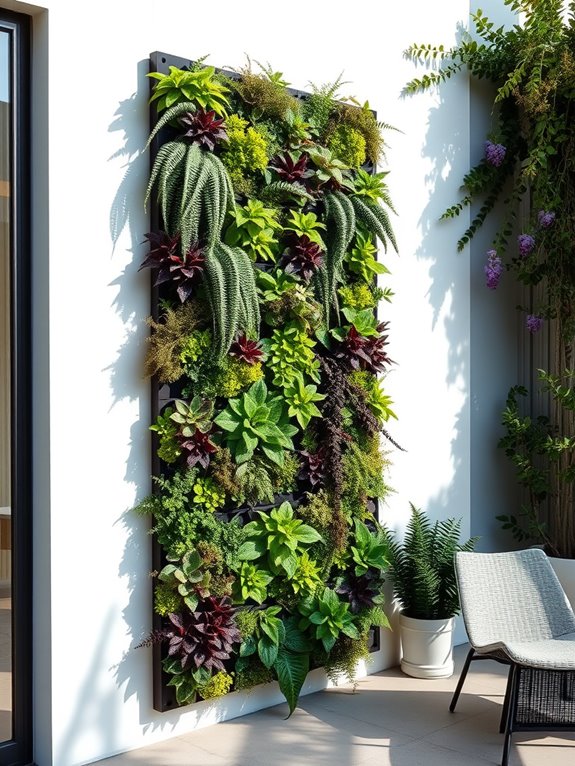
Transform your small front yard into a living tapestry with a stunning vertical garden wall that reaches toward the sky. Lush ferns cascade downward while vibrant succulents create intricate patterns, and flowering vines like jasmine and clematis weave their way upward, creating a mesmerizing display of colors and textures. The wall becomes a natural art piece, drawing the eye upward and making clever use of limited space while providing a welcoming entrance to your home.
This verdant masterpiece brings life to previously unused vertical space, creating an immediate impact with its diverse plant palette. Herbs like thyme and oregano release their aromatic essence when brushed against, while shade-loving coleus adds bold splashes of burgundy and lime. The vertical garden wall becomes a conversation piece, attracting butterflies and hummingbirds while providing a sense of privacy and natural cooling for your entryway.
Key Elements:
- Mounting system or modular wall panels
- Irrigation system with timer
- Moisture-resistant backing board
- Growing medium appropriate for vertical gardens
- Plant selection (mix of trailing and upright varieties)
- Support structures for climbing plants
- Drainage system
- Weather-resistant containers or pocket planters
- Fertilizer delivery system
- Tools for maintenance
Begin installation by securing a sturdy mounting system to your wall, ensuring proper waterproofing and drainage. Install the irrigation system, connecting it to a programmable timer for consistent watering. Create planting pockets or attach containers in a pattern that allows for proper plant spacing and growth.
Select plants based on their light requirements and growth habits, placing larger specimens at the bottom and trailing varieties where they can cascade naturally. Consider the weight-bearing capacity of your structure and ensure all elements are securely fastened.
Design Tips: Factor in your wall’s exposure to sun and wind when selecting plants. For smaller spaces, focus on one type of plant family or color scheme to create a cohesive look. Consider incorporating built-in lighting to highlight your vertical garden at night.
For balcony adaptations, use lightweight materials and ensure your structure complies with building regulations. Include easy-access points for maintenance, and plan for seasonal rotations of plants to maintain year-round interest.
Design a Low-Maintenance Container Garden
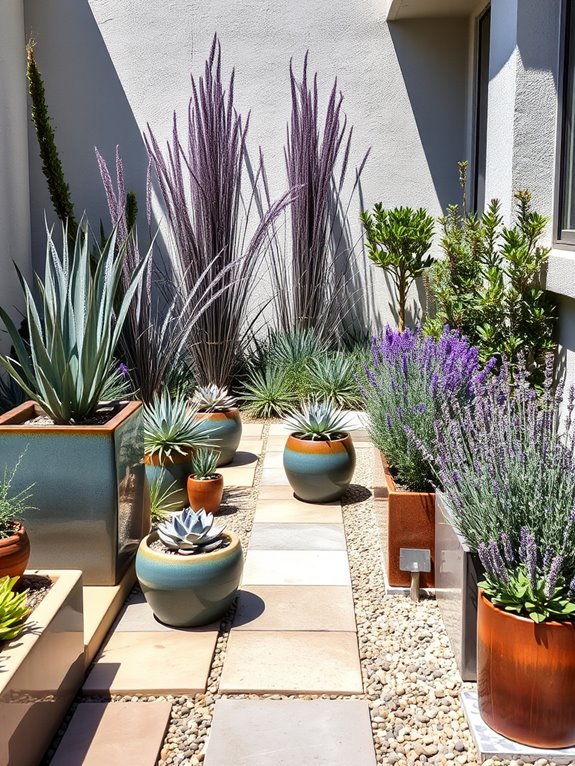
Transform your small front yard into a stunning container garden that offers both beauty and simplicity. Picture a welcoming arrangement of colorful glazed pots and sleek modern planters, filled with a curated selection of drought-resistant plants in varying heights and textures.
Tall ornamental grasses sway gently in the breeze, while compact lavender bushes and trailing petunias create layers of visual interest without overwhelming the space. The beauty of a container garden lies in its ability to create distinct zones and focal points while maintaining a clean, organized appearance.
Clusters of complementary containers featuring silver-blue succulents, purple fountain grass, and cheerful calibrachoa create an eye-catching display that requires minimal upkeep. Strategic placement of evergreen shrubs in larger containers provides year-round structure and anchors the overall design.
Key Elements:
- Various sized weather-resistant containers
- Well-draining potting soil
- Drought-tolerant perennials
- Ornamental grasses
- Flowering annuals
- Trailing plants
- Decorative mulch
- Automatic drip irrigation system
- Container feet or risers
- Solar-powered accent lighting
Begin implementation by selecting containers with adequate drainage holes and positioning them according to sunlight requirements. Group containers in odd numbers, placing larger specimens at the back and corners of your space.
Layer plants within each container using the “thriller, filler, spiller” technique: tall accent plants in the center, medium-height plants around them, and trailing varieties along the edges. Install a drip irrigation system with timers to ensure consistent watering while minimizing maintenance needs.
Essential Tips: Consider container weight and mobility when planning your design – use lightweight materials for upper-story balconies and ensure adequate space between pots for easy access.
For tiny spaces, focus on vertical elements and wall-mounted planters. In larger areas, create distinct groupings with walking paths between them. Choose containers with similar style elements but varying sizes to maintain visual cohesion while adding interest.
Always check weight restrictions for elevated gardens and ensure proper drainage to protect underlying surfaces.
Install a Charming Pathway With Border Plants

Transform your small front yard into an enchanting wonderland with a winding pathway bordered by lush, colorful plants. Natural stone pavers or brick stepping stones create an inviting journey to your front door, while masses of flowering perennials and ornamental grasses soften the edges, creating a romantic cottage-garden feel.
Lavender, catmint, and creeping thyme release delightful fragrances when brushed against, making every walk down the path a sensory experience.
The border plantings can be arranged in layers, with taller plants like ornamental grasses or Russian sage creating a backdrop, while shorter plants like dianthus, sedum, or candytuft form the front edge. This tiered approach adds depth and interest to the narrow space, while strategically placed solar lights illuminate the pathway at night, casting a magical glow across the garden scene.
Key Elements:
- Pathway materials (pavers, stepping stones, or gravel)
- Border plants of varying heights
- Solar pathway lights
- Edging material
- Ground cover plants
- Mulch or decorative stones
- Drainage materials
- Essential gardening tools
Begin installation by marking the pathway’s course with rope or garden hoses, ensuring a gentle curve that maximizes the space while maintaining practicality.
Excavate the path area to a depth of 4-6 inches, add a layer of crushed gravel for drainage, and install your chosen pathway material. Create planting beds along both sides, preparing the soil with organic matter and installing proper drainage.
Plant taller specimens at the back of the borders, graduating to medium-height plants and finally ground covers near the path’s edge.
For small front yards, consider using dwarf varieties of plants and opt for species that provide multiple seasons of interest. Incorporate evergreen plants for year-round structure, and choose plants with complementary blooming periods to ensure continuous color.
Maintain clean edges between the path and plantings using metal or plastic edging material, and mulch beds regularly to suppress weeds and retain moisture. Weather-resistant materials like concrete pavers or natural stone will ensure longevity, while permeable surfaces help manage rainwater runoff effectively.
Maximize Space With Tiered Planters
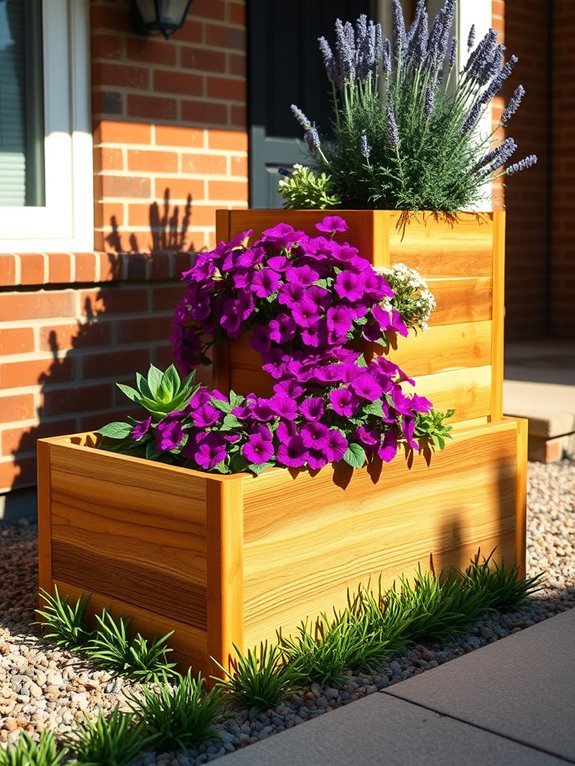
Transform your modest front yard into a lush vertical oasis with cascading tiers of vibrant blooms and foliage. Tiered planters create a stunning visual rhythm, drawing the eye upward through layers of trailing petunias, cascading lobelia, and spilling sweet alyssum. The graduated levels showcase a tapestry of textures, from bold-leafed hostas on lower tiers to delicate creeping thyme and sedum on upper levels, maximizing every inch of available space while creating depth and dimension.
Each tier becomes its own miniature garden, offering opportunities for seasonal color combinations and year-round interest. Mix ornamental grasses with flowering perennials, or combine compact evergreens with annual color spots. The vertical arrangement not only multiplies your planting area but also creates an architectural element that adds sophistication to your front yard while maintaining a welcoming, cottage-garden charm.
Key Elements:
- Tiered planter system (wood, metal, or composite)
- Soil mix specific for containers
- Irrigation system or watering tools
- Selection of plants for each tier
- Ground cover plants
- Trailing plants
- Upright accent plants
- Decorative stones or mulch
- Support structures for taller plants
- Drainage materials
Begin implementation by selecting a sunny location and installing the largest tier at the base, ensuring proper drainage with gravel or drainage holes. Layer subsequent tiers with gradually decreasing sizes, maintaining at least 12 inches of soil depth for root development.
Position taller plants at the back of each tier, medium-height plants in the middle, and trailing varieties at the edges. Install a drip irrigation system through each level to ensure consistent watering, as tiered gardens can dry out quickly.
Design considerations should account for mature plant sizes and seasonal changes. Place evergreen specimens strategically throughout the tiers to maintain structure during winter months.
Group plants with similar water and light requirements together within each tier, and ensure easy access for maintenance.
When adapting this design for different spaces, consider the scale of your tiered system relative to your yard size. For very small areas, use narrow tiers or corner units that maximize vertical space while minimizing the footprint.
Weather exposure should influence plant selection – choose more wind-resistant varieties for exposed locations and protect tender plants in sheltered tiers. Remember to leave adequate pathways for maintenance access and consider incorporating built-in seating or decorative elements into the lower tiers to create a multi-functional space.
Add a Cozy Sitting Area With Built-In Planters
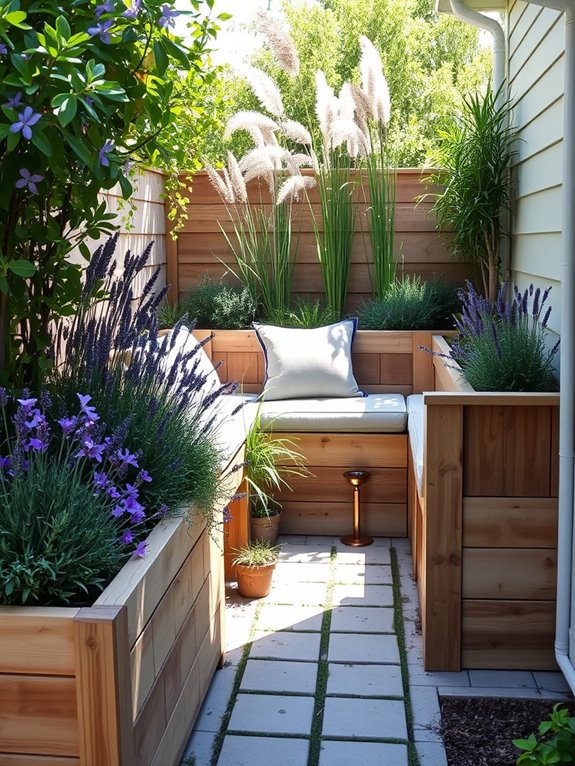
Transform your small front yard into an enchanting outdoor retreat by incorporating a cozy sitting area surrounded by built-in planters. Picture a welcoming nook where natural wood benches nestle between custom-made planter boxes overflowing with fragrant herbs, colorful perennials, and cascading vines. Weathered cedar or composite decking materials create warm, inviting seating surfaces, while strategically placed planters frame the space with layers of greenery and seasonal blooms.
The built-in planters serve both form and function, maximizing vertical growing space while defining intimate boundaries. Consider filling them with a mix of lavender, rosemary, and trailing plants like creeping thyme or sweet alyssum for ground coverage.
Add height with ornamental grasses or compact flowering shrubs, and incorporate spring bulbs for early-season color. Solar-powered accent lights nestled among the plants create a magical ambiance as evening falls.
Key Elements:
- Built-in wooden or composite benches
- Raised planter boxes
- All-weather cushions and pillows
- Solar landscape lighting
- Container-friendly plants
- Weather-resistant hardware
- Drainage system
- Irrigation setup
- Plant support structures
- Multi-season greenery
Start by designing the layout on paper, ensuring proper proportions for comfortable seating and adequate planting space. Build or install weather-resistant planter boxes first, incorporating proper drainage holes and quality potting soil.
Position benches at a comfortable height (typically 18-20 inches) and depth (minimum 16 inches), anchoring them securely to the ground or planter structure. Install an efficient irrigation system with drip lines to maintain consistent moisture levels in the planters.
When selecting plants, choose varieties that thrive in your specific light conditions and climate zone. Layer plants by height, placing taller specimens at the back of planters and trailing varieties at the edges.
Consider maintenance requirements and growth habits to prevent overcrowding. Regular pruning and seasonal replanting will keep the space looking fresh and inviting throughout the year.
For smaller spaces or varying yard sizes, adapt the design by using narrower planters or creating an L-shaped arrangement to fit corner areas.
Consider incorporating vertical gardening elements like trellises or wall-mounted planters to maximize growing space. Weather protection can be added through retractable awnings or umbrella stands, and modular furniture pieces can provide flexibility for different gathering sizes.
Remember to leave adequate pathways for easy access and maintenance, typically at least 24 inches wide.
Incorporate Strategic Lighting Elements
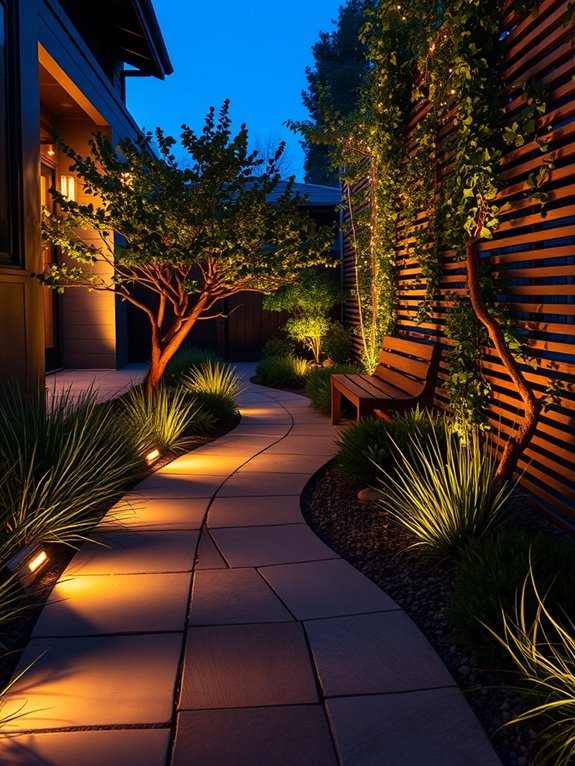
Strategic lighting transforms a small front yard into a magical nighttime oasis, creating depth and drama through carefully positioned illumination. Soft uplighting catches the silvery undersides of olive trees and ornamental grasses, while pathway lights cast gentle pools of warmth along stepping stones. Solar-powered stake lights nestled among lavender and sage create an ethereal glow, highlighting the garden’s textures and creating mysterious shadows that dance across walls and fences.
The layered lighting approach brings the garden to life after sunset, extending its usefulness and beauty into the evening hours. Modern LED strips tucked beneath built-in benches provide functional lighting while creating the illusion of floating elements. Spotlights strategically aimed at architectural features or specimen plants become focal points, while tiny fairy lights woven through climbing vines add whimsy and romance to vertical spaces.
Key Elements:
- Solar-powered pathway lights
- LED strip lighting
- Uplighting fixtures
- Motion sensor security lights
- Weatherproof electrical outlets
- Timer controls
- Various bulb types (warm white, cool white)
- Wire and cable management systems
- Transformers for low-voltage lighting
- Weather-resistant connection boxes
Installation begins with creating a detailed lighting plan, marking cable routes and fixture locations on paper. Start by installing main power sources and laying underground cables, ensuring all electrical work meets local codes. Position pathway lights first to establish safe navigation, then add uplighting at the base of key plants or architectural features.
Layer in accent lighting last, focusing on creating depth and atmosphere rather than bright illumination.
Extra Tips: Consider using smart lighting systems that can be controlled via smartphone, allowing easy adjustments for different seasons and occasions. For extremely small spaces, focus on fewer, higher-quality fixtures rather than multiple cheap options that can create a cluttered look.
Choose fixtures with adjustable brightness levels and beam spreads to accommodate changing needs. In areas with strict HOA regulations, opt for subtle lighting techniques that enhance security without creating light pollution or disturbing neighbors.
Plant a Compact Water Feature Garden

Transform your small front yard into a serene oasis with a compact water feature garden that combines the soothing sounds of flowing water with lush, moisture-loving plants. Picture a petite stone fountain as the centerpiece, surrounded by graceful Japanese forest grass, delicate ferns, and clusters of bright blue forget-me-nots. The gentle cascade of water creates a peaceful atmosphere while providing a focal point that draws the eye and invites visitors to pause and reflect.
The layered arrangement of plants adds depth and texture, with taller water-friendly bamboo varieties providing a natural privacy screen along the edges. Smooth river rocks and stepping stones create natural pathways, while strategic lighting illuminates the water’s movement after sunset. This miniature paradise incorporates vertical elements through climbing plants like clematis or jasmine, maximizing the use of limited space while maintaining an organic, flowing aesthetic.
Essential Elements:
- Compact water fountain or cascading feature
- Moisture-loving perennials
- River rocks and stepping stones
- Weather-resistant outdoor lighting
- Container plants for height variation
- Water-resistant ground cover
- Drainage system
- Timer-controlled pump
- Waterproof electrical connection
- Edge retention materials
Begin implementation by selecting a level area that receives partial shade and installing proper drainage beneath the water feature location. Create a solid foundation using crushed stone and level pavers, then install the water pump and electrical components according to local codes.
Arrange larger plants and structural elements first, working outward from the fountain in concentric circles. Position taller plants behind shorter ones, ensuring all elements are visible from the primary viewing angle while maintaining easy access for maintenance.
Design Tips:
Consider your climate when selecting plants and water feature materials, as freezing temperatures may require winter protection. For extremely small spaces, wall-mounted or corner fountains can maximize ground space while maintaining the desired effect.
Incorporate self-watering containers and drought-resistant plants around the edges to reduce maintenance needs, and select a fountain size that’s proportional to your yard – typically no larger than 1/4 of the available space. Remember to include adequate lighting for safety and evening enjoyment, using solar options where possible to minimize electrical requirements.
Build a Space-Saving Herb Garden
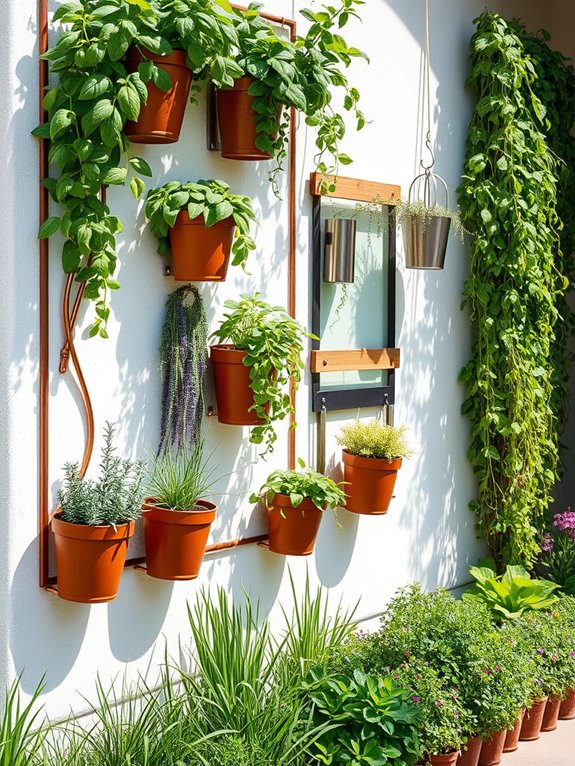
Transform your compact front yard into a fragrant oasis with a vertical herb garden that maximizes every inch of space. Imagine stepping onto your front path and being greeted by cascading rosemary, vibrant basil leaves, and delicate sprigs of thyme climbing up wooden trellises or nestled in tiered planters. The varied textures and heights create visual interest while releasing aromatic essential oils into the air, making your entrance both beautiful and functional.
The garden combines rustic and modern elements, featuring weathered terra cotta pots alongside sleek metal hanging planters. Herbs like sage, oregano, and mint spill over the edges of wall-mounted containers, while chives and parsley create lush ground coverage in corner spots. Solar-powered accent lights illuminate the herbs at night, casting interesting shadows and extending the garden’s charm into the evening hours.
Essential Elements:
- Vertical growing structures (trellises, wall planters, hanging baskets)
- Selection of culinary herbs (minimum 5-7 varieties)
- Container assortment (various sizes and materials)
- Drip irrigation system or self-watering planters
- Plant markers or labels
- Growing medium specifically for herbs
- Accent lighting
- Small tool storage solution
Start by mapping your available wall space and sunny spots, then install your vertical growing structures securely. Place larger herbs like rosemary and lavender at ground level in sturdy containers, while trailing herbs work best in hanging planters. Create depth by staggering container heights and using a mix of growing methods.
Install an efficient drip irrigation system that reaches all levels of the garden, ensuring consistent moisture without waste. Quick access is crucial for a herb garden, so arrange plants based on frequency of use, with everyday herbs like basil and parsley within easy reach. Consider seasonal rotations, replacing spent annual herbs with new varieties to maintain visual interest year-round.
Group herbs with similar water needs together to simplify maintenance. For smaller spaces, focus on dwarf varieties and compact growing systems like vertical pocket planters or spiral herb gardens. Those with larger areas can incorporate seating nooks or expand into themed sections like tea gardens or pizza herb collections.
Consider your local climate when selecting herbs, and protect tender varieties during extreme weather by using portable containers that can be relocated as needed. Remember that herbs generally prefer well-draining soil and at least 6 hours of sunlight daily, so adjust your design to maximize available light exposure.
Layer Mixed-Height Native Plants
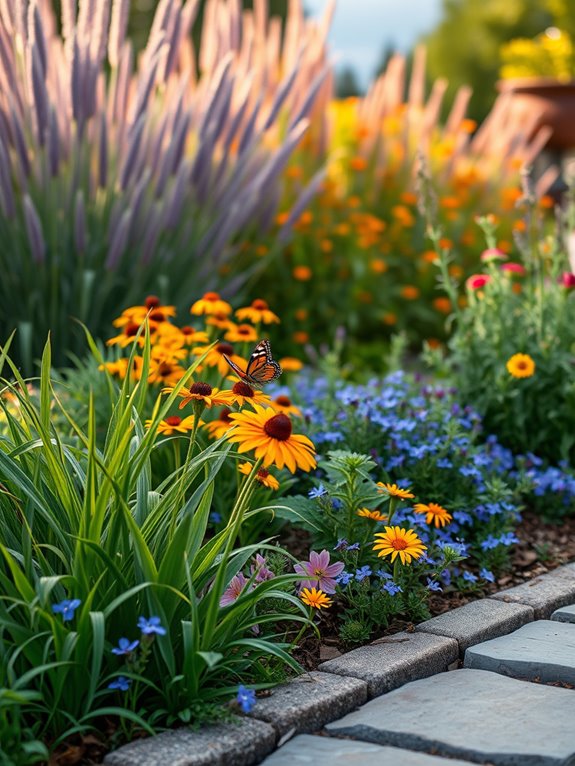
Transform your small front yard into a captivating natural sanctuary by layering native plants of varying heights, creating a sense of depth and wild beauty. Tall switchgrass and purple coneflowers sway gracefully in the background, while mid-height black-eyed susans and butterfly weed add vibrant splashes of color to the middle ground. Ground-hugging native sedges, wild strawberries, and creeping phlox carpet the foreground, forming a lush tapestry that welcomes both visitors and beneficial wildlife.
This multi-tiered approach not only maximizes limited space but also provides year-round visual interest through diverse textures and seasonal blooms. The layered design mimics natural plant communities, with taller plants offering shelter to shorter species while creating micro-climates that support a thriving ecosystem.
Native grasses catch morning light, while compact shrubs like ninebark or dwarf viburnum add structure and provide crucial habitat for local birds and insects.
Key Elements:
- Tall background plants (4-6 feet): switchgrass, joe-pye weed, native sunflowers
- Medium-height plants (2-4 feet): butterfly weed, black-eyed susan, blazing star
- Ground-level plants (under 2 feet): wild geranium, sedges, creeping phlox
- Native shrubs for structure
- Stepping stones or pathway
- Mulch for moisture retention
- Edge material (optional)
Begin implementation by mapping your space according to sun exposure and creating three distinct planting zones: back, middle, and front. Install taller plants first, positioning them roughly 2-3 feet apart along the back border. Work forward with medium-height plants, spacing them 18-24 inches apart in staggered rows. Finally, fill the foreground with ground covers and low-growing species, allowing them to spread naturally over time. Maintain clear pathways through the design for easy maintenance access.
Water deeply but infrequently to encourage deep root growth, and apply a 2-inch layer of organic mulch to retain moisture and suppress weeds. As plants establish, they’ll require less maintenance and water, typically showing their best form by the second or third growing season. Prune spent blooms and cut back dead foliage in late winter to maintain tidiness and encourage healthy growth.
For smaller spaces or challenging conditions, consider scaling down plant selections while maintaining the layered principle. Choose compact varieties of native plants, such as little bluestem instead of switchgrass, or dwarf varieties of coneflowers. In particularly tight spaces, focus on just two layers instead of three, and use vertical elements like trellised vines to add height without sacrificing ground space.
Container gardens can also be incorporated into the design, allowing for adjustment of plant heights and locations as needed throughout the seasons.