
7 Garden Ideas for a Shade-Loving Retreat
Just as secret gardens have captivated imaginations since Frances Hodgson Burnett’s beloved tale, you’ll discover that creating your own shaded sanctuary isn’t as mysterious as it seems. You’re about to transform that challenging dark corner of your yard into a peaceful retreat where Japanese maples dance with filtered sunlight, and shade-loving perennials thrive in perfect harmony. Before you grab your gardening gloves, let’s explore how to layer plants, incorporate natural elements, and design pathways that’ll make your garden an enchanting escape.
Contents
- 1 Choose Shade-Tolerant Plants That Thrive in Low Light
- 2 Layer Different Heights for Visual Interest
- 3 Add Water Features for Tranquil Ambiance
- 4 Create Inviting Seating Areas With Natural Materials
- 5 Incorporate Light-Reflecting Elements and Textures
- 6 Design Winding Pathways Through the Shade Garden
- 7 Blend Native and Woodland Species for Year-Round Appeal
Choose Shade-Tolerant Plants That Thrive in Low Light
Creating a serene retreat with shade-tolerant plants transforms even the darkest corners into magical woodland sanctuaries. Deep green hostas unfurl their textured leaves in graceful layers, while delicate Japanese forest grass sways in gentle breezes. Pale white astilbe flowers rise like ethereal clouds above dark foliage, accompanied by the heart-shaped leaves of hardy begonias that add splashes of burgundy and silver. Ferns cascade from hanging baskets, their fronds creating living curtains of emerald lace.
The layered plantings create depth and intrigue, mimicking nature’s forest floor. Japanese painted ferns provide silvery highlights against the deep green backdrop, while coral bells add pops of color with their foliage ranging from purple to amber. Bleeding hearts dangle their romantic blooms in spring, followed by the subtle beauty of foam flowers and wild ginger spreading as ground cover. This combination creates a peaceful sanctuary that thrives in filtered sunlight, perfect for meditation or quiet contemplation.
Essential Elements:
- Hostas (various varieties)
- Japanese Forest Grass
- Astilbe
- Hardy Begonias
- Japanese Painted Ferns
- Coral Bells (Heuchera)
- Bleeding Hearts
- Foam Flowers
- Wild Ginger
- Decorative moss
- Stone pathways
- Garden benches
- Landscape lighting
- Irrigation system
Begin implementation by assessing the shade patterns throughout the day and preparing soil with organic matter and proper drainage. Install taller plants like hostas and astilbe toward the back, with medium-height specimens like coral bells in the middle ground. Edge the space with spreading ground covers such as wild ginger.
Layer plants in groups of odd numbers, creating drifts that flow naturally through the space. Incorporate stepping stones or gravel paths to provide access for maintenance and peaceful strolling.
Adapt this garden style to any space by selecting appropriately sized varieties. Small balconies can focus on container groupings with dwarf hostas and compact ferns, while larger areas may incorporate multiple seating areas and water features.
Consider vertical gardening with wall-mounted planters for extra growing space, and use mirrors strategically to reflect light and create the illusion of depth. Success depends on consistent moisture levels and regular fertilization during the growing season, as shade plants often compete with tree roots for nutrients.
Layer Different Heights for Visual Interest
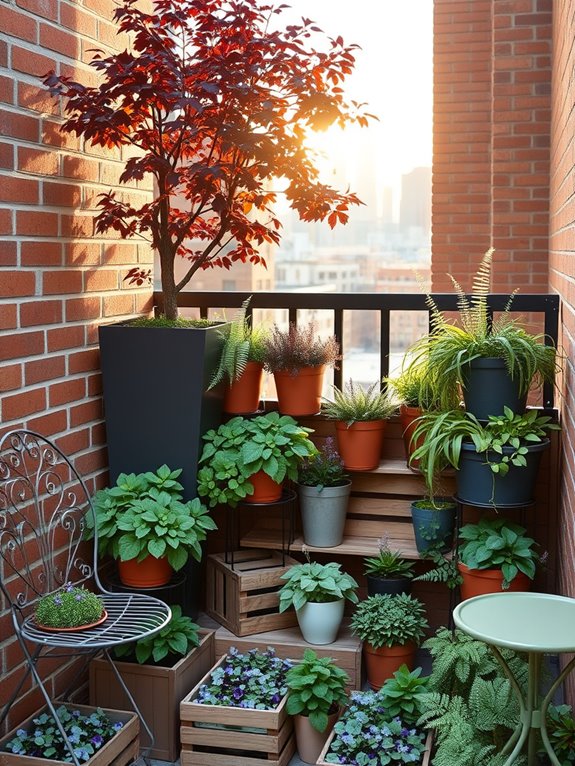
A layered shade garden creates a mesmerizing tapestry of heights and textures, drawing the eye from ground level upward through a carefully orchestrated arrangement of plants and decorative elements.
Tall, graceful Japanese maples cast dappled shadows over mid-height hostas and ferns, while ground-hugging coral bells and woodland violets carpet the earth below. This vertical interest transforms an ordinary shaded space into an enchanting woodland retreat that feels both intimate and expansive.
The strategic placement of different heights creates natural rhythm and movement throughout the garden, with climbing hydrangeas or Virginia creeper scaling walls or trellises to add yet another dimensional layer.
Ornamental features like stone birdbaths, vintage garden stools, and varying heights of container plants contribute to the multi-level design, while also providing functional resting spots for both wildlife and human visitors.
Key Elements:
- Tall anchor plants (Japanese maple, serviceberry, dogwood)
- Mid-height plants (hostas, ferns, astilbe)
- Ground cover plants (coral bells, wild ginger, woodland violets)
- Climbing vines
- Multi-level containers
- Elevated planters or raised beds
- Garden structures (trellises, obelisks, arbors)
- Varying height garden furniture
- Decorative stones or boulders
- Stepped or tiered landscaping features
Begin implementation by establishing the tallest elements first, positioning them where they’ll create the most impact without overwhelming the space.
Work downward in height, placing mid-level plants in clusters that complement and partially overlap with the taller specimens’ footprint.
Fill in the lowest layer with ground covers that can spread naturally, creating a living mulch that helps retain moisture and suppress weeds.
Ensure proper spacing between plants to allow for mature growth while maintaining the layered effect.
When designing a layered shade garden for different spaces, consider the viewing angles and scale appropriately.
For smaller areas or balconies, use dwarf varieties of taller plants and incorporate vertical gardening techniques like wall-mounted planters or cascading containers.
Focus on creating mini-layers within containers by combining upright plants with trailing varieties.
Remember to account for seasonal changes by including plants with varying bloom times and interesting foliage that provides year-round structure and interest.
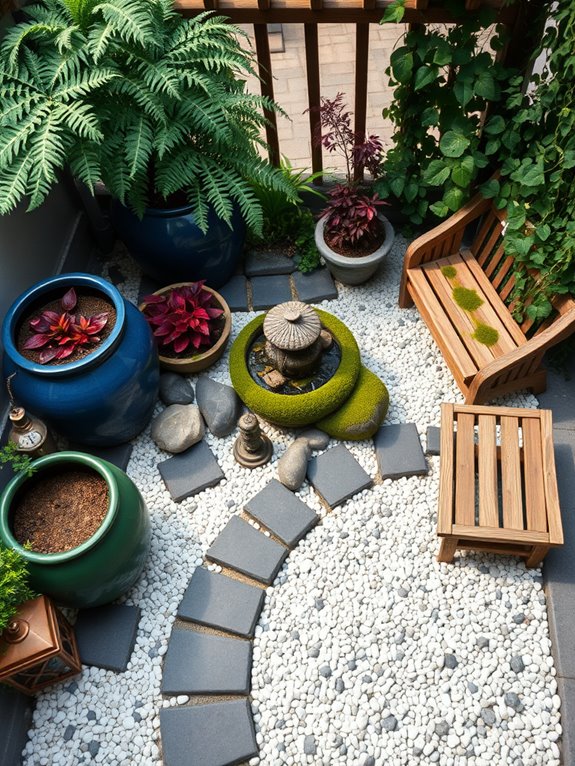
Add Water Features for Tranquil Ambiance
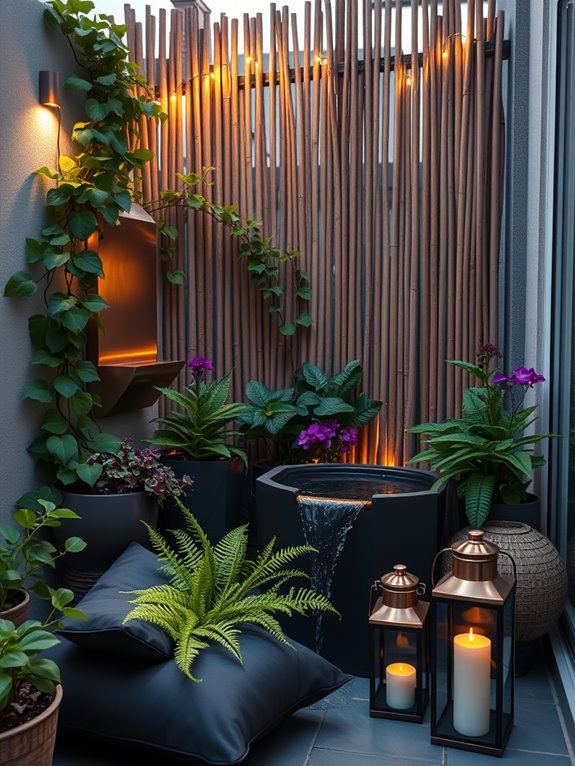
The gentle sound of trickling water creates an instant sense of serenity in a shaded garden retreat, transforming it into a peaceful sanctuary. A carefully positioned water feature becomes the focal point, drawing the eye while masking urban noise with its soothing melody. Whether it’s a classical tiered fountain surrounded by deep green ferns and variegated hostas, or a naturalistic stream cascading over moss-covered rocks, water brings movement and life to shaded spaces.
In the dappled light, water features create enchanting plays of light and shadow, while providing a cooling effect during warm months. Small recirculating fountains nestled among shade-tolerant plants like Japanese Forest Grass and Bleeding Hearts offer respite for visiting birds and butterflies. The combination of moving water and lush foliage creates a multi-sensory experience that transforms any shaded corner into an oasis of tranquility.
Key Elements:
- Recirculating fountain or water feature
- Submersible pump
- Water-resistant electrical outlet
- River rocks or decorative stones
- LED underwater lights
- Moisture-loving shade plants
- Extended drainage system
- Water treatment supplies
- Filter system
- Decorative edging materials
Position your water feature where it can be easily viewed from seating areas and windows, ensuring proper electrical connections are installed by a qualified professional. Create a stable base using compacted gravel and sand, then surround the feature with graduated layers of plants – taller specimens like Japanese Maples or Tree Ferns in the background, medium-height plants like Astilbe and Heuchera in the middle ground, and low-growing ground covers such as Sweet Woodruff in the foreground.
Install proper drainage to prevent water accumulation, and ensure the pump is easily accessible for maintenance.
Additional Tips: Consider space limitations when selecting your water feature – wall fountains work well in narrow areas, while table-top fountains are perfect for small patios or balconies. For larger spaces, consider connecting multiple water features with a meandering stream. Always incorporate safety features like automatic shut-offs and childproof grates.
In regions with freezing winters, choose features that can be easily drained and protected, or opt for all-season options designed to withstand cold temperatures.
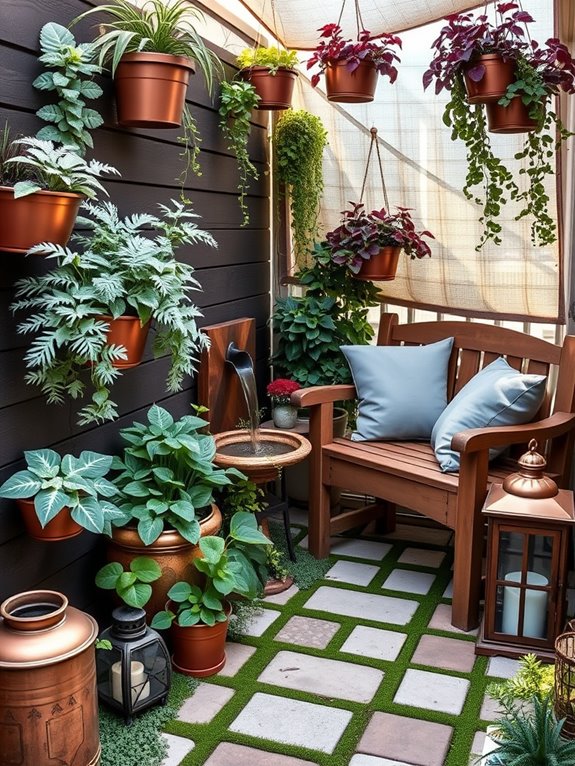
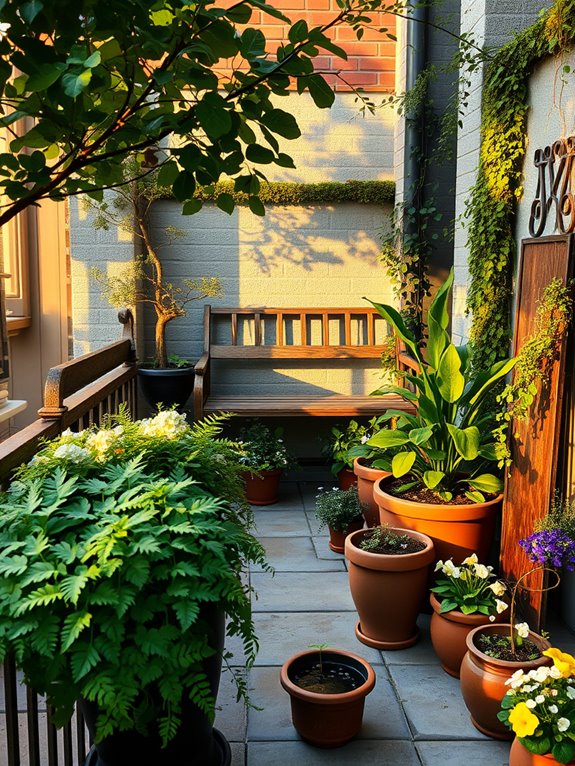
Create Inviting Seating Areas With Natural Materials
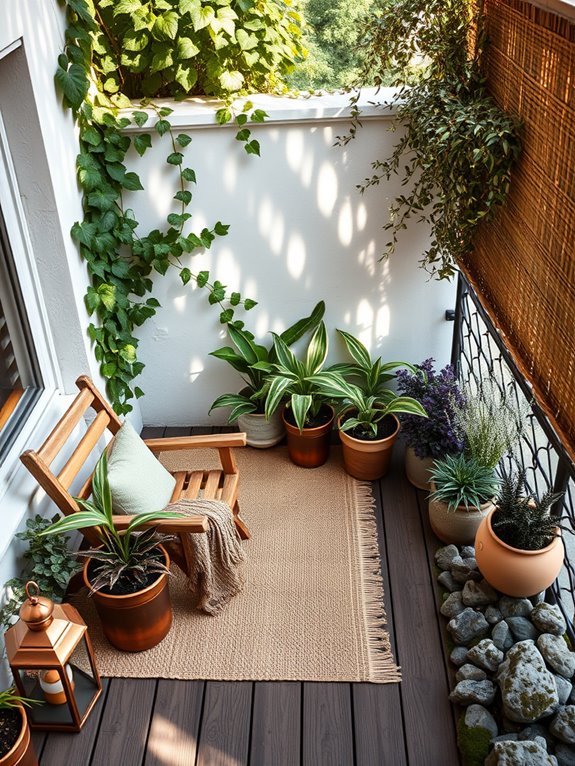
Transform your shaded garden into a peaceful sanctuary by incorporating natural seating areas that blend seamlessly with the surrounding landscape. Picture a weathered wooden bench nestled against a backdrop of lush ferns and delicate hostas, with moss-covered stones creating an enchanting path leading to your private retreat.
The dappled sunlight filtering through overhead tree canopies casts gentle shadows across comfortable seating arrangements made from sustainable materials like reclaimed teak or locally sourced stone. The space comes alive with textural elements that invite both rest and contemplation.
Oversized floor cushions in earthy tones rest atop a platform of natural cedar, while climbing hydrangeas and woodland vines create living walls that envelope the seating area. Strategic placement of shade-loving plants like Japanese Forest Grass and Bleeding Hearts adds movement and color, making the space feel like a natural extension of the forest floor.
Key Elements:
- Weather-resistant wooden benches or chairs
- Natural stone pavers or gravel
- Indoor/outdoor cushions in earth tones
- Potted shade plants
- Solar-powered accent lighting
- Small side tables made from stumps or natural materials
- Weather-resistant storage solutions
- Ground cover plants
- Plant stands of varying heights
- Natural screens or trellises
To implement this design, start by clearing and leveling your chosen area, ensuring proper drainage away from seating zones. Layer different ground materials, beginning with a stable base of crushed stone, followed by larger pavers or decking for the main seating area.
Position the largest furniture pieces first, considering traffic flow and viewing angles, then gradually add smaller elements like side tables and plant stands to create intimate conversation areas. When selecting materials and positioning elements, consider the seasonal changes in your shade garden.
Choose furniture that can withstand moisture and place seating areas where falling leaves or dripping water won’t create constant maintenance issues. Install adequate lighting along pathways and near seating areas to extend usability into evening hours.
For smaller spaces or balconies, opt for folding furniture or built-in bench seating along walls to maximize space. Consider vertical gardening techniques to incorporate more greenery without sacrificing floor space, and use multi-functional pieces like storage benches or nested tables that can be tucked away when not in use.
Lightweight, moveable containers allow for seasonal rearrangement and ensure proper plant rotation for optimal growth in limited light conditions.
Incorporate Light-Reflecting Elements and Textures
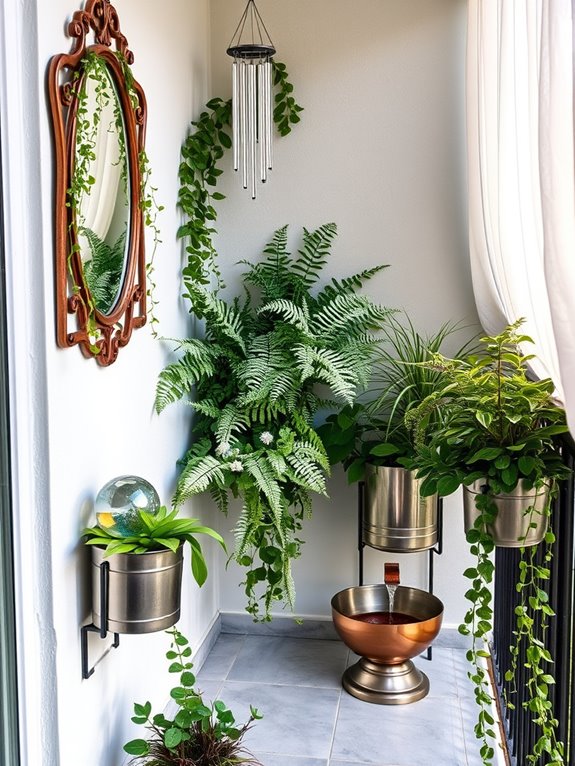
Transform your shaded garden into a luminous sanctuary by incorporating elements that capture and reflect light throughout the space. Strategically placed mirrors, metallic garden ornaments, and glossy-leaved plants create a magical interplay of light and shadow, making the area feel more spacious and bright.
Silver-foliaged plants like Japanese painted ferns, brunnera, and lamium dance with subtle movement, while white-blooming flowers such as astilbe and lily-of-the-valley provide ethereal spots of brightness against deeper green backgrounds.
Water features with reflective surfaces add another dimension of light play, whether through a small pond, fountain, or decorative birdbath. Glass gazing balls, metallic wind chimes, and polished stone pathways catch and scatter whatever light filters through the canopy above.
The combination of these elements creates an enchanting atmosphere that changes throughout the day as sunlight shifts and shadows move across the garden space.
Key Elements:
- Mirrors in weather-resistant frames
- Metallic garden ornaments and wind chimes
- Glass gazing balls
- Light-colored or polished stone pathways
- Silver-foliaged plants
- White-flowering shade plants
- Reflective water features
- Glass or metallic plant containers
- Light-colored garden furniture
- Glossy-leaved plants
Position mirrors to reflect garden views rather than direct sunlight, and angle them slightly downward to prevent hot spots. Install them securely on walls or fences, ensuring they’re weather-protected and won’t create hazardous glare.
Arrange reflective elements at varying heights, from ground-level gazing balls to hanging metallic ornaments, creating depth and visual interest throughout the space. Group silver-foliaged plants in clusters for maximum impact, and maintain their appearance by regular pruning and cleaning of reflective surfaces.
When designing a light-reflecting shade garden, consider the seasonal changes in light patterns and adjust element placement accordingly. For smaller spaces or balconies, use vertical surfaces for mirrors and metallic decorations, and opt for container-grown silver-foliaged plants that can be moved as needed.
Remember that less is often more with reflective elements – too many mirrors or metallic objects can create a cluttered appearance rather than the desired serene atmosphere.
Design Winding Pathways Through the Shade Garden
Winding pathways through a shade garden create an enchanting journey of discovery, where dappled light filters through overhead canopies to illuminate meandering stone or gravel paths. Lush ferns unfurl their fronds along the edges, while hostas display their architectural leaves in varying shades of green, blue, and cream. The curving nature of these paths slows visitors down, encouraging them to pause and observe hidden garden treasures like delicate Japanese forest grass, patches of wild violets, and strategically placed garden art.
These serpentine walkways transform an ordinary shaded space into a contemplative woodland retreat, where each turn reveals a new garden vignette. Stone lanterns cast gentle light in darker corners, while moss-covered rocks and fallen logs add natural drama to path edges. The peaceful sound of water from a small fountain or stream provides an additional sensory element, creating a complete escape from the outside world.
Key Elements:
- Crushed gravel, flagstone, or stepping stones for path material
- Shade-tolerant ground covers (moss, sweet woodruff)
- Large-leaved plants (hostas, bergenia)
- Ferns (Japanese painted, ostrich, maidenhair)
- Garden art or focal points
- Path lighting
- Natural stone accents
- Small water feature
- Edge plants (heuchera, tiarella)
- Japanese forest grass
- Native woodland wildflowers
Creating these winding paths begins with sketching a natural-looking curve that follows the contours of your space. Lay out the path’s shape using garden hoses or rope, ensuring curves are gentle enough for comfortable walking. Excavate the path area to a depth of 4-6 inches, add landscape fabric for weed prevention, and layer with crushed stone base before adding your chosen surface material.
Install larger plants first, positioning them to create rhythm along the path, then add smaller specimens and ground covers to fill spaces. The key to successful shade garden paths lies in proper spacing and maintenance. Allow adequate room between plants for growth while maintaining clear pathway edges. Regular pruning prevents overgrowth onto walking surfaces, while annual mulching helps retain moisture and suppress weeds.
Clean path surfaces periodically to prevent slip hazards from organic debris. For smaller spaces or balcony gardens, create the illusion of a winding path using container groupings arranged in a curved pattern. Use varying heights of containers and incorporate hanging plants to add vertical interest.
Consider using lighter-colored materials and plants with variegated foliage to brighten shaded areas. Install mirror features strategically to create the illusion of greater depth and space, and choose dwarf varieties of classic shade plants to maintain appropriate scale.
Blend Native and Woodland Species for Year-Round Appeal
Transform your shaded garden into a serene woodland sanctuary by harmoniously blending native species with classic woodland plants. Delicate ferns unfurl their fronds beneath the dappled shade of native dogwoods and serviceberries, while colonies of wild ginger and foamflower create a living carpet below. The layered effect mirrors nature’s own design, with tall understory trees giving way to shrubs like native hydrangeas and viburnums, which shelter smaller woodland treasures like bleeding hearts and Solomon’s seal.
This naturalistic approach creates an enchanting space that evolves through the seasons, beginning with spring ephemerals like trillium and bloodroot, transitioning to summer’s lush greenery, and concluding with autumn’s golden hues and winter’s architectural interest. Native ferns and moss-covered stones provide consistent structure, while woodland plants like jack-in-the-pulpit and cardinal flower add unexpected touches of color and intrigue throughout the growing season.
Essential Elements:
- Native understory trees (dogwood, redbud, serviceberry)
- Woodland shrubs (hydrangea, viburnum, witch hazel)
- Native ferns (Christmas fern, lady fern, ostrich fern)
- Spring ephemerals (trillium, bloodroot, Virginia bluebells)
- Ground covers (wild ginger, foamflower, woodland phlox)
- Natural stone elements
- Leaf mulch or composted pine needles
- Curved pathways
- Log or stone seating areas
- Native woodland wildflowers
Begin implementation by establishing the foundational layer of understory trees, positioning them to create optimal dappled shade. Layer shrubs beneath these trees in curved groupings, leaving open spaces for pathways and seating areas. Install ground covers and woodland perennials in sweeping drifts, mimicking natural growth patterns.
Add stone elements and pathways early in the process to avoid disturbing established plants later. The key to maintaining this garden style lies in understanding its seasonal rhythms. Allow fallen leaves to decompose naturally, adding organic matter to the soil. Light pruning of woody plants in late winter maintains shape while preserving the natural aesthetic.
Monitor soil moisture, especially during establishment, and supplement with leaf mulch as needed to retain moisture and suppress unwanted vegetation. For smaller spaces or balcony adaptations, focus on creating miniature woodland vignettes using container-friendly native ferns and shade-tolerant perennials. Use vertical space with wall-mounted planters for trailing woodland vines, and incorporate smaller specimen shrubs in decorative containers.
Consider dwarf varieties of native plants and create depth by varying container heights and placing mirrors strategically to reflect plantings and create the illusion of a larger woodland space.