
9 Garden Ideas for Rooftop Spaces
Just as the legendary hanging gardens of Babylon transformed ancient architecture, you can create your own elevated paradise with a modern rooftop garden. You’ll discover how to turn your unused space into a thriving outdoor retreat using smart container systems, vertical plantings, and weather-hardy materials. Whether you’re dreaming of a cozy urban vegetable patch or a sophisticated entertaining area with cascading flowers, these nine innovative approaches will help you maximize every square foot of your skyward sanctuary.
Contents
- 1 Container Gardens That Maximize Space
- 2 Multi-Level Planting Systems
- 3 Weather-Resistant Seating Areas
- 4 Vertical Garden Installations
- 5 Modular Garden Design Solutions
- 6 Water Features and Fountains
- 7 Urban Vegetable and Herb Gardens
- 8 Shade-Creating Pergolas and Structures
- 9 Low-Maintenance Succulent Landscapes
Container Gardens That Maximize Space
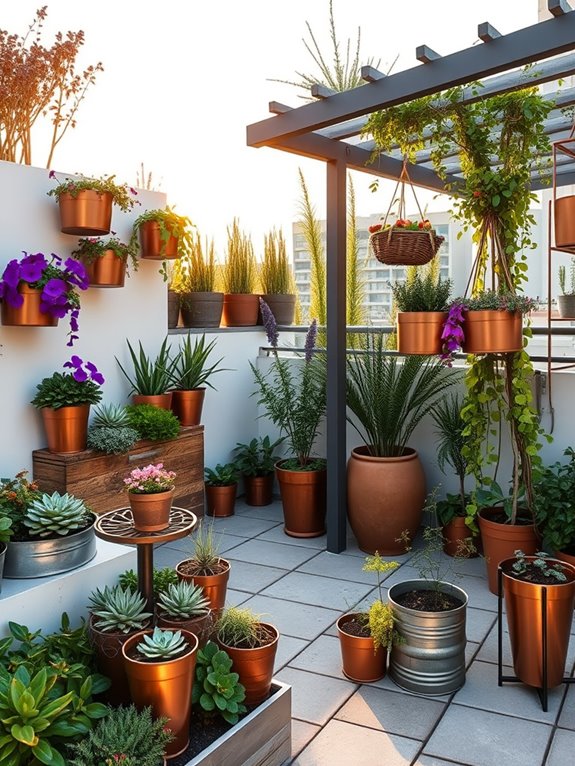
Transform your rooftop into a lush oasis with a thoughtfully designed container garden that makes the most of every square inch. Imagine stepping into an urban jungle where cascading vines spill from mounted wall planters, while compact herb gardens nestle alongside flowering perennials in tiered containers. Strategic placement of varying pot sizes creates depth and dimension, with tall ceramic containers housing bamboo or ornamental grasses serving as natural privacy screens, while smaller vessels overflow with colorful petunias, marigolds, and trailing lobelia.
The vertical possibilities are endless, with hanging baskets suspended from pergolas and railings, featuring eye-catching combinations of fuchsias, ivy, and wave petunias. Stackable planters showcase strawberries and herbs at different heights, while corner spaces come alive with multi-level container arrangements featuring drought-resistant succulents and Mediterranean herbs. The thoughtful mix of textures and heights creates an immersive garden experience that belies its efficient use of space.
Essential Elements:
- Multi-level container systems
- Vertical growing structures
- Self-watering planters
- Lightweight containers
- Trellises and support systems
- Drip irrigation equipment
- Plant casters or wheeled platforms
- Weather-resistant containers
- Container-specific potting soil
- Space-saving plant varieties
Begin implementation by mapping your rooftop’s sunny and shaded areas, then arrange containers accordingly. Place the largest planters first, positioning them along edges and corners where they’ll have the most structural support. Create levels using sturdy plant stands or purpose-built tiered systems, ensuring each container has adequate drainage and access for maintenance.
Install an automatic watering system early in the process, running irrigation lines discreetly among the containers. Connect vertical growing elements to existing structures or install free-standing trellises, securing them properly against wind. Group plants with similar water and sunlight needs together to streamline maintenance and ensure optimal growing conditions.
Position frequently harvested plants, like herbs and vegetables, in easily accessible containers near walkways or seating areas. For smaller rooftops, focus on dual-purpose containers that combine decorative and edible plants, and utilize wall space with mounted planters or pocket gardens. Consider collapsible or modular systems that can be reconfigured as needs change.
Always check weight restrictions and ensure proper waterproofing before installation, and plan for seasonal changes by incorporating both permanent and rotating plantings that can be easily swapped out as the seasons change.
Multi-Level Planting Systems
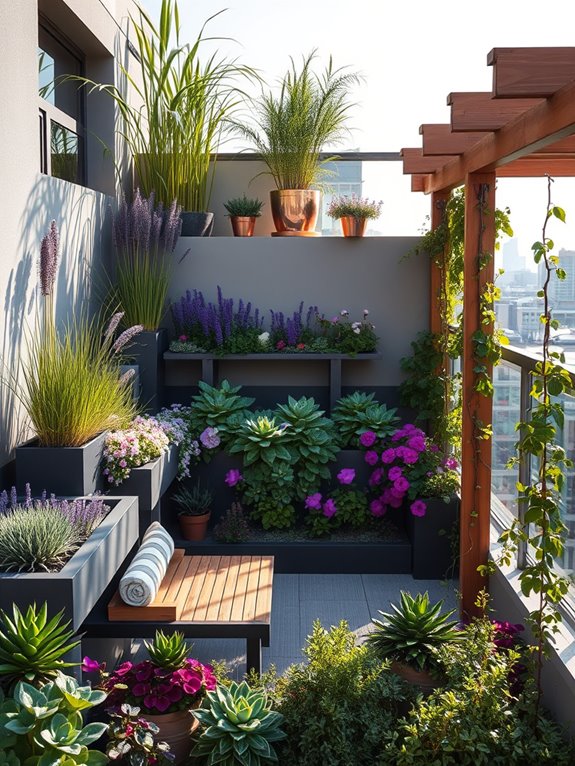
A multi-level planting system transforms an ordinary rooftop into a mesmerizing vertical oasis, where cascading greenery flows from varying heights like a living waterfall. Tall architectural plants like bamboo and ornamental grasses create a dramatic backdrop, while medium-height flowering perennials such as salvias and lavender occupy the middle ground. The lowest level bursts with trailing plants like creeping thyme, ivy, and cascading petunias, creating a lush carpet that spills over the edges of containers and stepped platforms.
The layered approach not only maximizes space but also creates distinct microclimates, allowing for a diverse plant palette that brings depth and interest to the rooftop garden. Steel or wooden structures support climbing roses and clematis, while strategically placed containers at different elevations showcase drought-resistant succulents and Mediterranean herbs. The varying heights create intimate spaces perfect for reading nooks and conversation areas, with the plants providing natural screens and boundaries.
Key Elements:
- Tiered planting structures
- Large elevated planters
- Vertical support systems
- Irrigation system with multiple zones
- Weather-resistant containers
- Lightweight soil mix
- Plant varieties for different heights
- Sturdy stair-step displays
- Trellis systems
- Drainage solutions
Implementation begins with a thorough assessment of the rooftop’s weight-bearing capacity and installation of proper drainage systems. Start by positioning the tallest structures against walls or at the northernmost point to prevent shadowing smaller plants.
Create a framework of stepped platforms using weather-resistant materials, ensuring each level receives adequate sunlight and can be easily accessed for maintenance.
The key to successful maintenance lies in installing an efficient irrigation system with separate zones for different levels, as plants at higher elevations may require more frequent watering due to wind exposure. Position drought-tolerant plants at the top levels where they’ll experience the most sun and wind, while shade-loving varieties can thrive in the protected lower levels.
Regular pruning and maintenance of climbing plants prevent overcrowding and maintain the desired visual effect.
Design adaptations can accommodate various rooftop sizes by adjusting the scale and number of levels. Smaller spaces might focus on wall-mounted vertical gardens with just two or three tiers, while larger areas can incorporate multiple stepped sections with integrated seating areas.
Consider using modular systems that can be reconfigured as plants grow or seasonal changes require adjustment. For wind protection, install transparent barriers on upper levels and choose sturdy plants that can withstand exposure while maintaining their aesthetic appeal.
Weather-Resistant Seating Areas
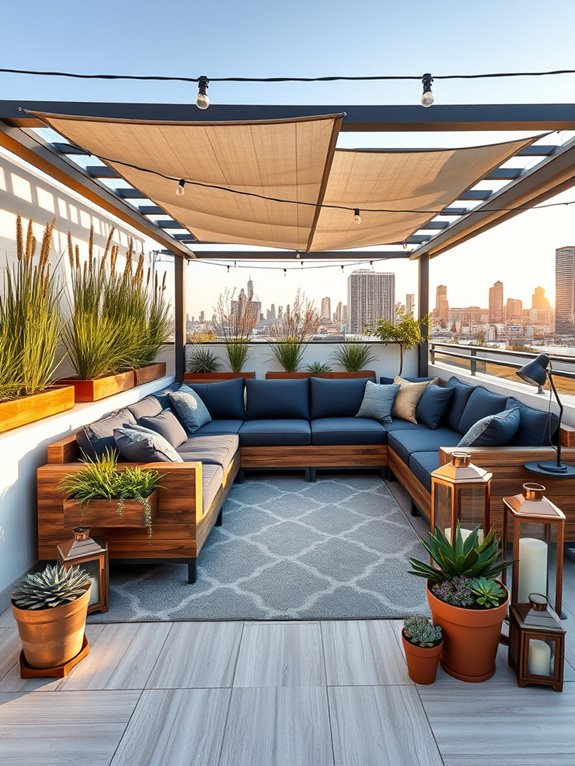
Transform your rooftop into a cozy retreat with a weather-resistant seating area that combines durability and style. Picture deep-seated outdoor sofas wrapped in marine-grade fabric, nestled among tall ornamental grasses that sway gently in the breeze.
Weather-resistant teak or powder-coated aluminum furniture creates intimate conversation nooks, while oversized ceramic planters filled with drought-tolerant lavender and rosemary provide natural windbreaks and delightful fragrance.
The space comes alive with strategically placed pergolas or sail shades, offering protection from harsh elements while creating dappled light patterns across the seating area. Weatherproof outdoor rugs in geometric patterns define distinct zones, while copper lanterns and solar-powered string lights create a magical ambiance for evening gatherings.
Hardy succulents in wall-mounted planters and trailing vines add vertical interest without taking up precious floor space.
Key Elements:
- Weather-resistant furniture (teak, aluminum, or synthetic wicker)
- Marine-grade fabric cushions and pillows
- Retractable or permanent shade structures
- Outdoor rugs designed for exposure
- Wind-resistant planters
- Hardy ornamental grasses
- Drought-tolerant herbs and succulents
- Solar-powered lighting
- Storage solutions for cushions
- Non-slip flooring materials
Creating a weather-resistant seating area starts with proper space planning. Position larger furniture pieces against walls or barriers to minimize wind exposure, and ensure adequate drainage beneath all seating areas.
Install modular flooring systems or weather-resistant deck tiles to create a level surface. Anchor all furniture and shade structures securely, considering local wind patterns and building codes.
Consider your climate’s specific challenges when selecting materials and plants. For coastal areas, choose salt-resistant materials and plants. In urban environments, opt for pollution-tolerant species.
Create multiple seating options – from dining areas to lounging spaces – but maintain clear pathways for maintenance and emergency access.
Extra Tips: Adapt your design to your space by using multi-functional furniture pieces that can serve as both seating and storage. For smaller balconies, consider fold-down tables and stackable chairs.
Install retractable awnings or removable shade sails for flexible sun protection. Always check weight restrictions and building regulations before installing heavy elements, and plan for seasonal maintenance to ensure longevity of both furniture and plants.
Vertical Garden Installations
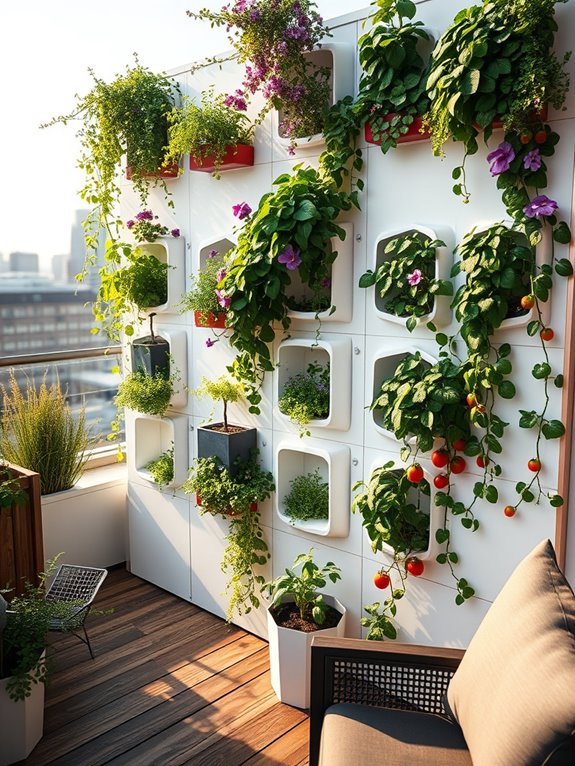
Transform your rooftop space into a living tapestry with a vertical garden installation that defies gravity and maximizes every inch of available space. Lush greenery cascades down modular wall panels, creating an enchanting display of textures and colors that draws the eye upward. Fragrant herbs like rosemary and thyme intermingle with flowering vines such as jasmine and clematis, while compact vegetables like cherry tomatoes and lettuce varieties add practical beauty to the vertical landscape.
The multi-layered design creates an intimate green sanctuary that shields you from urban surroundings while providing a natural cooling effect for your rooftop retreat. Geometric planting patterns in living wall systems combine with hanging planters and tiered arrangements to create depth and visual interest. Solar-powered LED strips weaved through the installation illuminate the foliage at night, transforming the space into a magical evening garden.
Essential Elements:
- Modular wall planting systems
- Irrigation system with timer
- Lightweight growing medium
- Plant support structures
- Waterproof backing material
- Drainage collection system
- Weather-resistant containers
- Selection of climbing plants
- Mix of ornamental and edible vegetation
- LED lighting fixtures
- Maintenance tools
- Weather protection panels
Installation begins with securing a waterproof barrier against your chosen wall surface, followed by mounting the modular planting system according to manufacturer specifications. Establish the irrigation system before adding growing medium, ensuring proper drainage channels are in place.
Plant selection should follow a strategic pattern, positioning larger specimens at the base and lighter, trailing varieties toward the top. Consider weight distribution and anchor points for additional support where needed.
For optimal results, incorporate various planting methods within your vertical design. Combine pocket planters, traditional containers, and hydroponic systems to accommodate different plant needs. Regular maintenance includes checking irrigation lines, pruning overgrowth, and monitoring plant health, particularly in exposed rooftop conditions where wind and sun exposure can be intense.
Adapt your vertical garden design based on available space and weight restrictions. Smaller balconies can utilize lightweight fabric pocket systems, while larger areas might support more substantial structured installations. Consider incorporating movable elements for flexibility, and always check building regulations regarding weight limits and attachment methods.
Creating zones for different plant types helps manage water needs efficiently, while installing wind barriers can protect delicate specimens in exposed locations.
Modular Garden Design Solutions

A modular garden design transforms your rooftop into a flexible, contemporary oasis where geometric planters and movable elements create distinct zones of greenery and function. Sleek container combinations in various heights showcase cascading herbs, compact vegetables, and architectural plants like bamboo and ornamental grasses.
The clean lines of modular units establish a strong visual rhythm, while their mobility allows for seasonal rearrangement, creating an ever-evolving landscape that adapts to your needs and the changing light patterns throughout the year.
The beauty of modular design lies in its ability to combine form and function seamlessly. Stackable planters in complementary materials like powder-coated steel, natural wood, and concrete create vertical interest while maximizing growing space. Integrated seating modules nestled between plant groupings provide intimate gathering spots, while movable privacy screens adorned with climbing vines can be repositioned to create sheltered nooks or open entertaining areas.
Key Elements:
- Lightweight modular planters
- Stackable container systems
- Mobile privacy screens
- Integrated seating units
- Drip irrigation components
- Weather-resistant storage solutions
- Adjustable plant supports
- Multi-functional furniture pieces
- Modular decking tiles
- Container-friendly plant varieties
Implementation begins with mapping your rooftop’s weight-bearing zones and creating a grid system that guides the placement of modular elements. Start with the largest components, such as seating units and tall planters, positioning them to create natural pathways and distinct functional areas.
Install a modular irrigation system that can be easily modified as your garden layout changes, ensuring consistent water delivery to all plantings. When selecting plants, choose specimens that will thrive in containers and complement your modular design.
Group plants with similar water and light requirements together in adjacent modules, making maintenance more efficient. Consider the mature size of each plant to ensure they won’t outgrow their designated spaces, and incorporate automatic irrigation systems that can be adjusted as needed.
Success with modular garden design depends on careful planning of scale and proportion. For smaller rooftops, choose vertical modular systems that maximize growing space while maintaining a clean aesthetic.
Larger areas can accommodate multiple seating zones and larger plant specimens, but maintain visual cohesion through consistent materials and color schemes. Always factor in wind exposure when selecting and securing modules, and ensure easy access to all plants for maintenance.
Consider incorporating wheels or sliding mechanisms on larger units to facilitate seasonal rearrangement while protecting your rooftop surface.
Water Features and Fountains
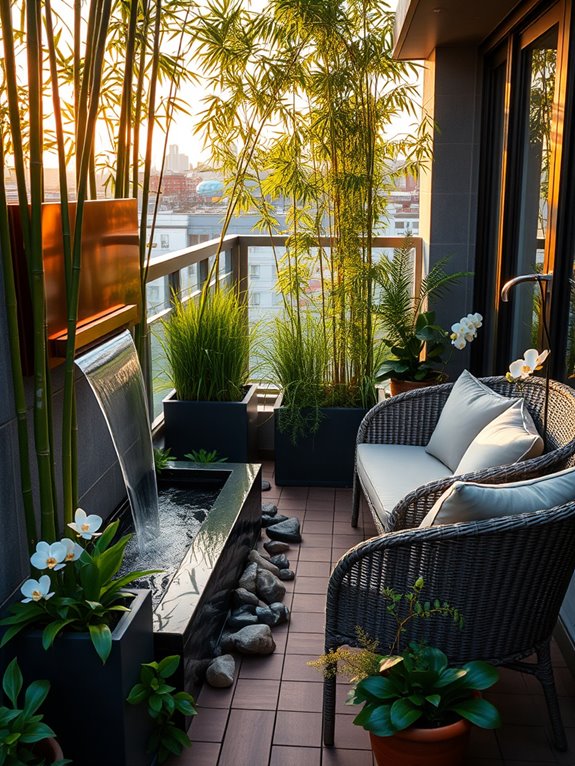
The gentle sound of cascading water creates an oasis of tranquility high above the urban landscape, as strategically placed fountains transform a rooftop garden into a peaceful retreat. Multi-tiered water features serve as stunning focal points, while smaller wall fountains maximize space efficiency and create soothing white noise that masks city sounds.
Surrounding these water elements, moisture-loving plants like Japanese forest grass, ferns, and bamboo thrive in the humid microclimate, creating a lush, natural atmosphere. Stone basins filled with water lilies and floating plants add another dimension to the space, reflecting sunlight and sky while attracting birds and butterflies.
The combination of moving and still water creates a dynamic environment that changes throughout the day as light plays across the water’s surface. Illuminated at night, these water features transform into dramatic sculptural elements that extend the garden’s usability into the evening hours.
Key Elements:
- Self-contained water fountain or cascade
- Recirculating pump system
- Waterproof membrane and drainage system
- Water-resistant decking or pavers
- Storage tank or reservoir
- Water-loving plants
- Underwater lighting
- Water level sensors
- Filter system
- Weather-resistant seating
- Moisture-resistant containers
- Stone or concrete basins
Installing water features requires careful planning and structural consideration. Begin by consulting a structural engineer to verify weight-bearing capacity and waterproofing requirements. Install a professional-grade waterproofing membrane before positioning water features, ensuring proper drainage systems are in place.
Position pumps and filters in accessible locations for maintenance, and install automatic water level sensors to prevent overflow or pump burnout. Multiple smaller water features often work better than one large installation, allowing for better weight distribution and easier maintenance.
Create zones around water features with varying levels of moisture requirements for plants, transitioning from water-loving species nearest the fountains to drought-tolerant plants in drier areas. Incorporate proper electrical outlets with weather-proof covers and automatic shut-offs for safety.
When designing a water feature garden, consider scale carefully – smaller spaces might benefit from wall-mounted fountains or narrow water channels, while larger areas can accommodate more substantial features.
Install wind barriers to reduce water loss through evaporation and splash, and choose materials that can withstand both water exposure and weather extremes. For micro-balconies, consider tabletop fountains or self-contained water walls that can be easily moved or stored during extreme weather conditions.
Always include automatic shut-off features and overflow protection to prevent water damage to the building structure.
Urban Vegetable and Herb Gardens
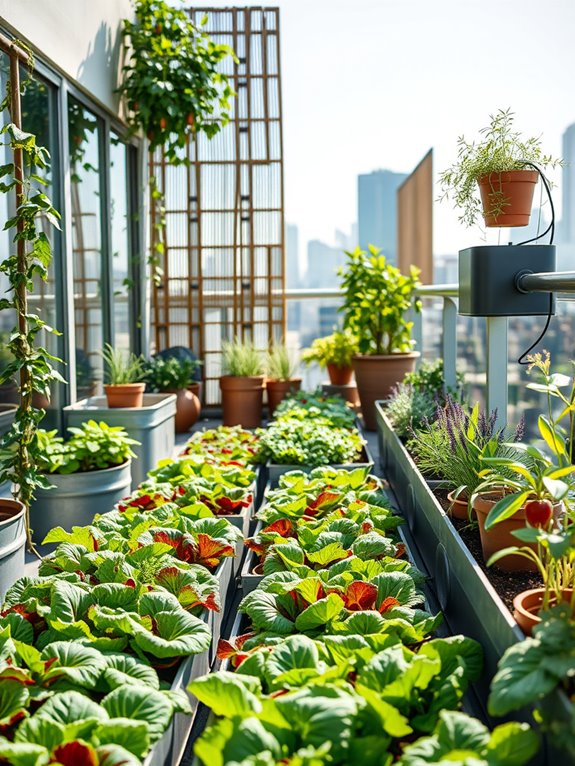
Transform your urban rooftop into a thriving oasis of fresh produce and aromatic herbs, where neat rows of leafy vegetables create a patchwork of greens against the city skyline. Compact tomato vines climb sleek trellises while basil, thyme, and rosemary release their fragrant oils into the warm air.
Galvanized steel planters arranged in geometric patterns house rainbow chard, crisp lettuce varieties, and climbing pole beans, creating an elegant yet productive space that merges form with function.
The garden comes alive with vertical growing systems showcasing cascading strawberry plants and compact pepper varieties, while portable herb boxes line the edges with their varying textures and heights.
Mediterranean herbs thrive in terracotta pots, adding rustic charm to modern metal railings, while strategic placement of dwarf fruit trees in large containers provides shade and visual anchor points throughout the space.
Essential Elements:
- Raised bed planters (varying heights)
- Vertical growing systems
- Drip irrigation setup
- Wind barriers or screens
- Container assortment (terracotta, metal, fabric)
- Trellises and support structures
- Composting system
- Tool storage solution
- Water collection system
- Weather-resistant furniture
- Shade structures
Implementation begins with assessing your rooftop’s weight-bearing capacity and installing appropriate waterproofing measures. Position the largest containers along load-bearing walls, creating a foundation for your garden layout.
Install vertical growing systems on south-facing walls or sturdy railings, maximizing growing space while maintaining accessibility for harvest and maintenance.
Establish irrigation zones based on plant water needs, grouping thirsty tomatoes and peppers separately from drought-tolerant herbs. Create dedicated areas for seasonal rotation, allowing space for succession planting throughout the growing season.
Incorporate a small composting system and tool storage to maintain garden efficiency. For smaller spaces, focus on high-yield compact varieties and utilize vertical space efficiently.
Consider mobile planters on wheels for flexibility, and invest in stackable containers that can be reconfigured as needs change. Maximize production by interplanting quick-growing crops like radishes and lettuce between slower-developing vegetables, and use reflective surfaces or light-colored walls to increase available light for plant growth.
Shade-Creating Pergolas and Structures
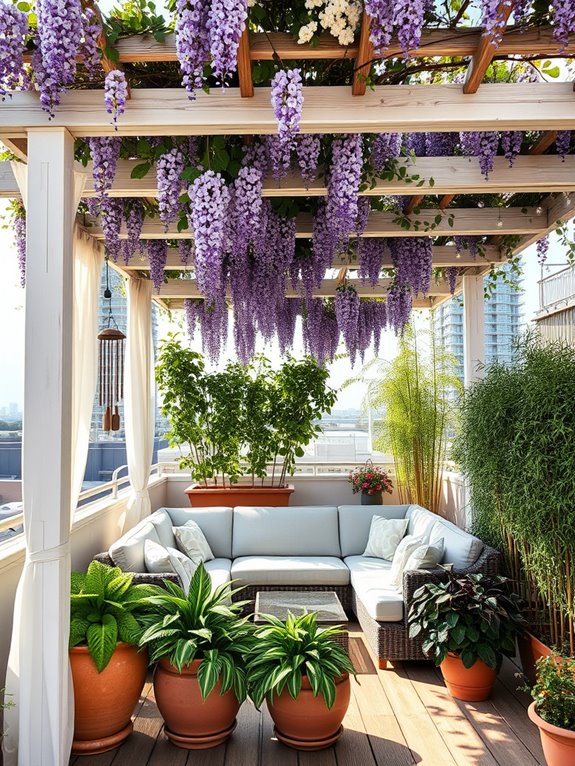
Transform your rooftop into a tranquil oasis with a stunning shade-creating pergola that provides both structure and sanctuary. Climbing vines like wisteria, jasmine, and climbing roses weave through wooden beams, creating a living canopy that dances in the breeze while offering protection from harsh sunlight. Below, comfortable lounge furniture nestles among potted plants, creating an intimate space perfect for afternoon reading or evening gatherings.
The pergola’s architectural elements add vertical interest while defining distinct zones within your rooftop garden. String lights draped across the beams create magical evening ambiance, while billowing curtains attached to the posts can be drawn for additional privacy and sun protection. Shade-loving plants like ferns, hostas, and caladiums thrive in the dappled light beneath the structure, adding layers of lush greenery to the space.
Essential Elements:
- Pergola structure (wood, metal, or vinyl)
- Climbing vines and supports
- Outdoor furniture (seating and tables)
- Shade-tolerant plants
- Container gardens
- Outdoor lighting
- Weather-resistant curtains
- Irrigation system
- Weather-resistant cushions and textiles
- Plant supports and trellises
Begin installation by securing the pergola structure properly to your rooftop, ensuring it meets local building codes and weight restrictions. Position the main posts to create optimal shade patterns throughout the day, typically oriented to block late afternoon sun.
Install an irrigation system for the climbing plants before adding container gardens and furniture groupings beneath the structure. Create layers of interest by positioning larger plants at the back and sides, with smaller containers arranged to define seating areas and walkways.
When selecting materials and plants, prioritize durability and wind resistance. Choose lightweight containers made from materials like fiberglass or resin, and anchor furniture securely. Implement self-watering systems or moisture-retaining solutions to maintain consistent soil moisture for climbing plants. Regular pruning of vines prevents overwhelming the structure while maintaining desired coverage.
Design Adaptations: For smaller rooftops, consider a partial pergola that extends from one wall rather than a full structure, or use modular components that can be reconfigured as needed. Vertical gardening techniques maximize space efficiency, while retractable shade solutions offer flexibility.
In windy locations, opt for sturdy, low-growing plants and secure loose elements with cables or brackets. Monitor weight distribution carefully, particularly when containers are wet, and ensure proper drainage systems are in place to prevent water accumulation.
Low-Maintenance Succulent Landscapes
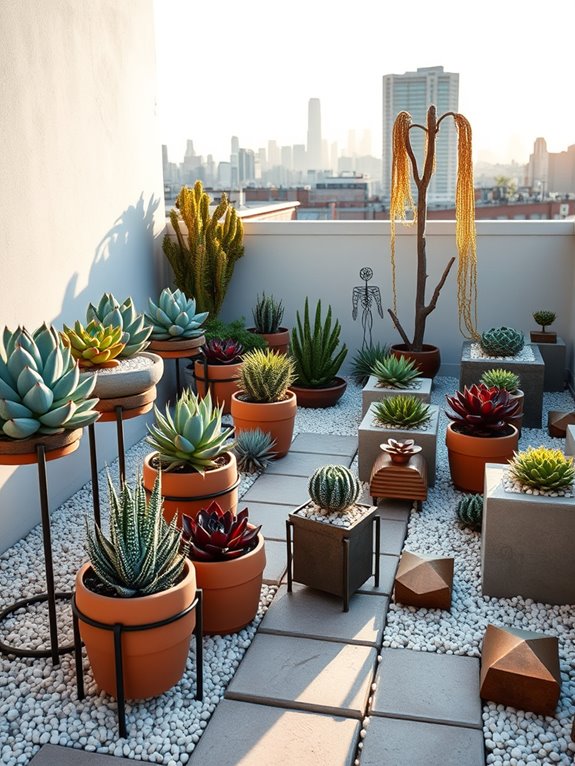
Transform your rooftop into a striking desert oasis with a low-maintenance succulent landscape that captivates through its sculptural beauty and subtle color variations. Clusters of blue-green echeveria rosettes mingle with spiky aloe vera plants, while trailing burro’s tail cascades over container edges, creating a living tapestry of forms and textures.
Terra cotta pots of varying heights showcase individual specimens, while geometric planters filled with hardy sedums and drought-resistant sempervivums add architectural interest to the space. The natural stone pathways weaving between planted areas create an organic flow, while decorative gravel in warm earth tones adds desert authenticity and practical drainage.
Small garden sculptures and weathered driftwood pieces nestle among the plants, casting interesting shadows across the textural landscape. The overall effect is both modern and timeless, offering a serene retreat that requires minimal intervention to maintain its beauty.
Essential Elements:
- Diverse succulent varieties (echeveria, sedum, sempervivum, aloe)
- Terra cotta and geometric containers
- Decorative gravel or pebbles
- Pathway stones
- Natural wood elements
- Garden sculptures
- Cactus/succulent potting mix
- Drainage materials
- Drip irrigation system
- Container risers
- Sun-reflecting screens (optional)
Begin implementation by arranging larger containers along the rooftop’s edges, ensuring proper weight distribution and access to drainage. Layer containers at varying heights using sturdy risers, creating visual depth while maintaining accessibility for maintenance.
Install a simple drip irrigation system with individual emitters for each container, and use well-draining succulent soil mixed with additional perlite to prevent water retention. Group plants with similar water needs together, and position taller specimens where they won’t shade smaller varieties.
When designing your succulent landscape, consider your specific microclimate challenges. For smaller balconies, focus on vertical gardening opportunities using wall-mounted planters or tiered stands. Protect sensitive varieties from intense afternoon sun with strategic placement or partial shade solutions.
Remember that succulents typically need more water during their active growing season and less during dormancy, so adjust irrigation accordingly. Monitor plant spacing to allow for growth while maintaining the clean, modern aesthetic that makes these gardens so appealing.