
9 Garden Ideas for Reusing Old Garden Tools
You’ll be amazed to discover that discarded garden tools can transform into stunning outdoor art pieces and functional garden features. Those rusty rakes, worn spades, and retired trowels sitting in your shed hold untapped creative potential for unique trellises, charming planters, and eye-catching decorative elements. From vintage tool gates that welcome visitors to weathered handle borders that define garden spaces, there’s a world of possibilities waiting in your old garden implements that’ll help you craft a one-of-a-kind outdoor sanctuary.
Contents
- 1 Create a Vintage Tool Garden Gate
- 2 Build a Garden Tool Wind Chime
- 3 Design a Rustic Tool-Handle Trellis
- 4 Transform Old Tools Into Garden Art
- 5 Craft a Tool-Head Bird Bath
- 6 Make a Garden Tool Storage Display
- 7 Turn Rake Heads Into Plant Hangers
- 8 Fashion a Tool Handle Garden Border
- 9 Assemble a Garden Tool Weather Vane
Create a Vintage Tool Garden Gate
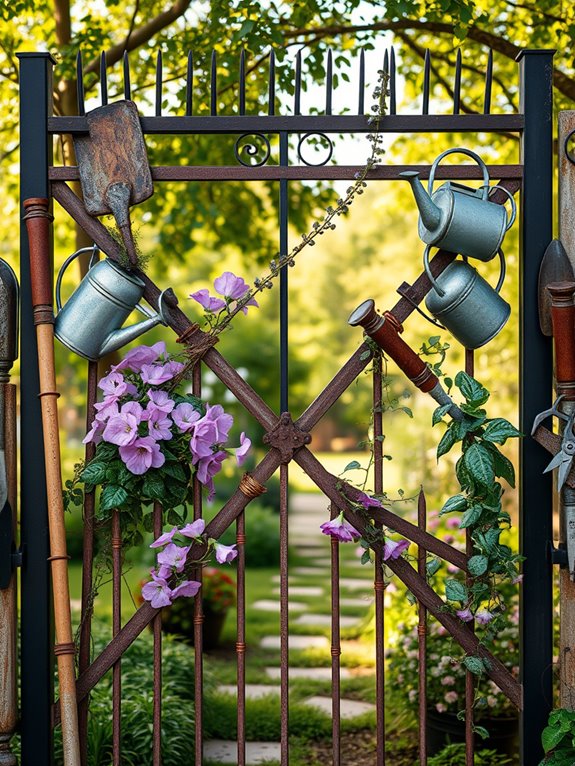
Transform your garden entrance into a whimsical conversation piece by crafting a charming gate from retired farm implements and vintage gardening tools. Weathered rake heads, rusty pitchforks, and antique spades interweave to create an artistic lattice pattern, while old hoe heads and trowels add decorative flourishes along the frame. Morning glories and climbing roses wind their way through the metalwork, softening the industrial elements with delicate blooms and creating a magical threshold between spaces.
The gate becomes a living sculpture where function meets nostalgia, telling stories of seasons past through each worn handle and patinated surface. Copper wire bindings catch the sunlight, while strategically placed vintage watering cans serve as planters for cascading herbs and trailing vines. The overall effect bridges the gap between practical entrance and artistic installation, drawing the eye while creating a distinct transition point in the garden landscape.
Essential Elements:
- Vintage garden tools (rakes, hoes, pitchforks, spades)
- Metal gate frame
- Copper wire or metal fasteners
- Climbing plants (roses, morning glories, clematis)
- Hanging planters or vintage watering cans
- Gate hinges and latch mechanism
- Weather-resistant sealant
- Decorative metalwork pieces
To implement this design, start with a sturdy metal frame sized appropriately for your entrance. Arrange larger tools like rakes and pitchforks to create the main structure, securing them with robust metal fasteners or welding when possible. Layer smaller implements like trowels and pruning shears in decorative patterns, ensuring all sharp edges are safely positioned or dulled.
Install strong hinges and a reliable latch system, then treat all metal surfaces with rust-inhibiting sealant to preserve the intentionally aged appearance while preventing further deterioration. Design considerations should account for local weather patterns and gate usage frequency.
Choose climbing plants that match your climate zone and consider their mature size to prevent overwhelming the structure. For smaller spaces, create a scaled-down version using hand tools rather than larger farm implements, or design a single decorative panel rather than a full gate. Ensure adequate support for climbing plants and integrate irrigation systems early in the planning stages to maintain healthy growth without compromising the gate’s functionality.
Build a Garden Tool Wind Chime
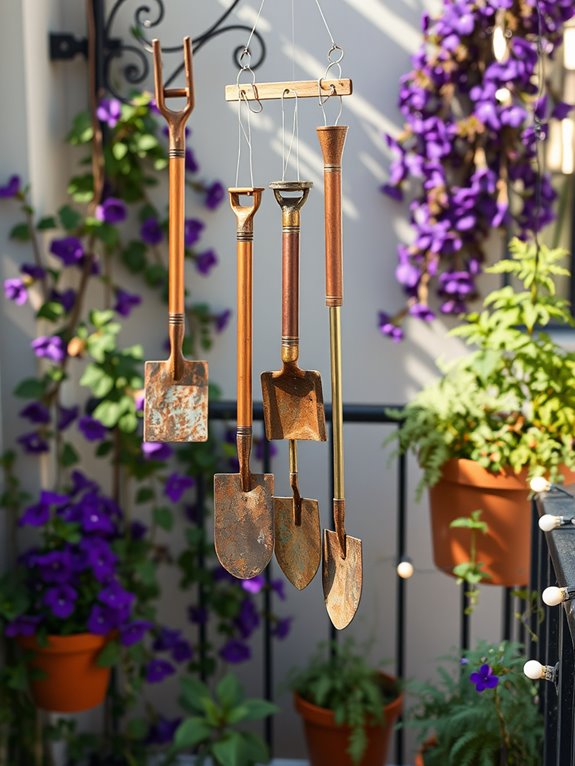
Transform your garden into a whimsical soundscape by crafting a charming wind chime from vintage garden tools. Imagine rustic hand trowels, weathered spades, and antique cultivator heads suspended at varying heights, dancing in the breeze while creating melodic tones that echo through your outdoor sanctuary.
The patina of well-loved tools adds character and history to the garden space, while copper pipes and metal washers intermingled among the tools catch sunlight and create additional visual interest. This artistic centerpiece becomes a focal point that draws the eye upward, adding vertical dimension to your garden design.
Position the wind chime near flowering vines like morning glories or clematis, allowing the blooms to weave naturally around the hanging structure. The combination of organic movement from the plants and the gentle chiming of metal creates a multi-sensory experience that enhances the peaceful atmosphere of your garden retreat.
Key Elements Needed:
- Assorted old garden tools (hand trowels, spades, cultivators)
- Sturdy mounting bracket or shepherd’s hook
- Strong fishing line or thin metal wire
- Copper pipes of varying lengths
- Metal washers
- Small S-hooks
- Weather-resistant string or cord
- Metal ring or circular frame
- Climbing plants (optional)
Creating your garden tool wind chime begins with selecting a sturdy mounting point that can support the weight of metal tools. Arrange the tools in a circular pattern, hanging them at different lengths from a central metal ring using weather-resistant cord.
Space the tools far enough apart to prevent tangling while allowing them to make contact when moved by the wind. Incorporate copper pipes between the tools to create different tones, and add metal washers as striking elements.
For optimal sound quality and durability, consider these essential tips: Choose a location that receives consistent but gentle breezes, avoid areas with harsh winds that could cause damage. Scale the size of your wind chime to your space – smaller balconies work well with miniature hand tools, while larger gardens can accommodate full-sized implements.
Protect metal elements from excessive rust by applying a clear outdoor sealant, and periodically check mounting hardware to ensure everything remains secure.
Design a Rustic Tool-Handle Trellis
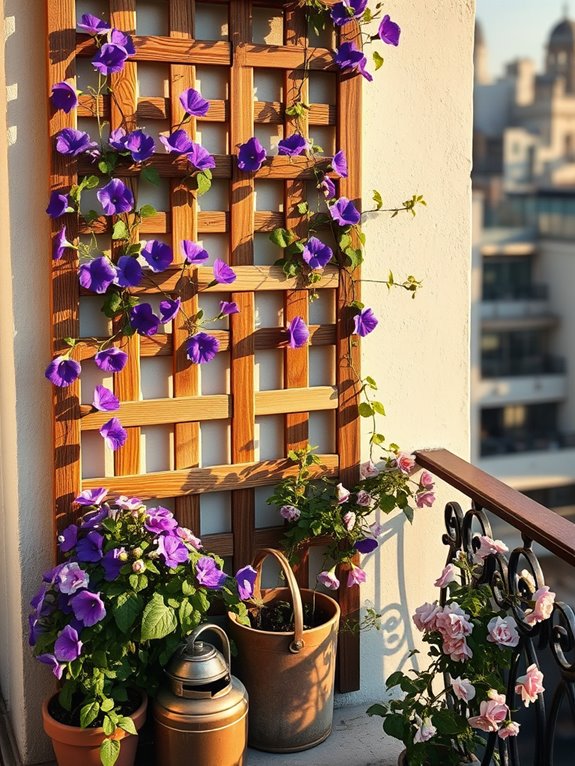
Transform your garden into a charming celebration of rustic heritage by creating a unique trellis from weathered tool handles. Old wooden rake handles, shovel shafts, and pitchfork stems arranged in a deliberate pattern create a striking vertical garden feature that pays homage to traditional farming and gardening practices.
The rich patina of aged wood, combined with climbing roses, morning glories, or clematis, creates a stunning contrast between the structured framework and the organic flow of flowering vines. This vintage-inspired design serves as both a functional growing support and a conversation piece, evoking memories of simpler times when tools were crafted to last generations.
The natural weathering of the wood handles adds character and depth to the garden space, while the climbing plants weave their way through the framework, softening the geometric pattern of the assembled handles. As seasons change, the display evolves from spring blooms to autumn seed heads, maintaining visual interest throughout the year.
Key Elements:
- Wooden tool handles (various lengths)
- Metal brackets or mounting hardware
- Climbing plants (roses, clematis, jasmine)
- Garden twine or plant ties
- Post hole digger
- Concrete mix
- Weatherproof wood sealant
- Decorative finials (optional)
Construct the trellis by arranging tool handles in a grid or ladder pattern, securing cross pieces with rust-resistant screws or traditional joinery methods. Set the vertical supports at least 24 inches deep in concrete footings to ensure stability.
Space the horizontal handles 8-12 inches apart to allow adequate room for plant growth and maintenance. Apply a weather-resistant sealant to protect the wood while maintaining its natural appearance.
Extra Tips: Consider the mature size of chosen climbing plants when spacing your tool handles, as some vigorous climbers may require more substantial support. For smaller spaces or balconies, create a scaled-down version using shorter handles arranged in a fan pattern against a wall.
Incorporate solar-powered string lights woven through the framework for evening ambiance, and position the trellis where it can cast interesting shadow patterns throughout the day. For urban gardens, mount the trellis directly to a sturdy fence or wall rather than setting posts in the ground.
Transform Old Tools Into Garden Art
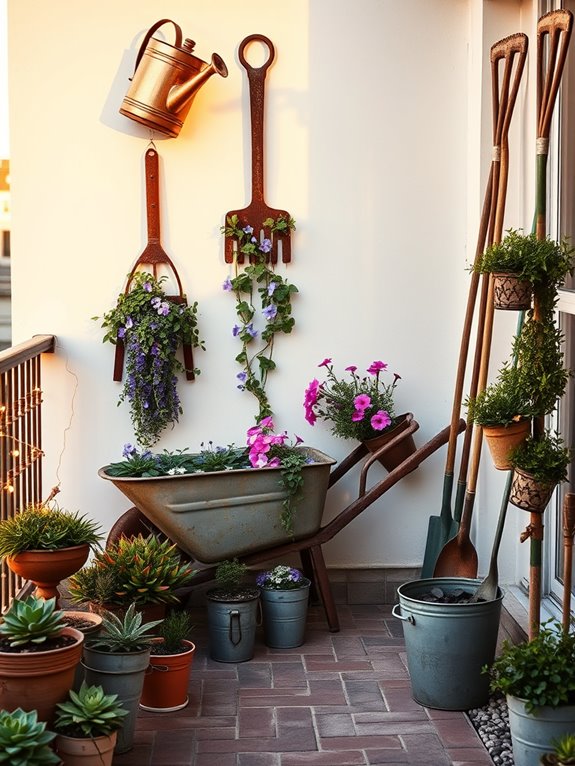
Rustic charm meets artistic expression in a garden where weathered tools find new life as whimsical sculptures and decorative elements. Vintage rakes fan out like metallic sunbursts against wooden fences, while collections of antique spades create unique border edging that catches the evening light. Climbing roses and morning glories weave through the handles of suspended garden implements, creating living artwork that changes with the seasons.
The garden becomes an outdoor gallery where retired wheelbarrows overflow with cascading petunias and lobelia, and old watering cans become unexpected planters for succulents and trailing vines. Strategically placed tool heads emerge from flowering bushes like industrial flowers, while copper-toned tool handles form elegant trellises for clematis and jasmine, adding vertical interest and a sense of history to the space.
Key Elements:
- Vintage garden tools (rakes, shovels, hoes, watering cans)
- Sturdy mounting hardware
- Weather-resistant wire or rope
- Climbing plants and trailing flowers
- Rust-resistant paint or sealant
- Wooden posts or fencing
- Decorative gravel or mulch
- Solar-powered accent lighting
Implementation begins with cleaning and treating old tools to prevent further rust and decay. Mount larger pieces like rakes and shovels at varying heights on fences or posts, creating visual rhythm and interest. Arrange smaller tools in clusters, considering balance and scale. Position climbing plants near mounted tools to encourage natural integration between the organic and industrial elements.
Ensure all mounted pieces are secured properly to withstand weather and plant growth.
Design Tips: Consider your garden’s exposure to elements when positioning metal pieces, as some patina adds character but excessive rust may compromise structural integrity. For smaller spaces or balconies, focus on wall-mounted displays and vertical arrangements.
Use lightweight tools for balcony installations and ensure proper drainage for any tool-planters. Group similar tools together for impact, and incorporate solar lighting to create dramatic evening shadows from your tool art installations.
Craft a Tool-Head Bird Bath
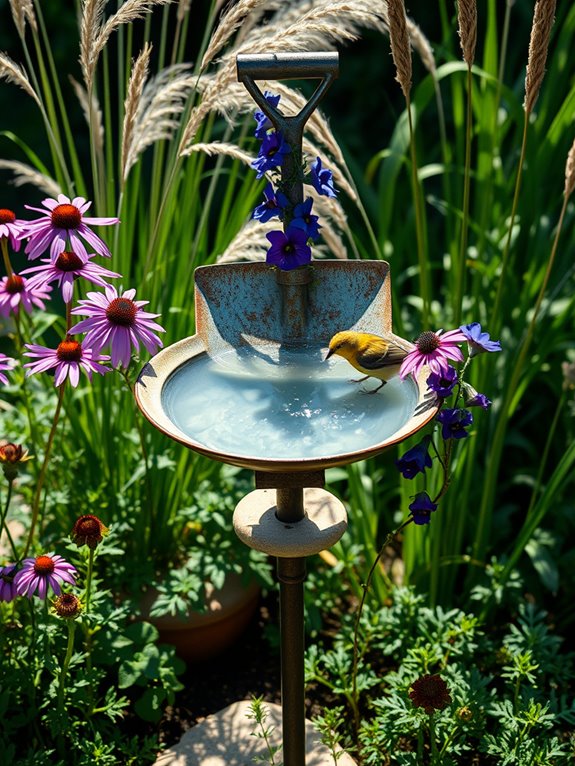
A charming tool-head bird bath transforms ordinary garden tools into an enchanting centerpiece that attracts feathered visitors while celebrating vintage garden heritage. The weathered patina of old metal tool heads, whether from rakes, shovels, or hoes, creates a rustic focal point surrounded by wispy ornamental grasses and bright blooming perennials like black-eyed susans and purple coneflowers that naturally draw birds.
The artistic arrangement marries form and function, with water pooling in the curved metal surfaces where birds can splash and drink. Native plants encircling the bath provide natural perches and shelter, while climbers like morning glories can be trained up the tool handles, creating a living sculpture. The overall effect is both whimsical and purposeful, bridging industrial charm with natural garden elements.
Key Elements:
- Vintage metal tool heads (rakes, shovels, hoes)
- Sturdy mounting post or pole
- Water-tight basin or bowl
- Native perennial flowers
- Ornamental grasses
- Bird-friendly shrubs
- Decorative rocks
- Ground cover plants
- Water source
- Drainage material
Select a sunny location for the bird bath, ensuring it’s visible from indoor viewing areas but offers birds some protective cover nearby. Mount the chosen tool head securely on a post at least 3 feet tall, ensuring it’s level and stable.
Create proper drainage by adding small holes if needed, and seal any areas where water shouldn’t pool. Surround the base with a graduated arrangement of plants, starting with taller species behind the bath and working down to ground covers in front.
Your bird bath should be regularly maintained to ensure safe water for garden visitors. Clean the basin weekly, check stability monthly, and adjust water levels daily during hot weather.
Consider adding moving water through a small solar fountain to increase bird activity and prevent mosquito breeding. In winter, a heating element can be added to provide year-round water access for birds.
Make a Garden Tool Storage Display
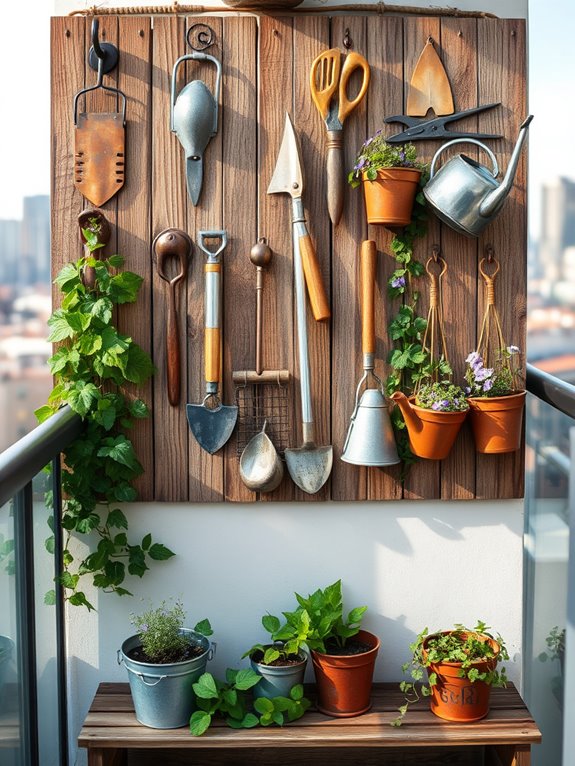
Transform your garden workspace into a charming and functional outdoor gallery by displaying vintage garden tools in an artful storage arrangement. Weather-worn rake heads become sculptural wall pieces, while collections of antique trowels and hand tools create eye-catching focal points against rustic wooden backdrops. The patina of aged metal tools contrasts beautifully with climbing jasmine or morning glories that wind their way through the display, adding life and movement to this practical garden feature.
This creative storage solution merges functionality with rustic charm, turning everyday garden maintenance into an aesthetic experience. Copper-toned tool handles gleam in the sunlight, while galvanized metal elements create silvery accents throughout the space. The overall effect is both organized and artistic, reminiscent of a well-curated country garden shed brought into the open air.
Key Elements:
- Vintage garden tools (rakes, hoes, trowels, watering cans)
- Weathered wooden panels or fencing
- Metal mounting brackets and hooks
- Wire mesh or lattice panels
- Climbing vines or trailing plants
- Weather-resistant paint or sealant
- Decorative hardware
- Tool hanging systems
- Storage bins or baskets
Install the main framework by securing a weather-resistant backing board or fence panel to your chosen wall space. Mount stronger tools like rakes and hoes first, creating a basic grid pattern that will serve as your display’s foundation. Layer smaller tools in between, ensuring each piece is securely fastened while maintaining easy accessibility.
Group similar tools together and vary heights to create visual interest while keeping frequently used items within easy reach.
Design Considerations: Consider protection from weather elements when positioning your tool display, perhaps incorporating a small overhang or selecting a partially sheltered location. For smaller spaces, focus on vertical storage solutions and multi-functional pieces that can serve both as storage and decoration.
Those with limited wall space might opt for a freestanding tool storage unit that can be moved as needed, while larger gardens can accommodate multiple themed tool display zones organized by task or season.
Turn Rake Heads Into Plant Hangers
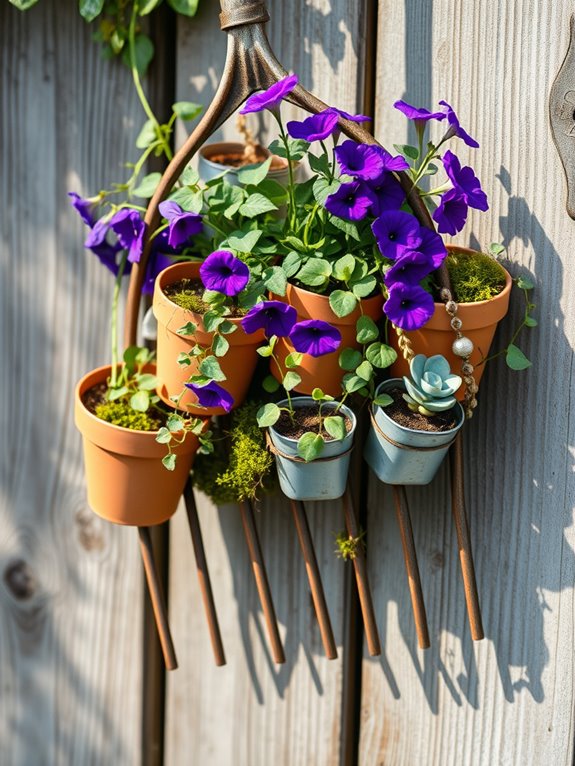
Transform your outdoor space into a whimsical vertical garden by repurposing vintage rake heads into charming plant hangers. These rustic metal implements, with their fan-like tines, create an eye-catching display when mounted on fences or walls, holding an array of trailing plants like ivy, petunias, and string of pearls.
The weathered patina of old metal rake heads adds character and vintage charm, while the cascading greenery softens their industrial appearance. The contrast between hardy metal and delicate foliage creates an enchanting garden feature that draws the eye upward, making excellent use of vertical space.
Colorful flowering plants like lobelia and calibrachoa spilling from between the rake tines create a romantic cottage garden feel, while air plants and succulents nestled in the spaces between tines offer a more modern, architectural aesthetic.
Key Elements:
- Vintage metal rake heads
- Wall mounting hardware
- Hanging planters or pots that fit rake tines
- Trailing plants or cascading flowers
- Potting soil
- Decorative moss or stone mulch
- Wire or twine for securing pots
- Weather-resistant sealant for metal
To implement this garden feature, begin by cleaning and treating the rake heads with rust inhibitor and sealant to prevent further deterioration.
Mount them securely to your chosen surface, ensuring proper spacing for plant growth and maintenance access. Position the rake heads at varying heights and angles to create visual interest. Select containers that can be safely secured to the rake tines, either by hanging them from the metal prongs or nestling them between tines.
Fill with appropriate potting mix and plants, ensuring adequate drainage. When designing your rake head plant display, consider weight distribution and water needs. Choose lightweight containers and drought-tolerant plants for upper levels to reduce maintenance demands.
For small balconies, use mini rake heads or position them in corners to maximize space. Incorporate drip irrigation systems for easier watering, and group plants with similar care requirements together. Consider seasonal changes by selecting a mix of evergreen and flowering plants to maintain year-round interest.
Fashion a Tool Handle Garden Border
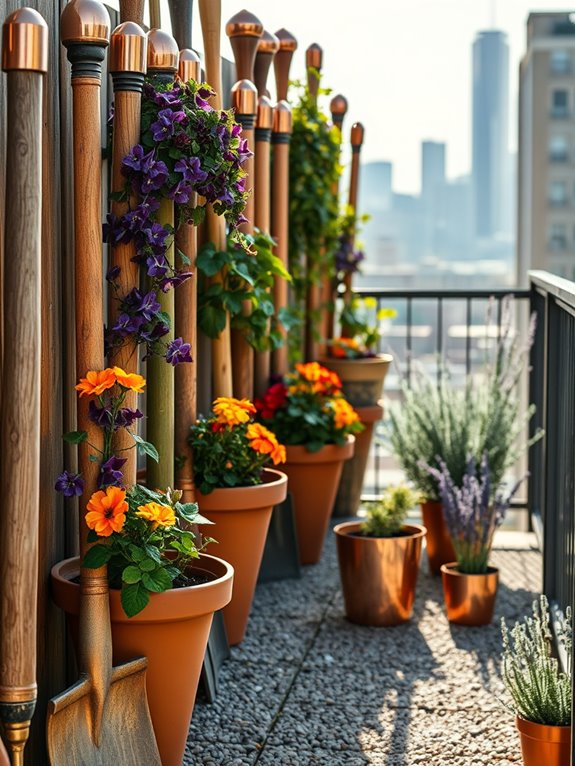
Transform your garden’s edge into a whimsical tribute to vintage gardening with a border crafted from weathered tool handles. Worn wooden rake, shovel, and hoe handles create a rustic fence-like boundary, their natural patina complementing climbing clematis and trailing nasturtiums that weave between the weathered wood. The handles, standing at varying heights, create an organic rhythm that guides the eye along flower beds filled with cottage garden favorites like lavender, Russian sage, and cheerful black-eyed Susans.
This repurposed tool handle border serves as both a practical garden divide and a conversation piece, telling stories of seasons past through each handle’s unique wear patterns and character. The vertical elements provide support for delicate climbing plants while defining distinct garden zones. When combined with gravel pathways and topped with solar-powered copper caps, the handles create enchanting light patterns at dusk, transforming the garden border into a magical boundary between spaces.
Essential Elements:
- Vintage wooden tool handles (15-20 pieces)
- Garden twine or wire for securing handles
- Solar-powered copper caps
- Gravel for pathways
- Climbing plants and perennials
- Ground anchors or stakes
- Post hole digger
- Level
- Preservative wood sealer
Implementation requires careful planning and spacing. Begin by laying out the handles in your desired pattern, typically 8-12 inches apart, depending on the border’s purpose. Dig holes 12-18 inches deep, using a post hole digger. Set each handle at varying heights between 24-36 inches above ground, securing them with ground anchors if needed.
Apply wood sealer to prevent deterioration, especially at ground level. Connect handles with garden twine or decorative wire to add stability and create additional climbing support for plants.
Garden Border Tips: Consider your climate when selecting wood preservation methods – handles in wet regions need more frequent sealing. For small spaces or balconies, create a miniature version using shorter handles as a container garden border, spacing them closer together (4-6 inches apart) in large planters.
Incorporate motion-activated solar lights for evening ambiance, and position climbing plants on the sunny side of the border to ensure healthy growth. Replace any deteriorating handles promptly to maintain the border’s structural integrity.
Assemble a Garden Tool Weather Vane
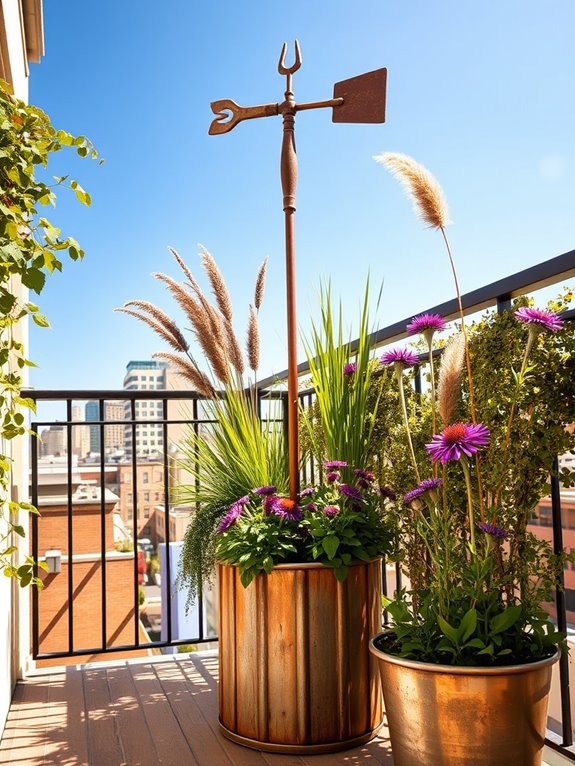
A rustic garden tool weather vane stands as a whimsical centerpiece, transforming retired garden implements into a functional piece of outdoor art. Old rake heads, worn spades, and weathered trowels dance in the breeze, catching sunlight as they pivot gracefully to indicate wind direction. The metallic patina of well-loved tools creates an industrial-meets-pastoral aesthetic that draws the eye upward while paying homage to gardening heritage.
Native grasses and tall perennials like coneflowers, black-eyed susans, and ornamental wheat sway beneath the weather vane, mimicking its movement and creating a harmonious connection between the mechanical and natural elements. The surrounding garden takes on a prairie-style feel, with plants arranged in dramatic sweeping curves that emphasize wind patterns and create a living compass rose beneath the sculptural centerpiece.
Key Elements:
- Vintage garden tools (rakes, hoes, trowels, etc.)
- Metal pole or post (6-8 feet tall)
- Mounting bracket with bearing system
- Directional markers (N,S,E,W)
- Tall ornamental grasses
- Prairie-style perennials
- Ground anchoring system
- Weather-resistant hardware
- Metal sealant or protective coating
The installation begins with securing a sturdy metal pole into concrete, ensuring it stands perfectly vertical. Tools are arranged in a balanced configuration, with lighter implements toward the outer edges and heavier pieces near the central axis.
Weather-resistant welding or bolting creates permanent connections between tools, while a high-quality bearing system allows smooth rotation. The surrounding garden bed should be prepared with well-draining soil and planted in a circular pattern, with tallest specimens closest to the pole and gradually decreasing heights toward the outer edges.
When designing a garden tool weather vane installation, consider the viewing angles from both yard and house windows. For smaller spaces or balconies, create a scaled-down version using smaller hand tools mounted on a deck post or railing. Urban gardeners can incorporate container plantings around the base, using tall grasses in elevated planters to maintain the vertical design element while working within space constraints.
Regular maintenance should include occasional lubrication of the bearing system and inspection of mounting hardware to ensure continued safe operation.