
8 Garden Ideas for Raised Herb Beds
If you’re ready to take your herb garden to new heights, you’ll love exploring these creative raised bed designs that combine beauty with functionality. From the mesmerizing curves of a spiral garden to the rustic charm of natural stone beds, each option offers unique ways to grow your favorite culinary and medicinal herbs. Whether you have a sprawling backyard or a tiny balcony, these eight approaches transform ordinary herb gardens into eye-catching features that make harvesting easier and growing more enjoyable.
Contents
Spiral Herb Garden Design
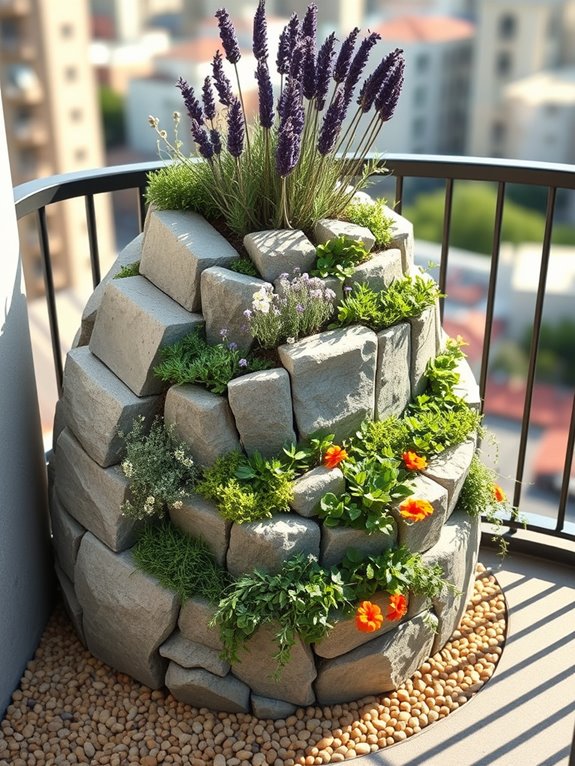
A spiral herb garden transforms an ordinary raised bed into a mesmerizing focal point that draws the eye upward through graceful curves of cascading plants. Mediterranean herbs like thyme, oregano, and sage spill over natural stone edges, while tall rosemary and lavender crown the spiral’s peak.
The ascending design creates a natural amphitheater of fragrances and textures, with each level offering a unique microclimate for different herb varieties. The spiral’s circular shape embodies ancient permaculture principles while providing a modern artistic element to any garden space.
As visitors follow the winding path upward, they discover hidden pockets of culinary and medicinal herbs nestled between weathered stones. The varying heights create natural shade patterns, allowing sun-loving plants to thrive on southern exposures while tender herbs find shelter in cooler, northern-facing sections.
Key Elements:
- Natural stone or brick for walls
- Well-draining soil mix
- Gravel for drainage
- Height-appropriate herbs
- Irrigation system
- Path materials
- Edge plants
- Center focal point
- Support stakes
- Soil amendments
Construction begins with marking a 6-8 foot diameter circle and establishing a center point. Build the spiral wall inward and upward, starting at ground level and gradually rising to about 3-4 feet at the center, using stones or bricks set in a stable pattern.
Fill each level with well-draining soil as construction progresses, ensuring proper compaction and stability. Create a narrow access path that winds upward for maintenance.
Taller herbs should be planted at the spiral’s summit, with cascading varieties positioned along the edges. Consider sunlight patterns when placing plants – drought-resistant Mediterranean herbs work best on the sunny southern exposure, while moisture-loving herbs like mint and parsley thrive in shadier northern sections.
Install a simple irrigation system during construction to ensure consistent water distribution throughout the spiral.
When adapting a spiral garden for smaller spaces, consider reducing the diameter to 4-5 feet while maintaining the height ratio. Container variations can be created using tiered planters arranged in a spiral pattern, perfect for balconies or patios.
For optimal growth, ensure at least 6 inches of soil depth for each planting pocket and incorporate water-retaining crystals into the soil mix to reduce maintenance needs in restricted spaces.
Vertical Pallet Herb Beds
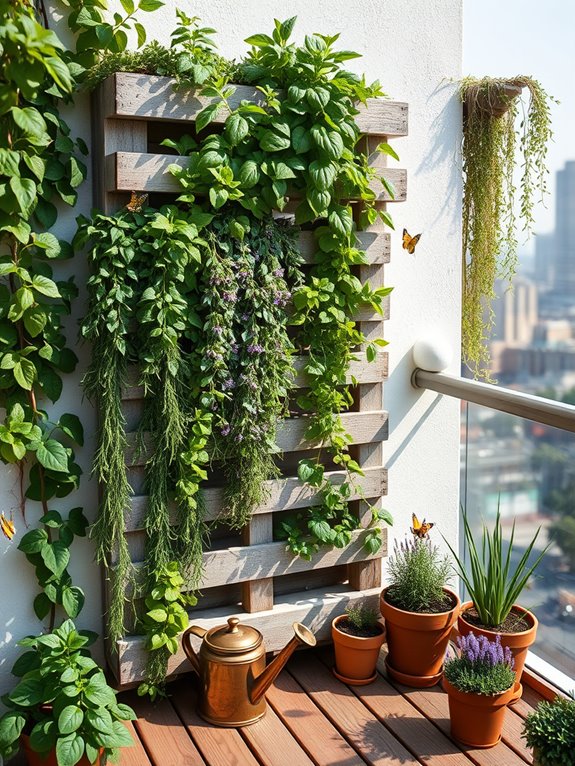
Transform your outdoor space into a living wall of aromatic herbs with a vertical pallet herb garden that combines rustic charm with practical functionality. Weathered wooden pallets, painted or naturally aged, create an eye-catching backdrop while cascading herbs in various shades of green spill from between the slats. Trailing rosemary, cascading thyme, and delicate oregano create a tapestry of textures, while compact basil and sage fill the upper sections with their bold leaves and distinctive fragrances.
The vertical design maximizes growing space in a minimal footprint, turning an ordinary wall or fence into a productive garden feature. Small-space gardeners particularly appreciate how the multiple tiers allow for growing different herb varieties in organized sections, making harvesting and maintenance a breeze. The overall effect is both practical and aesthetically pleasing, bringing the garden up to eye level and creating an engaging focal point that draws visitors in to explore the different herbs and their unique characteristics.
Key Elements:
- Wooden pallet (heat-treated, food-safe grade)
- Landscape fabric
- Potting soil suitable for herbs
- Herb plants of varying heights and growth habits
- Wood preservative or exterior paint
- Mounting brackets and hardware
- Drainage materials
- Irrigation system or watering can
- Plant markers or labels
The implementation begins with preparing the pallet by thoroughly cleaning it and treating it with a food-safe wood preservative or paint. Line the back and create individual pockets with landscape fabric, securing it firmly to create planting spaces between the slats.
Mount the pallet securely to a sunny wall using heavy-duty brackets, ensuring it can support the weight of soil and mature plants. Install a simple irrigation system or plan for regular hand-watering, as vertical gardens can dry out more quickly than traditional beds.
Consider these additional factors when planning your vertical pallet herb garden: Choose a location that receives at least 6 hours of sunlight daily, and group herbs with similar water needs together in the same sections. For smaller balconies, use half-pallets or create modular sections that can be arranged to fit available space.
Remember to factor in the mature size of plants when spacing them, and include access space for harvesting and maintenance. Consider incorporating a drip irrigation system with a timer for consistent watering, particularly important for vertical gardens where water tends to flow downward quickly.
Classic Cedar Box Gardens
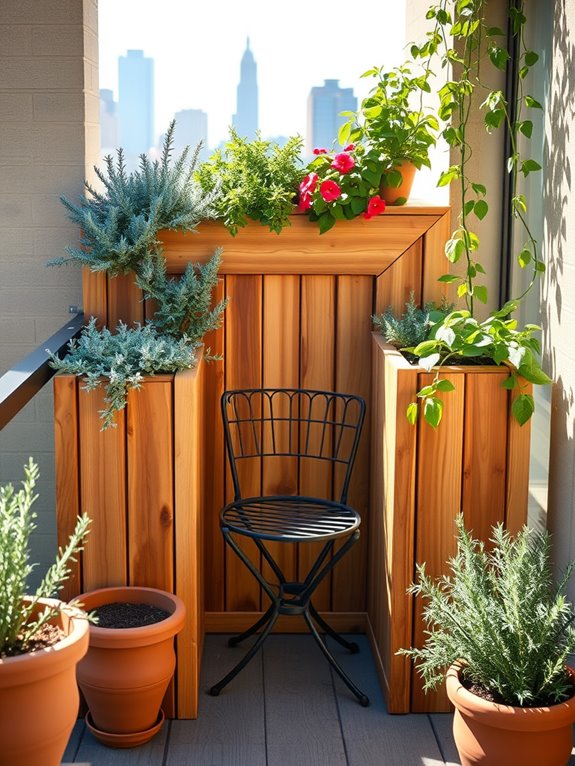
The timeless beauty of Classic Cedar Box Gardens brings a touch of refined elegance to any outdoor space. Rich, honey-colored cedar boxes arranged in clean geometric patterns create an organized yet inviting atmosphere, while the natural wood grain adds warmth and organic texture. Fresh herbs like rosemary, thyme, and sage cascade over the edges, their varied shades of green contrasting beautifully against the golden cedar, while purple basil and flowering oregano add pops of color throughout the season.
These elevated gardens transform ordinary spaces into aromatic sanctuaries, where neat rows of culinary herbs stand ready for harvesting. The raised design creates natural pathways between beds, making it easy to tend to plants while adding architectural interest to the garden. The cedar’s natural oils protect against decay while releasing a subtle, woodsy fragrance that mingles with the herbs’ own essential oils, creating an engaging sensory experience.
Key Elements:
- Cedar boards (1-inch thick)
- Galvanized screws and brackets
- Drainage holes
- Quality potting soil
- Organic compost
- Herb seedlings or seeds
- Landscape fabric
- Gravel for drainage
- Metal corner brackets
- Garden tools
To implement this garden style, start by selecting a location that receives 6-8 hours of sunlight daily. Construct boxes using cedar boards, ensuring each bed is between 6-24 inches high and no wider than 4 feet to allow easy access from all sides. Install drainage holes every 12 inches along the bottom, and line with landscape fabric before adding a layer of gravel. Fill boxes with a mixture of potting soil and compost, leaving 2 inches of space at the top for mulch and water retention.
Arrange plants according to height and water needs, keeping taller herbs like sage and rosemary toward the back or center of the beds. Space plants according to their mature size, typically 12-18 inches apart for most herbs. Group moisture-loving herbs together, separate from Mediterranean varieties that prefer drier conditions.
For adaptation to different spaces, consider varying box sizes and configurations. Small balconies might benefit from narrow boxes arranged along walls, while larger spaces can accommodate multiple boxes in grid patterns. Use vertical elements like trellises for climbing herbs to maximize space, and consider incorporating stepped or tiered designs for visual interest and improved access.
Remember that cedar boxes can be customized to fit unusual spaces or corners, making them versatile for any garden size.
Multi-Level Herb Terraces
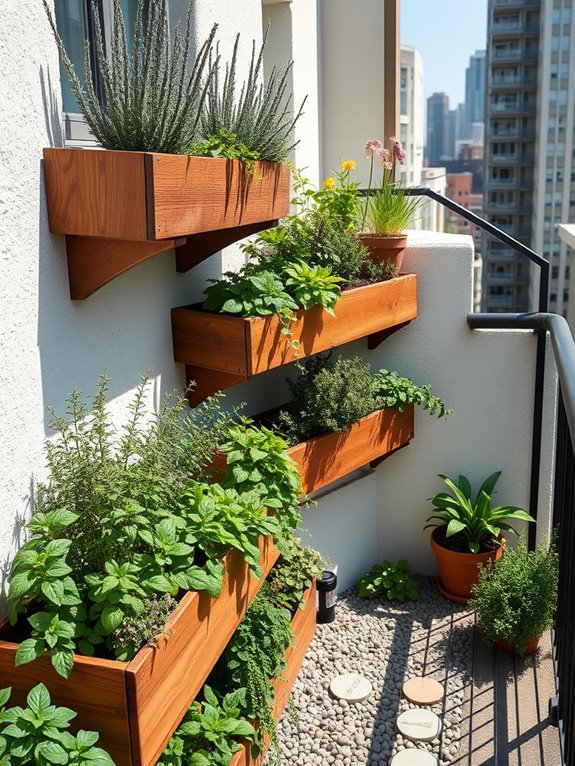
Multi-level herb terraces transform an ordinary garden space into a cascading display of aromatic greenery, creating visual intrigue through varied heights and textures. Imagine stepping stones winding between tiered wooden planters, where cascading thyme spills over edges while tall dill and fennel sway gracefully at the highest points. Mediterranean herbs like rosemary and sage occupy the sun-drenched upper levels, while shade-loving mint and parsley thrive in the cooler lower tiers.
The terraced design allows for a natural flow of both form and function, with each level offering a distinct microclimate for different herb varieties. Wooden retaining walls, weathered to a soft gray, provide striking contrast against the vibrant greens of the herbs, while copper plant markers catch the sunlight and add sparkle to the scene. The varying heights create natural focal points and invite exploration through the layers of fragrant plantings.
Essential Elements:
- Tiered wooden planters or retaining walls
- Mixed-height herbs (tall, medium, trailing)
- Stepping stones or pathway materials
- Plant markers
- Irrigation system or watering access points
- Quality potting soil
- Drainage materials
- Support stakes for tall herbs
- Decorative edging
- Solar lighting (optional)
Construction begins with establishing the strongest foundation at the lowest level, using pressure-treated lumber or stone for the first tier. Each subsequent level should step back 12-18 inches, creating enough planting space while maintaining structural integrity. Install proper drainage systems within each tier, using gravel layers beneath the soil and ensuring slight slopes away from retaining walls.
Position taller herbs at the back of each level, gradually decreasing plant height toward the front edges to maintain visibility and access. Design considerations should account for mature plant sizes and growth habits. When selecting herbs for each level, group plants with similar water and sunlight requirements together. Mediterranean herbs that prefer well-drained soil work best in upper tiers, while moisture-loving varieties are better suited to lower levels where water naturally collects.
Space adaptations can range from compact three-tier systems for small balconies to expansive seven-tier designs for larger yards. For limited spaces, consider narrower tiers and focus on dwarf varieties of herbs. Vertical growing techniques can maximize growing space in any size installation, while modular construction allows for future expansion or reconfiguration as needs change.
Remember to factor in maintenance access points and ensure each tier can be reached comfortably for harvesting and care.
Container Herb Gardens With Upcycled Materials
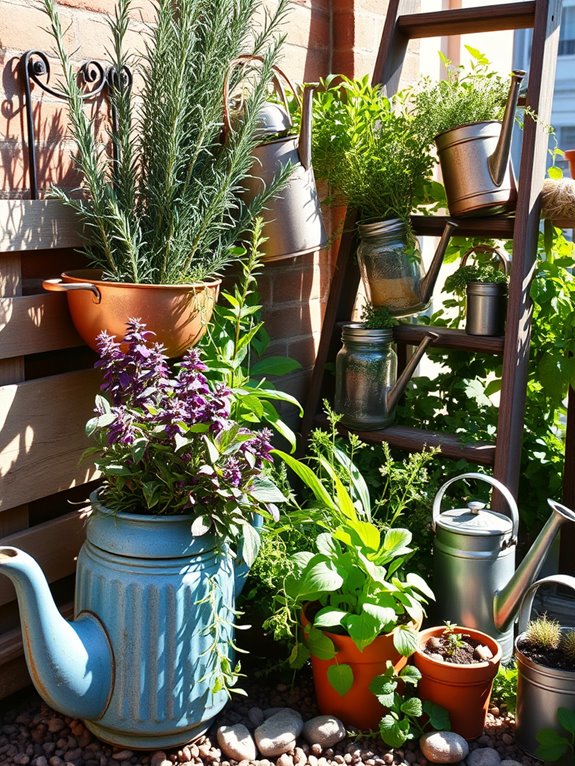
Transform your outdoor space into an eco-friendly oasis with a container herb garden crafted from repurposed treasures. Picture weathered wooden crates stacked artfully, vintage colanders bursting with trailing thyme, and old teapots sprouting fragrant mint leaves.
The varying heights and textures of upcycled containers create visual interest while sage, rosemary, and oregano add layers of silvery-green foliage against the patina of aged materials. Rustic metal watering cans overflow with purple basil and golden marjoram, while old mason jars line windowsills with compact varieties of chives and parsley.
The combination of industrial and vintage elements adds character to your garden space, creating an environment that feels both nostalgic and contemporary. Vertical arrangements on repurposed ladder shelves maximize growing space while contributing to the garden’s artistic appeal.
Key Elements:
- Repurposed wooden crates or boxes
- Vintage containers (teapots, colanders, watering cans)
- Mason jars of various sizes
- Vertical storage solutions (ladders, shelving)
- Drainage materials (gravel, broken pottery)
- Quality potting soil
- Selection of herb plants
- Natural twine or wire for mounting
- Basic hand tools
- Weather-resistant paint or sealant
Begin implementation by thoroughly cleaning all containers and adding drainage holes if needed. Arrange larger containers at ground level, creating a stable foundation for your garden.
Position vertical elements against walls or sturdy supports, ensuring they receive adequate sunlight. Layer containers with drainage material, then fill with high-quality potting soil mixed with organic compost. Plant herbs according to their growth habits, placing trailing varieties in elevated containers and upright herbs in deeper vessels.
When designing your upcycled herb garden, consider weight distribution and water needs. Place heavier containers closer to walls or sturdy surfaces, and group plants with similar water requirements together.
For small balconies, focus on vertical arrangements and wall-mounted options, while larger spaces can accommodate grouped container islands. Incorporate self-watering solutions by adding water reservoirs to deeper containers, and maintain consistent moisture levels by mulching with pebbles or broken terra cotta pieces to reduce evaporation.
Herbal Wheel Design With Sections
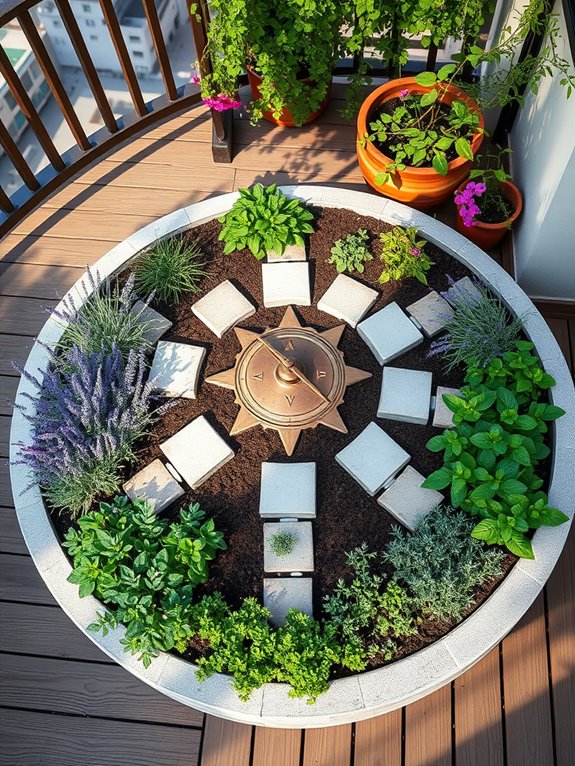
A herbal wheel design transforms your garden into a mesmerizing mandala of aromatic plants, radiating from a central focal point in pie-shaped sections. Each wedge hosts different herb varieties, creating a stunning visual pattern while maximizing growing space. Mediterranean herbs like lavender and sage occupy sun-loving sections, while shade-tolerant herbs like mint and parsley thrive in areas that receive less direct light. The circular design invites contemplation and interaction, making herb harvesting both practical and meditative.
Stone pathways or mulched walking spaces separate the sections, allowing easy access to each herb grouping while adding architectural interest to the design. The wheel’s center often features a decorative element such as a sundial, birdbath, or ornamental garden sculpture, serving as both an aesthetic anchor and functional focal point. This classical design draws inspiration from medieval monastery gardens, bringing historical charm to modern spaces while maintaining efficient growing practices.
Key Elements:
- Circular raised bed structure
- Dividing walls or markers
- Central decorative feature
- Stone or mulch pathways
- Various herb varieties
- Edge restraints
- Irrigation system
- Plant markers
- Quality soil mix
- Drainage material
Creating a herbal wheel begins with marking a perfect circle and dividing it into equal sections using stakes and string. Install the raised bed structure following these divisions, ensuring each section has proper drainage and is filled with rich, well-draining soil.
Position taller herbs toward the center, graduating to shorter varieties at the outer edges to maintain visual balance and prevent shading. Install irrigation lines before planting, ensuring each section receives appropriate water levels for its specific herbs.
Design adaptations can accommodate various space constraints – smaller gardens might feature a half-wheel against a wall or a quarter-wheel in a corner. Consider vertical elements for balcony gardens by incorporating tiered sections that rise toward the center, maximizing growing space in limited areas.
When selecting herbs, group plants with similar water and sunlight needs together in the same sections, and remember to leave adequate space between plants for future growth and easy harvesting access.
Urban Window Box Herb Gardens
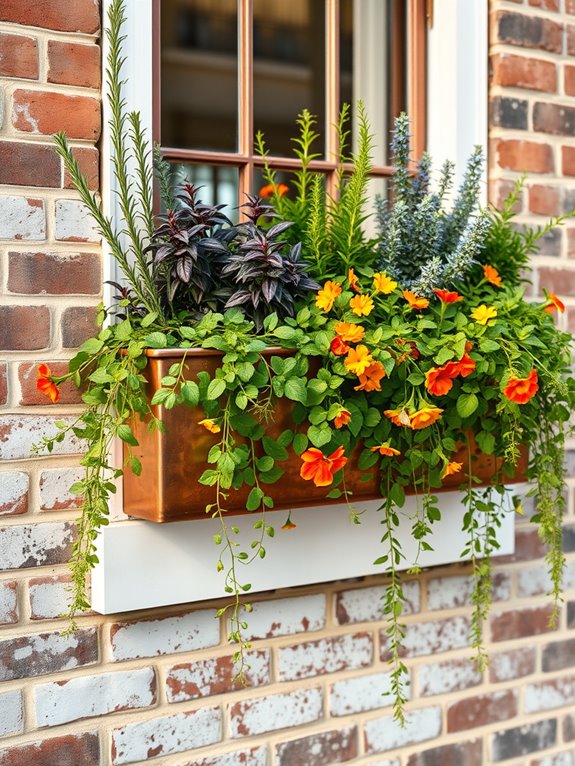
Transform your urban window into a fragrant oasis with a thoughtfully designed herb garden that brings the countryside charm right to your city dwelling. Imagine a rustic wooden window box overflowing with silvery sage leaves dancing alongside purple-stemmed basil, while delicate thyme cascades over the edges like a green waterfall. Cheerful nasturtiums add splashes of orange and yellow among the herbs, creating a dynamic display that changes with the seasons and attracts beneficial pollinators to your urban space.
The window box garden becomes a living tapestry of textures and heights, with tall rosemary standing sentinel at the corners while compact oregano and mint create a lush middle ground. Copper or zinc plant markers peek through the foliage, adding vintage charm, while the weathered patina of the window box itself complements both modern and traditional architecture. This vertical garden not only maximizes limited space but also creates an enchanting view from both inside and outside your home.
Essential Elements:
- Wooden or metal window box with drainage holes
- Mounting brackets rated for weight capacity
- Quality potting soil specific for herbs
- Selection of compatible herbs (4-6 varieties)
- Decorative plant markers
- Small-scale gardening tools
- Water-catching tray
- Organic fertilizer
- Natural pest deterrents
Position your window box where it receives at least 6 hours of sunlight daily, ensuring sturdy mounting to support the weight of soil and mature plants. Begin with fresh potting mix specifically formulated for herbs, filling the box to within one inch of the rim to allow for adequate watering.
Plant taller herbs like rosemary and sage toward the back, medium-height plants in the middle, and trailing varieties like thyme near the front edge. Space plants according to mature size, typically 4-6 inches apart.
Establish a maintenance routine that includes daily monitoring of soil moisture, especially during hot weather, as window boxes can dry out quickly. Water thoroughly when the top inch of soil feels dry, allowing excess water to drain freely. Harvest herbs regularly to encourage bushier growth and prevent flowering, which can make the leaves bitter. Trim back aggressive growers like mint to prevent them from overwhelming smaller herbs.
For varying window sizes, adjust your design accordingly – smaller windows might focus on compact varieties like Greek basil and French thyme, while larger spaces can accommodate more diverse plantings. Consider installing a simple drip irrigation system for ease of watering, particularly for south-facing windows that receive intense sun.
In windy locations, choose lower-growing varieties and ensure plants are well-anchored in the soil. During extreme weather, temporary protective covers can help shield delicate herbs while maintaining their aesthetic appeal.
Natural Stone Raised Beds
Natural stone raised beds transform an herb garden into a timeless sanctuary that echoes Mediterranean hillsides and ancient monastery gardens. The weathered textures of limestone, slate, or sandstone create a rustic elegance, while cascading herbs like creeping thyme and trailing rosemary soften the rigid lines of the stonework. The varying heights of carefully stacked stones create natural microclimates, offering different growing conditions for sun-loving herbs like sage and shade-preferring varieties like mint.
The interplay of textures between smooth and rough-cut stones adds visual interest throughout the seasons, while the natural thermal properties of stone help regulate soil temperature and moisture. Carved stone paths between the beds invite exploration, and strategically placed stones can serve as informal seating areas or display pedestals for pottery. The overall effect is one of permanence and natural harmony, evoking the feeling of a garden that has existed for generations.
Essential Elements:
- Natural stone blocks or slabs
- Crushed stone for drainage
- Landscape fabric
- Quality potting soil
- Herb plants
- Stone dust or sand for leveling
- Building stakes and string
- Capstones for topping walls
- Drainage pipes
- Garden tools for stone work
Begin implementation by marking the bed layout with stakes and string, ensuring proper spacing for maintenance access. Excavate the area to create a level base, adding a 4-inch layer of crushed stone for drainage. Stack stones carefully, stepping them back slightly for stability, and use stone dust between layers for secure positioning.
Create multiple tiers if desired, ensuring each level has adequate soil depth for root growth. Install drainage pipes through the walls at regular intervals to prevent water buildup.
When planting, organize herbs by height and water needs, placing taller specimens like fennel and dill toward the center or back of beds. Position cascading herbs near the edges where they can spill over the stonework. Maintain proper soil levels slightly below the top course of stone to prevent soil washout during watering or rain.
Adaptability Considerations: For smaller spaces or balconies, create miniature versions using smaller stones or precast concrete blocks with a natural stone veneer. Consider modular designs that can be expanded or reconfigured as needed.
In urban settings, incorporate built-in irrigation systems and ensure weight restrictions are considered for rooftop or balcony installations. Stone selection should reflect local climate conditions, choosing materials that weather appropriately and complement existing architecture.