
6 Garden Ideas for Rain Gardens
You’ll find that creating a rain garden brings both beauty and purpose to your outdoor space. These innovative garden spaces capture runoff water while providing a stunning display of native flowers, ornamental grasses, and thoughtfully placed stones. Whether you’re working with a small patio container or a spacious yard, you can transform troublesome drainage areas into vibrant landscapes that attract butterflies and birds. Let’s explore six inspiring design ideas that’ll help you craft your own eco-friendly oasis.
Contents
- 1 Selecting the Perfect Location for Your Rain Garden
- 2 Essential Native Plants for Wet Soil Conditions
- 3 Designing Your Rain Garden’s Layout and Shape
- 4 Creating Multiple Soil Layers for Optimal Drainage
- 5 Adding Decorative Elements and Hardscaping Features
- 6 Seasonal Maintenance Tips for a Thriving Rain Garden
Selecting the Perfect Location for Your Rain Garden
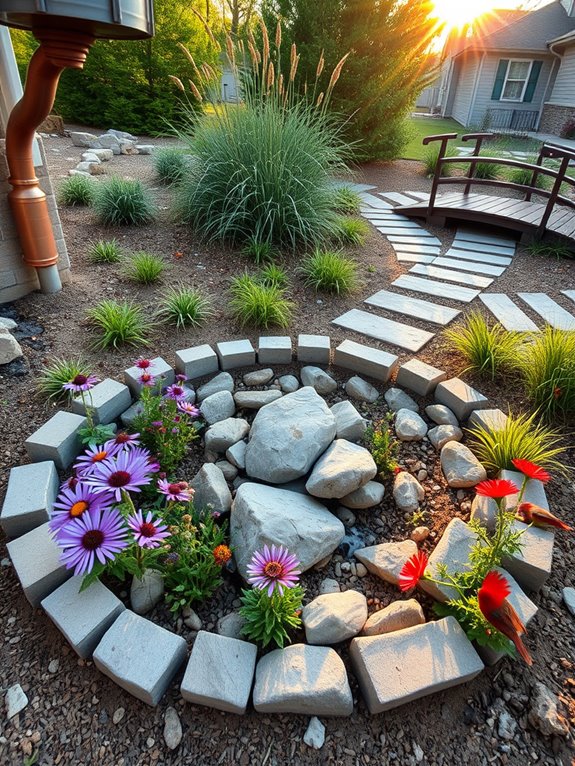
Creating a rain garden begins with finding that perfect spot where nature’s flow meets artistic design. Imagine a gently sloping area where ornamental grasses sway in the breeze, surrounded by deep-rooted native perennials like Black-Eyed Susans and Purple Coneflowers. Water naturally cascades through different levels, creating a peaceful sanctuary that transforms during rainfall into a dynamic, living water feature.
Stone pathways wind through the depression, offering glimpses of colorful Joe-Pye Weed and Cardinal Flowers that thrive in this moisture-rich environment.
The ideal location captures the essence of both form and function, typically situated at least 10 feet from your home’s foundation where downspouts direct rainfall. This thoughtfully designed space transitions from higher to lower ground, with layers of plants creating a natural filtration system.
Decorative rocks and river stones add texture while helping to slow water flow, creating an environment that supports local wildlife and pollinators while managing stormwater runoff effectively.
Essential Elements:
- Natural depression or bowl-shaped area
- Permeable soil layers
- Downspout connection or natural water flow path
- Edge plantings for erosion control
- Deep-rooted native plants
- Strategic rock placement
- Level spreader at water entry point
- Overflow area for excess water
- Multiple soil zones (dry to wet)
- Walking paths or stepping stones
To implement your rain garden, start by conducting a percolation test to ensure proper drainage – dig a hole 24 inches deep and fill it with water; it should drain within 24-48 hours. Create a bowl-shaped depression that’s approximately 4-8 inches deep, with gently sloping sides at a 3:1 ratio.
Layer the bottom with a mix of 50% native soil, 25% compost, and 25% sand to promote drainage. Position plants according to moisture tolerance, with water-loving species in the center and drought-resistant varieties along the edges.
The most successful rain gardens work with your property’s natural slope and drainage patterns. Consider seasonal changes and maintain flexibility in your design to accommodate varying rainfall amounts.
For smaller spaces or urban settings, create a scaled-down version using container gardens with overflow mechanisms, or implement a series of connected mini-gardens that work together to manage water flow.
Remember to check local regulations regarding stormwater management and maintain adequate distance from septic systems or utility lines.
Essential Native Plants for Wet Soil Conditions
Transform your soggy yard into a vibrant oasis where native wetland plants thrive in their natural element. Cardinal flowers shoot up like brilliant red flames against a backdrop of graceful joe-pye weed, while purple iris and golden marsh marigolds create a symphony of colors that dance in the breeze. The gentle rustling of native grasses like switchgrass and prairie cordgrass adds movement and texture, while attracting butterflies and birds that bring your garden to life.
This rain-loving sanctuary combines the practical with the beautiful, featuring deep-rooted plants that help filter rainwater while creating a lush, almost wild aesthetic. Swamp milkweed provides essential habitat for monarch butterflies, while native ferns unfurl their delicate fronds in shady spots. The garden transitions through the seasons, from spring’s cheerful marsh marigolds to summer’s blazing cardinal flowers and fall’s golden seedheads.
Essential Elements:
- Native wetland perennials (cardinal flower, joe-pye weed, swamp milkweed)
- Native grasses (switchgrass, prairie cordgrass)
- Spring-blooming water-tolerant bulbs
- Large rocks or boulders for water direction
- Rain garden basin or depression
- Well-draining soil mixture
- Mulch for moisture retention
- Edge plants for transition zones
Begin implementation by creating a depression that’s 4-8 inches deep, with gently sloping sides. Layer the bottom with a mixture of topsoil, sand, and compost to ensure proper drainage while maintaining moisture. Plant the deepest-water-tolerant species in the center, gradually moving to more drought-tolerant species along the edges. Arrange plants in groups of odd numbers for natural clustering, ensuring taller species won’t overshadow shorter ones.
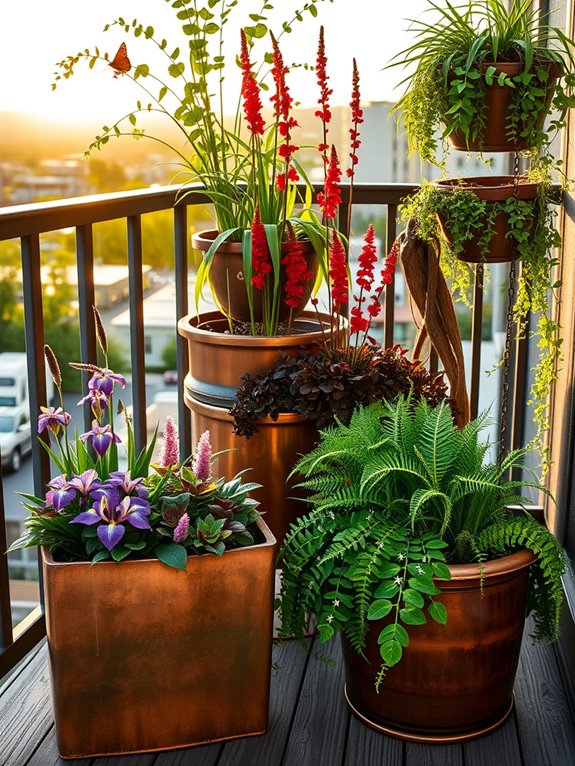
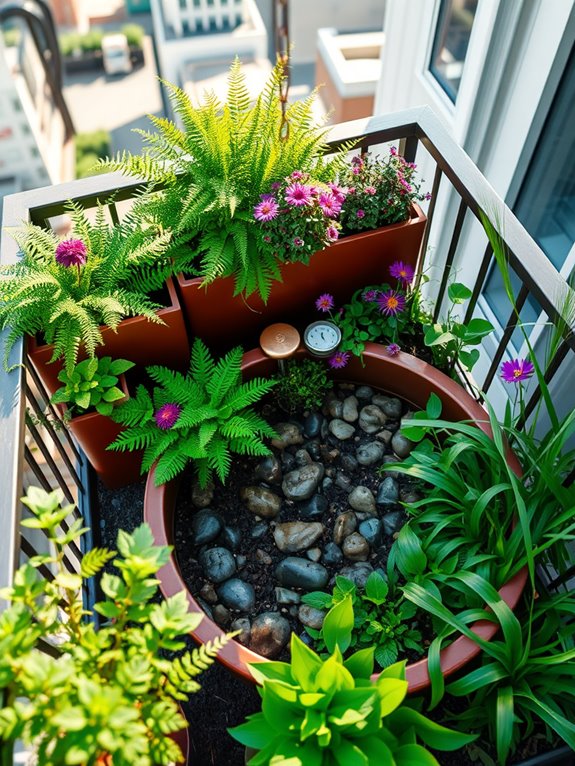
For adaptation to different spaces, consider container rain gardens for balconies or small yards. Use deep containers with drainage holes and overflow outlets. Select dwarf varieties of native plants and focus on smaller species like native sedges and rushes. Incorporate vertical elements through climbing natives like virgin’s bower for smaller spaces, and consider using tiered planters to maximize space while maintaining proper water flow and plant diversity.
Designing Your Rain Garden’s Layout and Shape
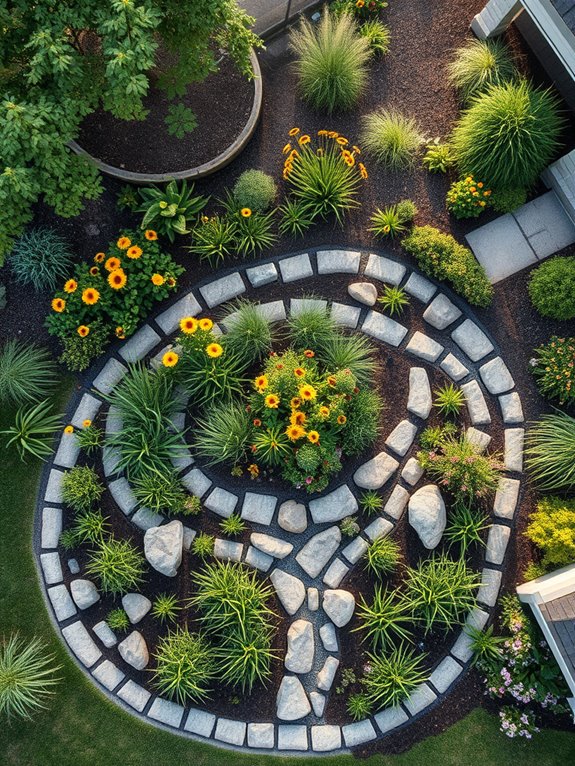
A thoughtfully designed rain garden transforms an everyday drainage area into a captivating landscape feature that mimics nature’s own water management systems. Gentle curves and flowing lines create natural-looking depressions where native wildflowers, ornamental grasses, and moisture-loving perennials thrive in harmony. The garden’s layout resembles a shallow bowl with graduated slopes, featuring taller plants like Joe Pye Weed and Black-Eyed Susans at the deepest point, transitioning to shorter species along the edges.
The garden’s shape can be customized to complement existing landscape features, whether as a crescent moon hugging a patio’s edge or a meandering stream-like formation following natural water flow patterns. Strategic placement of decorative rocks and river stones creates visual interest while helping to slow water movement, allowing it to percolate naturally into the soil. During rain events, the garden comes alive as water collects and filters through the carefully planned layers, creating a dynamic ecosystem that changes with each season.
Essential Elements:
- Bowl-shaped depression with gradual slopes
- Multi-layered planting zones
- Decorative rocks and river stones
- Native moisture-loving plants
- Clear entry point for water flow
- Well-defined edges
- Overflow area
- Permeable soil mix
- Strategic plant height arrangement
To implement an effective rain garden layout, begin by identifying the natural water flow patterns in your yard and selecting a location at least 10 feet from building foundations. Create a depression that’s roughly 4-8 inches deep, with sides sloping gradually at a 3:1 ratio.
Divide the garden into three distinct planting zones: the bottom (wettest), slopes (moderate moisture), and edges (driest). This allows for appropriate plant placement based on water tolerance.
Shape the garden into an organic form that complements your landscape while efficiently capturing runoff. The length should be approximately twice the width, with the longer side perpendicular to the water flow. A kidney or teardrop shape often works well, but the final design should prioritize functionality over aesthetics.
Consider incorporating a dry streambed of river rocks leading into the garden to manage heavy water flow while adding visual interest.
When adapting rain garden designs for different spaces, scale is crucial. Smaller properties can benefit from compact designs that focus on vertical layering rather than horizontal spread. For urban settings, consider breaking the garden into multiple smaller basins connected by shallow channels.
In areas with limited space, incorporate rain garden elements into existing landscape features by creating subtle depressions around trees or along property boundaries, ensuring the basic principles of water collection and filtration are maintained while maximizing available space.
Creating Multiple Soil Layers for Optimal Drainage
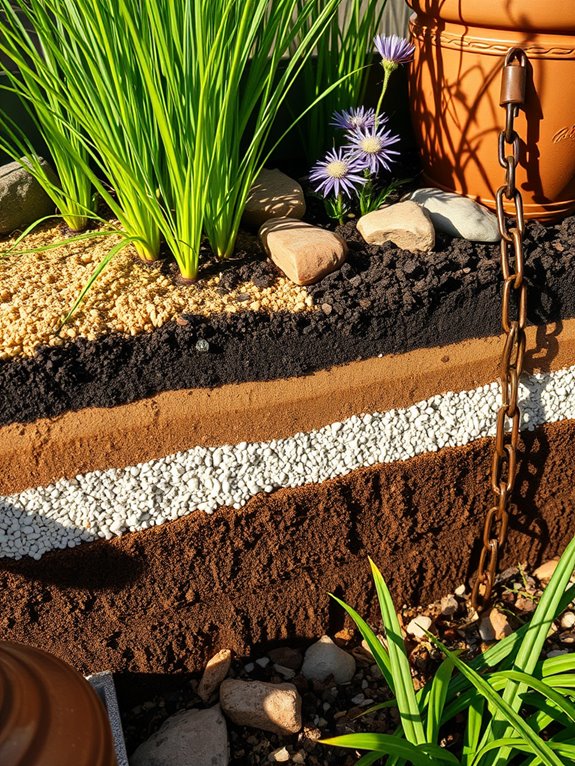
A layered rain garden creates a mesmerizing natural filtration system that mirrors the earth’s own water purification process. The carefully arranged soil layers create a striking visual effect when viewed from the side, with bands of different colored materials flowing from light to dark – from sandy loam at the top through rich organic matter, and finally to gravel at the base.
Native plants with deep root systems thrive in this environment, their stems swaying gracefully above the carefully engineered terrain. When rainwater flows into this thoughtfully designed space, it dances through the various soil layers, creating a dynamic ecosystem that supports both surface and deep-rooting plants.
Tall switchgrass and purple coneflowers stand sentinel at the garden’s highest points, while moisture-loving ferns and sedges flourish in the lower areas where water naturally pools before slowly seeping into the ground.
Key Elements:
- Sandy loam topsoil
- Organic matter middle layer
- Gravel bottom layer
- Native deep-rooting plants
- Moisture-loving plants
- Erosion control stones
- Filter fabric
- Drainage pipe (optional)
- Edge materials (rocks or pavers)
- Rain gauge
To implement this layered system, begin by excavating the area to a depth of 18-24 inches, ensuring the bottom slopes away from any structures. Install a layer of gravel (6-8 inches) at the base, followed by a middle layer of organic matter mixed with sand (6-8 inches). Top with a sandy loam layer (4-6 inches) that’s rich in organic material.
Create berms around the edges to contain water flow, and install plants according to their moisture preferences – drought-tolerant species at the highest points and water-loving varieties in the lower areas.
When adapting this design for different spaces, consider scale carefully. Small spaces can utilize a modified version with minimum depths of 12 inches total, while larger areas might benefit from deeper layers and more elaborate plant combinations.
Use container gardens or raised beds for balcony installations, ensuring proper drainage and waterproof barriers to protect underlying structures. For slopes greater than 12%, incorporate terracing to prevent erosion and maximize water absorption.
Adding Decorative Elements and Hardscaping Features
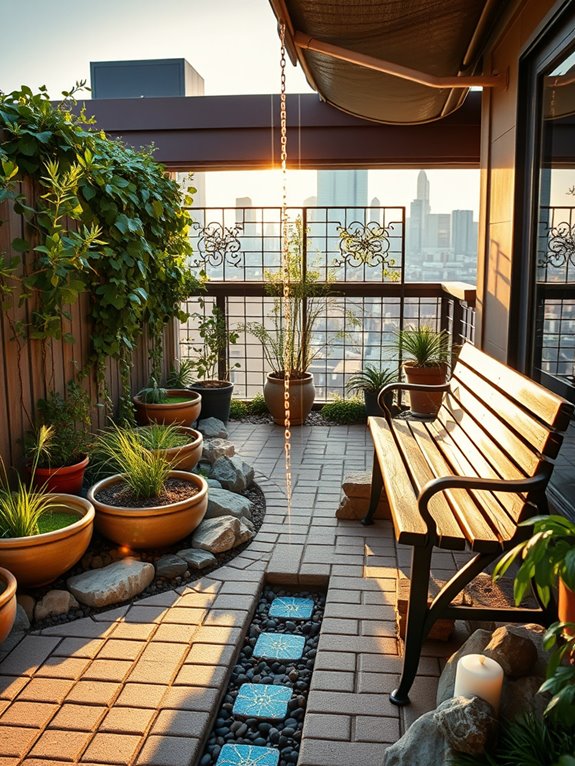
Decorative elements and hardscaping transform a functional rain garden into an enchanting outdoor sanctuary. Natural stone pathways wind through native plantings, while strategically placed boulders create striking focal points and provide seating areas for quiet contemplation.
Artistic elements like copper rain chains guide water from downspouts, creating melodic sounds during rainfall, while decorative bridges span bioswales, adding both functionality and visual interest to the space.
Weather-resistant artwork, such as mosaic stepping stones and metal sculptures, adds personality year-round, while carefully positioned landscape lighting illuminates key features after dark. The combination of hard and soft elements creates a balanced aesthetic, where permeable paving materials complement the lush vegetation, and carefully selected gravel allows for both drainage and visual appeal.
Key Elements:
- Natural stone pathways
- Decorative bridges
- Rain chains
- Garden sculptures
- Landscape lighting
- Permeable pavers
- Ornamental rocks and boulders
- Sitting areas
- Artistic stepping stones
- Gravel or river rock
- Metal or wooden accents
- Decorative edging
When implementing hardscaping elements, start by mapping out primary walkways and seating areas, ensuring they follow natural traffic patterns while complementing the garden’s drainage design.
Install permeable materials first, such as crushed stone or specially designed pavers, creating stable paths that allow water infiltration. Position larger elements like boulders and seating areas before adding smaller decorative pieces, ensuring proper spacing and visual flow throughout the garden.
Layer lighting elements strategically, combining path lights with uplighting for trees and focal points. Consider installing lighting on timers or motion sensors for energy efficiency and security.
When positioning decorative elements, group them in odd numbers and vary heights to create visual interest while maintaining proper spacing for maintenance access.
Design adaptations can accommodate various space constraints – smaller gardens might focus on vertical elements like wall-mounted rain chains and artistic panels, while larger spaces can incorporate multiple seating areas and extensive pathway systems.
Consider using multi-functional elements, such as boulder seating that doubles as flow directors for stormwater, and select weather-resistant materials that complement your home’s architecture while withstanding exposure to regular moisture.
Seasonal Maintenance Tips for a Thriving Rain Garden
A well-maintained rain garden transforms through the seasons, creating an ever-changing tapestry of colors and textures. Spring brings forth vibrant rushes and sedges in brilliant green, while native wildflowers like purple coneflower and black-eyed susans dot the landscape with splashes of color. The garden’s natural bowl shape creates an enchanting microclimate where moisture-loving plants thrive, and butterflies dance among the blooms during warm months.
As autumn approaches, ornamental grasses take center stage, their feathery plumes swaying in the breeze while deep-rooted plants continue their important work of filtering stormwater. Winter reveals the garden’s structural elements – strategically placed rocks, artistic drainage channels, and the architectural forms of dormant plants frosted with snow. This year-round interest makes the rain garden a focal point that’s both beautiful and functional in any season.
Key Elements:
- Native moisture-loving perennials
- Deep-rooted grasses
- River rocks and drainage stones
- Mulch layer
- Soil amendments
- Seasonal pruning tools
- Rain gauge
- Garden fork and spade
- Leaf rake
- Plant markers
Maintaining a rain garden requires attention to seasonal rhythms and weather patterns. In spring, remove winter debris and dead growth, divide overcrowded plants, and refresh mulch layers.
Summer maintenance focuses on weeding, monitoring plant health, and ensuring proper drainage during heavy rains.
Fall calls for cutting back spent blooms, removing fallen leaves, and protecting sensitive plants before winter sets in.
Winter maintenance is minimal but includes checking for erosion and planning next season’s adjustments.
For optimal results in any space, consider your specific climate zone and rainfall patterns. Small spaces can utilize vertical elements like rain chains and compact varieties of native plants, while larger areas might incorporate stepped pools or meandering swales.
Always position the garden to capture runoff from impervious surfaces, and ensure the soil mix contains enough sand and organic matter for proper drainage.
In urban settings, container-based rain gardens can be created using deep planters with modified drainage systems, making this eco-friendly approach accessible even on balconies and patios.