
9 Garden Ideas for Playful Paths
You can transform your garden paths from simple walkways into enchanting adventures that spark imagination and joy. Whether you’re seeking to engage young explorers or add whimsical touches for your own enjoyment, these nine creative path designs blend practical function with playful charm. From rainbow-hued stepping stones to secret garden mazes, each option offers unique ways to make every outdoor journey more meaningful. Let’s explore how these magical pathways can bring your garden to life while creating memorable experiences for visitors of all ages.
Contents
Rainbow Mosaic Stepping Stones
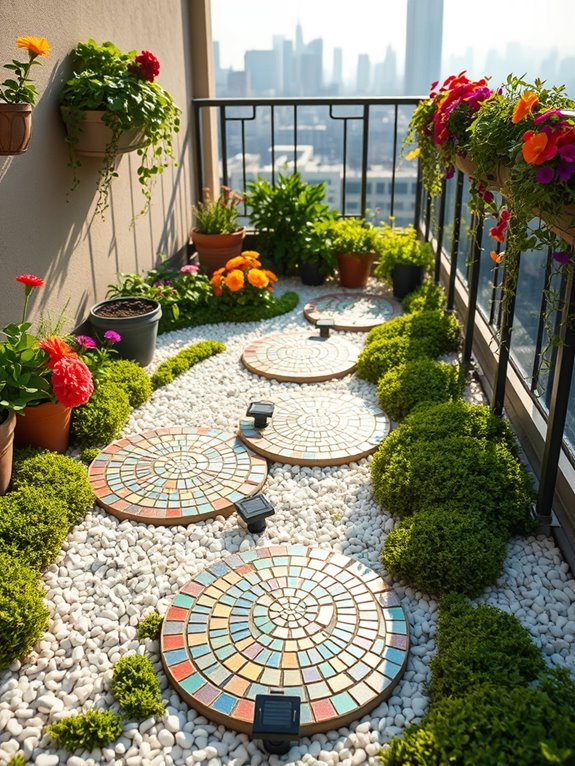
Transform your garden path into a whimsical wonderland with Rainbow Mosaic Stepping Stones that dance through your outdoor space like scattered jewels. These handcrafted pathways combine vibrant glass pieces, colored stones, and decorative elements arranged in stunning patterns that catch and reflect sunlight throughout the day.
Surround these artistic stones with low-growing plants like creeping thyme, Irish moss, or baby’s tears to create a lush, fairy-tale setting where the borders between path and garden blur beautifully. The magic truly comes alive when morning dew catches the mosaic surfaces, creating miniature rainbows that sparkle between your flowerbeds.
Consider placing these stepping stones among clusters of bright flowers like marigolds, zinnias, and purple coneflowers, allowing the colors in your mosaics to echo the natural hues of your garden. This creates a cohesive design that feels both playful and purposeful, inviting exploration while providing practical garden access.
Key Elements:
- Concrete stepping stone molds
- Colored glass pieces
- Mirror fragments
- Ceramic tiles
- Weather-resistant grout
- Ground cover plants
- Solar-powered path lights
- Complementary flowering plants
- Crushed stone or pebbles
- Level sand base
To implement this enchanting path design, start by planning your route and preparing level ground with a sand base. Space your stepping stones approximately 24 inches apart on center, allowing room for plants between them.
Create your mosaic designs using a concrete base and embedding your chosen materials in pleasing patterns – consider spirals, sunbursts, or abstract designs. Once set, surround the stones with a mixture of ground covers and low-growing plants, ensuring they won’t overtake the mosaic surfaces but will soften the edges.
For optimal results and longevity, consider seasonal maintenance requirements and regional climate challenges. In areas with freeze-thaw cycles, install stones slightly above ground level and use flexible grout to prevent cracking.
Ensure proper drainage around each stone by incorporating crushed stone or pebbles in the surrounding soil. Regular sweeping and occasional resealing will keep your mosaics vibrant for years to come.
Adaptation Tips: For smaller spaces or balcony gardens, create mini-mosaic stepping stones as decorative accents rather than functional pathways. Use lightweight materials and smaller stones to reduce weight concerns.
Consider vertical elements like mosaic wall pieces or decorated containers to maximize limited space while maintaining the playful rainbow theme. For larger gardens, create multiple interconnected paths with varying patterns that tell a color story throughout your space, or design themed areas using different color schemes in each section.
Hidden Musical Chimes Path
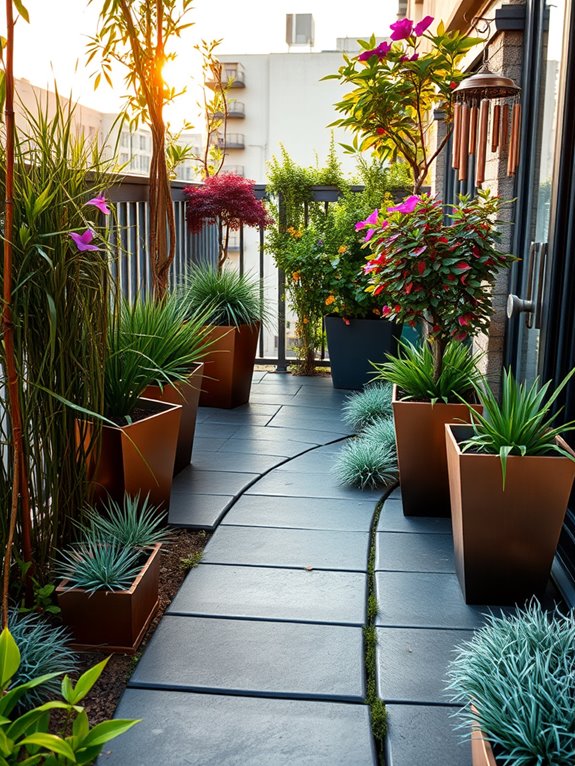
A Hidden Musical Chimes Path transforms an ordinary garden walkway into a magical journey of sound and discovery. Tall ornamental grasses like feather reed grass and fountain grass line the meandering path, their leaves rustling in harmony with delicate wind chimes concealed among the foliage.
Japanese forest grass and blue fescue create soft mounds at varying heights, while climbing jasmine and morning glories wind their way up copper poles that support carefully placed chimes.
The path itself features a mix of natural materials – slate stepping stones interspersed with river rocks and moss-covered segments that dampen footsteps, allowing the musical elements to take center stage.
Strategic placement of bamboo stands creates natural alcoves where brass, copper, and crystal chimes hang at different heights, each producing unique tones when activated by the breeze. Japanese maples and dwarf conifers provide year-round structure while offering additional hanging points for musical elements.
Key Elements:
- Wind chimes of varying materials and tones
- Ornamental grasses (feather reed, fountain grass, Japanese forest grass)
- Climbing vines (jasmine, morning glory)
- Copper or metal poles
- Slate stepping stones
- River rocks
- Moss patches
- Bamboo stands
- Japanese maples
- Dwarf conifers
- Garden hooks and hanging hardware
Begin implementation by mapping out a gently curved path that’s at least three feet wide, using stepping stones as the foundation.
Install metal poles or bamboo stands at varying heights (4-8 feet) along the path’s edges, ensuring they’re secured firmly in the ground.
Plant ornamental grasses and climbing vines near these supports, allowing space for mature growth. Add wind chimes at different heights, positioning them so they don’t tangle when moving.
Layer plants by height, with taller species at the back and shorter ones closer to the path.
For smaller spaces or balconies, this concept can be scaled down using container gardens with dwarf varieties of ornamental grasses and compact climbing plants.
Consider wall-mounted chimes or create a vertical garden structure that incorporates both plants and musical elements. Focus on using lightweight materials and ensuring proper drainage for container plants.
Choose chimes carefully based on your space’s acoustics and proximity to neighbors, opting for smaller ones with gentler tones in close quarters.
Hopscotch Pattern Pavers
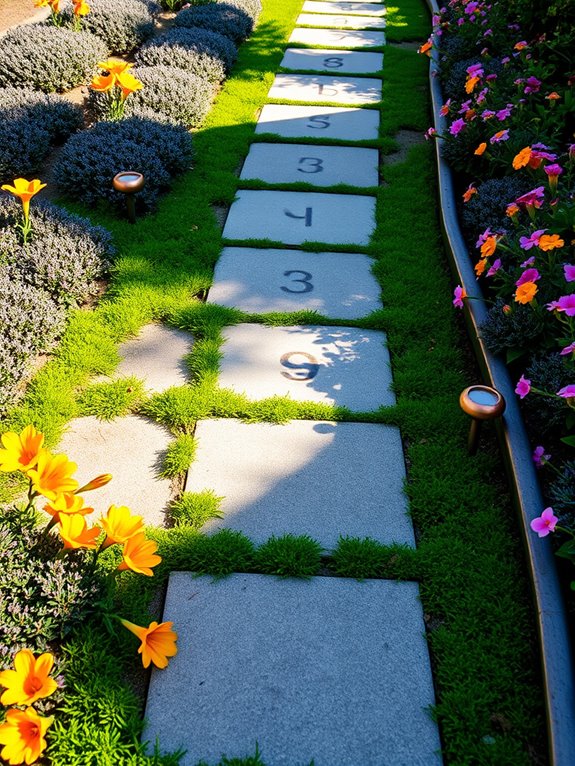
A whimsical hopscotch pattern created with garden pavers transforms an ordinary pathway into a playful journey through your outdoor space. The numbered stepping stones, arranged in the classic hopscotch configuration, are interspersed with low-growing groundcovers like creeping thyme and Irish moss, which soften the edges and add natural texture.
Colorful blooms from dwarf daylilies and hardy geraniums peek through the edges, creating a vibrant border that frames the game-inspired path. The artistic arrangement combines functionality with childhood nostalgia, as the pavers provide stable footing while encouraging both children and adults to engage playfully with the garden.
Weather-resistant paint or stained concrete numbers on each paver maintain the hopscotch theme, while strategic placement of solar-powered path lights illuminates the course during evening hours, creating an enchanting nighttime display.
Key Elements:
- Square or rectangular concrete pavers
- Weather-resistant paint or stains
- Creeping groundcover plants
- Border flowering plants
- Solar path lights
- Landscaping fabric
- Pea gravel or sand
- Level ground base
- Garden edging material
Installation begins with preparing level ground and laying landscaping fabric to prevent weed growth. Arrange the numbered pavers in the traditional hopscotch pattern, ensuring proper spacing for comfortable stepping. Fill the gaps between pavers with pea gravel or sand, then plant selected groundcovers around the edges.
Install garden edging to contain the design and prevent material spread. Position border plants strategically to maintain clear access to the hopscotch course while providing visual interest.
Design Adaptations: For smaller spaces, consider a modified hopscotch pattern using fewer squares or creating a condensed version that curves to maximize limited area.
Choose compact plant varieties that won’t overflow onto the pavers, and consider vertical elements like climbing vines on nearby walls to add dimension without consuming ground space. In areas with heavy shade, opt for shade-tolerant groundcovers like sweet woodruff or ajuga, and incorporate glow-in-the-dark paint elements for enhanced visibility.
Glow-in-the-Dark Pebble Trail
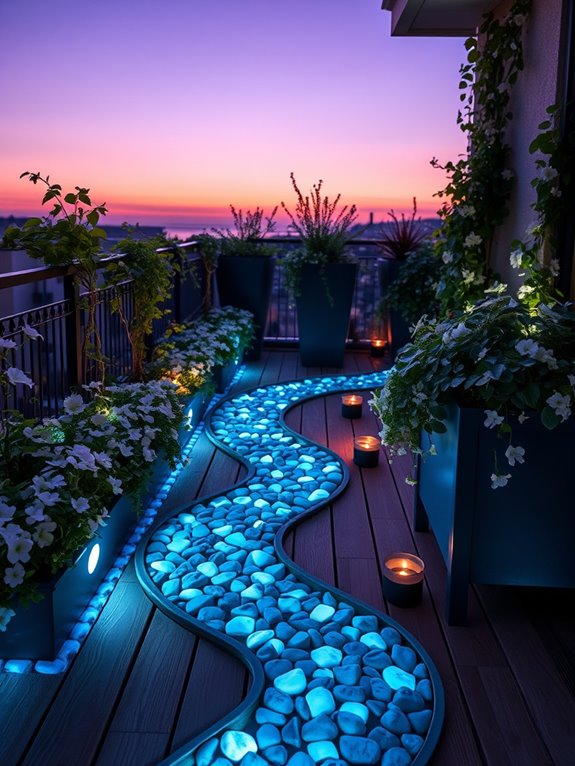
Transform your garden path into a magical nighttime wonderland with a luminescent pebble trail that captures the enchantment of starlight brought down to earth. During daylight hours, these specialized stones blend seamlessly with your garden’s natural elements, but as dusk settles, they begin to emit a soft, ethereal glow that outlines your garden pathway. The gentle illumination creates an otherworldly atmosphere, perfect for evening strolls and adding mystery to your outdoor space.
Complementing the glowing stones, consider incorporating white-flowering plants like moon flowers or night-blooming jasmine along the path edges. These natural elements enhance the magical effect while providing subtle fragrance. The combination of luminous pebbles and evening-blooming flowers creates a multi-sensory experience that transforms your garden into an enchanted realm after sunset.
Essential Elements:
- Photoluminescent or solar-powered glow stones
- Clear path edging material
- Solar path lights for supplementary lighting
- White or light-colored flowering plants
- Ground cover plants for path edges
- Weatherproof sealant
- Drainage material
- Garden soil
- Mulch
Installation begins with proper path preparation, including establishing clear boundaries and ensuring adequate drainage. Lay a foundation of standard gravel or crushed stone, then carefully arrange the glow pebbles in your desired pattern, ensuring even distribution for consistent illumination.
The stones should be set slightly below the path surface level to prevent displacement while walking. Apply a clear, weatherproof sealant to protect the stones’ luminescent properties and extend their lifespan.
Design Tips: Consider varying the density of glow stones to create patterns or highlight specific areas of your garden. For smaller spaces or balconies, use glow stones as accents rather than full pathways, perhaps creating illuminated borders around container gardens or small seating areas.
Weather exposure can affect luminescence over time, so place stones strategically under partial cover when possible. In regions with heavy rainfall, ensure proper drainage to prevent water accumulation that could dim the stones’ glow effect.
Alphabet Learning Walkway
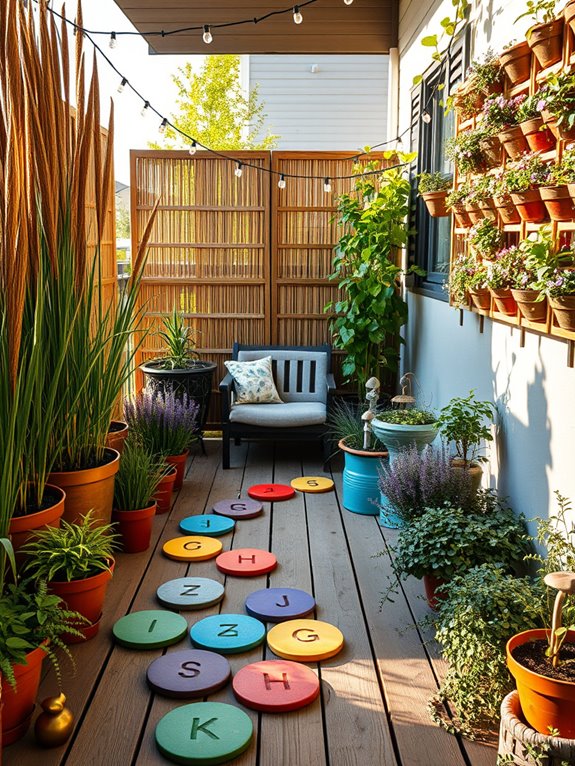
Transform your garden path into an educational wonderland with an Alphabet Learning Walkway that delights both children and adults alike. Colorful stepping stones, each adorned with letters of the alphabet, weave through a vibrant display of flowers and foliage arranged in corresponding patterns – ‘A’ for Asters, ‘B’ for Black-eyed Susans, and so forth. The path creates an engaging journey where learning seamlessly blends with nature’s beauty, featuring letterforms crafted from weather-resistant materials in bold, child-friendly fonts.
Sensory elements enhance the educational experience, with fragrant herbs like mint and lavender planted strategically along the route. Decorative elements such as alphabet-themed garden stakes, whimsical sculptures, and educational signage add visual interest while reinforcing letter recognition. The overall design maintains a playful yet organized appearance, with clear sightlines and adequate spacing between elements to ensure safety and accessibility.
Key Elements:
- Alphabet stepping stones (26 letters)
- Weather-resistant letter markers
- Educational plant identification signs
- Child-safe, non-toxic plants
- Wide, stable pathway material
- Themed garden ornaments
- Reading nook or rest area
- Safety lighting
- Border plants
- Educational activity stations
Creating an Alphabet Learning Walkway begins with establishing a clear, level path at least 3 feet wide. Position the alphabet stones sequentially, spacing them approximately 18 inches apart to accommodate children’s natural stride length.
Install border plants in alphabetical order, ensuring each letter corresponds to nearby vegetation when possible. Include resting points every 6-8 letters where children can pause and engage with educational elements.
For maintenance and durability, seal stone letters annually and regularly trim surrounding vegetation to prevent overgrowth. Consider installing low-voltage lighting to extend learning opportunities into evening hours. Position taller plants toward the back of the border and shorter ones near the path’s edge to maintain visibility and prevent obstacles.
Design adaptations can accommodate various spaces – smaller gardens might focus on vowels or common consonants with vertical gardening elements, while larger areas can incorporate additional learning stations or separate themed sections.
Consider using container gardens for flexibility, and implement raised beds to make letters more visible. In limited spaces, wall-mounted alphabet elements or climbing vines trained into letter shapes can maximize vertical space while maintaining the educational purpose.
Animal Footprint Adventure Track
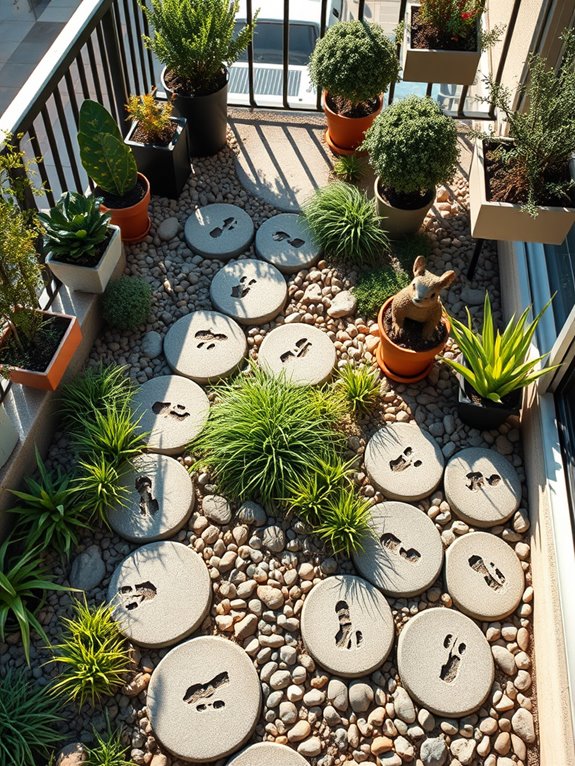
Transform your garden path into a whimsical wildlife adventure with an Animal Footprint Adventure Track that sparks imagination and curiosity. Concrete stepping stones molded with realistic animal tracks guide visitors through lush greenery, while native grasses like feather reed and fountain grass sway alongside the path, creating natural movement and intrigue.
Strategic placement of animal-themed garden ornaments, like metallic rabbits or ceramic owls, adds authenticity to the trail experience. The path meanders through clusters of woodland-inspired plants such as ferns, hostas, and wild violets, creating a natural habitat feel. Each footprint tells a story, leading explorers past butterfly bushes, berry-producing shrubs, and fragrant herbs that attract real wildlife to complement the themed pathway.
Natural elements like bark mulch, river rocks, and moss patches between the tracks enhance the wild atmosphere.
Key Elements:
- Concrete stepping stones with animal track impressions
- Native ornamental grasses
- Woodland perennials and shade plants
- Animal-themed garden ornaments
- Natural mulch or ground cover
- River rocks and pebbles
- Motion-sensor wildlife lights
- Weather-resistant track markers
- Border plants for path definition
Implementation requires careful planning of the path’s flow and proper spacing of footprint stones. Begin by laying out the track pattern with rope or garden hose to establish natural curves. Install stepping stones at comfortable walking distances, ensuring firm placement on leveled ground with adequate drainage.
Surround each track with low-growing plants that won’t obscure the prints but provide soft edges. Layer taller plants behind the path to create depth and mystery.
Design Tips: Consider your regional wildlife when selecting track patterns to maintain authenticity. For smaller spaces or balconies, create a simplified version using miniature footprint pavers and container gardens. Incorporate educational elements like track identification plaques or QR codes linking to wildlife information.
Ensure adequate lighting for evening exploration, and select durable materials that withstand weather exposure while maintaining the natural aesthetic of your outdoor space.
Fairy Tale Treasure Hunt Path
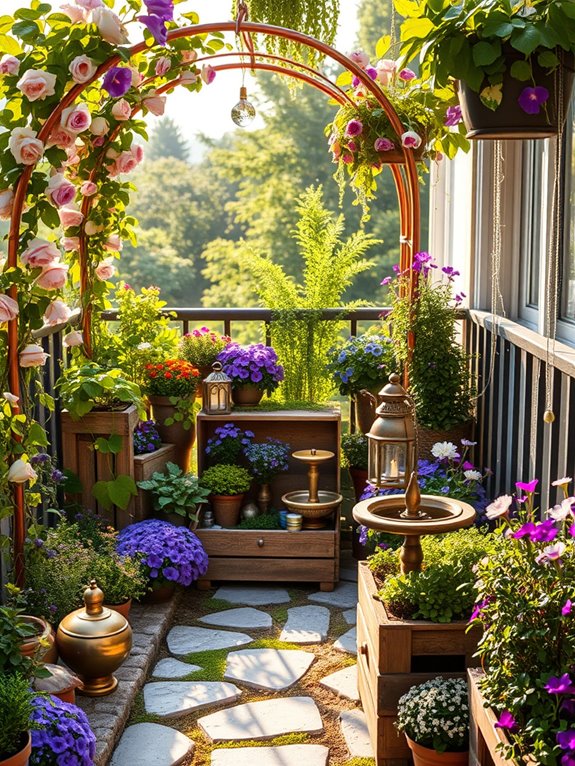
Transform your garden path into an enchanting treasure hunt inspired by beloved fairy tales, where every turn reveals magical surprises and whimsical discoveries. Winding stepping stones painted with golden arrows lead adventurers through a mystical landscape dotted with tiny doors at tree bases, miniature castles nestled among flowering bushes, and sparkling crystals hidden within native plantings.
Fragrant herbs like thyme and chamomile create soft, cushiony patches between path segments, while climbing roses and morning glories cascade over wooden archways marked with story-themed clues. The path meanders through varying heights of vegetation, from low-growing creeping jenny and fairy vine to towering foxgloves and hollyhocks that create secret nooks perfect for hiding treasure tokens.
Strategic placement of mirror balls, colored glass orbs, and metallic wind chimes adds mystical sparkle and movement, while carefully positioned spotlights create dramatic shadows and illuminate key features at dusk. Small water features provide gentle background music and host water-loving plants like miniature cattails and fairy moss.
Key Elements:
- Stepping stones with directional markers
- Miniature doors and fairy houses
- Crystal and glass decorative elements
- Climbing plants and archways
- Story-themed clues or markers
- Native flowering plants
- Ground cover herbs
- Water features
- Strategic lighting
- Hidden treasure tokens
- Metallic wind chimes
- Mirror balls
Begin implementation by establishing the path’s route using temporary markers, ensuring gentle curves that create anticipation and mystery. Install stepping stones slightly below ground level for safe footing, incorporating electrical conduit beneath the path for future lighting needs.
Plant larger specimens first, such as climbing roses and hollyhocks, allowing space for growth and creating natural alcoves for decorative elements. Layer in medium-height plants and ground covers, ensuring year-round interest through careful plant selection.
Position fairy houses and doors at child height, securing them properly to trees or creating stable standalone features. Install water features early in the process, ensuring proper drainage and electrical connections are in place.
Add decorative elements progressively, creating a cohesive story through thoughtful placement of clues and treasures. For smaller spaces or balconies, focus on vertical elements and container gardening to maximize impact. Use hanging baskets and wall-mounted planters to create layers of greenery, and incorporate battery-operated lights and smaller water features.
Consider using mirrors to create illusions of depth and space, and choose compact varieties of plants that won’t overwhelm limited areas. Regular maintenance should include trimming climbing plants, refreshing mulch, checking lighting systems, and occasionally changing the location of treasures to maintain interest for returning visitors.
Secret Garden Maze Route
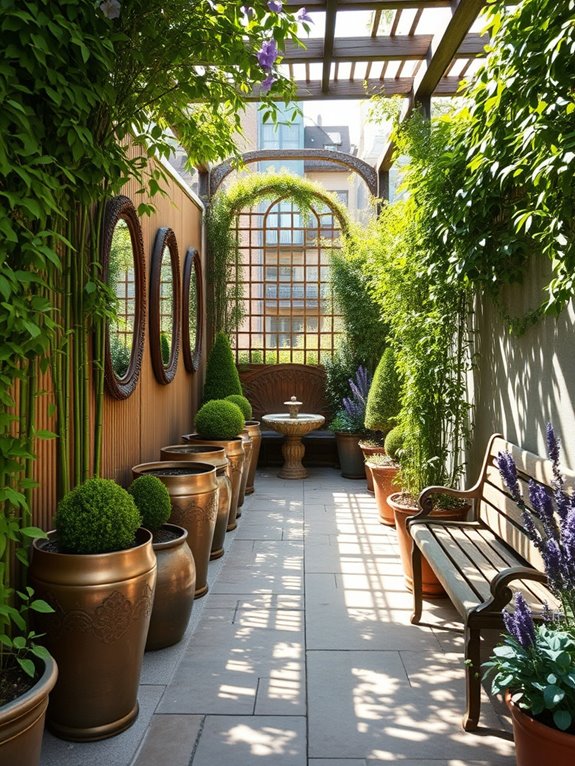
A Secret Garden Maze Route transforms an ordinary garden path into an enchanting journey of discovery. Tall hedges of carefully trimmed boxwood and yew create mysterious green walls that wind and curve, while climbing roses and flowering vines cascade over weathered archways. The narrow passages open occasionally into hidden pocket gardens, each revealing its own delightful surprise – perhaps a tinkling fountain, a weathered stone bench, or a collection of shade-loving hostas in varying shades of green and blue.
The magic lies in the journey itself, where each turn promises new wonders. Fragrant herbs like lavender and thyme line the path edges, releasing their scent when brushed against. Strategically placed mirrors create illusions of additional pathways, while ornamental grasses whisper and sway, adding movement and mystery. The maze’s design incorporates both sunny and shaded sections, allowing for diverse plant combinations that change with each season.
Key Elements:
- Evergreen hedging plants (boxwood, yew, privet)
- Climbing plants (roses, clematis, jasmine)
- Stone or gravel pathways
- Decorative archways or pergolas
- Garden mirrors
- Accent plants (ornamental grasses, hostas)
- Hidden seating areas
- Water features
- Path lighting
- Fragrant herbs
- Ornamental gates or doors
Implementation begins with careful planning of the route, ensuring paths are at least 3 feet wide for comfortable passage. The maze’s foundation relies on establishing sturdy evergreen hedges, planted in well-prepared soil with adequate spacing for mature growth.
These should be maintained at a height of 5-6 feet to create an immersive experience while allowing enough light for underplanting. Pathways should be properly graded and laid with permeable materials to prevent water pooling.
Secondary plantings and decorative elements should be installed once the primary hedge structure is established. Focus on creating distinct zones or ‘rooms’ within the maze, each with its own character. Layer plants vertically, using climbing varieties on structures, medium-height flowering plants against hedges, and ground covers along path edges.
Install irrigation systems before dense growth makes access difficult. For smaller spaces or balcony adaptations, consider using container plantings and movable screens to create a maze-like experience. Dwarf varieties of hedging plants can be used in large containers, while trellises with climbing plants can create vertical interest.
Mirrors become especially valuable in compact areas, creating the illusion of extended pathways and additional space. The key is to maintain proportion – in smaller spaces, reduce the height of barriers and focus on creating intimate, connected spaces rather than long wandering paths.
Nature Discovery Timeline Path
A Nature Discovery Timeline Path transforms an ordinary garden walkway into an engaging journey through seasonal changes and natural cycles. Native wildflowers, ornamental grasses, and flowering shrubs line the curved pathway, creating distinct sections that showcase different blooming periods throughout the year.
Early spring bulbs give way to summer perennials, followed by autumn seed heads and winter berries, offering a continuous display of nature’s progression.
Stone markers or artistic signposts along the path highlight notable moments in the garden’s annual timeline, while educational plaques describe the wildlife attracted to each season’s offerings. The path itself features varying textures – from smooth pebbles to stepping stones embedded with fossil imprints – encouraging mindful walking and observation.
Strategically placed benches and observation points allow visitors to pause and witness nature’s daily activities, from butterfly visits to bird migrations.
Key Elements:
- Curved pathway materials (gravel, stepping stones, or permeable pavers)
- Season-specific plant groupings
- Educational markers or plaques
- Observation benches
- Wildlife-attracting features
- Native plants for each season
- Timeline indicators
- Fossil imprints or nature-inspired decorative elements
- Weather-resistant interpretive signs
- Strategic lighting for evening viewing
The implementation begins with plotting the path’s course through the garden, ensuring gentle curves that create natural stopping points.
Group plants by blooming time, creating distinct zones that highlight each season’s special features. Install permanent markers or plaques at key points, ensuring they’re visible but don’t obstruct the natural flow.
The path should be wide enough for comfortable walking and wheelchair access, with firm, level surfaces that drain well.
Additional tips: Consider vertical elements like climbing vines or tall grasses to create discovery moments at different heights. For smaller spaces, use container gardens to create seasonal vignettes, and incorporate wall-mounted timeline markers.
Mini discovery stations can be created even in balcony gardens by using portable planters and hanging elements that demonstrate natural cycles in a compact space. Ensure all materials are weather-resistant and that educational elements are easily updatable to reflect changing seasons and garden developments.