
10 Garden Ideas for Pathways and Walkways
While many gardeners believe pathways are merely functional elements, your garden’s walkways can actually become stunning design features that transform ordinary spaces into enchanting landscapes. You’ll discover how combining materials like weathered brick, natural stone, and recycled wood creates inviting routes that guide visitors through your outdoor sanctuary. From classic herringbone patterns to illuminated evening trails, these pathway ideas will help you craft garden spaces that blend beauty, practicality, and personal style.
Contents
- 1 Classic Brick Herringbone Patterns
- 2 Natural Stone Stepping Paths
- 3 Recycled Wood and Mulch Walkways
- 4 Mediterranean-Style Mosaic Designs
- 5 Modern Concrete Slab Solutions
- 6 Gravel and Pebble Path Layouts
- 7 Mixed Material Garden Routes
- 8 Eco-Friendly Permeable Pathways
- 9 Japanese-Inspired Zen Walkways
- 10 Illuminated Evening Garden Trails
Classic Brick Herringbone Patterns

Classic brick herringbone patterns create an elegant and timeless aesthetic that transforms ordinary garden pathways into sophisticated thoroughfares. The intricately woven pattern of bricks, laid at 45-degree angles, creates a stunning visual flow that draws the eye through the garden space.
Deep red clay bricks complemented by emerald boxwood hedges and white flowering perennials like candytuft or sweet alyssum create a refined border that epitomizes traditional garden design. The herringbone arrangement adds depth and dimension to the walkway, while the geometric precision provides a striking contrast to the natural, organic forms of surrounding plantings.
Climbing roses trained on decorative trellises or mature hydrangeas softly draping over the pathway edges help soften the rigid lines of the brickwork. This interplay between structured hardscaping and billowing plant material creates a harmonious balance that feels both formal and welcoming.
Key Elements:
- Clay bricks in uniform size and color
- Edge restraints or border bricks
- Crushed stone base material
- Sand for joint filling
- Boxwood or similar hedge plants
- White flowering border plants
- Climbing roses or hydrangeas
- Decorative metal or wooden trellises
- Garden lighting fixtures
- Stone dust or setting sand
The implementation of a herringbone brick pathway begins with thorough ground preparation, including excavation to a depth of 8-10 inches and installation of a properly compacted crushed stone base. Bricks should be laid starting from a straight edge or existing structure, maintaining consistent 45-degree angles throughout the pattern.
Border bricks installed parallel to the pathway edges help contain the pattern and provide clean lines. Regular maintenance includes periodic sweeping, occasional pressure washing, and reapplying joint sand as needed.
Design adaptations can accommodate various garden sizes and shapes by adjusting the pattern scale and incorporating curved sections where appropriate. For smaller spaces, consider using half-size bricks or creating focal points where the pathway widens into small seating areas.
Proper drainage is essential – slope the pathway slightly (about 1 inch per 8 feet) away from any structures and install drainage channels if necessary. When selecting bricks, choose frost-resistant varieties for cold climates and consider sealing the surface to prevent moss growth and maintain the rich brick color over time.
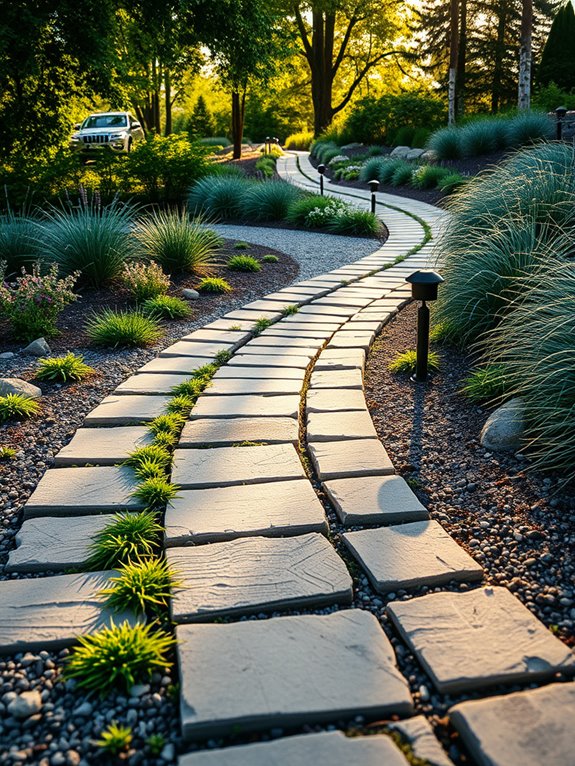
Natural Stone Stepping Paths
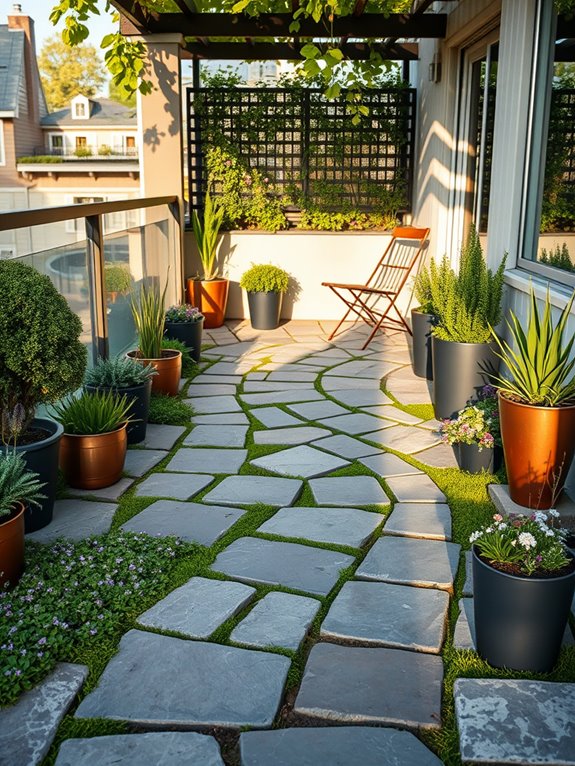
Natural stone stepping paths create an enchanting journey through your garden, with irregular yet perfectly placed stones leading the way through lush greenery and blooming perennials. The organic shapes of natural stone pavers, whether slate, flagstone, or granite, blend seamlessly with surrounding plant life, creating a sense of timeless harmony that appears as if nature itself designed the pathway.
Ground covers like creeping thyme or Irish moss soften the edges of each stone, releasing gentle fragrances when brushed against. The path invites exploration, meandering past ornamental grasses that sway in the breeze and compact evergreen shrubs that provide year-round structure.
Small flowering plants like dianthus and armeria dot the spaces between stones, while taller perennials such as salvias and Russian sage create depth and vertical interest along the pathway’s borders. The natural variations in stone coloring complement both the plantings and existing hardscape elements, tying the entire garden design together.
Key Elements:
- Natural stone pavers (flagstone, slate, or granite)
- Low-growing ground covers
- Ornamental grasses
- Compact evergreen shrubs
- Small flowering perennials
- Border plants of varying heights
- Crushed stone or gravel for base
- Landscape fabric
- Edge restraints
- Garden soil and compost
Implementation begins with plotting your path’s course using rope or garden hose to visualize flow and transitions. Prepare the area by removing existing vegetation and creating a level surface.
Install landscape fabric to prevent weed growth, then add a 2-inch layer of crushed stone as a stable base. Place stones approximately 24 inches apart, allowing comfortable stepping distance while maintaining visual flow. Consider stone thickness and stability, ensuring each piece sits firmly without wobbling.
Fill gaps between stones with prepared soil mixed with compost, then plant selected ground covers and small perennials. Install larger border plants and ornamental grasses according to their mature size, maintaining adequate spacing to prevent overcrowding. Water newly planted areas thoroughly and add a layer of mulch around plants to retain moisture and suppress weeds.
Design Considerations: For smaller spaces, choose smaller stones and compact plant varieties to maintain scale. Consider using a repeating pattern of just 3-4 stone types for visual cohesion in limited areas.
Ensure proper drainage by slightly elevating stones above grade level, and select plants adapted to your specific light conditions. For sloped areas, incorporate steps or terracing into the design, using larger stones for stability. In high-traffic areas, space stones closer together and select hardy ground covers that can withstand frequent foot traffic.
Recycled Wood and Mulch Walkways
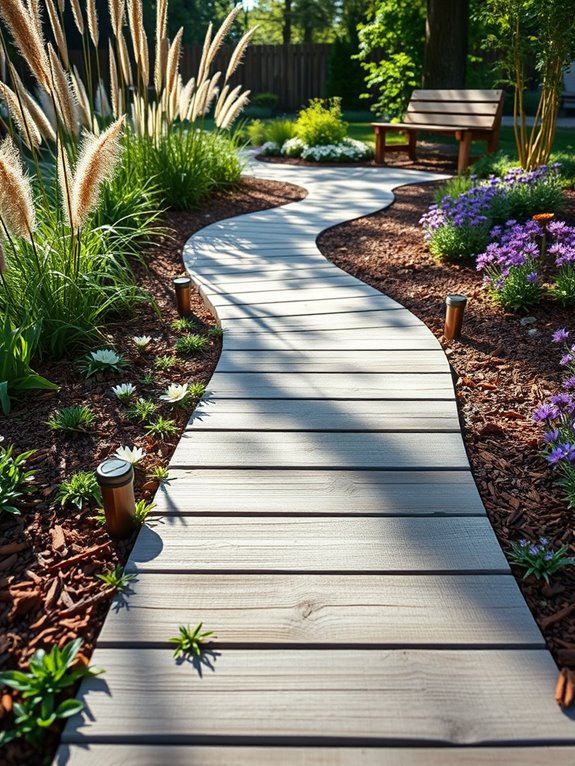
Transform your garden into a charming rustic retreat with recycled wood and mulch walkways that bring warmth and natural character to your outdoor space. Weathered wooden planks, arranged in thoughtful patterns, create inviting paths that meander through garden beds, while natural mulch borders soften the edges and provide contrast.
Native wildflowers and ornamental grasses peek between the wooden elements, creating a delightful interplay of textures and bringing life to the pathway margins.
The combination of reclaimed timber and organic mulch materials creates an eco-friendly landscape that feels both established and evolving. Cedar and pine fragments release their subtle fragrance when walked upon, while the wooden planks develop a silvery patina over time. This design approach allows for creative expression through varying plank arrangements, from formal geometric patterns to free-flowing curves that mirror nature’s organic forms.
Key Elements:
- Reclaimed wooden planks or railroad ties
- Natural wood mulch or bark chips
- Landscape fabric or weed barrier
- Crushed gravel for base layer
- Edge restraints or border materials
- Native perennial plants
- Solar path lights
- Drainage materials
- Ground cover plants
- Weather-resistant sealant
Begin implementation by clearing and leveling the intended pathway area, then laying a foundation of crushed gravel for drainage. Install landscape fabric to prevent weed growth before arranging wooden planks in your desired pattern, ensuring proper spacing for water drainage.
Fill the gaps and borders with mulch, tamping down firmly to create a stable surface. Install edge restraints to contain the mulch and maintain clean lines. Plant hardy perennials and ground covers along the edges to soften the transition between path and garden.
For maintenance, seal wooden elements annually to protect against moisture damage, and refresh mulch layers as needed, typically every spring. Monitor for any loose planks or settling areas, adjusting as necessary to maintain a level walking surface.
Regular weeding and edge trimming will keep the pathway defined and inviting.
Design Adaptations: Consider using narrower planks or creating a scaled-down version for smaller spaces, and incorporate raised bed elements along the sides for added interest in limited areas. For sloped terrain, create shallow steps using shorter sections of timber, and ensure proper drainage channels are incorporated into the design. In areas with high rainfall, elevate wooden elements slightly above ground level and use fast-draining mulch varieties to prevent water accumulation.
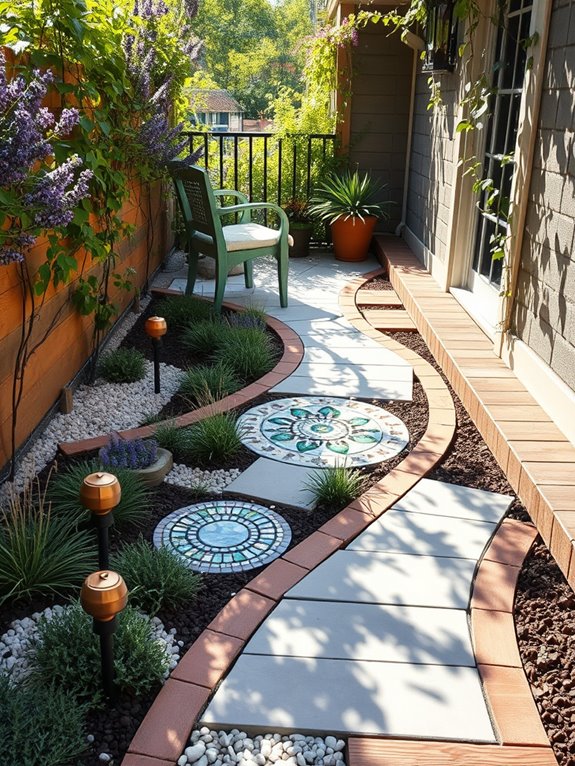
Mediterranean-Style Mosaic Designs
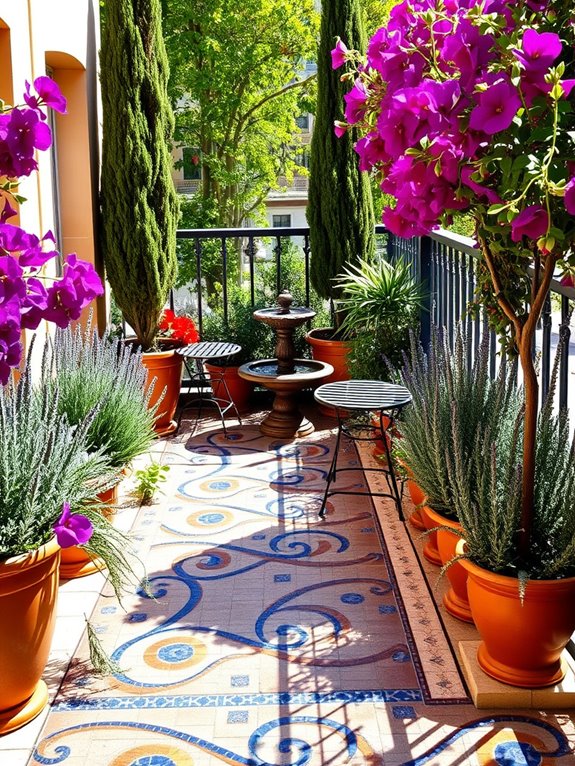
Transport yourself to the sun-drenched coastlines of Greece and Italy with a Mediterranean-style mosaic pathway that transforms an ordinary garden into an artistic masterpiece. Intricate patterns of cobalt blue, terra cotta, and golden tiles weave through drought-resistant herbs and flowers, creating a sense of ancient beauty merged with modern sophistication.
The pathways feature geometric designs and flowing curves, often incorporating classical motifs like waves, fish, or stylized sun patterns that catch light and draw the eye through the garden space. Fragrant lavender and rosemary border the mosaic walkways, while cypress trees stand as elegant sentinels along the path’s edge.
Mediterranean pottery in warm earth tones dots the landscape, filled with cascading bougainvillea and bright geraniums. The overall effect combines rustic charm with artistic refinement, evoking the timeless appeal of European coastal gardens while providing practical, low-maintenance beauty.
Key Elements:
- Mosaic tiles in blues, terracotta, and gold
- Mediterranean herbs (lavender, rosemary, thyme)
- Cypress or olive trees
- Terra cotta pots and urns
- Drought-resistant flowering plants
- Natural stone borders
- Gravel or pebble accents
- Mediterranean statuary or fountains
- Heat-tolerant ground covers
- Weathered architectural elements
Creating a Mediterranean mosaic pathway begins with establishing a solid foundation of compacted gravel and sand. The mosaic pattern should be planned in advance, with tiles arranged in sections that can be installed progressively to ensure consistent patterns and proper spacing.
Edge the pathway with weather-resistant materials that complement the mosaic design while providing structural support and clear boundaries between the path and planted areas.
Plant selection and placement should follow the natural contours of the pathway, with taller specimens positioned strategically to create depth and shorter plants cascading near the path’s edge. Group plants with similar water needs together, and incorporate irrigation systems that avoid spraying water directly onto mosaic surfaces to prevent mineral buildup and damage.
Design adaptations can accommodate various space constraints: small gardens might focus on a single striking mosaic focal point surrounded by container plantings, while larger areas can feature multiple interconnected pathways.
Consider using smaller tiles for intricate patterns in confined spaces, and opt for lighter colors in shaded areas to maximize visual impact. Weather resistance is crucial – select materials rated for outdoor use and apply appropriate sealants to protect the mosaic work from climate extremes and regular foot traffic.
Modern Concrete Slab Solutions
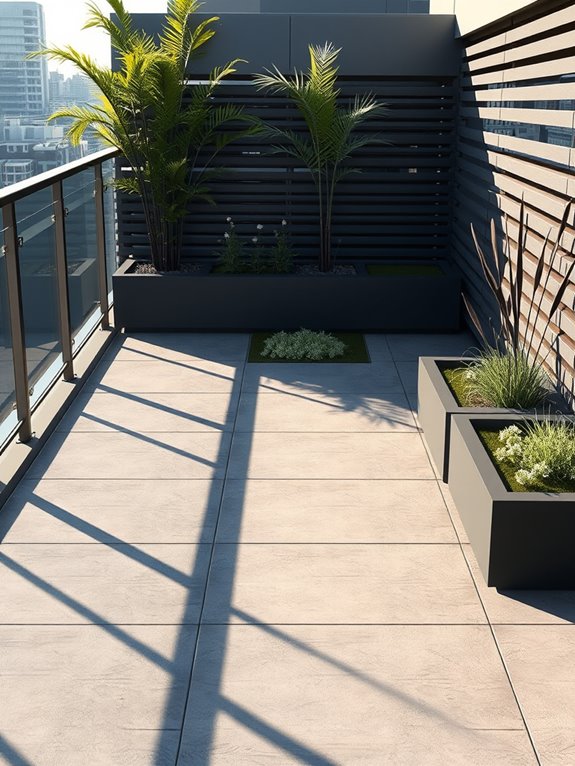
Modern concrete slab pathways create a bold architectural statement in contemporary garden spaces, combining clean lines with naturalistic plantings.
Large-format concrete pavers in subtle gray tones establish a sophisticated foundation, while carefully placed geometric shapes create rhythm and movement throughout the garden. Low-growing sedums and creeping thyme soften the edges of each slab, introducing organic elements that contrast beautifully with the stark modernism of the concrete.
The interplay of light and shadow across the smooth concrete surfaces adds depth and visual interest throughout the day, while strategically placed LED strip lighting transforms the pathway into an ethereal journey after dark. Ornamental grasses like Mexican feather grass and blue fescue provide movement and texture alongside the rigid lines, while architectural plants such as black bamboo and horsetail reed reinforce the contemporary aesthetic.
Key Elements:
- Large-format concrete slabs (minimum 24″ x 24″)
- LED strip lighting or path lights
- Geometric spacing templates
- Drought-resistant ground covers
- Architectural plants
- Crushed stone or pea gravel for slab spacing
- Landscape fabric
- Concrete sealant
- Modern planters
- Drainage system components
Implementation begins with careful planning of the pathway layout, ensuring proper spacing between slabs to create a comfortable walking rhythm.
Prepare the ground by excavating to a depth of 6 inches, installing landscape fabric, and creating a level base with crushed stone. Position concrete slabs with precision, using a laser level to ensure perfect alignment and proper drainage slope. Install edge restraints to prevent shifting and fill gaps with appropriate ground cover plants or decorative aggregate.
Additional Tips: Consider incorporating permeable surfaces between slabs to manage rainwater runoff effectively. For smaller spaces, use smaller format concrete pavers while maintaining the geometric pattern.
Climate considerations should influence plant selection and slab spacing – in rainy regions, wider gaps between slabs improve drainage, while in dry areas, tighter spacing reduces maintenance. Weather-resistant sealants are essential for protecting the concrete’s finish and extending its lifespan.
Gravel and Pebble Path Layouts

Winding through the garden like a natural stream, gravel and pebble pathways create an enchanting journey that merges Japanese zen aesthetics with English cottage charm. The varied textures and earthy tones of mixed pebbles and crushed stone catch the light differently throughout the day, while ornamental grasses like feather reed and blue fescue sway gracefully along the edges, softening the transition between path and planted areas.
Low-growing plants such as creeping thyme, moss phlox, and sedum peek between strategically placed stepping stones, creating a lived-in feel that suggests the path has existed for generations. Large decorative rocks and weathered ceramic containers positioned at key points serve as focal features, while Oriental lanterns cast gentle shadows across the stone surface at dusk, transforming the pathway into a magical evening journey.
Key Elements:
- Mixed size gravel (3/8″ to 3/4″)
- River rocks or smooth pebbles
- Landscape fabric
- Metal or plastic edging
- Stepping stones
- Ornamental grasses
- Ground cover plants
- Accent boulders
- Path lighting
- Drainage materials
Implementation begins with excavating the pathway area to a depth of 4-6 inches, installing proper drainage if needed, and laying high-quality landscape fabric to prevent weed growth. Install rigid edging along both sides to contain the gravel and create clean lines. Layer the base with larger stones or compacted crushed rock, followed by progressively finer gravel grades, ensuring proper compaction between layers.
Position focal points and larger decorative elements first, then add stepping stones at comfortable walking intervals. Allow approximately 2-3 feet of width for primary paths and 18-24 inches for secondary routes. Consider grade changes and water flow patterns when establishing the path’s course, incorporating subtle slopes for drainage while maintaining stability.
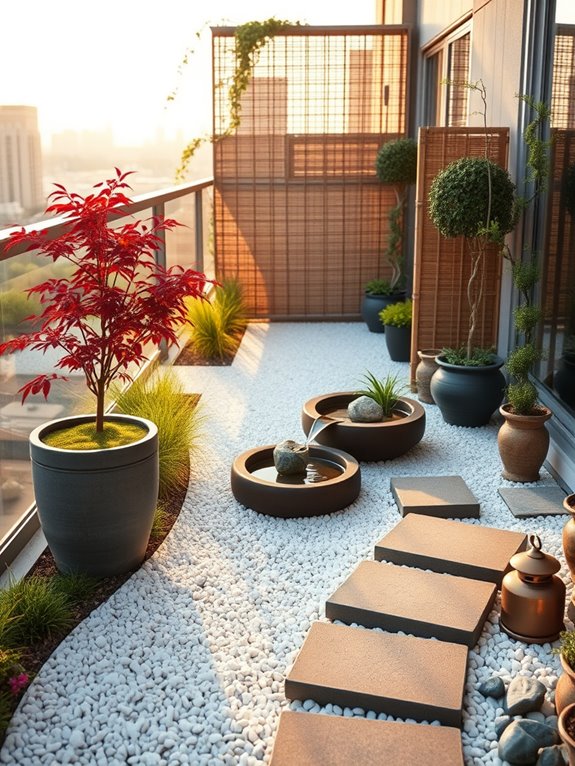
Design Considerations: Climate and usage patterns should influence material selection – choose angular gravel for high-traffic areas as it compacts better than round pebbles. For smaller spaces or balcony gardens, create miniature versions using contained gravel areas with portable water features and container plants.
Consider using different colored gravels to create patterns or define spaces, but limit color variations to maintain a cohesive look. In regions with heavy rainfall, ensure adequate drainage channels and use stabilizing grids under the gravel to prevent washing out.
Mixed Material Garden Routes
Mixed material garden routes transform ordinary pathways into artistic journeys through your outdoor space. Natural stone pavers intermingle with rustic brick sections, while smooth concrete portions transition seamlessly into gravel-lined stretches. Weathered wood planks create bridge-like segments, and mosaic tile inserts add unexpected bursts of color and pattern. The varied textures and materials create visual rhythm, drawing the eye forward while moss and creeping thyme soften the edges of each transition.
The combination of materials allows for creative expression while maintaining functionality. River rocks outline curved sections where flowering perennials like lavender and catmint spill onto the path edges. Ornamental grasses sway alongside wooden portions, while sturdy succulents accent areas where stone meets concrete. Solar-powered path lights nestle between material transitions, creating magical evening ambiance and highlighting the interplay of textures.
Key Elements:
- Natural stone pavers
- Brick sections
- Concrete portions
- Decorative gravel
- Wooden planks
- Mosaic tile inserts
- River rocks
- Path lighting
- Edge plants
- Material transition pieces
- Weather-resistant sealants
- Landscape fabric
- Drainage materials
Implementation begins with careful planning of the route and material transitions. Start by laying a solid foundation of compacted gravel and landscape fabric to ensure proper drainage and prevent weed growth. Create smooth transitions between different materials using metal or plastic edging strips, ensuring each section is level with adjacent areas.
Install larger elements first, such as stone pavers and concrete sections, followed by smaller materials like gravel and decorative touches.
Design adaptations can accommodate various garden sizes by adjusting the scale of materials and frequency of transitions. For smaller spaces, focus on two or three complementary materials rather than incorporating every possible option. Consider maintenance requirements when selecting materials – some combinations may require more upkeep than others.
Always factor in local climate conditions when choosing materials, as freeze-thaw cycles can affect certain combinations differently. For narrow passages, use smaller material sections and ensure smooth transitions to maintain safe footing.
Eco-Friendly Permeable Pathways
Winding through the garden like a gentle stream, permeable pathways create an eco-conscious connection between nature and design. Spaced stepping stones nestled among creeping thyme and Irish moss allow rainwater to seep naturally into the ground, while crushed granite and pebble sections provide stable footing between garden beds.
Native wildflowers like purple coneflowers and black-eyed susans dance along the edges, attracting butterflies and creating a living border that softens the transition between path and plant. The pathway’s natural materials blend seamlessly with the surrounding landscape, from locally sourced flagstone to recycled glass aggregates that catch and reflect sunlight.
Low-growing sedums and woolly yarrow peek between pavers, while ornamental grasses like blue fescue create movement and texture along the journey. The overall effect is one of organic flow and environmental harmony, where every step feels grounded in nature’s wisdom.
Key Elements:
- Permeable pavers or stepping stones
- Crushed stone or pebble fill
- Water-resistant ground cover plants
- Edge plants and grasses
- Local natural stone materials
- Recycled aggregates
- Drainage layer materials
- Native pollinator-friendly plants
- Erosion control fabric
Installation begins with proper site preparation, including removing existing soil to a depth of 6-8 inches and installing a layer of landscape fabric to prevent weed growth. Create a base layer of coarse gravel for drainage, followed by a setting bed of finer crushed stone.
Space pavers or stepping stones to allow for adequate water penetration, leaving gaps for ground cover plants. Fill remaining areas with permeable materials like pea gravel or crushed granite, ensuring proper grading for water flow away from structures.
Consider the local climate and rainfall patterns when selecting materials and plants for your permeable pathway. Choose native species that can withstand foot traffic and require minimal maintenance.
In areas with heavy rainfall, incorporate additional drainage features like French drains or rain gardens along the path’s edge. For sloped terrain, create subtle terracing with natural stone to prevent erosion and maintain pathway stability.
Extra Design Tips: Adapt the pathway width to your space – narrow paths (2-3 feet) work well in small gardens, while wider paths (4-5 feet) create a more substantial presence in larger landscapes.
For challenging spaces, consider modular permeable pavers that can be easily modified to fit irregular shapes. In shaded areas, use moss-friendly materials and avoid smooth surfaces that might become slippery.
Incorporate solar-powered path lights to enhance safety and create evening ambiance while maintaining the eco-friendly theme.
Japanese-Inspired Zen Walkways
Japanese-Inspired Zen Walkways transform ordinary garden paths into meditative journeys through carefully curated spaces. Stepping stones, arranged in thoughtful patterns across raked gravel, create an intentional walking rhythm that encourages mindfulness with each step. The path weaves between carefully pruned Japanese maples, whose delicate leaves cast intricate shadows on the ground, while strategically placed moss gardens add layers of gentle green texture along the edges.
Natural elements like weathered stone lanterns and bamboo fencing frame the walkway, establishing a sense of peaceful enclosure without feeling confined. The sound of water from a simple bamboo fountain mingles with the subtle rustling of ornamental grasses, while perfectly positioned boulders serve as natural focal points. This harmonious blend of elements creates a space that feels both grounding and uplifting, offering a serene escape from daily stresses.
Key Elements:
- Stepping stones (irregular or rectangular)
- Fine gravel or crushed granite
- Bamboo fencing or screens
- Stone lanterns
- Japanese maple trees
- Moss gardens
- Ornamental grasses
- Natural boulders
- Bamboo water features
- Rakes for gravel maintenance
- Pruned evergreen shrubs
- Stone basins (tsukubai)
Implementation requires careful planning, starting with a clear layout that incorporates curved pathways rather than straight lines. Begin by establishing the path’s border using edge restraints, then lay a base of compacted crushed stone.
Position stepping stones at a comfortable walking distance, allowing approximately 24 inches between centers. Fill the surrounding areas with a 2-inch layer of fine gravel, which should be regularly raked in traditional patterns to maintain the zen aesthetic.
The placement of plants and decorative elements should follow the principle of asymmetrical balance. Install larger elements like trees and boulders first, then work outward with smaller plants and accessories. Regular maintenance includes pruning, gravel raking, and moss care to preserve the garden’s intentional appearance.
For smaller spaces or balconies, this style can be adapted by using container gardens with dwarf Japanese maples, miniature bamboo, and small water features.
Focus on creating depth through layering, using varying heights of plants and decorative elements. Consider vertical elements like bamboo screens or climbing vines to maximize limited space, and opt for lightweight materials that won’t overload structural limitations. The key is maintaining the same principles of simplicity and intentional design, regardless of scale.
Illuminated Evening Garden Trails

Transform your garden path into a magical evening retreat with softly illuminated walkways that guide visitors through your outdoor sanctuary. Solar-powered path lights cast a gentle glow on carefully placed river rocks and stepping stones, while delicate string lights twinkle overhead like a constellation of stars.
White-blooming plants like moonflowers, evening primrose, and night-blooming jasmine add ethereal beauty, their pale petals seeming to float in the darkness while releasing their enchanting fragrances into the night air.
Along these illuminated trails, silver-leaved plants such as dusty miller and lamb’s ear reflect moonlight and artificial lighting, creating subtle highlights throughout the garden. Strategic placement of copper and brass lanterns adds warmth to the pathway edges, while LED ground lights uplight ornamental grasses and small trees, creating dramatic shadows that dance in the evening breeze.
Key Elements:
- Solar-powered path lights
- LED ground spotlights
- Weather-resistant string lights
- White-blooming night plants
- Silver-foliaged plants
- Reflective stones or pebbles
- Metal lanterns
- Motion sensors
- Light-colored stepping stones
- Reflective garden ornaments
Start by mapping your pathway‘s course, ensuring it flows naturally through your garden space. Install main lighting fixtures first, beginning with permanent solutions like buried electrical lines and mounted fixtures.
Layer your lighting by combining ground-level illumination with overhead elements, spacing path lights every 4-6 feet. Include motion sensors at key points for both security and energy efficiency. Position white-blooming plants and silver-leaved specimens where they’ll catch the most light, creating focal points at path intersections and curves.
When designing illuminated evening trails for different spaces, consider vertical lighting solutions for smaller areas. Wall-mounted lights and hanging lanterns work well in confined spaces, while container gardens with built-in lighting can define paths in any setting.
For maintenance, regularly check electrical connections, clean solar panels, and trim plants to prevent them from obscuring lights. Replace bulbs proactively to maintain consistent illumination levels, and consider installing a timer system to automate your garden’s evening transformation.