
7 Garden Ideas for Outdoor Art Installations
You’ll discover endless possibilities when transforming your garden into an artistic sanctuary with carefully chosen outdoor installations. From the shimmer of metal sculptures catching sunlight to intricate mosaics that guide your footsteps, each element can tell its own unique story. Your backyard can become a gallery where nature and art blend seamlessly, creating an ever-changing display that shifts with the seasons. Let’s explore seven inspiring ways to bring creative expression into your outdoor space.
Contents
Repurposed Metal and Industrial Elements

Transform your garden into an industrial-chic sanctuary by incorporating salvaged metal pieces and repurposed industrial elements alongside carefully selected plantings.
Weathered steel beams serve as dramatic sculptural features, while old machinery parts, vintage farm equipment, and metallic artifacts create striking focal points among ornamental grasses and hardy perennials.
Rusted patinas and industrial textures contrast beautifully with soft, billowing plants like Mexican feather grass, bronze fennel, and burgundy-colored sedums.
The combination of hard-edged industrial elements with natural vegetation creates a compelling narrative of nature reclaiming human-made structures.
Copper pipes can become vertical gardens, old metal gates transform into climbing trellises, and steel drums convert into dramatic planters.
This style particularly shines when complemented by plants with metallic qualities – such as silver artemisia, blue fescue, and copper-toned carex – which echo the industrial materials while softening their stark appearance.
Key Elements:
- Salvaged metal beams or poles
- Vintage industrial machinery parts
- Metal gates or fencing sections
- Steel or copper pipes
- Industrial containers or drums
- Metallic-hued plants
- Ornamental grasses
- Hardy perennials
- Climbing vines
- Weather-resistant sealants
- Gravel or crushed stone
- LED lighting fixtures
Begin implementation by establishing a solid foundation with proper drainage using gravel or crushed stone.
Position larger industrial pieces first as anchor points, ensuring they’re properly secured and treated with rust-inhibiting sealants when necessary.
Create layers by placing medium-sized elements at varying heights, then integrate plantings in groups of three to five for visual impact.
Consider sight lines and viewing angles when positioning sculptural pieces, and ensure adequate space between elements for maintenance access.
Critical Tips:
Consider weight restrictions when designing for elevated spaces or balconies, and opt for hollow or aluminum pieces instead of solid steel when necessary.
For smaller spaces, focus on vertical installations using wall-mounted industrial elements.
Always verify that salvaged materials are free from harmful substances and sharp edges.
Incorporate proper lighting to create dramatic nighttime shadows and highlights, emphasizing the sculptural qualities of your industrial elements.
In humid climates, choose materials with appropriate rust resistance or plan for regular maintenance to prevent deterioration.
Mosaic Garden Pathways and Walls
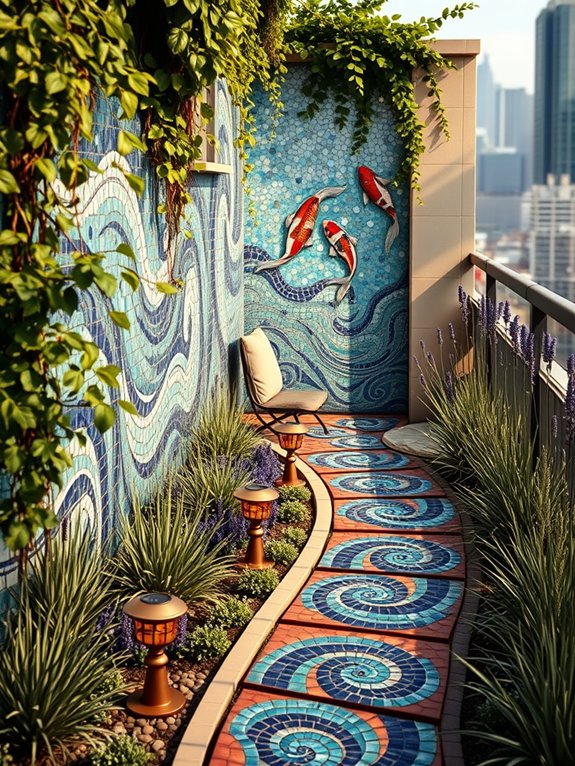
Transform your garden pathways and walls into stunning works of art with mesmerizing mosaic designs that catch sunlight and create magical patterns throughout your outdoor space. Intricate arrangements of colorful tiles, broken pottery, and glass pieces form serpentine paths that wind through beds of lavender, thyme, and other low-growing perennials.
The shimmering surfaces create a Mediterranean atmosphere, especially when complemented by trailing vines like clematis or jasmine cascading over mosaic-adorned garden walls. These artistic pathways serve as both functional walking surfaces and eye-catching focal points, drawing visitors through the garden while telling visual stories through carefully chosen patterns and colors.
The mosaic walls act as permanent outdoor galleries, featuring designs ranging from abstract geometric patterns to detailed nature scenes. When surrounded by drought-resistant plants like ornamental grasses and succulents, the hard surfaces of the mosaics create a striking contrast against the soft, organic shapes of the vegetation.
Key Elements:
- Ceramic tiles or broken pottery pieces
- Glass mosaic pieces
- Weather-resistant grout
- Concrete pathway base
- Backing board for wall installations
- Waterproof adhesive
- Edge restraints
- Decorative stones or pebbles
- Drought-tolerant border plants
- Solar-powered pathway lights
Start by creating a solid foundation with a properly graded and compacted base for pathways, or secure backing boards for wall installations. Layout your design on paper first, then transfer the pattern onto the surface using chalk lines. Apply waterproof adhesive in small sections, placing mosaic pieces according to your design, maintaining consistent spacing.
Once complete, apply weather-resistant grout between pieces, ensuring all gaps are filled to prevent water penetration and frost damage. For design success, consider light reflection patterns throughout the day, and choose colors that complement your existing garden palette. Scale patterns appropriately – larger designs work better on walls, while smaller, repeating patterns are more suitable for pathways.
In small spaces or balconies, focus on creating mosaic wall panels or small stepping stones rather than full pathways, and use lighter colors to create an illusion of more space.
Handcrafted Wind Chimes and Mobiles

Delicate melodies drift through the air as handcrafted wind chimes and mobiles dance gracefully among flowering vines and tall ornamental grasses. Copper and brass elements catch the sunlight, creating mesmerizing patterns of light that shift across garden paths while crystal elements scatter rainbow prisms throughout the space.
Japanese forest grass and bamboo provide a gentle swaying backdrop, complementing the musical movement above, while climbing jasmine and morning glories add vertical interest by winding their way up support poles that anchor larger wind sculptures.
The garden becomes a symphony of motion and sound, with carefully placed art pieces creating different zones of musical interaction. Smaller ceramic chimes cluster near intimate seating areas, while larger metallic sculptures command attention in open spaces.
Strategic placement of wind-catching plants like Mexican feather grass and switches of native grasses amplify the natural movement, making the entire garden feel alive with gentle motion and peaceful tinkling sounds.
Key Elements:
- Metal wind chimes (copper, brass, aluminum)
- Glass and crystal mobiles
- Decorative support poles or shepherd’s hooks
- Ornamental grasses (Japanese forest grass, feather grass)
- Climbing vines (jasmine, morning glory)
- Bamboo stands
- Wire or sturdy string for hanging
- Weather-resistant hooks and mounting hardware
- Decorative bells
- Wind spinners
Installation begins with establishing anchor points throughout the garden, using either permanent posts or shepherd’s hooks strategically placed to create varying heights and zones of interest.
When mounting support structures, ensure they’re deeply secured and slightly angled away from prevailing winds to prevent excessive movement. Create a layout that positions larger pieces in open areas where they can catch maximum airflow, while placing delicate chimes in more protected spots near seating areas or along garden paths.
Weather considerations play a crucial role in maintaining these musical elements. Choose materials that resist rust and degradation, and regularly check mounting hardware for security.
Consider using swivel hooks for larger pieces to prevent twisting and tangling during strong winds, and implement a system of quick-release mechanisms to easily take down heavier pieces during storms.
For smaller spaces like balconies or patios, focus on lightweight pieces and wall-mounted options that maximize vertical space. Consider using retractable hooks or adjustable hanging systems that allow for seasonal rearrangement.
Layer your wind chimes at different heights to create depth without cluttering limited space, and choose pieces with complementary tones to prevent acoustic overwhelming in confined areas. For year-round interest, incorporate LED-enhanced pieces or reflective elements that create visual interest even on still days.
Living Plant Sculptures and Topiary
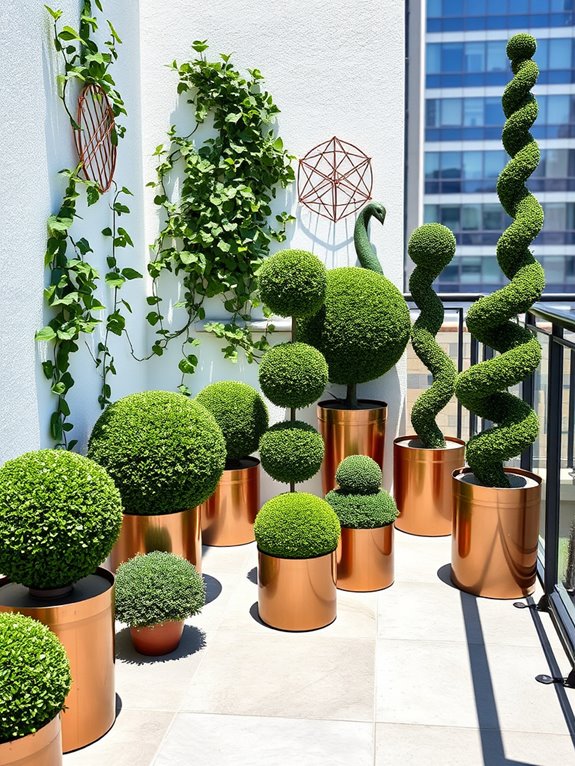
Transform your garden into a living art gallery with sculptural topiary and plant formations that blur the line between nature and artistic expression. Meticulously shaped evergreen shrubs rise from manicured lawns in geometric patterns and whimsical figures, while climbing vines cascade over wire frameworks to create three-dimensional green sculptures.
The interplay of precisely trimmed boxwood spheres, spiral junipers, and undulating hedges creates a sophisticated rhythm throughout the space, offering year-round visual interest and architectural drama. This botanical art form combines classical garden design with contemporary sculptural elements, where living plants become both the medium and the masterpiece.
Whether featuring traditional animal shapes, abstract modern forms, or architectural elements, living plant sculptures transform ordinary garden spaces into extraordinary outdoor galleries. The careful positioning of each topiary piece creates sight lines and focal points, while negative space between sculptures allows the eye to rest and appreciate each artistic element.
Key Elements:
- Evergreen shrubs (boxwood, yew, privet)
- Wire frames and support structures
- Pruning and shaping tools
- Garden pathways
- Accent lighting
- Geometric patterns
- Living walls or screens
- Mixed height platforms
- Sculptural forms
- Training wires and ties
Begin implementation by selecting slow-growing evergreen plants suitable for your climate and installing them in well-draining soil enriched with organic matter. Position wire frames or support structures to guide plant growth into desired shapes, ensuring adequate spacing between sculptures for maintenance access and visual impact.
Create a maintenance schedule for regular trimming, starting with basic shapes and gradually developing more complex forms as plants mature. Install proper irrigation systems to maintain consistent moisture levels, crucial for healthy topiary development.
Design adaptations can accommodate any space, from expansive gardens to intimate balconies. For smaller areas, focus on vertical elements and container-based topiary, using dwarf varieties and wall-mounted installations.
Consider incorporating mirrors to create the illusion of larger space and multiple viewing angles, and integrate LED lighting to highlight sculptural elements after dark. When selecting shapes and sizes, remember that simpler designs require less maintenance and are more suitable for beginners, while complex formations should be reserved for more experienced gardeners or professional maintenance.
Glass Art Installations and Sun Catchers
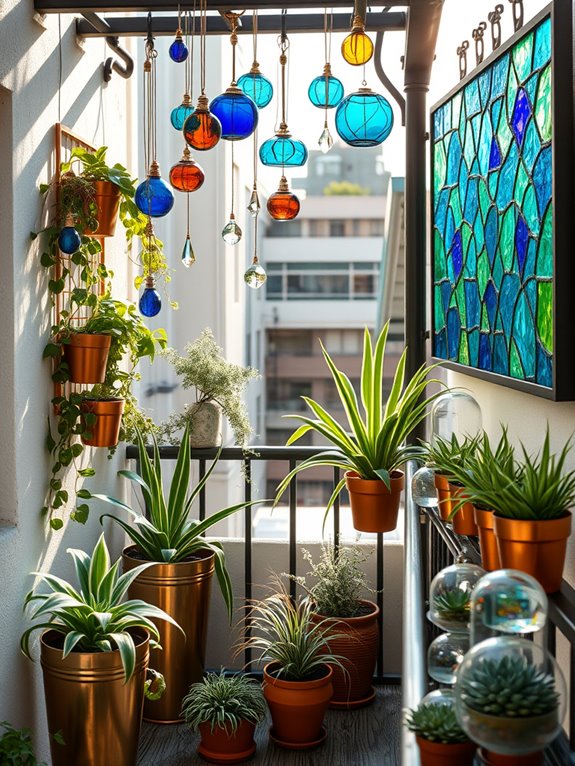
Transform your garden into a mesmerizing display of light and color with strategically placed glass art installations and sun catchers. Imagine delicate blown glass spheres suspended among flowering vines, creating rainbow-like patterns across garden paths as sunlight streams through them. Colored glass panels mounted on copper poles rise from beds of silver-leafed plants like Artemisia and Dusty Miller, while crystalline structures catch and fragment light into dancing patterns across garden walls and ground covers.
The combination of glass art with carefully selected plantings creates a dynamic space that changes throughout the day as the sun moves across the sky. Morning light catches dew-covered glass flowers nestled among real blooms, while afternoon sun transforms hanging prisms into spectacular light shows. Plants with translucent or variegated leaves, such as Japanese Forest Grass and Ghost Fern, complement the ethereal quality of the glass elements, creating a cohesive artistic statement.
Key Elements:
- Blown glass spheres and orbs
- Stained glass panels
- Crystal prisms and sun catchers
- Mirror balls
- Glass flowers and stakes
- Copper or metal mounting poles
- Wire hanging systems
- Light-reflecting plants
- Silver or variegated foliage
- Clear path spaces
Begin implementation by mapping sun patterns throughout your garden to identify optimal placement for glass elements. Install sturdy mounting systems, ensuring they’re anchored securely and at varying heights to create visual interest. Position larger glass pieces as focal points, then arrange smaller elements in clusters or flowing patterns.
Incorporate plants that enhance light play, placing reflective foliage near glass installations to maximize the artistic effect. Consider durability when selecting glass pieces, choosing weather-resistant materials and secure mounting methods. Clean glass elements regularly to maintain their brilliance, and check mounting systems seasonally for stability. Prune surrounding plants to prevent overcrowding and ensure adequate light reaches the glass elements.
For smaller spaces or balconies, focus on vertical installations using wall-mounted glass panels or hanging elements. Window-box plantings can incorporate miniature glass stakes, while rail-mounted sun catchers maximize limited space. Consider using lightweight acrylic alternatives for upper-story installations where weight restrictions apply, and position pieces to avoid creating hazardous light reflections for neighbors or passing traffic.
Natural Stone Stacking and Rock Art
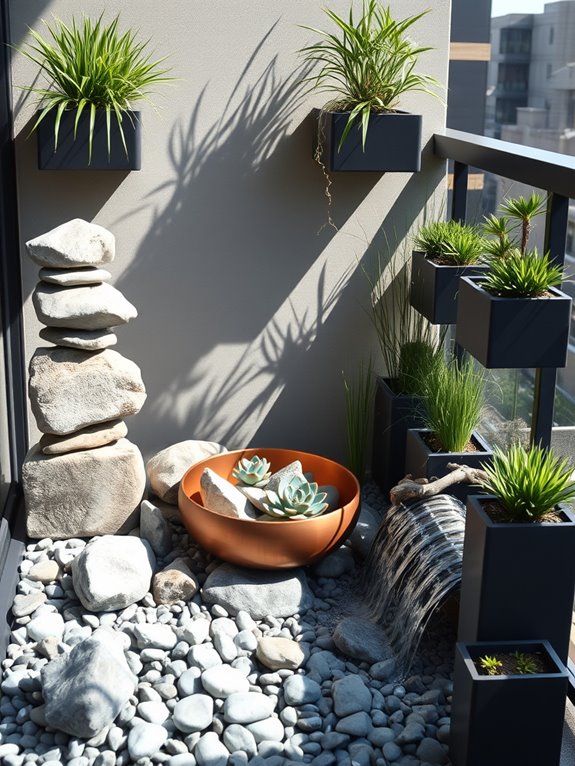
Natural stone stacking and rock art transforms an ordinary garden into a mesmerizing sculptural landscape where ancient meets modern. Carefully balanced stones rise from beds of flowing ornamental grasses, creating dramatic vertical elements that draw the eye upward while grounding the space in earthen simplicity.
Japanese forest grass, blue fescue, and flowing fountain grass provide dynamic movement around the base of stone installations, while creeping thyme and moss slowly claim the lower rocks, softening their edges with organic texture.
The interplay of light and shadow throughout the day brings these stone sculptures to life, casting ever-changing patterns across their surfaces and highlighting their natural striations and colors. Strategic placement of flat river rocks creates meandering pathways between the installations, while smaller rock gardens feature collections of uniquely shaped stones nestled among drought-tolerant succulents and alpine plants, offering intimate vignettes for contemplation.
Key Elements:
- Variety of natural stones (different sizes, shapes, colors)
- Ornamental grasses
- Ground cover plants (moss, thyme, sedum)
- Succulents and alpine plants
- River rocks for pathways
- LED landscape lighting
- Sand or gravel base
- Drainage materials
- Garden tools for stone placement
- Safety equipment
Begin implementation by preparing the site with proper drainage, laying a foundation of gravel or sand where major stone installations will stand. Select stones with naturally flat surfaces for stacking, starting with the largest pieces as bases and gradually working upward with progressively smaller stones.
Create stable connections between stones by finding their natural contact points and ensuring each piece sits securely before adding the next layer. Integrate plants around the bases of stone installations after completing the structural elements, being mindful of root space and water requirements.
Important considerations include weight distribution, seasonal weather impacts, and safety precautions. For balcony gardens, focus on smaller stone arrangements in lightweight containers, using materials like pumice or hollow artificial rocks.
Consider wind exposure at higher elevations, and ensure all installations comply with building weight restrictions. Create micro-installations using miniature rock gardens in shallow containers for small spaces, or opt for wall-mounted stone art pieces that provide vertical interest without consuming floor space.
DIY Garden Mirror Displays
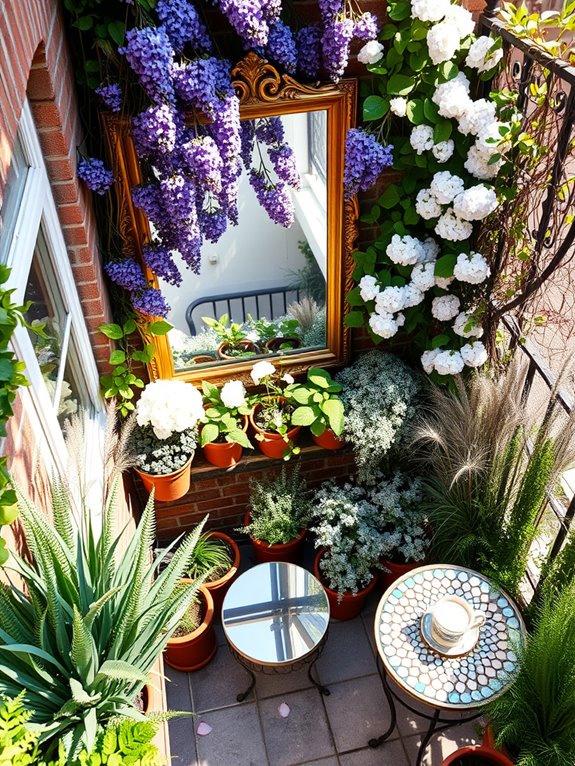
Transform your garden into a captivating wonderland with strategically placed mirrors that create illusions of endless space and dancing light. Vintage window frames repurposed as mirrors peek through climbing jasmine and morning glories, while circular mirrors nestled among ferns and hostas reflect delicate shadows and glimpses of the sky above. The interplay between reflective surfaces and natural elements creates an enchanting depth that makes even the smallest garden appear expansive and mysterious.
Weather-resistant mirrors mounted on rustic trellises or garden walls bounce sunlight into shaded corners, illuminating dark spots and highlighting architectural features of your outdoor space. Surrounded by ornamental grasses, white flowering plants like astilbe and hydrangeas amplify the ethereal quality of the reflected light, especially during dawn and dusk. The strategic placement of mirrors creates unexpected views and vantage points, turning every angle of your garden into an artistic composition.
Essential Elements:
- Weather-resistant outdoor mirrors in various shapes and sizes
- Vintage window frames or decorative mirror frames
- Mounting hardware and weather-resistant adhesives
- Climbing vines and trailing plants
- Light-colored flowering plants
- Ornamental grasses
- Trellises or sturdy garden walls
- Solar-powered garden lights
- Natural stone or gravel pathways
Begin installation by carefully planning mirror placement, ensuring reflections create depth without causing glare or confusion for birds. Mount larger mirrors at eye level on stable surfaces, using proper outdoor mounting hardware. Position smaller mirrors at varying heights and angles, partially obscured by plants to create subtle glimpses rather than obvious reflections. Ensure all mirrors are securely fastened and sealed against moisture, using silicon caulk around edges where necessary.
Adaptation Tips: For small spaces or balconies, use lightweight acrylic mirrors and create vertical installations with hanging mirrors and climbing plants. Consider using mirrored mosaic tiles for a more delicate effect, or implement folding mirror panels that can be adjusted throughout the day to maximize light reflection. Always position mirrors to reflect interesting garden features rather than blank walls or fences, and regularly clean surfaces to maintain their reflective properties and prevent water damage.