
10 Garden Ideas for Maximizing Sun
You’ll discover that maximizing sunlight in your garden isn’t just about placing plants randomly in bright spots. It’s a thoughtful process that combines strategic layout planning, clever use of materials, and smart plant selection to create a thriving garden space. Whether you’re working with a small urban plot or a sprawling backyard, these ten proven techniques will help you harness the sun’s energy and transform even the shadiest corners into productive growing areas.
Contents
- 1 Strategic Plant Height Placement
- 2 Creating Garden Zones by Sun Exposure
- 3 Using Reflective Materials and Surfaces
- 4 Vertical Gardening for Better Light Capture
- 5 Pruning Trees and Shrubs for Light Management
- 6 Installing Mirrors and Light-Directing Features
- 7 Choosing Sun-Loving Plant Varieties
- 8 Mobile Container Gardens for Sun Tracking
- 9 Designing Terraced Garden Layouts
- 10 Optimizing Wall and Fence Colors
Strategic Plant Height Placement

Towering sunflowers stand like natural sentinels at the northern border of the garden, their golden faces tracking the sun throughout the day while creating a majestic backdrop for shorter plants. Before them, layers of vegetation cascade downward in a carefully orchestrated display – mid-height cosmos and zinnias paint the middle ground with vibrant colors, while compact marigolds and trailing nasturtiums carpet the southern edge, ensuring every plant receives its share of life-giving sunlight.
The garden unfolds like an amphitheater facing the sun, with each plant playing its role in this vertical symphony. Ornamental grasses of varying heights add texture and movement, while climbing vines on trellises create living walls that don’t overshadow their neighbors. The strategic placement transforms the space into a living sundial, where shadows dance across the layers without depriving any plant of essential light.
Key Elements:
- Tall background plants (6+ feet): sunflowers, hollyhocks, tall dahlias
- Medium-height plants (3-5 feet): cosmos, zinnias, salvias
- Low-growing plants (1-2 feet): marigolds, verbena, compact herbs
- Ground covers: creeping thyme, sedums, nasturtiums
- Support structures: trellises, stakes, plant supports
- Mulch and soil amendments
- Garden planning grid or diagram
- Sun tracking compass
Creating an effective height-graduated garden requires careful planning and precise placement. Begin by mapping the sun’s path across your garden space throughout the day, noting any existing shadows from structures or trees.
Position the tallest plants along the northern border, ensuring they won’t cast shadows on shorter plants. Work southward, gradually decreasing plant heights like steps leading down to the garden’s edge. Install support structures for tall plants early in the season, before they’re needed, to avoid disturbing established root systems.
Maintain the designed structure through regular pruning and plant management, removing any volunteers that might disrupt the carefully planned heights. Consider the mature size of plants when spacing them, allowing room for each to reach full size without overcrowding its neighbors.
Group plants with similar water and nutrient needs together to simplify maintenance while maintaining the height progression.
For adaptable design, consider container gardening with portable planters that can be rearranged as needed. In smaller spaces or balconies, use vertical gardening techniques with wall-mounted planters or tiered stands, maintaining the height gradient principle but in a more compact form.
Remember that plants closer to walls or structures may need more frequent watering due to heat reflection, and consider using dwarf varieties of traditionally tall plants to maintain the layered effect in limited spaces.
Creating Garden Zones by Sun Exposure
A thoughtfully zoned garden that follows the sun’s daily journey creates a magical progression of spaces, each uniquely suited to different plants and purposes. Morning sun zones burst with delicate blooms like cosmos and morning glories climbing decorative trellises, while herbs like lavender and thyme release their aromatic oils in the warming light.
The dappled shade areas feature hostas and ferns creating cool, peaceful retreats, complemented by curved stone pathways that lead visitors through the changing light patterns.
The full-sun afternoon zones showcase dramatic displays of sun-loving perennials such as black-eyed susans, salvias, and coneflowers, their vibrant colors intensified by the strong light. Strategic placement of pergolas and decorative screens creates intentional shade pockets, allowing for versatile plant combinations while providing comfortable seating areas for outdoor enjoyment throughout the day.
Key Elements:
- Plant markers or mapping system
- Varied height trellises and supports
- Mixed hardscape materials
- Sun-tracking tools or apps
- Shade-creating structures
- Irrigation zones
- Plant varieties for each light condition
- Seating areas for different times of day
- Soil amendments specific to each zone
- Path lighting systems
Begin by mapping your garden’s sun patterns throughout the day and across seasons, marking out distinct zones for full sun (6+ hours), partial sun (4-6 hours), and shade (less than 4 hours).
Install necessary hardscape elements first, such as pathways and retaining walls, ensuring they complement your light zones rather than creating unwanted shadows. Group plants with similar light requirements together, placing taller specimens toward the back of each zone and graduating down to shorter plants in front, always considering mature plant sizes in your planning.
When selecting plants, choose varieties that will thrive in each specific light condition, and prepare the soil accordingly. Full-sun areas typically need more organic matter and moisture retention, while shade zones may require soil amendment for better drainage.
Install irrigation systems that can be customized for each zone’s unique requirements. Consider seasonal changes when designing your zones, as deciduous trees will create different shade patterns throughout the year. Incorporate flexible spaces that can adapt to shifting light patterns, and use container gardens that can be moved as needed.
For smaller spaces like balconies, use vertical gardening techniques and reflective surfaces to maximize available light, and consider using lightweight, moveable planters that can follow the sun’s path throughout the day.
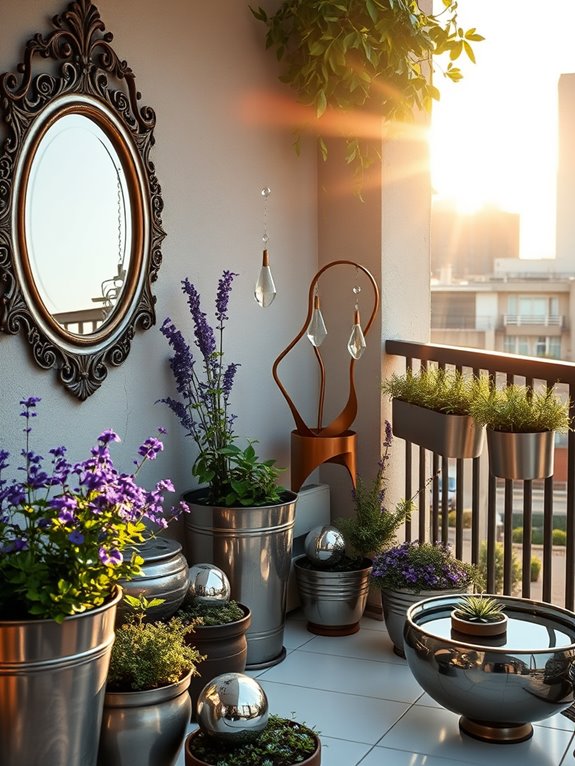
Using Reflective Materials and Surfaces
Imagine stepping into a garden where light dances and multiplies, creating an enchanting display of sparkle and shine throughout the space. Mirrored gazing balls nestled among silver-leafed plants like Artemisia and Dusty Miller catch and scatter sunlight in all directions, while metallic wind spinners twist gently overhead, sending shimmering reflections across the garden bed.
White pebble pathways and light-colored pavers bounce sunlight upward, illuminating the undersides of leaves and creating a magical interplay of light and shadow. Strategically placed mirrors, whether mounted on walls or cleverly disguised among climbing vines, create the illusion of depth while doubling the apparent sunlight in darker corners. Polished steel sculptures and chrome garden furniture add modern sophistication while serving as functional light reflectors.
The overall effect transforms an ordinary garden into a luminous sanctuary where even shade-loving plants thrive in redirected sunlight.
Key Elements:
- Mirrored gazing balls
- Silver-leafed plants
- White or light-colored gravel
- Reflective pavers
- Garden mirrors
- Metallic wind sculptures
- Chrome or stainless steel furniture
- Polished decorative elements
- Light-colored walls or fencing
- Glass or crystal decorative pieces
Begin implementation by mapping sun patterns in your garden and identifying areas that need more light. Install large mirrors on walls or fences at angles that redirect sunlight into shadowy spots, ensuring they’re securely mounted and weather-resistant.
Create pathways using light-colored materials, positioning them to maximize light reflection toward plant beds. Place metallic and reflective decorative elements at varying heights throughout the garden, considering both their aesthetic appeal and their light-reflecting properties.
Position silver-foliaged plants where they’ll catch the most light, creating striking contrasts with darker greenery. Remember that reflective surfaces can generate heat, so maintain appropriate spacing between reflective elements and sensitive plants. Regular cleaning of reflective surfaces ensures optimal light reflection and maintains the garden’s sparkling appearance.
For adapting this style to different spaces, smaller gardens or balconies can utilize vertical mirrors and compact reflective elements like miniature gazing balls or metallic planters. Consider using lightweight, removable reflective elements in rental properties or temporary gardens.
In intense summer climates, incorporate adjustable or removable reflective elements to prevent overheating during peak seasons. For north-facing gardens, focus reflective elements on the southern edge to maximize light capture and distribution.
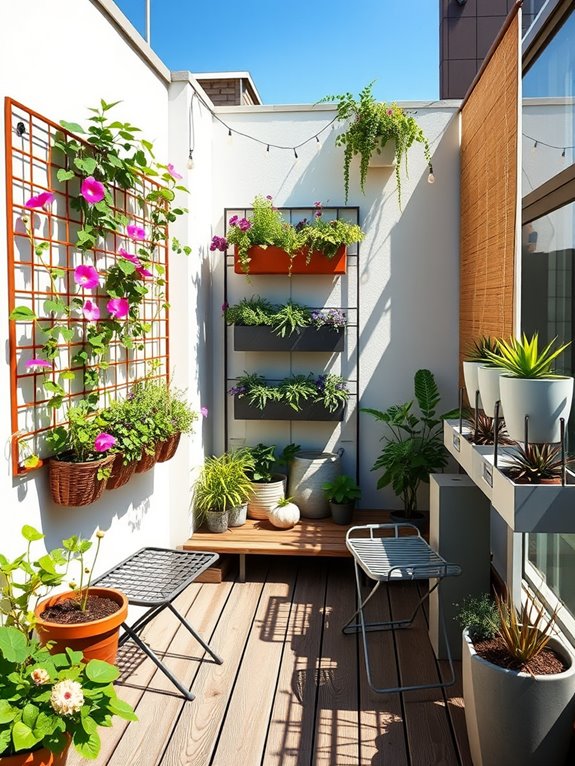
Vertical Gardening for Better Light Capture
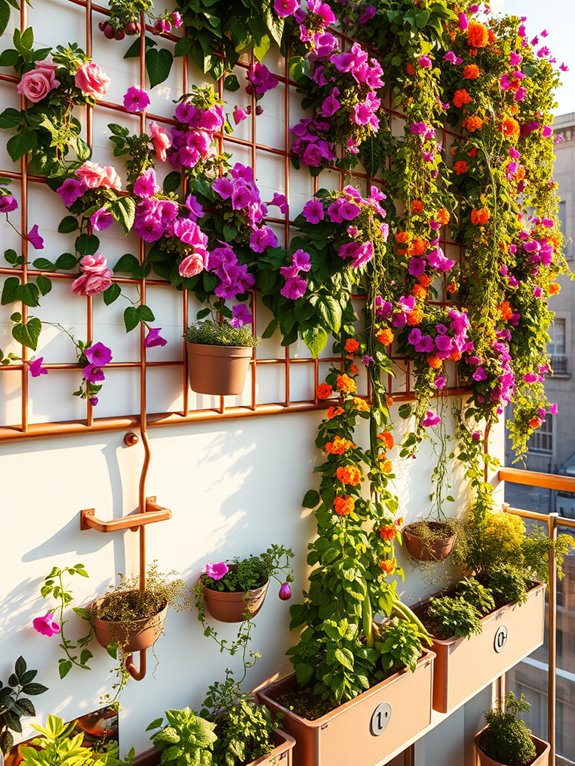
Transform your outdoor space into a living tapestry of cascading greenery and blooms with a vertical garden designed to capture maximum sunlight. Climbing roses in deep crimson and soft pink weave through copper-toned trellises, while hanging baskets overflow with vibrant petunias, trailing lobelia, and sun-loving nasturtiums.
The vertical layers create a stunning visual effect, drawing the eye upward through a carefully orchestrated display of color and texture. The garden becomes a dynamic space where morning glories open their azure faces to greet the day, while jasmine releases its sweet perfume in the evening hours.
Geometric patterns formed by climbing supports add architectural interest, while strategically placed mirrors amplify available light and create the illusion of expanded space. The vertical arrangement allows sun-loving vegetables like cherry tomatoes and pole beans to thrive alongside ornamental plants, creating a productive yet aesthetically pleasing environment.
Essential Elements:
- Sturdy wall-mounted trellises or grid systems
- Hanging planters of varying depths
- Climbing plant supports and tension wires
- Soil moisture meters
- Drip irrigation system
- Light-reflecting mirrors or metallic surfaces
- Weather-resistant planting pockets
- Plant ties and soft garden twine
- Multi-level mounting brackets
- Growth medium suitable for vertical systems
Begin implementation by assessing your wall’s sun exposure and structural integrity. Install the main support system using heavy-duty anchors, ensuring each component can bear the weight of mature plants and saturated soil.
Create planting zones based on light requirements, positioning sun-loving species at the top and shade-tolerant varieties lower down. Install an automated irrigation system with multiple delivery points to ensure consistent moisture throughout the vertical space.
Strategic plant placement is crucial for long-term success. Train climbing plants along their supports early, using soft ties to guide growth in desired directions. Monitor soil moisture carefully, as vertical gardens can dry out more quickly than traditional beds.
Regular pruning maintains the desired shape and prevents overcrowding, while periodic fertilization through the irrigation system supports continuous growth.
For smaller balconies, consider modular systems that can be expanded gradually, and focus on compact varieties of plants. Incorporate fold-down or removable components for seasonal flexibility, and use lightweight growing media to reduce structural load.
Success in vertical gardening often depends on thorough planning of the support system and careful consideration of micro-climates created by surrounding buildings or structures – factors that become especially important in limited spaces.
Pruning Trees and Shrubs for Light Management
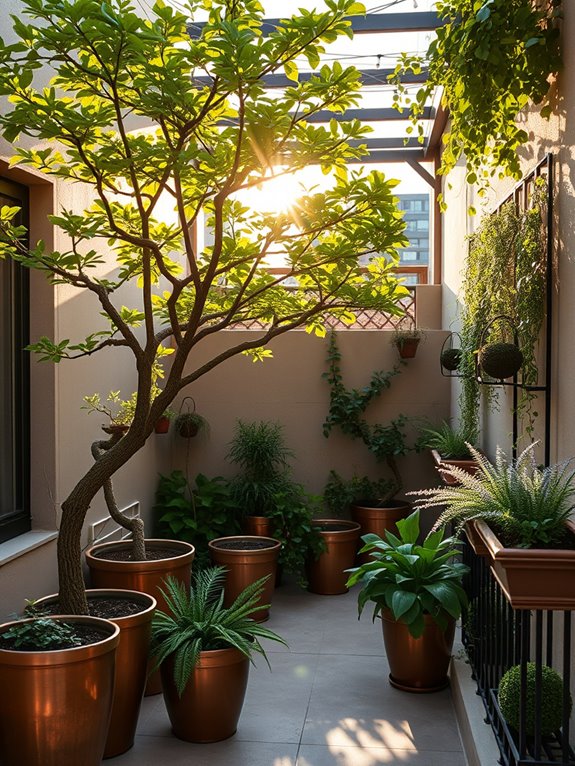
A well-pruned garden space transforms sunlight into a dynamic artistic medium, creating an ever-changing dance of light and shadow throughout the day. Strategic pruning opens windows to the sky, allowing golden rays to filter through carefully shaped branches and illuminate understory plants.
Japanese maples, carefully trimmed dogwoods, and sculptural evergreens form living architecture that frames both the sky above and the garden below, while allowing essential sunlight to reach every corner of the space.
The interplay between pruned vegetation and sunlight creates distinct garden rooms and pathways defined by light rather than walls. Climbing roses trained on arches cast delicate shadow patterns, while pollarded trees provide high canopies that allow maximum light penetration during growing seasons.
This thoughtful management of woody plants transforms the garden into a light-filled sanctuary where sun-loving perennials thrive alongside shade-tolerant specimens.
Key Elements:
- Pruning tools (hand pruners, loppers, pole saw)
- Deciduous trees with open growth habits
- Columnar or vase-shaped shrubs
- Climbing plants and support structures
- Multi-stemmed specimens for selective thinning
- Path lighting to complement natural light
- Reflective surfaces or mirrors
- Light-colored mulch or gravel
To implement effective light management through pruning, begin by assessing the sun’s path across your garden throughout the year. Remove crossing branches and thin dense canopies to create dappled shade rather than heavy shadow.
Focus on maintaining natural plant shapes while opening up light corridors that allow sun to reach lower-growing plants. Establish a regular pruning schedule that anticipates seasonal growth patterns and maintains desired light levels.
When selecting plants and determining pruning strategies, consider the balance between summer shade and winter light penetration. For smaller spaces like balconies, choose dwarf varieties and espalier fruit trees against walls.
Container gardens benefit from regular pruning of woody plants to maintain scale and prevent overshadowing of neighboring plants. Incorporate flexible screening options, such as deciduous vines on pergolas, that can be adjusted seasonally to optimize light levels according to changing needs.
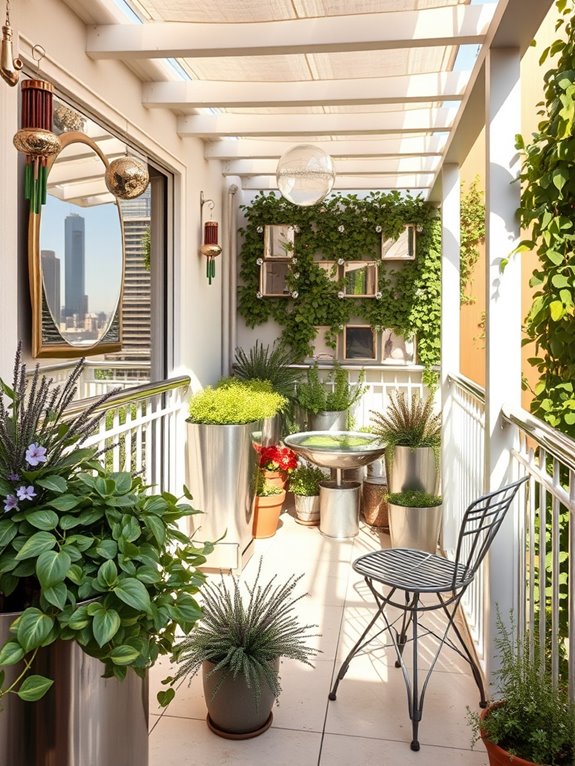
Installing Mirrors and Light-Directing Features
Transform your garden into a dazzling oasis where strategically placed mirrors and reflective surfaces create an enchanting play of light throughout the day. Polished metal sculptures catch morning rays, while decorative mirrors nestled among climbing jasmine and morning glories multiply the visual impact of your blooming beauties.
The clever positioning of these elements can make small spaces appear more expansive, creating magical moments as sunbeams dance across your garden’s surface. Mirrored trellises and metallic wind chimes add both visual and auditory dimensions to the space, while reflective gazing balls placed among low-growing sedums and creeping thyme create mysterious depths and unexpected light pools.
Glass mosaic tiles integrated into garden walls or pathways scatter rainbow prisms across neighboring plants, enhancing the natural beauty of silver-leaved plants like artemisia and dusty miller.
Key Elements:
- Outdoor-rated mirrors in various sizes
- Metallic wind sculptures
- Reflective gazing balls
- Glass mosaic tiles
- Polished metal planters
- Mirror-finished trellises
- Light-colored paving stones
- Metallic wind chimes
- Reflective water features
- Chrome or stainless steel garden furniture
Begin implementation by conducting a sun study of your space, noting where light naturally falls throughout the day. Position larger mirrors on walls or fences facing north to reflect southern light without creating hot spots.
Install mirrored surfaces at slight angles to direct light toward shaded areas and ensure reflected beams won’t disturb neighbors. Create layers of reflection by placing smaller decorative mirrors at varying heights among plants, and incorporate reflective water features to add movement to the captured light.
When designing with mirrors and reflective elements, safety comes first. Use shatterproof materials rated for outdoor use, and ensure all installations are properly secured against wind. Scale your elements to your space – balconies might utilize miniature mirrors and metallic containers, while larger gardens can accommodate full-length mirror panels and substantial reflective sculptures.
Consider incorporating light-colored or metallic plants like silver sage and Japanese forest grass to enhance the luminous effect naturally, and remember to clean reflective surfaces regularly to maintain their impact.
Choosing Sun-Loving Plant Varieties
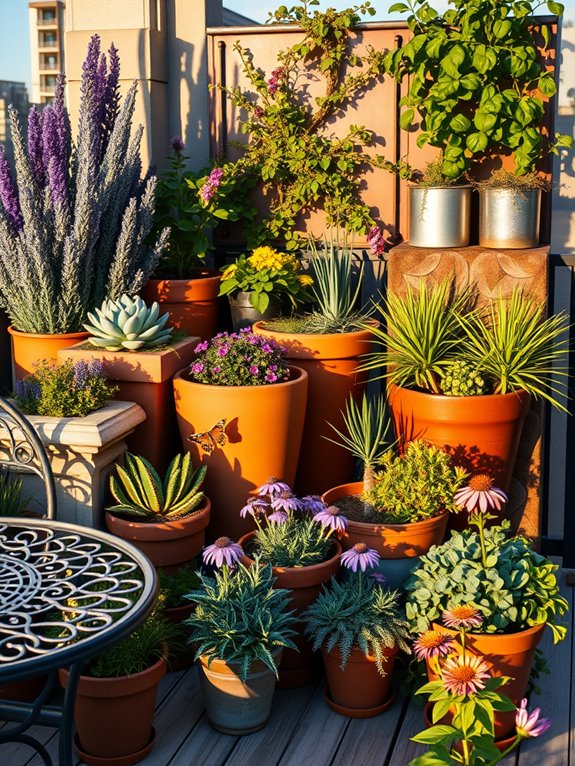
Vibrant pops of yellow coneflowers sway alongside towering purple salvias, while clusters of lavender stand sentinel in this sun-drenched garden paradise. The carefully selected sun-loving perennials create a stunning tapestry of colors that thrive in full sunshine, transforming any outdoor space into a celebration of light and warmth.
Russian sage adds an ethereal purple haze to the backdrop, while drought-resistant sedums provide groundcover in varying shades of green and burgundy. The garden pulses with life as butterflies and bees dance from bloom to bloom, drawn to the nectar-rich flowers that flourish in bright conditions.
Black-eyed Susans create bold splashes of gold, complemented by the silvery foliage of lamb’s ear and the architectural presence of ornamental grasses. This thoughtful combination of plants creates a dynamic, low-maintenance space that peaks in beauty during the hottest months of the year.
Key Elements:
- Drought-resistant perennials (coneflowers, salvias, lavender)
- Ornamental grasses (maiden grass, blue fescue)
- Heat-tolerant groundcovers (sedums, creeping thyme)
- Butterfly-attracting plants (butterfly weed, yarrow)
- Hardy herbs (rosemary, sage)
- Mulch or gravel for moisture retention
- Irrigation system or soaker hoses
- South or west-facing location
- Well-draining soil mix
Begin implementation by analyzing your space‘s sun exposure patterns and preparing the soil with organic matter and drainage improvements. Group plants according to their height, with taller specimens like ornamental grasses and Russian sage toward the back or center, medium-height plants like salvias and coneflowers in the middle zone, and ground covers along the edges.
Space plants considering their mature size, allowing room for growth while maintaining a full appearance. Ensure proper irrigation during the establishment phase, typically the first growing season. While these plants are drought-tolerant once established, consistent watering helps develop strong root systems.
Apply a 2-3 inch layer of mulch around plants to retain moisture and suppress weeds, keeping it away from plant stems to prevent rot.
Design Adaptations: For smaller spaces or balconies, focus on container-friendly varieties like compact lavender, dwarf salvias, and trailing sedums. Use reflective surfaces like light-colored walls or mirrors to maximize available sunlight, and consider vertical growing options such as wall-mounted planters or trellises for climbing varieties.
Choose containers with excellent drainage and light-colored materials to prevent root overheating, and group pots together to create humidity pockets that benefit the plants while maintaining their sun-loving nature.
Mobile Container Gardens for Sun Tracking
A mobile container garden that follows the sun transforms an ordinary patio or deck into a dynamic living space that evolves throughout the day. Sleek wheeled planters filled with vibrant sun-loving flowers like petunias, marigolds, and zinnias create ribbons of color that can be repositioned as sunlight shifts across your outdoor space.
Cascading vines spill over contemporary metal containers, while tall ornamental grasses sway gently, casting intricate shadow patterns on nearby surfaces.
The flexibility of this garden style allows for creative expression through both plant selection and container arrangement. Mediterranean herbs like rosemary, sage, and lavender thrive in portable terra cotta pots, releasing their aromatic essences when brushed against during garden adjustments.
Strategic placement of different-sized containers creates visual interest through varying heights, while lightweight materials ensure easy mobility to chase optimal growing conditions.
Key Elements:
- Wheeled planters or containers with sturdy casters
- Lightweight potting mix
- Sun-loving annual flowers
- Mediterranean herbs
- Ornamental grasses
- Trailing vines
- Water-efficient container irrigation system
- Plant dollies or furniture sliders
- Weather-resistant container materials
- Moisture meters
Implementation begins with selecting containers that complement your space while remaining practical for movement. Choose planters with reliable drainage and attach quality casters rated for outdoor use and appropriate weight capacity.
Group plants with similar water needs together, and incorporate a mix of heights and textures within each container for visual appeal. Position taller plants toward the center or back of containers to maintain stability during movement.
The key to success lies in understanding your space’s daily sun patterns and creating designated “parking spots” for different times of day.
Monitor sun exposure for several days before determining optimal container positions and movement schedules. Install simple markers or use existing landscape features to remember ideal placement spots for morning, afternoon, and evening sun positions.
For adaptation to different spaces, consider vertical options like stackable planters on rolling bases for small balconies, or create modular arrangements that can be separated or combined as needed.
Install automatic drip irrigation systems with flexible tubing to maintain consistent moisture levels despite container movement. In windy locations, use broader, lower containers for stability, and consider installing temporary anchor points for securing containers during severe weather while maintaining mobility for regular sun tracking.
Designing Terraced Garden Layouts
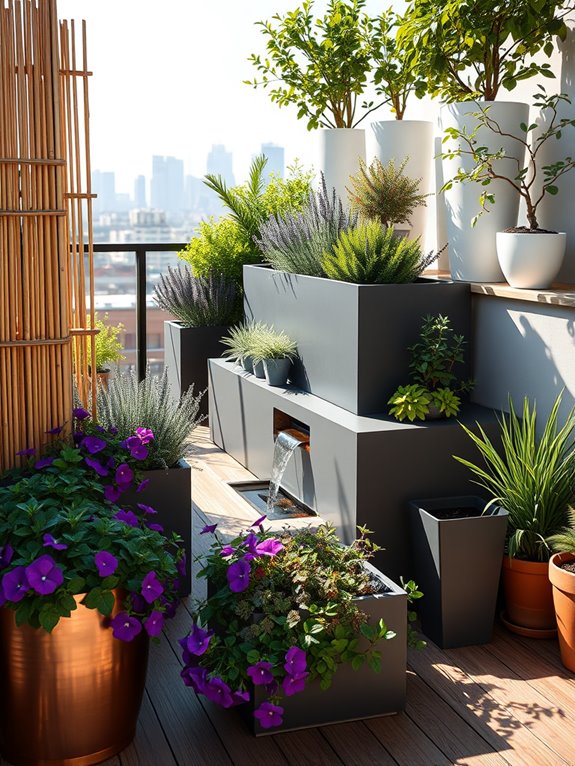
A terraced garden layout transforms an ordinary sloping space into a magnificent cascade of greenery and blooms that chase the sun throughout the day. Stone or wooden retaining walls create distinct levels that step down gracefully, each tier offering a perfect platform for different plant varieties and garden features. Mediterranean herbs like lavender and rosemary spill over the edges of upper terraces, while compact fruit trees and flowering perennials occupy the middle levels, creating a rhythmic visual journey from top to bottom.
The architectural elements of terraced gardens provide natural focal points, with stairs and pathways weaving between levels to create an engaging exploration of the space. Each terrace becomes its own microclimate, with heat-loving vegetables thriving on south-facing upper tiers while shade-tolerant ferns and hostas flourish in the cooler lower levels. Water features can cascade between levels, adding both sound and movement while helping to manage rainfall distribution throughout the garden.
Essential Elements:
- Retaining walls (stone, timber, or concrete)
- Multi-level planting beds
- Irrigation system for each level
- Steps or pathway system
- Soil retention materials
- Drainage solutions
- Support structures for climbing plants
- Level-appropriate plant selections
- Edge protection
- Maintenance access points
Creating a terraced garden begins with careful measurement and planning of the slope’s grade. Each terrace should be level, with retaining walls typically ranging from 2-4 feet in height. Start construction from the bottom up, ensuring proper drainage behind each wall and incorporating a slight backward tilt (about 1 inch per foot of height) for stability.
Space terraces far enough apart to allow comfortable maintenance access and install irrigation systems during the initial construction phase.
When designing plant placement, consider the natural light patterns across your terraces throughout the day. Position taller plants at the back of each terrace to prevent shadowing of lower levels, and incorporate trailing plants near the edges to soften wall faces.
Install root barriers where necessary to prevent aggressive plants from compromising wall stability, and ensure each level has adequate soil depth for its intended plantings.
For smaller spaces or balconies, terraced gardens can be adapted using container systems or vertical structures. Consider using tiered planters, hanging baskets at different heights, or wall-mounted containers to create the same stepped effect.
Ensure weight limitations are considered for balcony installations, and opt for lightweight growing mediums when necessary. Incorporate self-watering systems and choose compact plant varieties that suit your specific space constraints while maintaining the dramatic visual impact of a traditional terraced garden.
Optimizing Wall and Fence Colors
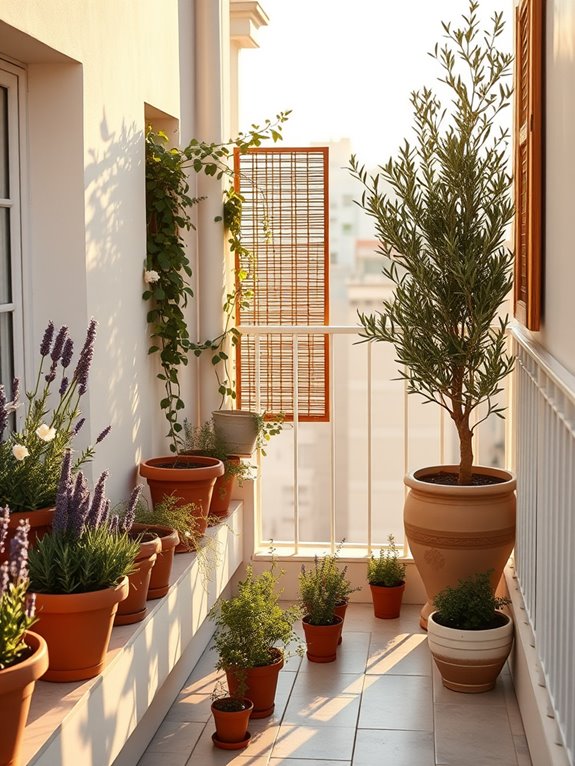
A sun-drenched garden transforms into a radiant oasis when walls and fences are thoughtfully painted in light-reflecting hues. Crisp white walls create a Mediterranean ambiance, bouncing sunlight onto heat-loving plants like lavender, rosemary, and climbing jasmine. The luminous backdrop makes purple and blue blooms pop while highlighting the silvery foliage of ornamental grasses and sage, creating a dynamic interplay of light and shadow throughout the day.
Golden cream fences paired with terra cotta pots evoke a warm, welcoming atmosphere that amplifies natural light into shaded corners. This strategic use of color extends the growing season for sun-loving vegetables and flowers, while providing a perfect backdrop for espaliered fruit trees and trailing vines. The reflected light creates a gentle glow that enhances both the plants’ growth and the garden’s visual appeal.
Key Elements:
- Light-colored exterior paint (white, cream, pale yellow)
- Weather-resistant paint suitable for outdoor use
- Paint rollers and brushes
- Pressure washer or cleaning supplies
- Primer
- Protective sealant
- Basic painting tools and supplies
- Surface repair materials
The transformation begins with thorough surface preparation, including cleaning, repairs, and priming. Choose high-quality exterior paint in light, reflective colors, applying two coats for durability and optimal light reflection.
Position plants that require maximum sunlight against the brightest walls, creating graduated layers of vegetation that take advantage of the reflected light. Consider the sun’s path throughout the day when selecting wall colors, using warmer tones for north-facing walls and cooler whites for south-facing surfaces.
Success with wall and fence color optimization depends on regular maintenance and strategic plant placement. Keep walls clean to maintain their reflective properties, touch up paint as needed, and monitor plant growth patterns as they respond to the enhanced light conditions.
Adjust plant positioning seasonally to maximize the benefits of reflected sunlight, especially during shorter winter days. When adapting this concept to different spaces, consider the scale and proportion of painted surfaces.
Small balconies benefit from all-white walls to maximize light reflection, while larger gardens can incorporate subtle color variations to create distinct garden rooms. Use lighter colors at the top of walls and slightly warmer tones at the base to create depth.
In humid climates, choose paints with mold-resistant properties, and in exposed areas, ensure the paint system can withstand intense UV exposure without frequent repainting.