
8 Garden Ideas for Low-Light Conditions
If you’re dealing with a shady yard, you don’t have to give up on creating a vibrant garden space. Your low-light area can transform into a peaceful retreat with the right combination of shade-loving plants, strategic lighting, and thoughtful design elements. From lush hostas and delicate ferns to glowing solar lanterns and reflective surfaces, you’ll discover that dim corners offer unique opportunities for creativity. Let’s explore how to turn those challenging shady spots into your garden’s most enchanting features.
Contents
- 1 Choose Shade-Loving Plants and Flowers
- 2 Install Strategic Lighting Solutions
- 3 Create Reflective Surfaces and Pathways
- 4 Design a Layered Vertical Garden
- 5 Incorporate Water Features and Mirrors
- 6 Maximize Light With Smart Plant Placement
- 7 Add Bright Containers and Garden Accessories
- 8 Cultivate a Woodland Garden Theme
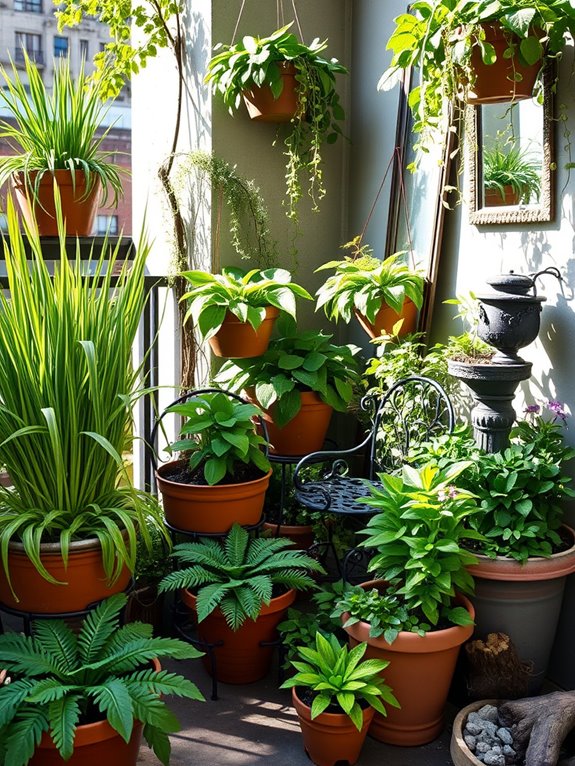
Choose Shade-Loving Plants and Flowers
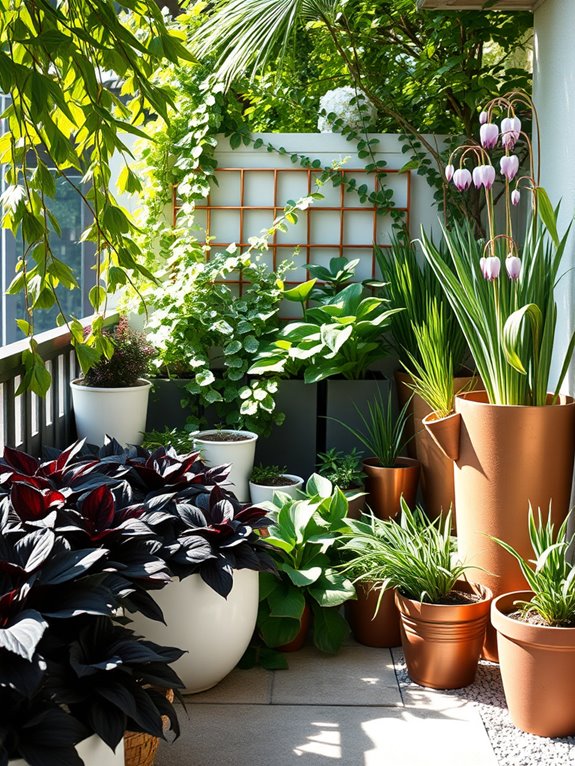
A shade-loving garden transforms challenging low-light spaces into enchanting woodland retreats, where delicate hostas unfurl their textured leaves and Japanese forest grass waves gracefully in gentle breezes. Deep green ferns create a lush backdrop while astilbe sends up feathery plumes in shades of pink, white, and purple, creating a layered tapestry of foliage and subtle blooms. The interplay of different leaf shapes and sizes creates visual interest even without abundant flowers.
This peaceful sanctuary comes alive with bleeding hearts dangling their romantic pink and white blooms, while hellebores provide winter interest with their sturdy evergreen foliage and early-season flowers. Ground-hugging ajuga spreads a carpet of purple-tinged leaves beneath taller plants, and Japanese painted ferns add silvery highlights that seem to glow in dim conditions. The overall effect is one of tranquil sophistication, reminiscent of a misty forest floor.
Essential Elements:
- Hostas (various varieties)
- Japanese Forest Grass
- Astilbe
- Bleeding Heart
- Hellebores
- Japanese Painted Ferns
- Ajuga
- Heuchera
- Wild Ginger
- Solomon’s Seal
Begin by evaluating the light conditions throughout the day, as even shade gardens have varying degrees of darkness. Plant taller specimens like Solomon’s Seal toward the back or center of beds, with medium-height plants like hostas and astilbe in the middle ground.
Edge the garden with low-growing ajuga or wild ginger. Group plants with similar water needs together, and incorporate organic matter into the soil before planting to improve moisture retention and drainage.
Apply a layer of mulch to maintain soil moisture and suppress weeds, but keep it away from plant crowns to prevent rot. Most shade-loving plants prefer consistent moisture but not waterlogged conditions, so install soaker hoses or drip irrigation for efficient watering.
Monitor plant spacing carefully, as shade gardens often fill in more slowly than sun gardens but can become overcrowded over time.
For smaller spaces or balconies, focus on container groupings using compact varieties of hostas and heuchera, which thrive in pots. Consider vertical growing options like climbing hydrangea for walls or trellises, and use mirrors strategically to reflect available light.
Choose light-colored containers and hardscaping materials to brighten the space, and incorporate variegated plants to add brightness to darker corners. Regular pruning and division of spreading plants becomes especially important in confined areas to maintain the garden’s intended design.
Install Strategic Lighting Solutions
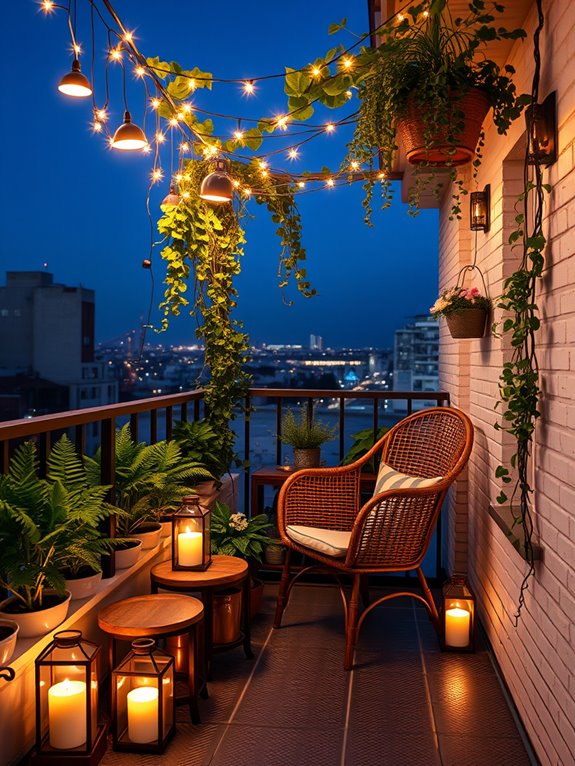
Transform your low-light garden into a magical wonderland with strategically placed lighting that creates an enchanting atmosphere both day and night. Soft, warm LED lights nestled among ferns and hostas cast gentle shadows across stone pathways, while uplighting on ornamental trees creates dramatic silhouettes against garden walls. Solar-powered lanterns scattered throughout the space provide gentle illumination that mimics moonlight, making the garden appear larger and more mysterious after sunset.
The layered lighting approach combines practical functionality with aesthetic appeal, turning dark corners into inviting spaces. Ground-level path lights guide visitors safely through the garden, while accent lighting highlights architectural features, water features, and prized plants. The interplay of light and shadow adds depth and dimension, making even the smallest garden feel like an expansive outdoor room.
Key Elements:
- LED path lights
- Solar-powered lanterns
- Uplighting fixtures
- Motion sensor lights
- Weatherproof extension cords
- Timer systems
- Various bulb types (warm and cool)
- Light shields and covers
- Mounting hardware
- Transformers and controllers
Begin installation by mapping out your garden’s traffic patterns and identifying key features to highlight. Install path lighting first, spacing fixtures 6-8 feet apart along main walkways. Position uplights at the base of trees or architectural elements, angling them slightly away from viewing areas to prevent glare.
Mount accent lights on walls or stakes, focusing on creating layers of illumination rather than uniform brightness. Install timers and motion sensors to automate the lighting system and ensure energy efficiency.
When designing your lighting scheme, consider the specific needs of different garden zones and seasonal changes. Choose fixtures that complement your garden’s style, and opt for warm white lights (2700-3000K) to create an inviting atmosphere. Remember to position power sources discreetly and protect all electrical components from moisture.
Focus on creating a balance between functional lighting for safety and aesthetic lighting for ambiance.
Final Tips: For small spaces, use fewer, more versatile fixtures that can serve multiple purposes. Consider using portable, battery-operated lights for flexibility in smaller gardens or balconies. Install lighting in phases to test effects and adjust as needed.
Use light-colored surfaces and reflective elements to maximize illumination, and incorporate light-sensitive plants that show well in evening hours. For balconies, focus on wall-mounted fixtures and hanging lights to save floor space, and consider using string lights to create an overhead canopy effect.
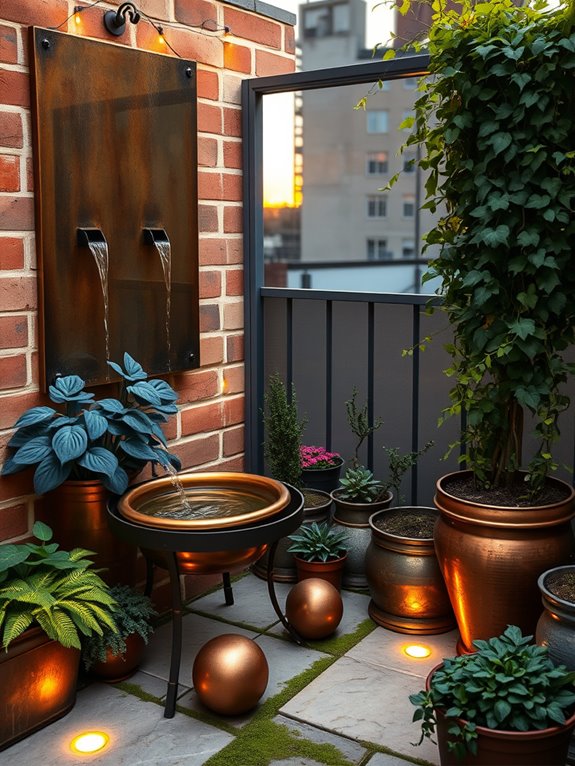
Create Reflective Surfaces and Pathways
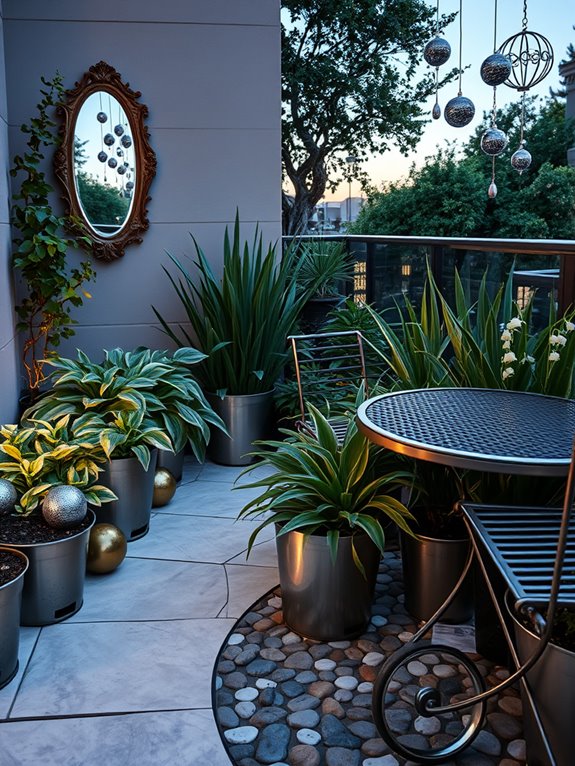
Reflective surfaces transform a low-light garden into a mesmerizing space where every bit of available light dances and multiplies. Metallic garden ornaments, polished stones, and mirrors strategically placed among shade-loving plants like hostas and ferns create an enchanting interplay of light and shadow.
The pathways, lined with light-colored gravel or pale stepping stones, weave through the garden like ribbons of moonlight, making navigation easier while adding an ethereal quality to the space. The combination of reflective elements brings depth and dimension to darker corners, making the garden appear larger and more luminous.
Glass gazing balls nestled among Japanese Forest grass catch and scatter light, while white-flowering plants like astilbe and lily of the valley seem to glow against darker foliage. Water features with reflective surfaces add movement and sound, completing the sensory experience with gentle ripples that capture and redirect available light.
Key Elements:
- Metallic garden ornaments and sculptures
- Mirrors and glass gazing balls
- Light-colored gravel or stepping stones
- Polished river rocks
- Reflective water features
- White or silver-leaved plants
- Solar-powered path lights
- Metallic wind chimes
- Light-colored garden furniture
- Glass or metal edging materials
Installing reflective elements requires careful planning to maximize their impact while maintaining safety and aesthetic appeal. Begin by mapping out pathways using light-colored materials, ensuring they’re wide enough for comfortable passage and positioned to catch available light.
Place mirrors at angles that reflect greenery and light rather than direct sunlight, and secure them firmly to walls or fences. Incorporate metallic elements at varying heights, from ground-level stones to hanging wind chimes, creating layers of reflection throughout the space.
Maintenance involves regular cleaning of reflective surfaces to maintain their effectiveness, adjusting mirror positions seasonally as light patterns change, and ensuring pathway materials remain level and secure. For maximum impact, combine reflective elements with light-colored plants and materials that naturally brighten the space.
When adapting this design to different spaces, consider scale carefully. Small balconies benefit from vertical mirrors and compact metallic planters, while larger gardens can accommodate more elaborate reflective water features and pathway designs.
In particularly shady areas, supplement natural light with solar-powered fixtures that charge during brighter periods and provide gentle illumination during darker hours. Always position reflective elements to avoid creating glare or hot spots that could damage plants or disturb neighbors.
Design a Layered Vertical Garden
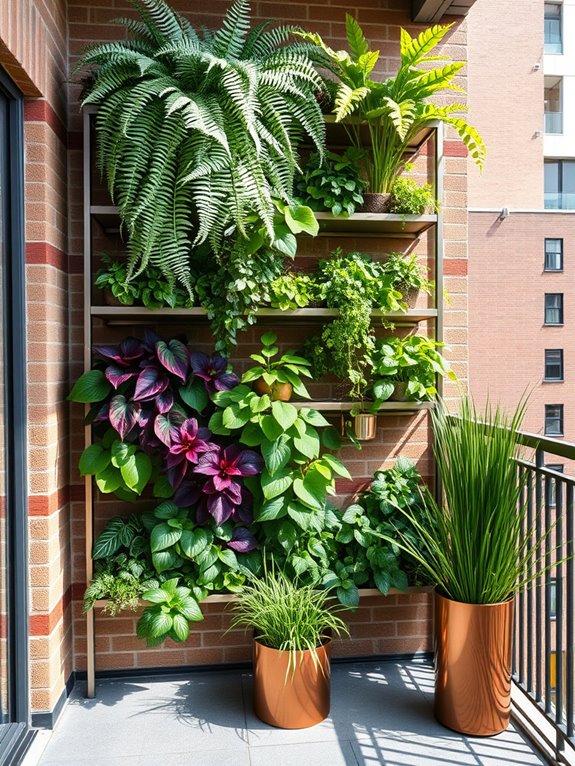
A layered vertical garden transforms a dim corner into a living tapestry of shade-loving foliage, creating depth and visual interest through carefully arranged tiers of plants. Dark-leafed heucheras cascade down from upper levels, while delicate ferns and trailing ivy weave between sturdy metal or wooden frames. Japanese forest grass adds a graceful, flowing element, catching what little light filters through to create subtle movement in the space.
The dramatic architectural elements of this garden style emerge through the interplay of different heights and textures. Deep-green mondo grass provides a lush base layer, while taller Japanese painted ferns create a mid-level focal point. Heart-shaped leaves of climbing philodendrons reach upward through the structure, their glossy surfaces reflecting ambient light. Strategically placed mirrors amplify available light while metal wall planters add industrial charm to the organic arrangement.
Key Elements:
- Tiered planting system or vertical garden frame
- Shade-tolerant climbing plants
- Various sized planters
- Plant support structures
- Moisture-retaining soil mix
- Irrigation system
- Decorative mirrors
- LED grow lights (optional)
- Metal or wooden wall brackets
- Drainage collection system
Implementation begins with securing a sturdy frame to your wall, ensuring proper weight distribution and waterproofing. Install the largest planters at the bottom tier, gradually decreasing size as you move upward.
Create a proper soil mix combining regular potting soil with moisture-retaining materials like coconut coir and perlite. Position plants strategically, placing larger specimens toward the back and trailing varieties near the edges of each tier. Install an irrigation system that ensures even water distribution throughout all levels.
Design adaptations depend largely on available space and light conditions. For smaller balconies, focus on creating mini-tiers using stackable planters or wall-mounted pocket planters.
Consider incorporating grow lights in particularly dark areas to supplement natural light, positioning them discreetly behind foliage. Choose plants that thrive in your specific light conditions, and remember that darker-leaved varieties often handle low light better than variegated ones.
Regular pruning and maintenance will keep the garden looking lush while preventing overcrowding in confined spaces.
Incorporate Water Features and Mirrors
The gentle sound of trickling water creates an enchanting atmosphere in a low-light garden, while strategically placed mirrors amplify what little natural light filters through. Water features, from simple wall fountains to small ponds, become focal points that attract both wildlife and human attention, creating movement and life in shaded spaces.
The reflective surfaces of both water and mirrors create an illusion of depth, making the garden appear larger and more dynamic, even in areas where plants struggle to thrive. Mirrors positioned to catch and reflect available light can transform dark corners into luminous spaces, while water features add a magical quality through sound and motion.
Whether it’s a decorative mirror nestled among climbing vines or a small reflecting pool surrounded by shade-loving ferns and hostas, these elements work together to create a multi-sensory experience that enhances the garden’s natural beauty and creates a sense of serenity.
Key Elements:
- Water fountain or pond
- Decorative mirrors in weather-resistant frames
- Waterproof lighting
- Shade-tolerant plants like ferns and hostas
- Smooth pebbles or river rocks
- Pump and filtration system
- Weatherproof electrical outlets
- Reflective ornaments or gazing balls
- Water-loving plants like Japanese iris or water lily
- Mirror mounting hardware
Begin installation by identifying the darkest areas that would benefit most from reflected light. Install mirrors at varying heights, ensuring they’re securely mounted and angled to avoid direct sunlight that could create hot spots.
For water features, choose a location with access to electricity and consider the natural slope of the land. Install proper drainage and ensure the water feature is level. Layer plants around both mirrors and water features, using taller specimens to disguise equipment and create natural transitions.
When designing this type of garden space, consider the size and scale of your elements. For small balconies, wall-mounted mirrors paired with compact tabletop fountains can create similar effects without overwhelming the space.
Larger gardens can accommodate multiple water features and mirror installations, creating different zones of interest. Remember to clean mirrors regularly, maintain proper water levels, and protect both elements from harsh weather conditions during extreme seasons.
Maximize Light With Smart Plant Placement

Transform your shaded garden into a luminous retreat by strategically placing plants to capture and reflect every bit of available light. Picture silvery Japanese painted ferns catching subtle gleams along their fronds, while white-blooming astilbe and lily-of-the-valley create pools of brightness in darker corners.
Variegated hostas with cream-streaked leaves bring natural highlights to ground level, and climbing hydrangeas with their white lacecap flowers brighten vertical spaces. The garden comes alive through thoughtful layering, with taller plants like white-barked birch trees positioned to avoid casting additional shadows on shade-loving specimens below.
Pale stone pathways and light-colored mulch reflect scattered sunlight upward, while mirrors strategically hidden among the foliage bounce light into darker recesses. The result is an enchanting space that seems to glow from within, even in minimal light conditions.
Key Elements:
- Light-colored or variegated foliage plants
- White-flowering species
- Reflective hardscaping materials
- Strategic mirror placement
- Vertical growing structures
- Light-colored mulch or gravel
- Plants of varying heights
- Light-catching water features
- Pale-barked trees
- Metallic garden accessories
Position taller plants along the northern border of your garden space, creating a graduated slope down to shorter specimens in the south. This arrangement prevents larger plants from casting shadows on smaller ones.
Install reflective surfaces, such as metallic wind chimes or gazing balls, at varying heights to maximize light distribution. Create planting pockets near light-colored walls or fences where their reflective properties can benefit nearby plants.
When designing your light-maximizing garden, consider seasonal changes in light patterns. Map sun patterns throughout the year and place deciduous plants where they’ll allow winter light to reach evergreen specimens below.
Maintain clear sight lines between plants and light sources by regular pruning and spacing plants appropriately to prevent overcrowding. Adapt these principles to any space by scaling elements proportionally.
Balcony gardeners can use vertical growing systems with reflective backing materials and choose compact varieties of light-reflecting plants. Container gardens benefit from light-colored pots and metallic plant stakes, while tiered planters help create the essential height variation needed for effective light distribution.
Consider using LED growing lights in particularly dark corners to supplement natural light during shorter winter days.
Add Bright Containers and Garden Accessories
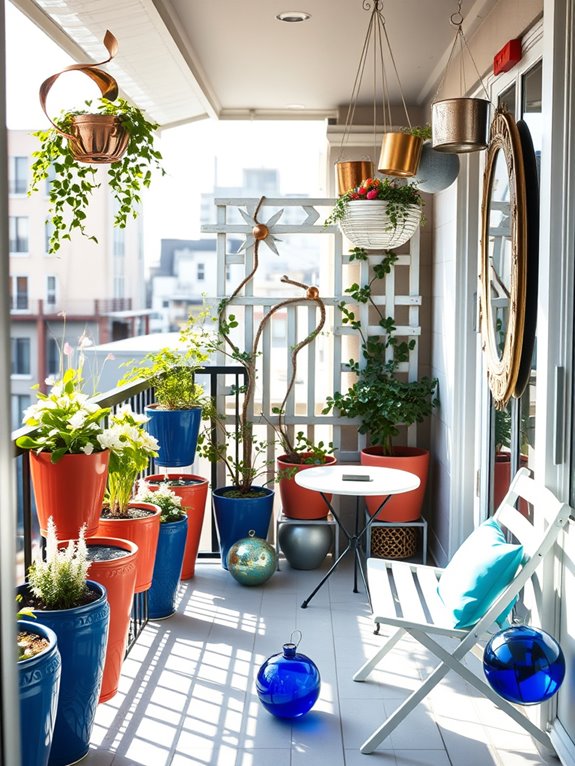
Vibrant containers and eye-catching accessories transform shaded garden spaces into enchanting retreats where color thrives even without direct sunlight. Bold ceramic pots in cobalt blue, sunshine yellow, and coral pink create striking focal points, while metallic planters and mirrored ornaments reflect and amplify available light.
White-flowering plants like astilbe, foam flower, and Japanese anemone appear to glow against dark backgrounds, especially when planted in light-colored containers. The strategic placement of bright accessories energizes shadowy corners and creates visual intrigue throughout the day.
Glass gazing balls, weathered copper sculptures, and pale stone pathways guide the eye through the space, while colorful wind chimes and garden flags add movement and whimsy. Painted trellises and decorative screens in light hues provide vertical interest and serve as stunning backdrops for shade-loving climbers.
Essential Elements:
- Light-colored or bright containers in various sizes
- Metallic or reflective garden ornaments
- White-flowering shade plants
- Glass or metal decorative elements
- Painted garden structures
- Light-colored stepping stones or pavers
- Weatherproof garden art
- Solar-powered accent lights
- Bright outdoor cushions or furniture
Position the largest containers first, creating anchor points in the garden’s design. Group containers in odd numbers, varying heights and colors while maintaining a cohesive color scheme. Install reflective elements at different heights, ensuring they don’t create unwanted glare.
Place lighter accessories toward the back of shaded areas to create depth and draw attention to darker corners. When selecting and arranging accessories, consider durability in shade and moisture, choosing weather-resistant materials that maintain their brightness.
Clean reflective surfaces regularly to maximize their light-enhancing properties, and rotate container plantings seasonally to maintain visual interest year-round. For smaller spaces like balconies or courtyard gardens, focus on vertical arrangements using wall-mounted containers and hanging elements.
Choose scaled-down accessories that won’t overwhelm the space, and consider using lighter colors predominantly to create an illusion of more space. Incorporate multi-functional pieces, such as decorative container stands that can also serve as plant storage, and select collapsible or stackable elements for seasonal storage flexibility.
Cultivate a Woodland Garden Theme
Step into a magical woodland sanctuary where dappled sunlight filters through leafy canopies, creating an enchanting retreat reminiscent of nature’s most peaceful corners.
Delicate ferns unfurl their fronds beneath towering shade trees, while clusters of woodland flowers like hellebores, bleeding hearts, and wild violets add splashes of subtle color to the forest floor.
Natural stone pathways wind through the space, their edges softened by creeping moss and woodland groundcovers.
This garden style embraces the serene beauty of forest understories, featuring layers of texture and height that mirror natural woodland ecosystems.
Japanese forest grass sways gently alongside bold hostas, while shade-loving shrubs like oakleaf hydrangeas and mountain laurel provide structural elements.
Rustic log sections, weathered branches, and natural stone features create habitat spaces for beneficial wildlife while adding authentic woodland character.
Key Elements:
- Shade-tolerant trees and shrubs
- Native woodland perennials
- Ferns (multiple varieties)
- Natural stone pathways
- Fallen logs or stumps
- Moss gardens
- Leaf mulch
- Native groundcovers
- Garden benches or seating
- Natural water features
- Woodland ornaments (mushrooms, statuary)
- Indirect lighting
Implementation begins with establishing a canopy layer using existing trees or by planting fast-growing shade trees.
Create meandering pathways using natural materials like flagstone or wood chips, allowing them to guide placement of plant layers.
Install larger shrubs and structural elements first, then add mid-sized plants like ferns and perennials.
Finally, introduce groundcovers and woodland ephemerals, allowing them to naturally spread over time.
Maintain authentic woodland conditions by regularly adding leaf mulch and maintaining consistent soil moisture.
Design Considerations: Adapt this style to smaller spaces by using dwarf varieties of woodland plants and creating vertical interest with wall-mounted planters or tiered containers.
Consider incorporating mirrors to create the illusion of depth and reflect limited light.
For balcony gardens, focus on container groupings with shade-tolerant specimens and use vertical structures to create overhead screening.
Pay special attention to drainage in containers, and choose lightweight planting mediums that retain moisture while allowing proper air circulation to root systems.