
7 Garden Ideas for Hilly Terrain
If you’re looking at your sloped backyard and wondering how to transform it into a beautiful garden, you’ll find that hills offer unique opportunities for creative landscaping. You can work with the natural gradient to create stunning multi-level displays, flowing water features, and cozy retreats that flat terrain simply can’t match. From terraced beds bursting with colorful perennials to strategically placed stone walls that double as seating, your challenging slope can become an enviable outdoor paradise.
Contents
Creating Terraced Garden Beds

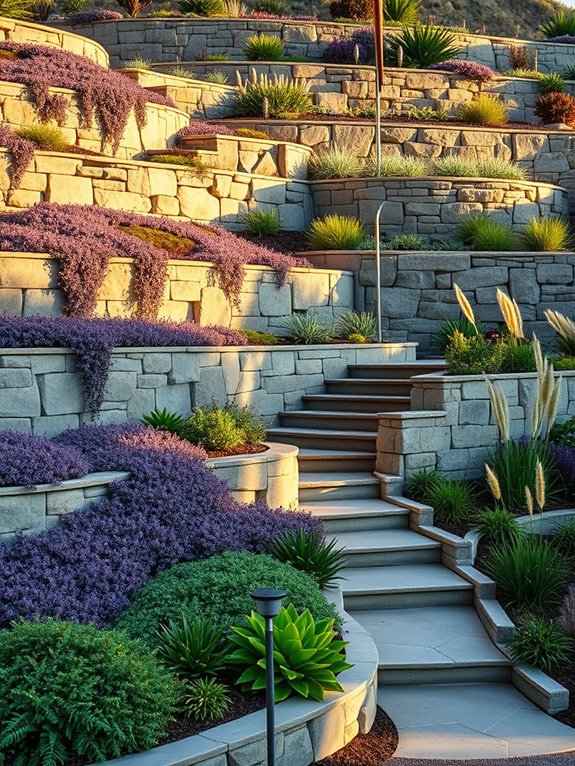
Cascading levels of lush greenery transform a challenging hillside into a breathtaking Mediterranean-inspired retreat. Stone retaining walls create distinct levels filled with aromatic herbs like rosemary and lavender, while flowering perennials such as Russian sage and yarrow spill over the edges, softening the hardscape. Each tier presents a unique viewing angle, allowing visitors to experience the garden from multiple perspectives as they ascend or descend the gentle stone steps connecting each level.
The terraced design maximizes growing space while controlling erosion, creating microclimates that support diverse plant communities. Drought-tolerant sedums and native grasses occupy the uppermost sun-drenched tiers, while shade-loving ferns and hostas thrive in the protected lower levels. Ornamental features like copper rain chains guide water from tier to tier, creating peaceful water music during rainstorms and ensuring proper drainage throughout the structure.
Key Elements:
- Retaining walls (stone, concrete, or timber)
- Steps or pathways between levels
- Drainage system
- Soil retention materials
- Edge plantings
- Drought-resistant plants
- Shade-tolerant species
- Ornamental features
- Irrigation system
- Ground cover
Construction begins with careful measurement and marking of each terrace level, ensuring proper slope and drainage.
Install the lowest retaining wall first, working upward with each subsequent tier. Incorporate drainage materials behind walls and install irrigation systems before adding soil. Space tiers approximately 2-4 feet in height difference, depending on the overall slope and desired accessibility. Fill each level with well-draining soil mix and add plants according to sun exposure and moisture requirements.
When customizing a terraced garden, consider the viewing angles from both inside your home and various points in the garden.
For smaller spaces, create narrower tiers and focus on vertical growing options like climbing vines or espalier fruit trees. Incorporate seating areas on wider terraces to create usable outdoor living spaces. Use locally sourced materials for retaining walls to reduce costs and maintain regional character, and consider implementing a drip irrigation system to ensure consistent water delivery across all levels.
Installing Stone Retaining Walls
Stone retaining walls transform challenging slopes into stunning multi-level garden sanctuaries, creating a sense of ancient permanence reminiscent of Mediterranean hillside villages.
These weathered stone structures rise in graceful tiers, hosting cascading vines like creeping thyme and trailing rosemary that spill over their edges, while hardy succulents nestle into the wall’s crevices. The natural granite, limestone, or slate materials weather beautifully over time, developing rich patinas that complement both formal and naturalistic garden designs.
The walls serve as both architectural elements and living canvases, dividing the space into intimate garden rooms while providing essential erosion control. Each level becomes its own microclimate, offering opportunities for different plant collections – drought-tolerant herbs and ornamental grasses at the top, shade-loving ferns and hostas at the base.
The vertical elements create dynamic shadows throughout the day, while integrated stairs and pathways invite exploration between the levels.
Key Elements:
- Natural stone blocks or cut stone
- Drainage materials (gravel, pipes)
- Soil stabilization fabric
- Foundation materials
- Capstones
- Climbing plants and cascading groundcovers
- Integrated lighting
- Steps or pathways
- Soil for planting pockets
Construction begins with careful site assessment and proper foundation preparation, ensuring adequate drainage behind the wall structure.
Each stone layer must be carefully placed with a slight backward tilt, incorporating drainage material behind the wall as construction progresses. Professional engineering may be required for walls exceeding four feet in height, as structural integrity becomes increasingly critical.
The final layer should include capstones to protect the wall’s top edge and provide a finished appearance.
For optimal success, incorporate planting pockets during construction rather than attempting to add them later. Choose plants suited to the specific light exposure each wall section receives, and ensure irrigation systems can reach all planted areas.
Consider incorporating lighting elements during construction to highlight architectural features and ensure safe navigation after dark. Regular maintenance includes checking drainage systems and monitoring plant growth to prevent root damage to the wall structure.
Designing Natural Rock Gardens
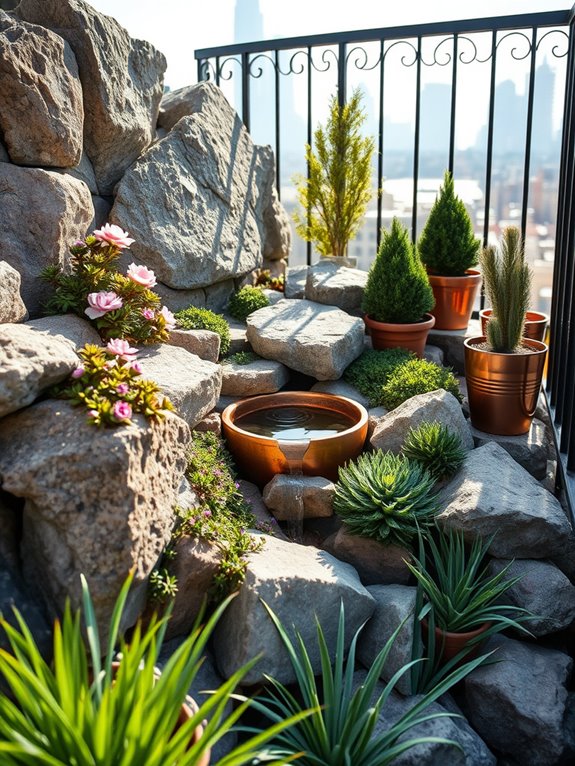
A natural rock garden transforms challenging hillsides into striking displays of nature’s raw beauty, where rugged stone formations emerge organically from the terrain, creating dramatic levels and intimate garden pockets. Alpine flowers nestle between weathered boulders, while cascading creepers spill over rock faces, mimicking the untamed grace of mountain landscapes. The interplay of textures – from smooth river rocks to craggy limestone – provides a perfect backdrop for drought-resistant plants like sedums, thyme, and miniature conifers.
The garden captures changing light throughout the day, casting enchanting shadows across stone surfaces while highlighting the delicate blooms of rock-loving perennials. Small waterfalls or trickling streams can be incorporated to add gentle movement and soothing sounds, creating peaceful meditation spots amid the rocky terrain. Native grasses sway in the breeze, adding movement and softening harsh edges while attracting butterflies and birds to this naturalistic sanctuary.
Essential Elements:
- Large anchor rocks and boulders
- Small to medium-sized stones for filling
- Alpine and drought-resistant plants
- Groundcover varieties
- Proper drainage materials
- Landscape fabric
- Topsoil and gravel mix
- Edge restraints
- Lighting fixtures
- Irrigation system
Begin implementation by carefully positioning larger rocks as anchor points, ensuring they appear partially buried for a natural look. Create terraced levels working down the slope, incorporating proper drainage channels beneath the rock placement. Layer smaller stones between larger ones, leaving adequate planting pockets filled with well-draining soil mix.
Install irrigation lines before final stone placement, ensuring water reaches all planted areas without causing erosion. Successful rock gardens require attention to scale and proportion. Choose rocks that complement your space without overwhelming it, and group plants in odd-numbered clusters for natural appeal.
For smaller spaces, focus on creating mini-vignettes using vertical arrangements and dwarf varieties. Consider incorporating built-in seating areas using flat stones, and ensure pathways provide safe access for maintenance. Urban gardeners can adapt this style using container arrangements with careful rock placement and appropriate plant selection for their specific light conditions.
Building Functional Garden Steps
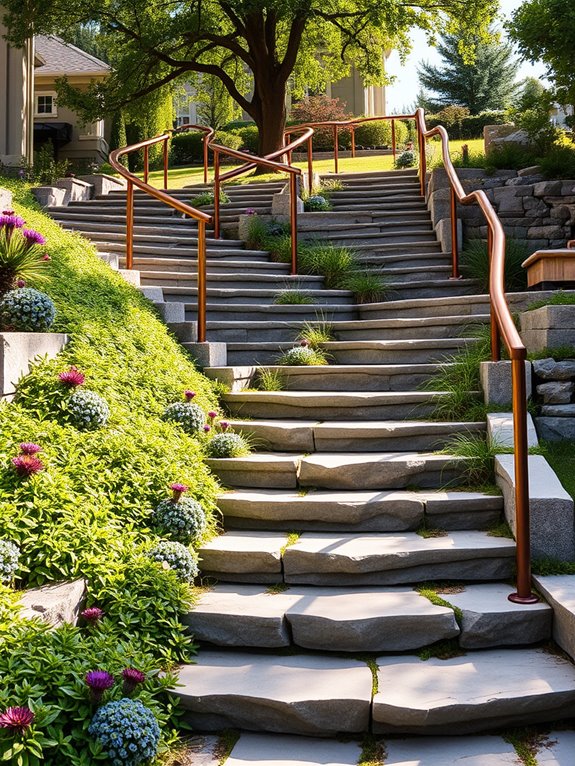
Garden steps winding through a hillside create a dramatic and enchanting journey through layers of natural beauty. Natural stone steps, weathered to perfection, emerge from lush groundcover like creeping thyme and moss, while ornamental grasses sway gently along the edges. Japanese Forest Grass and Blue Fescue provide soft movement, while hardy succulents like Sempervivum peek through rocky crevices, adding texture and year-round interest.
Each level of the steps offers a new perspective, with strategic placement of flowering perennials creating visual stopping points along the journey. Purple Coneflowers and Black-Eyed Susans stand tall at step corners, while Creeping Phlox cascades over step edges in a vibrant display of spring color. Steel handrails, weathered to a rich patina, provide both safety and artistic elements, especially when paired with climbing vines like Carolina Jessamine.
Key Elements:
- Natural stone slabs or pre-cast concrete steps
- Steel or wooden handrails
- Ground cover plants (Creeping Thyme, Moss)
- Ornamental grasses
- Hardy succulents
- Flowering perennials
- Path lighting
- Drainage materials
- Retaining materials (timber or stone)
- Landing areas
Building functional garden steps requires careful planning and proper installation techniques. Begin by establishing the correct rise and run ratios – steps should have a consistent height of 6-7 inches and depth of 12-14 inches for comfortable walking. Install proper drainage beneath and alongside steps using gravel and perforated pipes to prevent water accumulation.
Secure each step firmly using construction adhesive and ensure the foundation is well-compacted to prevent shifting. Before installation, consider your local climate and choose materials that can withstand weather extremes. For steep slopes, incorporate landing areas every 5-6 steps to create resting spots and visual breaks. Select plants that can tolerate both the growing conditions and foot traffic, and install them in stages to prevent soil erosion during construction.
Additional Design Tips: Incorporate lighting into step risers or along pathways for safety and ambiance. Consider your maintenance capabilities when selecting materials and plants – natural stone requires less upkeep than wooden steps but costs more initially.
For narrow hillsides, design switchback steps to reduce the slope’s steepness and create additional planting pockets. Use varying textures and colors in your hardscaping to add visual interest and ensure steps blend naturally with the surrounding landscape.
Planning Multi-Level Water Features
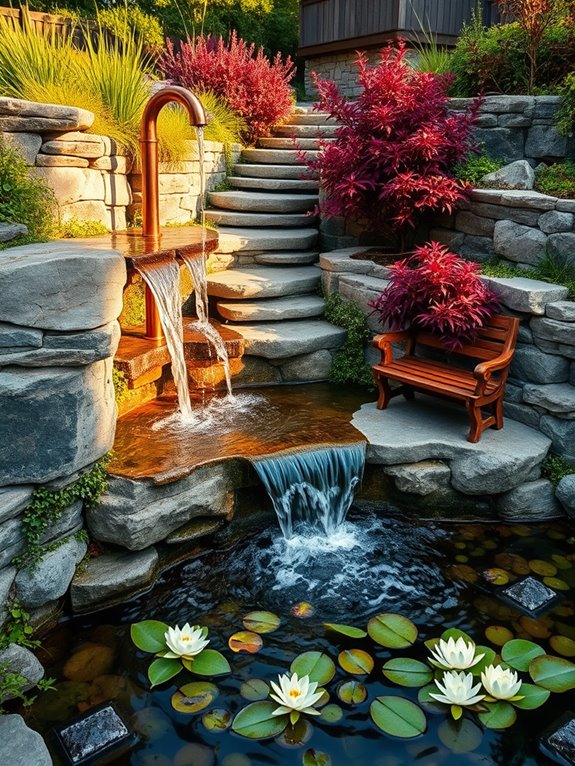
Cascading water features transform a challenging hillside into a mesmerizing oasis, where crystalline streams tumble from one level to the next, creating a symphony of flowing water. Natural stone retaining walls cradle each pool, while Japanese forest grass, creeping Jenny, and delicate ferns soften the edges. The sound of water dancing over rocks mingles with the gentle swaying of ornamental grasses, creating an atmosphere of tranquil movement throughout the space.
As visitors traverse the terraced landscape, they discover intimate seating areas nestled beside reflecting pools, where water lilies and floating lotus flowers add splashes of color. Stone pathways wind between the levels, revealing hidden waterfalls and serene meditation spots. Strategic lighting transforms the water features into magical displays at night, with subtle uplighting catching the water droplets and creating ethereal shadows.
Key Elements:
- Submersible water pumps
- Natural stone or precast concrete retaining walls
- Flexible pond liner
- Water-loving plants
- River rocks and boulders
- LED landscape lighting
- Filtration system
- Automatic water level controls
- Copper or bamboo water spouts
- Seating elements
- Non-slip pathway materials
- Aquatic plants
Begin by mapping water flow patterns that work with the natural slope, ensuring each level drops at least 2-3 feet for optimal water movement. Install a robust pump system at the lowest point, connecting through hidden pipes to feed upper pools. Create varying pool depths, from shallow reflecting areas to deeper zones for aquatic plants, while incorporating flat stones and concrete foundation work to prevent erosion.
Establish proper drainage systems and overflow channels to manage heavy rainfall and maintain water balance between levels.
Design Adaptations and Tips: Scale your water feature to match available space by using smaller cascade elements for intimate areas or incorporating wall-mounted water features for narrow spaces. Consider using pre-formed pond liners for easier installation, and install automatic top-off systems to maintain consistent water levels.
In regions with freezing winters, include deeper sections (at least 2 feet) to prevent complete freezing, and consider installing removable covers to protect pumps and fish during extreme weather.
Establishing Erosion Control Plants
Transform your challenging hillside into a stunning tapestry of erosion-fighting greenery that cascades down slopes like nature’s own living sculpture. Deep-rooted ornamental grasses sway gracefully in the breeze, while creeping juniper and colorful ice plants spread their protective embrace across the earth.
Purple and gold lantana blooms create vibrant patches of color among the stabilizing vegetation, while drought-resistant sedums add texture and year-round interest to the terrain. The layered effect of erosion control plants creates a mesmerizing visual flow, mimicking the natural patterns found in mountainous regions.
Evergreen groundcovers like vinca minor carpet the ground with glossy leaves and delicate periwinkle flowers, while spreading cotoneaster adds height variation with its arching branches and bright red berries. Native grasses like blue fescue and maiden grass provide vertical interest while their extensive root systems work tirelessly beneath the surface to hold the soil in place.
Key Elements:
- Deep-rooted ornamental grasses
- Spreading groundcovers
- Native perennials
- Stabilizing shrubs
- Drought-resistant succulents
- Terracing materials
- Erosion control matting
- Mulch or gravel
- Drip irrigation system
- Rock gardens
Begin implementation by creating small terraces or gradual steps in the slope using natural materials like stone or timber. Plant larger, deep-rooted specimens first, spacing them according to their mature size and positioning them where they’ll intercept water flow.
Install drought-tolerant groundcovers between larger plants, ensuring they’ve room to spread and create a living mulch. Incorporate a drip irrigation system during planting to provide consistent moisture without causing soil erosion from overhead watering.
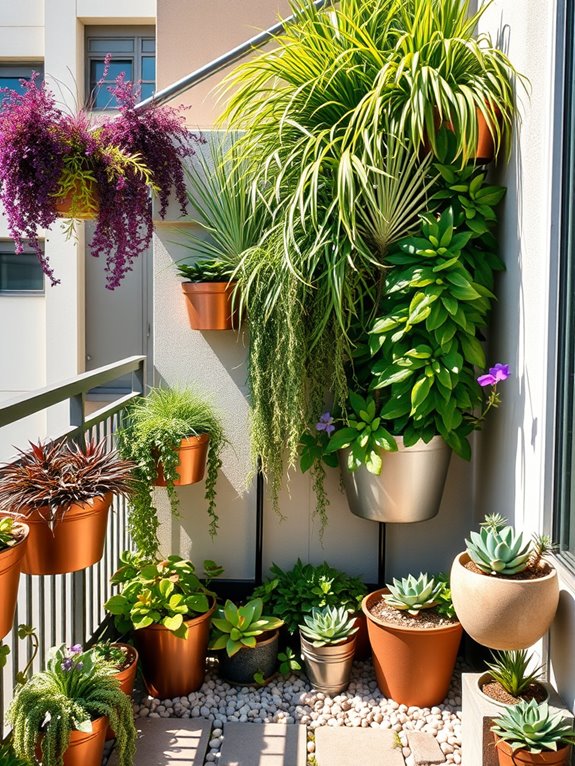
Adaptability is key when designing erosion control gardens. For steep slopes, consider incorporating retaining walls or cellular containment systems beneath plants for added stability. In smaller spaces or on balconies, utilize vertical gardening techniques with cascading plants in tiered planters.
Remember to monitor soil moisture levels regularly, especially during the establishment period, and replace any plants that don’t thrive to maintain continuous ground coverage.
Integrating Hillside Seating Areas
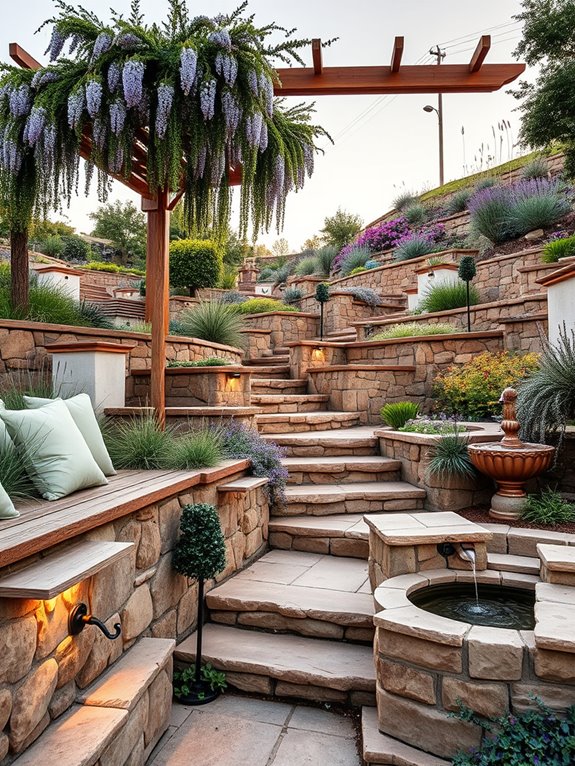
Transform your sloping terrain into an enchanting hillside retreat by creating integrated seating areas that seem to emerge naturally from the landscape. Stone terraces nestled into the hill can be adorned with soft cushions and surrounded by cascading plants like creeping thyme, trailing rosemary, and wave petunias. The strategic placement of ornamental grasses such as Mexican feather grass and blue fescue adds movement and texture while providing natural privacy screens between different seating levels.
Each seating zone can become its own microclimate, with pergolas supporting flowering vines like wisteria or climbing roses offering shade and structure. Natural stone steps connect different levels, while built-in benches constructed from weather-resistant materials blend seamlessly with retaining walls. The integration of small water features or fountains nearby adds a peaceful soundtrack to these intimate gathering spaces.
Key Elements:
- Weather-resistant seating (built-in benches or moveable furniture)
- Retaining walls with integrated seating
- Stone or concrete steps
- Pergolas or shade structures
- Cushions and weather-resistant textiles
- Low-maintenance ground covers
- Ornamental grasses
- Climbing vines
- Lighting fixtures
- Drainage systems
Creating successful hillside seating areas begins with proper grading and installing robust retaining walls that can double as seating. Start by excavating level platforms into the slope, ensuring each area has proper drainage to prevent water accumulation.
Install retaining walls using materials that complement your home’s architecture, incorporating built-in seating at comfortable heights (typically 18-20 inches). Connect these areas with well-designed pathways that follow natural contours of the land, using steps where necessary.
Layer your plantings around the seating areas, placing taller specimens behind benches and lower-growing plants in front to maintain views. Install lighting at different levels – path lights, step lights, and accent lighting – to ensure safe navigation and create ambiance for evening enjoyment.
Consider incorporating small tables or flat surfaces into the design for practical use. When designing hillside seating areas, consider the angle of the sun throughout the day and seasons to provide appropriate shade and shelter from prevailing winds.
For steeper slopes, incorporate multiple smaller seating areas rather than one large space, as this helps with both structural stability and creating more intimate gathering spots. If working with a particularly challenging slope, consider using terraced containers or raised planters to add greenery without compromising the integrity of the hillside.