
10 Garden Ideas for Growing Your Own Food
You’ll be amazed at how a small patch of soil can transform into a thriving food garden that feeds your family throughout the year. Whether you’re working with a sunny windowsill, a compact balcony, or a spacious backyard, there’s a gardening solution that fits your space and lifestyle. From vertical systems that climb walls with cascading tomatoes to compact hydroponic units that produce fresh lettuce in your kitchen, modern growing methods have made home food production more accessible than ever. Let’s explore the clever ways you can create your own personal produce aisle.
Contents
- 1 Vertical Garden Systems for Small Spaces
- 2 Raised Bed Construction and Layout
- 3 Container Gardening Essentials
- 4 Hydroponic Growing Solutions
- 5 Herb Garden Planning and Design
- 6 Square Foot Gardening Method
- 7 Greenhouse and Cold Frame Techniques
- 8 Companion Planting Strategies
- 9 Year-Round Indoor Growing
- 10 Edible Landscaping Designs
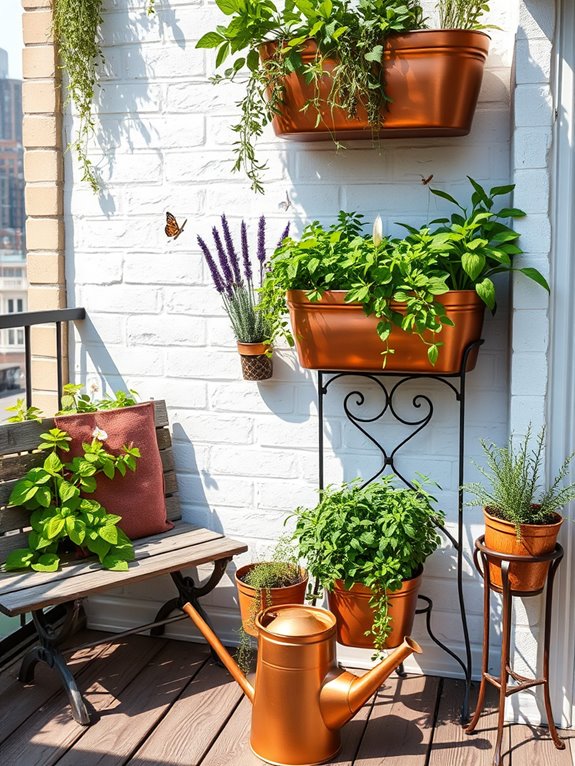
Vertical Garden Systems for Small Spaces
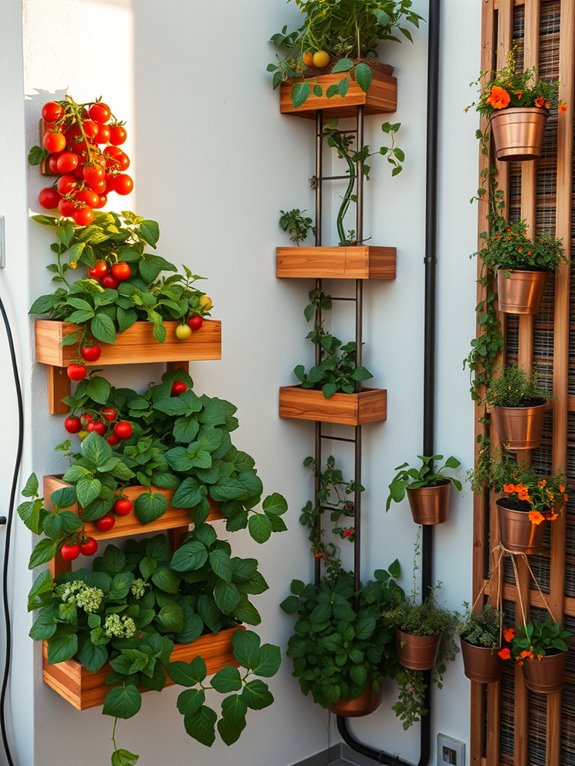
Transform your limited outdoor space into a lush, living wall of edible abundance with a vertical garden system that defies spatial constraints. Cascading cherry tomatoes spill from mounted planters, while climbing beans spiral upward on space-saving trellises. Strawberry towers burst with ripening fruit at multiple levels, and compact herbs like thyme, basil, and oregano fill wall-mounted pockets with fragrant greenery.
The organized layers create a tapestry of textures and colors that turns an ordinary wall into an artistic, functional growing space. The vertical arrangement maximizes natural light exposure while creating distinct microclimates for different crops. Lower levels house shade-tolerant leafy greens like lettuce and spinach, while sun-loving vegetables flourish at higher elevations. Hanging baskets swing gently in the breeze, showcasing trailing plants like peas and nasturtiums. The resulting garden becomes both a practical food source and a living privacy screen, offering a sense of sanctuary in urban settings.
Essential Elements:
- Mounted planter boxes or pocket systems
- Sturdy trellis structures
- Drip irrigation system
- Growing containers of varied depths
- Plant support clips and ties
- Weather-resistant mounting hardware
- Soil moisture meters
- Lightweight growing medium
- Multi-level hanging basket systems
- Wall-mounted tool storage
Begin installation by securing strong mounting brackets to wall studs or solid surfaces, ensuring they can support the weight of mature plants and wet soil. Install the irrigation system first, with main water lines running vertically and smaller distribution tubes feeding individual planters.
Layer your growing spaces vertically, placing larger containers for root vegetables and fruiting plants at the bottom, with progressively lighter options moving upward. Ensure each level receives appropriate light exposure and can be easily accessed for maintenance. The key to success lies in creating an efficient maintenance routine that allows easy access to all plants. Position frequently harvested herbs and vegetables within comfortable reach, and install a pulley system for higher hanging baskets if necessary.
Create a maintenance schedule that includes regular pruning, fertilizing, and system checks. When adapting this system to different spaces, consider weight restrictions and available light patterns. For sunny balconies, maximize vertical space with double-sided growing walls. In shadier areas, focus on leafy greens and shade-tolerant herbs.
Install reflective surfaces to bounce light onto plants, and choose compact varieties bred specifically for container growing. Consider incorporating horizontal growing bars that can be adjusted seasonally to optimize sun exposure and create additional growing space when needed.
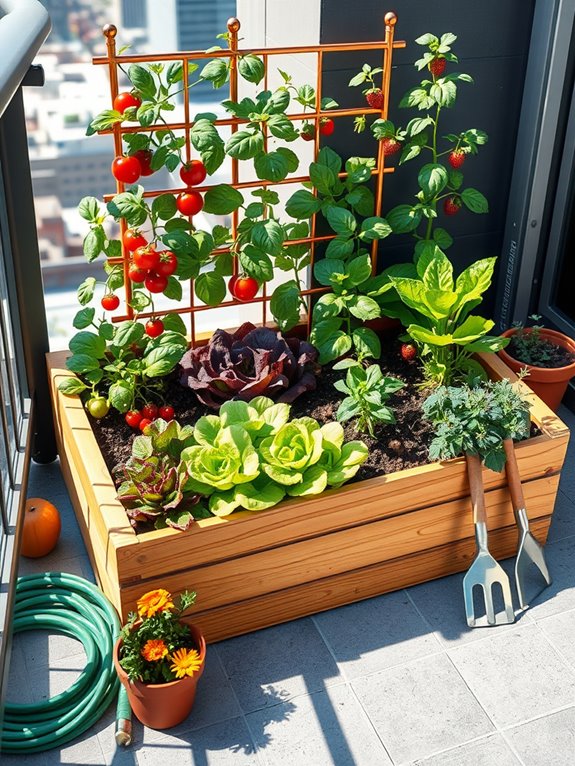
Raised Bed Construction and Layout
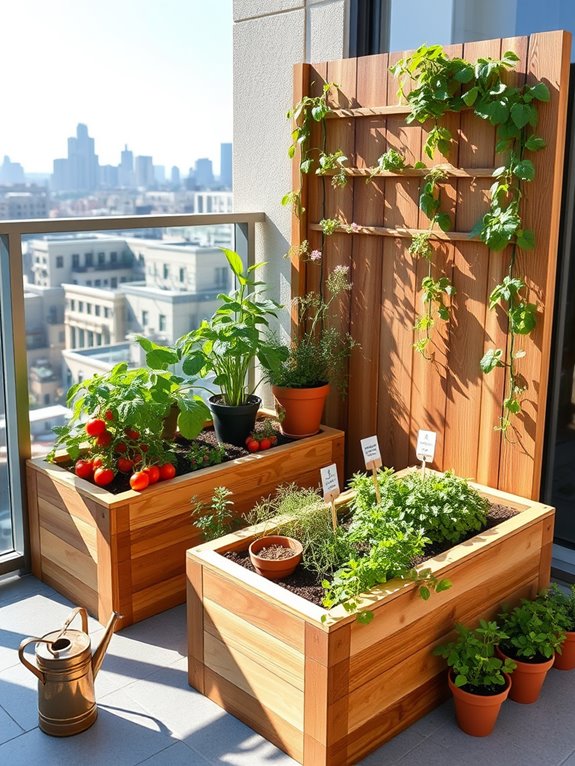
Picture a series of handcrafted wooden raised beds, their rich cedar tones creating an organized yet organic pattern across your garden space. The beds rise like floating islands of abundance, filled with layers of dark, fertile soil and crowned with lush vegetables in neat rows. Trellises stand as architectural elements, supporting climbing peas and runner beans that reach skyward, while compact tomato plants add splashes of red and yellow against the deep green backdrop.
The geometric precision of raised beds transforms your garden into an outdoor room, with wide pathways allowing easy access to every plant. Square and rectangular beds create a pleasing grid pattern that satisfies both the eye and the practical gardener’s needs. Herbs border the edges, their varied textures and heights softening the linear design while providing aromatic borders that attract beneficial insects and create a multi-sensory experience.
Essential Elements:
- Wooden boards (cedar or pressure-treated lumber)
- Corner posts and brackets
- Hardware (screws, nails)
- Landscape fabric
- Quality soil mix
- Irrigation system components
- Path materials (gravel, mulch, or pavers)
- Trellises or support structures
- Edge barriers
- Level and measuring tools
Construction begins with site preparation, ensuring proper drainage and sunlight exposure. Layout your beds in a north-south orientation when possible, maintaining 2-3 foot pathways between beds for comfortable access.
Standard bed dimensions of 4 feet wide by 8 feet long allow easy reach from all sides, while depths of 12-18 inches accommodate most vegetable root systems. Install irrigation systems before filling with soil, and incorporate vertical growing supports during the initial build to ensure structural integrity.
For optimal space utilization, consider vertical growing opportunities by installing permanent trellis systems along the north sides of beds. Create designated zones within each bed based on plant height and growing season, with taller plants positioned to avoid shading shorter ones. Implement companion planting strategies by grouping compatible vegetables together, maximizing both space and yield potential.
Adaptation Tips: For smaller spaces or balcony gardens, consider modular raised bed systems that can be reconfigured as needed. Use corner brackets that allow for easy disassembly and height adjustments.
In limited spaces, focus on high-value crops and incorporate vertical growing whenever possible. For weight considerations on balconies, use lightweight growing media and consider self-watering designs to reduce overall mass while maintaining optimal growing conditions.
Remember to check weight restrictions and waterproofing requirements for elevated installations.
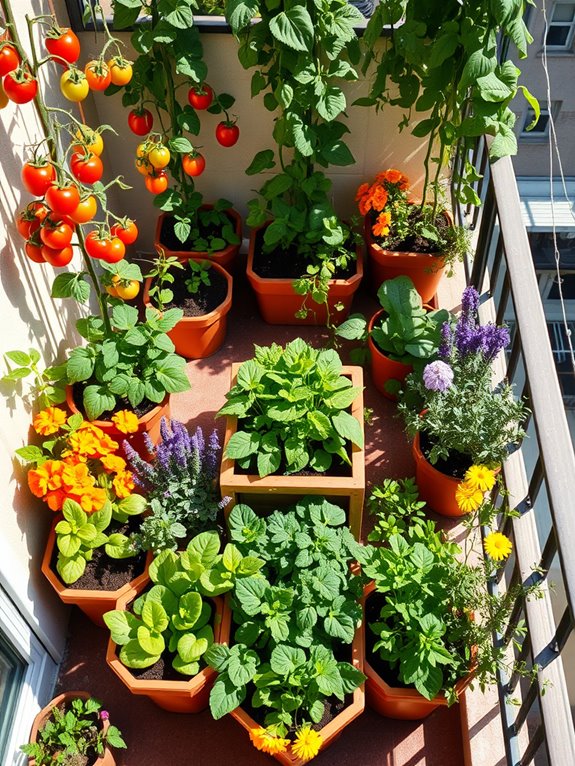
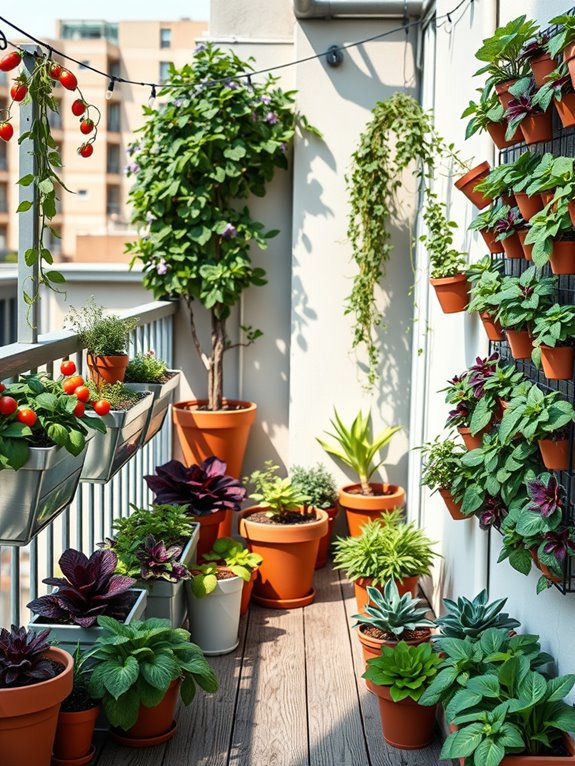
Container Gardening Essentials
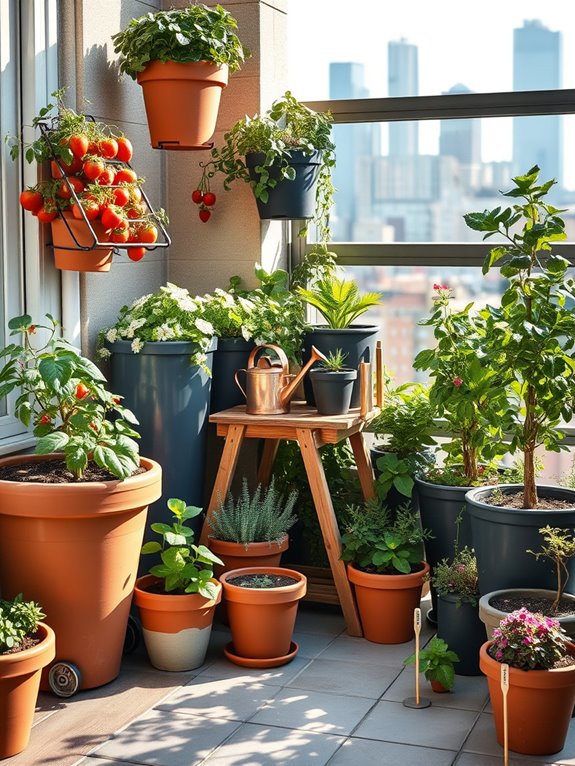
Transform your balcony, patio, or small outdoor space into a thriving food oasis with an array of vibrant containers bursting with edible possibilities. Terracotta pots filled with cascading cherry tomatoes create living curtains of red and gold, while sleek modern planters host a tapestry of fresh herbs in varying shades of green.
Vertical towers showcase strawberries at eye level, their white flowers and red fruits adding pops of color against metallic or wooden container surfaces. The arrangement creates an intimate garden room feeling, with varying heights of containers creating visual interest and maximizing growing space.
Compact blueberry bushes in large decorative pots serve as anchor points, while hanging baskets overflow with trailing herbs and compact vegetables. The mix of container materials – from classic clay to contemporary metal and repurposed wooden boxes – adds texture and personality while supporting a diverse edible ecosystem.
Essential Elements:
- Containers of various sizes (minimum 12″ depth)
- Quality potting soil with organic matter
- Container-specific fertilizer
- Irrigation system or watering cans
- Plant supports and trellises
- Rolling platforms for heavy containers
- Drainage trays
- Container-appropriate edible plants
- Mulch material
- Hand tools
Position larger containers along walls or railings, creating a foundation for your design. Place heavy pots before filling with soil, using rolling platforms for mobility. Arrange medium containers in tiers or on shelving units to maximize vertical space, ensuring all plants receive adequate sunlight.
Install an irrigation system with timers, or group plants with similar water needs together for efficient hand watering. Add trellises and supports at planting time to avoid disturbing roots later.
Small space gardeners should focus on high-yield crops that are container-friendly and match available sunlight conditions. For balconies under 50 square feet, use vertical growing systems and stick to dwarf varieties. Larger spaces can accommodate fruit trees in wheeled containers and dedicated herb sections.
Consider weight restrictions, prevailing winds, and water access when planning container placement and selecting your growing vessels. Microgreens and lettuces can thrive in shallow containers, while root vegetables need deeper pots – match container depth to plant requirements for optimal growth.
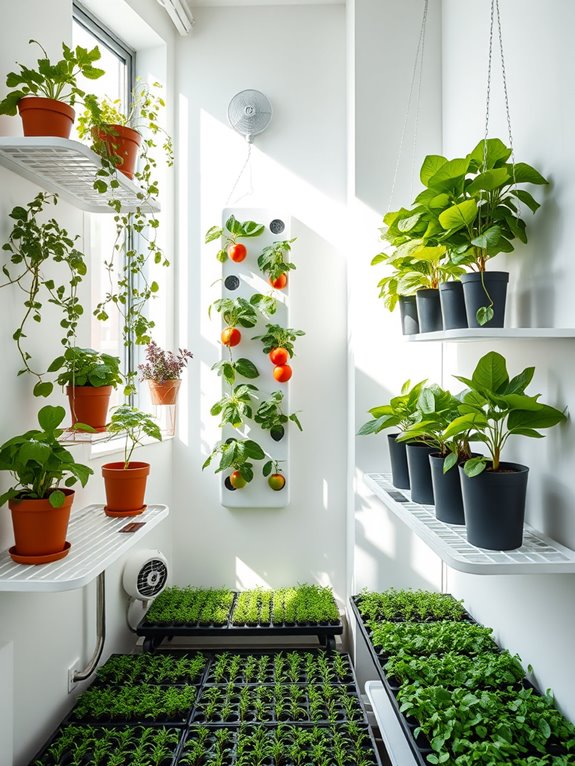
Hydroponic Growing Solutions
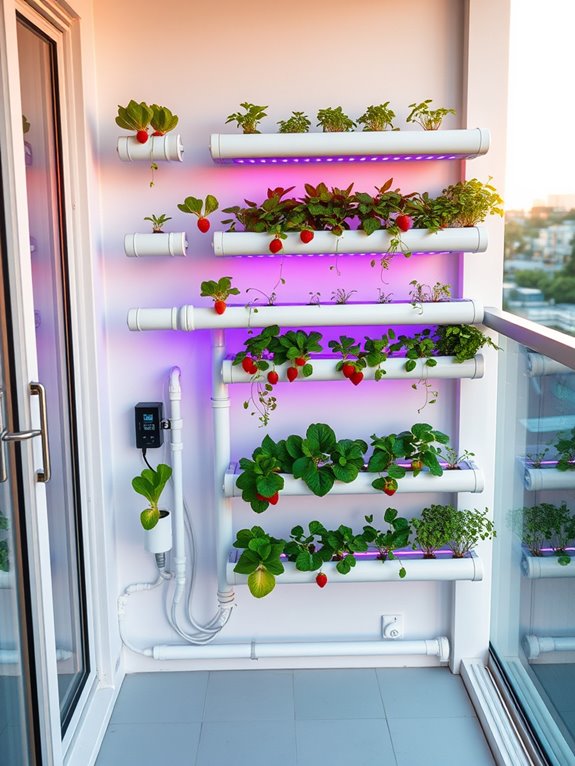
A modern hydroponic garden transforms any space into a sleek, efficient growing environment where gleaming water channels and nutrient-rich solutions nurture pristine rows of lettuce, herbs, and compact vegetables. The clean lines of PVC pipes and growing channels create an artistic pattern against walls or across tabletops, while the gentle sound of flowing water adds a soothing ambient element.
LED grow lights cast a purple-pink glow that creates an almost otherworldly atmosphere, especially during evening hours. The vertical possibilities of hydroponic systems allow for cascading strawberry towers, floating beds of fresh basil, and walls of crisp microgreens that bring life to previously unused spaces. Clear nutrient reservoirs reveal the intricate root systems developing beneath the surface, while the minimal soil usage creates a clean, contemporary aesthetic that fits perfectly in modern homes or urban settings.
Essential Elements:
- Growing channels or PVC pipes
- Submersible water pump
- Nutrient reservoir
- Air stones and air pump
- LED grow lights
- pH testing kit
- Hydroponic nutrients
- Growing medium (rockwool, clay pellets, or coco coir)
- Timer system
- Water-resistant shelving or support structure
Implementation begins with selecting a water-resistant location and installing a tiered support system that allows for proper water flow between levels. Mount the primary reservoir at the lowest point, connecting it to elevated growing channels using food-grade tubing and a reliable pump system.
Position air stones within the reservoir to maintain oxygen levels, and install LED lighting approximately 12-18 inches above each growing level. The timer system should coordinate both water flow and lighting schedules, typically running in 15-minute intervals for water and 12-16 hours for lights.
For optimal results, maintain water temperature between 65-75°F (18-24°C), check pH levels twice weekly, and clean the system monthly to prevent algae buildup. Regular nutrient solution changes every 2-3 weeks ensure proper plant nutrition.
Start with easy-growing plants like lettuce or herbs before progressing to more demanding crops like tomatoes or peppers.
Adaptation Tips: Small balconies can utilize vertical A-frame systems or wall-mounted channels to maximize space, while larger areas might accommodate multiple connected systems or specialized deep water culture setups.
Consider incorporating a backup power supply for pump operation, and install an automatic top-off system for convenience. For areas with limited natural light, supplement with additional grow lights, and use reflective materials on walls to maximize light efficiency. In warmer climates, consider adding a small chiller to the reservoir to maintain optimal water temperatures.
Herb Garden Planning and Design
A thoughtfully designed herb garden transforms any outdoor space into a fragrant sanctuary of culinary possibilities. Neat rows of silvery sage intermingle with the deep purple spikes of lavender, while compact bushels of emerald basil and feathery dill create a tapestry of textures.
Terracotta pots stationed at varying heights add warmth and Mediterranean charm, while weathered stone pathways wind between raised beds filled with thyme, oregano, and flowering chives.
The garden comes alive with the gentle hum of pollinators drawn to the herb blossoms, creating a peaceful retreat that engages all senses. Rosemary stands sentinel along borders, its woody stems reaching skyward, while creeping varieties of mint cascade over bed edges.
Strategic placement of aromatic varieties ensures that every footstep releases subtle fragrances, making even the smallest herb garden an immersive experience.
Essential Elements:
- Raised beds or containers with proper drainage
- Mediterranean herbs (rosemary, sage, thyme, oregano)
- Culinary basics (basil, parsley, chives)
- Stone or gravel pathways
- Terracotta pots
- Garden markers or labels
- Seating area
- Water source
- Tool storage
- Vertical growing structures
Begin implementation by selecting a location that receives 6-8 hours of daily sunlight. Create a foundation of well-draining soil enriched with organic matter, arranging herbs according to water needs—Mediterranean varieties together in drier areas, moisture-loving herbs in separate sections.
Position taller herbs like rosemary and sage toward the north side to prevent shading smaller plants. Incorporate vertical elements such as trellises or tiered planters to maximize growing space and add visual interest.
For optimal maintenance, establish clear pathways between plantings, allowing easy access for harvesting and care. Group herbs with similar growing requirements together, creating distinct zones for annuals and perennials.
Install an efficient irrigation system or position plants within easy reach of water sources.
When adapting this design for different spaces, consider container gardening for small balconies, using wall-mounted planters or hanging baskets to maximize vertical space.
For larger areas, create dedicated sections for tea herbs, culinary varieties, and medicinal plants. Incorporate dwarf varieties for compact spaces, and remember that many herbs thrive in containers, making the design adaptable to any setting—from tiny urban balconies to sprawling garden plots.
Square Foot Gardening Method
Square foot gardening transforms ordinary backyard spaces into organized, productive micro-farms that blend form and function. Neat wooden boxes filled with rich, dark soil create an appealing geometric pattern across the landscape, while carefully spaced plants grow in tidy squares. Vibrant tomatoes climb upward on sturdy trellises, while compact herbs and lettuce varieties create a living checkerboard of greens, purples, and silvers below.
The methodical layout brings a sense of order and calm to the garden space, making it both visually striking and highly efficient. Each square foot becomes its own miniature garden, hosting different crops that complement each other in height and color. Marigolds and nasturtiums add bright pops of orange and yellow between vegetables, while vertical elements like pole beans and cucumber vines add dramatic height and movement to the overall design.
Key Elements:
- Raised wooden beds (4’x4′ recommended)
- Grid system (string or wood)
- Rich soil mix (equal parts compost, peat moss, vermiculite)
- Vertical trellises
- Plant markers
- Irrigation system
- Walking paths between beds
- Garden tools
- Selected seeds and seedlings
Start by building or purchasing 4’x4′ raised beds and filling them with the specialized soil mix. Create a grid system dividing each bed into 16 one-foot squares using thin strips of wood or string.
Plant each square according to spacing guidelines: one large plant (like tomatoes or peppers) per square, four medium plants (like lettuce or swiss chard), or 16 small plants (like radishes or carrots). Install vertical supports along the north side of beds to maximize growing space while preventing shade on smaller plants.
For ongoing maintenance, keep paths clear and maintain the grid system visibility. Water deeply but infrequently, focusing on the root zone of each plant. Practice succession planting by replacing harvested crops with new seedlings throughout the growing season. Monitor plant spacing carefully to prevent overcrowding and maintain the organized aesthetic.
Extra Tips: Square foot gardens can be adapted to any space by adjusting bed sizes and configurations. For balconies, use smaller 2’x2′ or 2’x4′ beds with lightweight soil mix, and focus on compact varieties of vegetables.
Consider using self-watering containers for areas with limited access, and maximize vertical space with hanging planters or wall-mounted beds. In windy locations, secure grids and trellises firmly and choose lower-growing plant varieties.
Greenhouse and Cold Frame Techniques
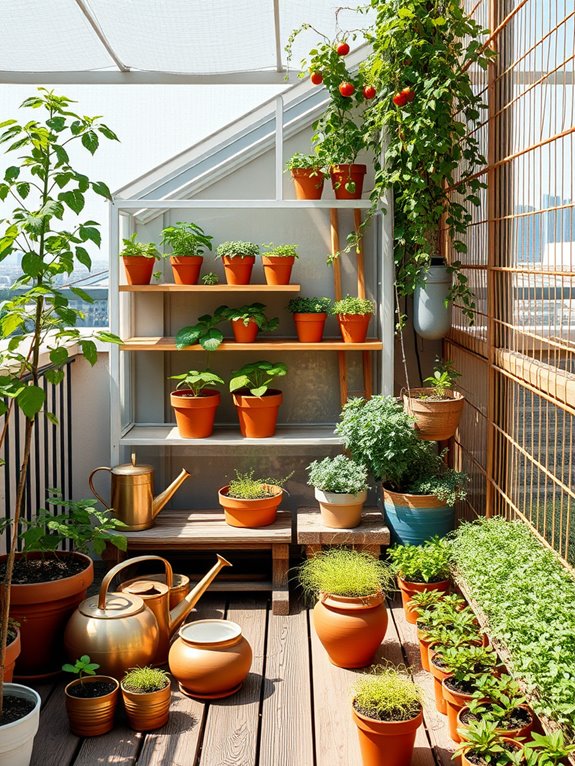
A greenhouse garden space transforms an ordinary backyard into a verdant oasis of possibility, where delicate seedlings stretch toward diffused sunlight and tropical plants thrive despite chilly weather outside.
The translucent walls create a magical atmosphere as sunbeams filter through, casting gentle shadows across rows of emerging vegetables and fragrant herbs. Wooden shelving units lined with terra cotta pots showcase cascading vines of cherry tomatoes, while sturdy benches hold flats of emerging lettuce and peppers.
Cold frames nestle into strategic corners, their hinged glass tops protecting hardy greens and root vegetables from frost while extending the growing season well into winter.
These mini-greenhouses blend seamlessly with the landscape, their wooden frames weathering to a natural gray that complements both modern and rustic garden designs. The combination of greenhouse and cold frame spaces creates a year-round growing environment that’s both functional and aesthetically pleasing.
Essential Elements:
- Greenhouse structure (glass or polycarbonate)
- Ventilation systems
- Growing benches and shelving
- Irrigation setup
- Temperature control devices
- Cold frame boxes
- Hinged transparent lids
- Growing medium and containers
- Plant support systems
- Shade cloth or screening
- Storage space for tools
Begin by selecting a level site with maximum sun exposure, installing your greenhouse with its longest side facing south. Layer the interior with sturdy benches along the walls, leaving a central walkway for access.
Install automatic ventilation systems at the roof peak and consider supplemental fans for air circulation. Position cold frames nearby, partially sunken into the ground for temperature stability, with their sloped tops angled south at approximately 35 degrees.
For successful maintenance, establish a regular watering schedule using automated systems when possible. Rotate plant positions based on their light requirements, keeping taller plants toward the back (north side) to prevent shading.
Monitor temperature and humidity daily, adjusting ventilation as needed. Clean structures seasonally to maintain maximum light transmission and prevent pest issues.
Whether working with a full-sized greenhouse or adapting to smaller spaces, these growing environments can be scaled to fit your needs.
For limited areas, consider lean-to greenhouses that attach to existing walls, or mini greenhouse shelving units for balconies. Portable cold frames can be particularly effective for small spaces, as they can be moved to follow the sun or stored when not in use.
Focus on vertical growing techniques and use hanging baskets to maximize growing space in any sized structure.
Companion Planting Strategies
Imagine stepping into a harmonious garden where plants work together in perfect symphony – tall corn stalks create natural support for climbing beans, while squash spreads beneath them, its broad leaves providing natural mulch and shade. This classic Three Sisters arrangement is just the beginning of your companion planting paradise, where herbs like basil nestle between tomato plants, marigolds border garden beds with cheerful orange blooms, and nasturtiums cascade over the edges, their edible flowers adding splashes of vibrant color.
The garden buzzes with beneficial insects attracted by companion flowers, creating a living ecosystem where dill and fennel host butterfly larvae, while lavender and borage draw in crucial pollinators. Plants are thoughtfully grouped in guilds, with aromatic herbs protecting vegetables from pests, root vegetables growing alongside leaf crops, and climbing plants sharing space with low-growing ground covers in a beautiful display of natural cooperation.
Key Elements:
- Tall support plants (corn, sunflowers, pole beans)
- Ground cover plants (squash, sweet potatoes)
- Aromatic herbs (basil, oregano, thyme)
- Flowering companions (marigolds, nasturtiums, borage)
- Vertical growing structures
- Plant spacing markers
- Garden layout plan
- Complementary plant groupings
- Natural pest deterrent plants
Implementation begins with careful planning of plant groupings based on their mutual benefits. Create a layout that positions tall plants on the north side to prevent shading, then arrange medium-height plants in the middle and ground covers at the southern edge. Space plants according to mature sizes while considering their companionship benefits – for example, place carrots near tomatoes, as they grow at different soil depths and share nutrients efficiently.
Establish herbs throughout the garden in strategic locations where their pest-deterrent properties can protect multiple vegetable groups. Consider microclimates within your garden space when adapting this design to different sizes. For small balconies, use vertical growing systems and concentrate on highly beneficial partnerships like tomatoes with basil, or radishes with lettuce.
Essential companions can be grown in containers, while climbing plants can be trained up walls or railings to maximize space. Remember that even in confined spaces, the principles of companion planting – such as pairing heavy feeders with light feeders, or aromatic pest deterrents with vulnerable crops – remain equally effective at any scale.
Year-Round Indoor Growing
Transform any room into a lush, productive oasis with a year-round indoor growing space that merges functionality with natural beauty.
Emerald-leafed herbs cascade from floating shelves while compact tomato plants stretch toward grow lights, creating an ever-changing tapestry of edible greenery. Stylish terracotta pots and sleek hydroponic towers stand as both functional growing vessels and artistic elements, while the soft hum of circulation fans adds a gentle ambiance to this living pantry.
The space radiates with purpose and possibility, featuring vertical growing walls adorned with lettuce varieties in vibrant greens and deep purples. Cherry tomatoes ripen alongside compact pepper plants, while microgreens create a carpet of tender shoots in perfectly aligned trays.
Moisture-loving herbs thrive in kitchen window boxes, and dwarf citrus trees in decorative containers serve as natural room dividers, their glossy leaves reflecting artificial and natural light.
Key Elements:
- LED grow lights with adjustable heights
- Vertical growing systems
- Multi-tier shelving units
- Temperature and humidity monitors
- Irrigation system or self-watering containers
- Oscillating fans
- Growing medium (soil, coco coir, or hydroponic supplies)
- Timer systems
- Plant containers in various sizes
- Drainage trays
- Air-purifying filters
Position your growing stations against walls or in corners where they can be properly supported and accessed.
Install grow lights on adjustable chains, ensuring they hang 6-24 inches above plants, depending on the species.
Arrange plants by height and light requirements, with shade-tolerant varieties on lower shelves. Implement a drip irrigation system or self-watering setup to maintain consistent moisture levels, and position fans strategically to prevent mold and strengthen plants.
Adapt your indoor garden to available space by utilizing vertical space efficiently.
For small areas, focus on compact varieties and herbs, using wall-mounted systems and hanging baskets. Larger spaces can accommodate free-standing hydroponic units or multiple growing stations.
Consider incorporating a workstation for seedling preparation and maintenance tasks, and install easy-to-clean flooring or protective mats in growing areas.
Monitor temperature and humidity closely, as indoor environments can fluctuate significantly with heating and cooling systems.
Edible Landscaping Designs
Transform your outdoor space into a stunning fusion of form and function with an edible landscape that delights both the eyes and the palette. Graceful clusters of rainbow chard create dramatic borders alongside flowering herbs, while espaliered fruit trees form living walls that add vertical interest.
Purple basil mingles with ornamental kale, creating a tapestry of textures and colors that rivals traditional ornamental gardens. Architectural artichoke plants serve as striking focal points, their silvery-green leaves catching the light and adding drama to the landscape.
Stepping stones wind through beds of strawberries that act as ground cover, while climbing grape vines drape elegantly over pergolas, providing both shade and sustenance. Blueberry bushes offer year-round interest with spring flowers, summer fruit, and brilliant fall foliage.
Decorative elements like obelisks support climbing peas and beans, while raised beds bordered with herbs create geometric patterns that please the eye while maximizing growing space.
Key Elements:
- Multi-level planting beds
- Vertical growing structures
- Fruit trees or espaliered fruit
- Ornamental edibles (colorful lettuce, rainbow chard, purple basil)
- Herb borders
- Edible ground covers
- Architectural plants (artichokes, cardoons)
- Stepping stones or pathways
- Trellises or pergolas
- Container groupings
- Water features or irrigation systems
Begin implementation by mapping your space and identifying key viewing areas from both inside and outside your home. Create a master plan that incorporates layers of height, from ground covers to mid-height vegetables to taller fruit trees or climbing structures.
Install hardscaping elements first, including irrigation systems, raised beds, and pathways. Group plants according to water needs and sun requirements, using herbs and drought-tolerant edibles in drier areas.
Consider maintenance requirements when designing your layout, ensuring easy access to all growing areas for harvesting and care. Position frequently harvested herbs and vegetables near kitchen entrances, while placing larger, more permanent elements like fruit trees toward the back of the space.
Create year-round interest by including plants with different growing and harvesting seasons.
Design Tips and Adaptations: For smaller spaces or balconies, focus on vertical growing systems and container groupings that can be easily rearranged. Use dwarf varieties of fruit trees and compact vegetables bred for small spaces.
Incorporate mobile planters on wheels for flexibility, and maximize railing space with hanging planters. Consider removable trellises and seasonal rotation plans to maintain visual interest throughout the year while accommodating changing light conditions and space constraints.