
10 Garden Ideas for Growing Vertical Greens
When your garden space isn’t quite what you’d hoped for, you don’t have to limit your growing dreams. You’ll discover that vertical gardening opens up a world of possibilities, from charming repurposed pallets bursting with herbs to sleek hydroponic towers yielding fresh greens year-round. Whether you’re working with a tiny balcony or a modest backyard, these innovative growing solutions will transform your vertical space into a thriving, edible oasis. Let’s explore how you can multiply your growing area without expanding your footprint.
Contents
- 1 Repurposed Pallet Gardens for Small Spaces
- 2 Living Wall Systems With Integrated Irrigation
- 3 DIY Trellis Designs for Climbing Vegetables
- 4 Hanging Gutter Gardens for Herbs and Greens
- 5 Multi-Tiered Container Systems
- 6 Vertical Hydroponic Towers
- 7 Espalier Fruit Trees Along Fences
- 8 Pocket Garden Solutions for Walls
- 9 Vertical Garden Structures From Recycled Materials
- 10 Space-Saving Garden Towers for Urban Areas
Repurposed Pallet Gardens for Small Spaces
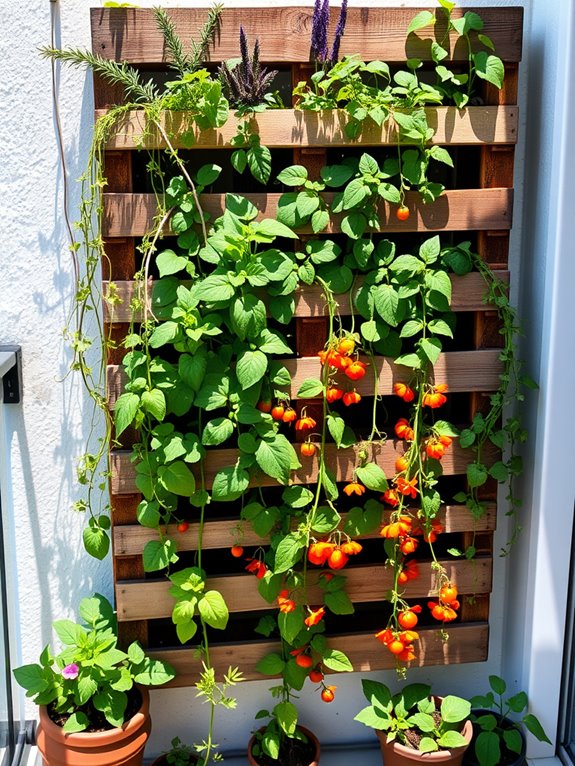
Transform your small outdoor space into a charming vertical oasis with a repurposed pallet garden that combines rustic charm with modern urban gardening. Weather-worn wooden pallets, painted in soft sage or left naturally weathered, create an eye-catching living wall where cascading herbs mingle with compact vegetables and trailing flowers.
The vertical layers burst with texture and color as thyme spills over edges, cherry tomatoes peek through gaps, and nasturtiums add bright pops of orange and yellow against the wooden backdrop. This space-saving solution turns ordinary walls into productive growing spaces while adding architectural interest to modest balconies or patios.
The multi-tiered design allows for creative plant combinations, with deeper pockets supporting leafy greens like butter lettuce and spinach, while shallow spaces host aromatic herbs such as basil, oregano, and mint. Solar-powered fairy lights woven through the structure create a magical ambiance at dusk, transforming the practical garden into an enchanting evening retreat.
Essential Elements:
- Wooden pallets (heat-treated, food-safe)
- Landscape fabric
- Potting soil
- Mounting brackets and hardware
- Drainage system
- Drip irrigation components
- Plant varieties suitable for vertical growing
- Weather-protective sealant
- Tools for assembly
Begin implementation by thoroughly cleaning and sanding the pallet, then applying a weather-resistant sealant to prevent rot. Line the back and bottom with landscape fabric, creating individual pockets for planting while ensuring proper drainage.
Mount the pallet securely to the wall using heavy-duty brackets, ensuring it can support the weight of wet soil and mature plants. Install a simple drip irrigation system along the top tier, allowing water to naturally flow downward through the levels.
Consider carefully positioning plants based on their light requirements and growth habits – place sun-loving plants in upper tiers and shade-tolerant varieties below. Ensure the pallet is mounted with slight forward tilt to retain water while preventing waterlogging. Regular maintenance includes pruning, fertilizing, and checking the irrigation system for clogs.
For different balcony sizes, adjust the number of pallets or their orientation. Smaller spaces might benefit from a single pallet mounted horizontally, while larger areas can accommodate multiple pallets arranged in patterns.
Consider incorporating companion planting principles to maximize yield and naturally deter pests. In windy locations, add wind breaks or choose more compact plant varieties. For year-round interest, include both seasonal and perennial plants, and consider installing a cover during extreme weather conditions.
Living Wall Systems With Integrated Irrigation
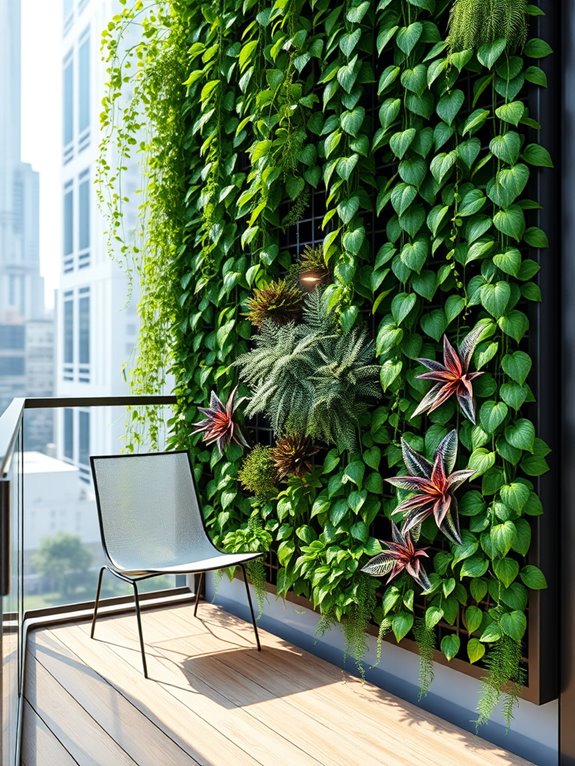
Transform any vertical space into a lush, cascading masterpiece with a living wall system that seamlessly integrates irrigation for effortless maintenance.
Picture a verdant tapestry of ferns, philodendrons, and flowering vines creating an enchanting green canvas that appears to defy gravity. The integrated irrigation system disappears behind the foliage, allowing the plants to take center stage while maintaining optimal moisture levels throughout the living artwork.
The atmosphere created by a living wall system brings nature’s tranquility to urban spaces, with plants arranged in intricate patterns that catch light and shadow throughout the day.
Varieties like pothos, peace lilies, and spider plants create depth and texture, while pockets of colorful bromeliads and orchids add dramatic focal points. The gentle sound of water moving through the irrigation system adds a meditative quality to the space, creating a peaceful retreat.
Essential Elements:
- Modular wall panels or pocket systems
- Automated irrigation system with timer
- Moisture-resistant backing board
- Growing medium appropriate for vertical gardens
- Plant varieties suited for vertical growth
- Drainage collection system
- LED grow lights (for low-light areas)
- Fertilizer injection system
- Maintenance access points
- Water-efficient drip emitters
Installation begins with securing a moisture-resistant backing to the wall and attaching the modular panels or pocket systems.
The irrigation system should be installed in zones, allowing for different watering schedules based on plant needs and position on the wall. Connect the main water line to a timer and pressure-regulated system, ensuring even distribution throughout the living wall.
Position plants according to their light requirements and growth patterns, with trailing varieties at the top and compact growers in the middle and bottom sections.
Critical maintenance involves regular monitoring of the irrigation system, checking for clogs or leaks, and adjusting water flow as seasons change.
Prune plants to maintain desired shape and prevent overcrowding, and replace any struggling specimens promptly to maintain the wall’s aesthetic appeal. Fertilizer should be administered through the irrigation system according to plant needs and growing seasons.
Design Adaptations:
For smaller balconies, consider creating a modular system that can be expanded over time, starting with a single panel and adding more as budget and space allow.
Use lightweight systems for rental properties or temporary installations, and incorporate seasonal plants that can be easily swapped out.
In areas with limited natural light, supplement with grow lights and choose shade-tolerant species.
For maximum impact in minimal space, focus on plants with interesting foliage patterns and varying textures rather than relying solely on flowers for visual interest.
DIY Trellis Designs for Climbing Vegetables
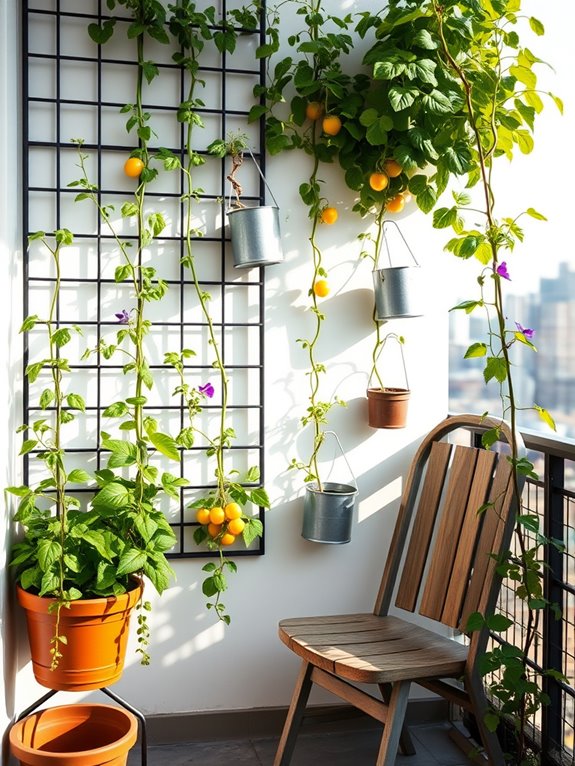
Transform your garden into a living wall of flourishing vegetables with artfully designed DIY trellises that combine form and function. Climbing green beans wind their way up handcrafted wooden lattices, while sprawling cucumber vines embrace metal archways, creating natural curtains of edible bounty. The vertical landscape becomes a tapestry of colors and textures, with purple pole beans, yellow squash blossoms, and the bright red jewels of cherry tomatoes dotting the verdant canvas.
The architectural elements of DIY trellises add visual interest even in winter months, with options ranging from rustic branch tepees to sleek metal grid panels. Morning glories and nasturtiums can be interplanted with vegetables, adding splashes of color as they climb alongside their edible companions.
The vertical design creates intimate garden rooms and pathways, transforming even small spaces into productive growing areas while maintaining an aesthetic appeal.
Essential Elements:
- Wooden lattice panels
- Metal grid panels or cattle panels
- Bamboo poles or natural branches
- Twine or garden wire
- Post anchors or support stakes
- Climbing vegetables (beans, peas, cucumbers)
- Flowering vines
- Wire clips or plant ties
- Weather-resistant screws and hardware
Position trellises along north-facing garden edges to prevent shading other plants, ensuring sturdy anchoring at least 18 inches deep. Space supports every 4-6 feet, depending on the weight of mature plants.
Create modular designs that can be easily dismantled for seasonal storage, using removable panels or folding structures. Install guide wires or strings between main supports to provide additional climbing surfaces for younger plants.
Design Considerations: Adapt trellis height to available space, keeping structures under 6 feet for easy maintenance on balconies or 8-10 feet for garden beds.
Consider wind exposure and use cross-bracing for stability in exposed areas. For balcony gardens, utilize railing-mounted designs or freestanding containers with built-in supports. Incorporate multi-level growing spaces by combining hanging planters with vertical trellises to maximize growing area in limited spaces.
Hanging Gutter Gardens for Herbs and Greens
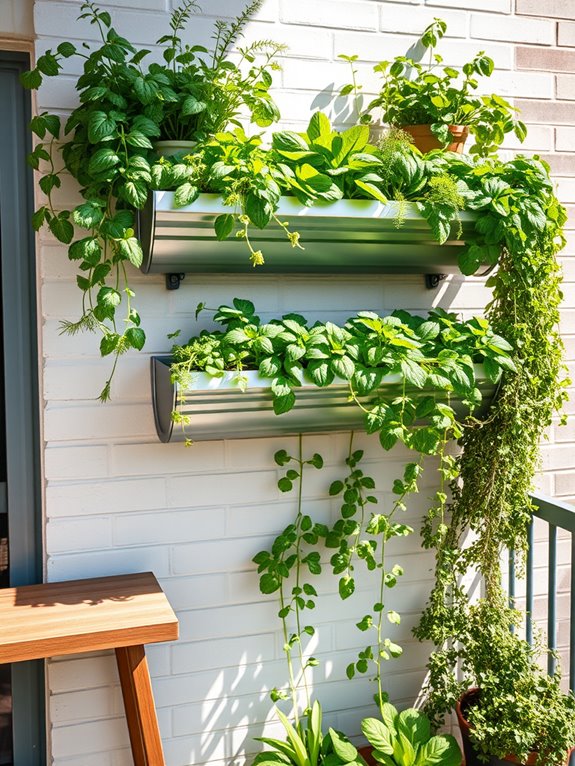
Transform your outdoor space into a lush, cascading display of herbs and greens with a hanging gutter garden that combines industrial charm with natural beauty. Repurposed rain gutters, mounted in neat horizontal rows, create an eye-catching living wall where fresh herbs and tender lettuce leaves spill over the edges. The silvery shine of aluminum gutters contrasts beautifully with the vibrant greens of basil, parsley, cilantro, and delicate microgreens, creating a modern geometric pattern that doubles as a functional kitchen garden.
The vertical arrangement maximizes growing space while adding architectural interest to blank walls or fence sections. As the plants mature, the rigid lines of the gutters soften beneath waves of aromatic herbs and crisp salad greens. The gentle movement of leaves in the breeze adds a dynamic element to the display, while the varied textures and shades of green create depth and visual interest throughout the growing season.
Key Elements:
- Vinyl or aluminum rain gutters
- Gutter end caps and mounting brackets
- Drainage holes
- Lightweight potting soil
- Herb and lettuce seedlings
- Wall anchors and screws
- Level
- Power drill
- Cable ties (optional)
- Drip irrigation system (optional)
Mount gutters on a sunny wall or fence, spacing them 12-18 inches apart vertically to allow adequate light penetration and easy harvest access. Drill drainage holes every 12 inches along the bottom of each gutter, then secure end caps and install mounting brackets according to wall type.
Fill gutters with lightweight potting mix, leaving one inch at the top for watering space. Plant herbs and greens at recommended spacing, typically 4-6 inches apart, alternating varieties for visual interest and optimal growth.
For maximum success, consider sun exposure patterns throughout the day, as well as the wall’s ability to bear the weight of soil-filled gutters. Choose compact varieties of herbs and greens that won’t outgrow the gutter’s depth. Regularly check mounting hardware and drainage holes to ensure system stability and proper water flow.
For larger walls, create multiple gutter sections with small gaps between them to allow for thermal expansion and easier maintenance access.
Multi-Tiered Container Systems
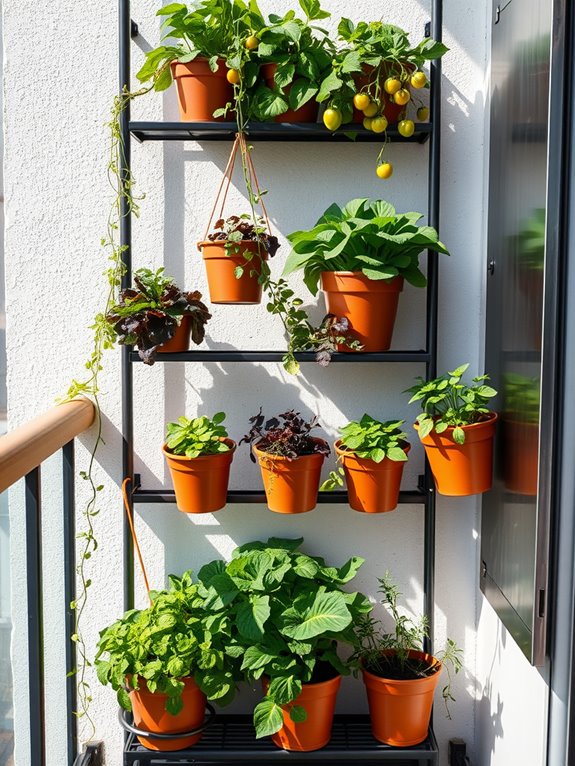
A cascading display of verdant life emerges from strategically stacked containers, creating a living wall of edible greens and flowering plants. Lettuce varieties in varying shades of green and purple spill over copper-toned terra cotta pots, while compact cherry tomatoes reach upward from the top tier. Trailing herbs like thyme and oregano create aromatic waterfalls between levels, their silver-green foliage catching afternoon light and releasing gentle fragrances with each breeze.
The multi-tiered arrangement transforms ordinary vertical space into a productive garden that doubles as a stunning architectural element. Each level presents a different height and depth perspective, allowing for a dynamic interplay of textures and colors. Compact vegetables like bush beans and dwarf peas occupy the deeper containers, while shallow-rooted crops like microgreens and radishes thrive in the smaller upper tiers.
Essential Elements:
- Sturdy shelving unit or tiered plant stand
- Containers of varying sizes (minimum 6″ depth)
- High-quality potting soil
- Drip irrigation system or self-watering containers
- Plant supports and trellises
- Drainage trays
- Growing lights (for indoor systems)
- Weather-resistant materials
- Plant markers
- Nutrient-rich compost
Begin installation by securing a robust shelving system to the wall or selecting a free-standing tiered unit rated for the weight of filled containers. Position larger containers on lower levels, ensuring each tier receives adequate light exposure.
Install a drip irrigation system that flows from top to bottom, or place self-watering containers strategically to maintain consistent moisture levels. Group plants with similar water and light requirements together, and establish support structures for climbing varieties before they begin vertical growth.
When designing a multi-tiered container system for different spaces, consider the available natural light and adjust the number of tiers accordingly. For smaller balconies, opt for narrow shelving units with built-in lighting systems, or create a corner installation to maximize space efficiency.
Use reflective materials behind plants to increase light exposure, and choose compact varieties bred specifically for container growing. Remember to account for mature plant size when spacing containers, and maintain easy access to all levels for harvesting and maintenance.
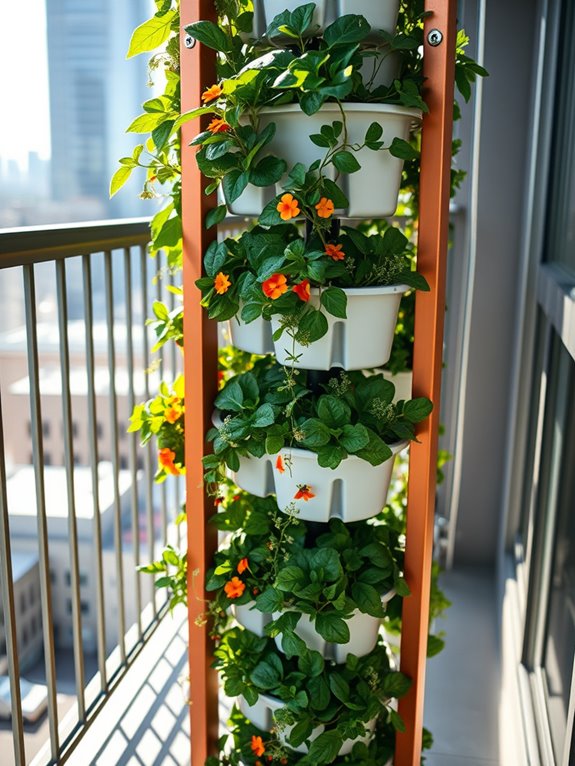
Vertical Hydroponic Towers
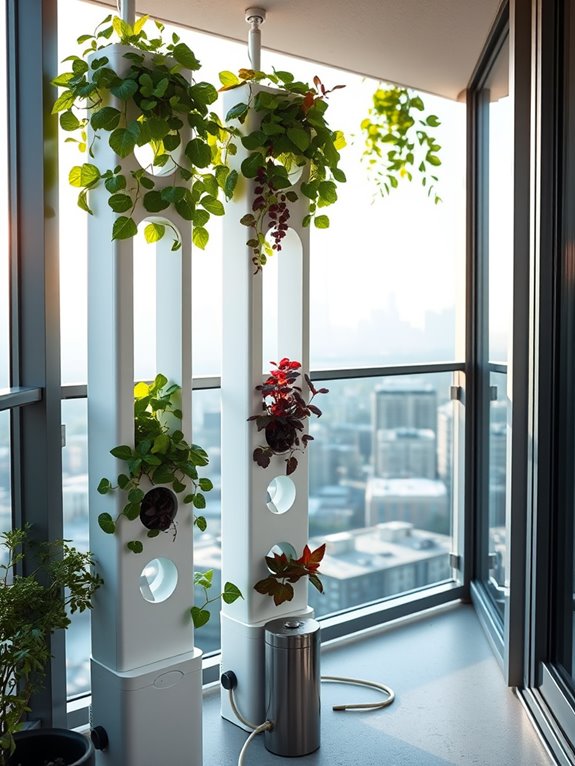
Sleek columns of verdant growth rise from minimalist white towers, creating a modern masterpiece of efficiency and beauty. The hydroponic towers stand like living sculptures, their perfectly spaced openings showcasing an array of leafy greens, herbs, and compact vegetables.
Lettuce varieties in shades of deep purple, bright green, and burgundy cascade downward, while compact herbs like basil, mint, and parsley create aromatic vertical gardens that transform any space into a futuristic food forest.
The clean lines of the vertical towers contrast beautifully with the natural growth patterns of the plants, creating an architectural element that doubles as a productive garden. Water trickles quietly through the system, providing a subtle ambient sound that adds to the peaceful atmosphere. LED grow lights can be incorporated to create dramatic evening lighting, turning the practical garden into an artistic display that changes throughout the growing cycle.
Essential Elements:
- Vertical hydroponic tower units
- Nutrient solution reservoir
- Water pump and timer
- Growing medium (coconut coir or clay pellets)
- pH testing kit
- Plant nutrients
- LED grow lights
- Seedling starter plugs
- Climate control system
- Drainage collection system
Begin by selecting a location with access to electricity and proper drainage. Position the tower units to maximize natural light exposure while maintaining easy access for maintenance.
Assemble the hydroponic system by connecting the reservoir to the towers using food-grade tubing, ensuring proper water flow through each level. Install the timer to regulate nutrient solution delivery, typically running for 15 minutes every hour during daylight hours. Test and adjust the pH levels weekly, maintaining a range between 5.5 and 6.5 for optimal nutrient absorption.
For balcony gardens of varying sizes, consider modular tower systems that can be scaled up or down. Small balconies might accommodate a single tower with 20-30 growing spots, while larger spaces can support multiple connected towers.
Ensure proper weight distribution by positioning towers near load-bearing walls, and install automatic monitoring systems to alert you of any changes in water levels or pH. Consider seasonal plant rotation and maintain backup seedlings to quickly replace harvested crops, keeping your vertical garden consistently productive and visually appealing year-round.
Espalier Fruit Trees Along Fences
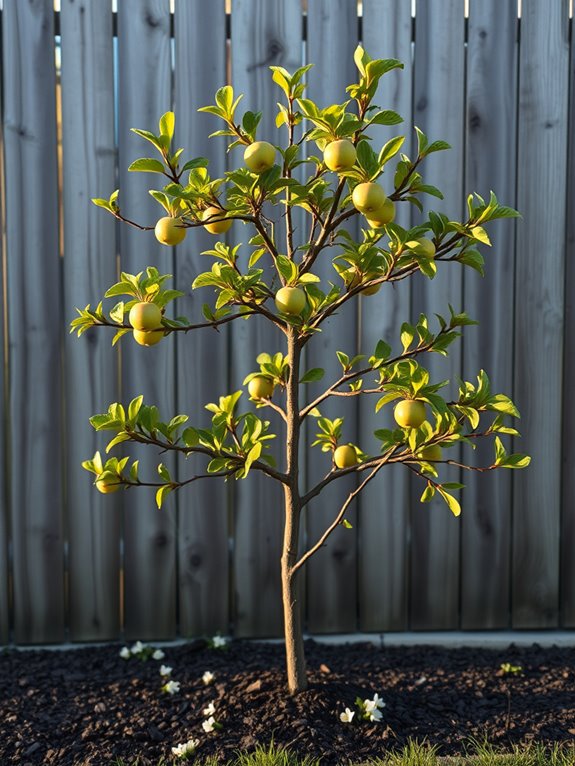
Transform your ordinary fence line into a living masterpiece with gracefully trained espalier fruit trees. The elegant branches stretch like nature’s artwork across the vertical plane, creating a stunning geometric pattern that changes with the seasons. Against the backdrop of your fence, apple, pear, or citrus branches weave an intricate tapestry, adorned with spring blossoms, summer fruits, and autumn foliage.
This classical European gardening technique brings both beauty and bounty to narrow spaces, turning mundane boundaries into productive garden features. The horizontal branches laden with fruit create a natural screen while maintaining an open, airy feel. The orderly arrangement of branches brings a sense of structure and formality, making it an ideal choice for both traditional and contemporary garden designs.
Key Elements:
- Young fruit trees suitable for espalier (apple, pear, plum)
- Strong fence or wall support system
- Wire training system
- Bamboo stakes
- Plant ties
- Pruning tools
- Well-draining soil
- Organic fertilizer
- Mulch
- Irrigation system
Begin by selecting a sturdy fence that receives 6-8 hours of sunlight daily. Install horizontal wires along the fence at 18-inch intervals, creating the framework for training.
Plant young fruit trees 12-15 feet apart, ensuring adequate root space. As the trees grow, gently tie developing branches to the horizontal wires, creating the classic espalier patterns – whether horizontal tiers, candelabra, or fan shapes. Regular pruning and training throughout the growing season maintains the desired form.
The key to success lies in early formative pruning and consistent maintenance. Select trees with flexible young branches, and begin training them while they’re still pliable. Maintain vigilant pest monitoring and proper fertilization schedules to ensure healthy growth and abundant fruit production. Water deeply but infrequently to encourage strong root development.
For smaller spaces, consider dwarf varieties or limit the espalier to two tiers instead of three or four. Belgian fence patterns work well for shorter boundaries, while palmette verrier patterns maximize vertical space on taller fences.
In urban settings, self-pollinating varieties ensure fruit production without requiring multiple trees. Always consider the mature size of your chosen fruit trees and plan accordingly to prevent overcrowding as the espalier develops.
Pocket Garden Solutions for Walls
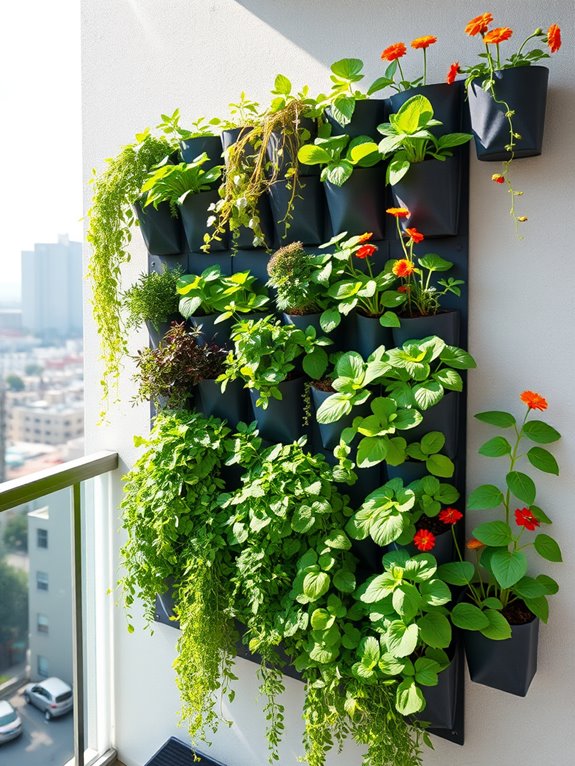
Transform any vertical surface into a lush, living tapestry with pocket gardens that turn blank walls into verdant displays of nature.
Fabric pocket planters cascade down walls like floating gardens, filled with trailing herbs, compact leafy greens, and delicate flowering plants. The varied textures of plants like creeping thyme, baby lettuce, and compact strawberries create an eye-catching dimensional effect, while different shades of green interspersed with edible flowers add visual interest and practical value.
The multi-tiered arrangement allows plants to flourish at different heights, creating microenvironments that suit various species. Morning light catches dewdrops on baby spinach leaves, while afternoon shadows play across cascading oregano and mint. The overall effect is both soothing and productive, transforming unutilized vertical space into a practical garden that provides fresh herbs and vegetables while doubling as living wall art.
Key Elements:
- Fabric pocket planters or modular wall-mounted containers
- Drip irrigation system or self-watering mechanisms
- Fast-draining potting soil mix
- Compact vegetable varieties
- Trailing herbs
- Small-scale flowering plants
- Wall anchors and mounting hardware
- Moisture barriers for wall protection
- Timer-controlled grow lights (optional)
Install a moisture barrier against the wall first, then secure sturdy mounting brackets at regular intervals. Position the pocket planters or modular containers, ensuring they’re level and properly spaced for plant growth.
Fill each pocket with lightweight, well-draining potting mix, and install an irrigation system that ensures consistent moisture distribution. Choose plants based on light conditions, placing sun-loving varieties at the top and shade-tolerant species lower down.
To maintain the garden, regularly check soil moisture levels and adjust irrigation as needed. Trim plants to prevent overcrowding, and rotate crops seasonally to maintain soil health and continuous production.
Replace soil annually and inspect mounting hardware periodically to ensure structural integrity.
For smaller spaces, focus on compact varieties and essential herbs, using fewer but larger pockets. Larger walls can accommodate multiple planting systems and more diverse species.
Consider incorporating LED grow lights for areas with limited natural light, and group plants with similar water needs together to optimize irrigation. Always assess weight limitations of the mounting surface and choose appropriate anchoring systems based on wall material and load requirements.
Vertical Garden Structures From Recycled Materials
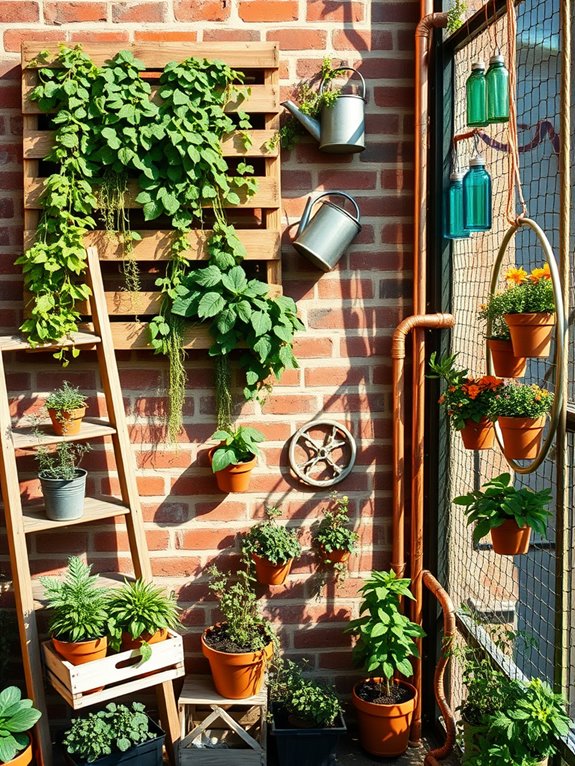
Transform your outdoor space into an eco-conscious vertical oasis using repurposed materials that add character while reducing waste. Old wooden pallets painted in weathered pastels serve as living walls bursting with cascading herbs and leafy greens, while vintage rain gutters mounted in zigzag patterns create striking linear gardens filled with trailing vines and compact vegetables. Rustic metal watering cans and antique milk crates become unique planters, adding whimsical charm as they house thriving strawberry plants and flowering herbs.
The vertical garden becomes a testament to creative sustainability, where recycled glass bottles form colorful light features between the greenery, and salvaged copper pipes create an industrial-chic irrigation system. Repurposed wooden ladders lean against walls, their rungs supporting potted ferns and air plants, while old bicycle wheels transformed into circular trellises support climbing peas and nasturtiums. The overall effect is an artistic blend of vintage charm and modern urban farming.
Key Elements:
- Wooden pallets
- Rain gutters
- Metal containers (watering cans, milk crates)
- Glass bottles
- Copper pipes
- Wooden ladders
- Bicycle wheels
- Wire mesh or chicken wire
- Rope or sturdy twine
- Weather-resistant paint
- Mounting brackets
- Drainage materials
Begin by thoroughly cleaning and treating all recycled materials to ensure they’re safe for growing food. Mount larger structures like pallets securely to walls using heavy-duty brackets, ensuring proper spacing for air circulation and plant growth. Create an efficient watering system by positioning containers with proper drainage and connecting them with recycled piping.
Layer different materials at varying heights and angles to maximize growing space while maintaining accessibility for maintenance. When designing your recycled vertical garden, consider weight distribution and water flow. Choose lightweight containers for upper levels and heavier ones for ground level. For smaller balconies, focus on modular systems that can be easily rearranged, such as stackable crates or hanging bottle gardens.
Weather-proof all wooden elements with eco-friendly sealants, and ensure metal containers have drainage holes and are lined with landscape fabric to prevent rust contact with soil. Remember that dark-colored containers will heat up more quickly, so position these thoughtfully to protect plant roots from overheating.
Space-Saving Garden Towers for Urban Areas
Transform your limited urban space into a lush vertical oasis with a carefully designed garden tower system. Multiple tiers of leafy greens cascade downward, creating a living wall of vibrant Swiss chard, spinach, and aromatic herbs. Copper-toned metal frames support modular planting containers, while trailing nasturtiums add splashes of orange and yellow among the predominant greens, creating a stunning visual tapestry that draws the eye upward.
The vertical arrangement maximizes natural light exposure, with each level catching sunlight at different angles throughout the day. Compact LED grow lights, strategically placed between levels, create a magical evening ambiance while extending growing hours. The sound of water trickling through the integrated irrigation system adds a peaceful element to the space, making it feel like a secret garden retreat despite its urban setting.
Essential Elements:
- Multi-tiered growing tower system
- Modular planting containers
- Drip irrigation system
- LED grow lights
- Support framework
- Drainage collection tray
- Timer-controlled watering system
- Weather-resistant materials
- Plant-specific growing medium
- Vertical trellising components
Begin implementation by securing the main support structure to a sturdy wall or creating a free-standing frame, ensuring it can bear the weight of fully saturated soil and mature plants.
Install the irrigation system starting from the top tier, allowing gravity to distribute water evenly through each level. Position containers at 45-degree angles to maximize sun exposure and create a cascading effect. Layer the growing medium with a mix of lightweight potting soil and water-retaining materials specific to your chosen plants.
Maintain the garden by regularly checking irrigation lines for clogs and adjusting watering schedules based on season and plant needs.
Rotate plants periodically to ensure even growth, and prune regularly to prevent overcrowding. Monitor the structural integrity of support systems monthly, particularly after extreme weather events.
For varying balcony sizes, adapt the tower design by modifying its footprint and height. Smaller spaces can utilize corner-mounted systems or slim, single-column designs, while larger areas might accommodate multiple towers or U-shaped configurations.
Consider incorporating fold-down or removable sections for seasonal adjustment, and always verify weight restrictions for your specific structure before installation. Light-reflecting materials can help compensate for shadowed areas in narrow spaces.