
10 Garden Ideas for a Fairy Tale Garden
You can transform your backyard into an enchanted wonderland that captures the magic of fairy tales with just a few creative touches. From crafting miniature doors nestled in tree trunks to arranging twinkling solar lights along winding stone paths, each element adds layers of whimsy and charm. Whether you’re starting with a small corner or planning a complete garden makeover, these ten magical ideas will help you create a space where imagination flourishes and everyday stress melts away.
Contents
- 1 Creating Miniature Fairy Doors and Windows
- 2 Designing Winding Pathways With Natural Materials
- 3 Incorporating Twinkling Garden Lights
- 4 Selecting Enchanted Garden Plants and Flowers
- 5 Building Tiny Fairy Houses and Cottages
- 6 Adding Magical Water Features and Fountains
- 7 Crafting Whimsical Garden Furniture
- 8 Setting Up Secret Garden Nooks
- 9 Installing Mystical Garden Art and Sculptures
- 10 Planting a Fairy Tale Herb Garden
Creating Miniature Fairy Doors and Windows
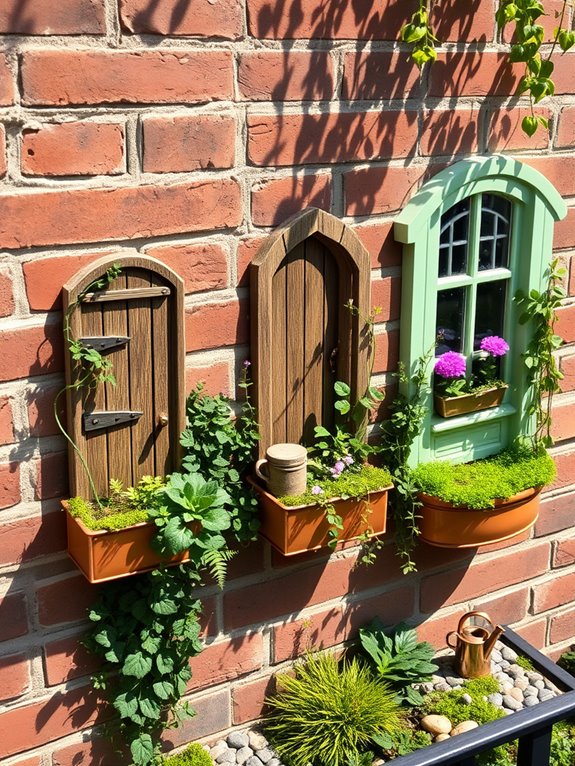
Miniature fairy doors and windows transform ordinary garden spaces into enchanting portals to magical realms. Nestled at the base of mature trees, tucked into stone walls, or peeking out from dense foliage, these whimsical additions create an air of mystery and wonder. The carefully crafted entrances, complete with tiny brass doorknobs, carved wooden frames, and diminutive window boxes filled with baby’s breath and miniature ivy, suggest the presence of unseen woodland residents.
These magical entryways become focal points that draw the eye and spark imagination, especially when surrounded by scaled-down gardens featuring thyme, moss, and tiny flowering plants like sweet alyssum. Weathered copper or brass hardware, small stepping stones leading to doorways, and delicate climbing vines frame these fairy portals, creating the illusion of centuries-old dwellings hidden within your garden landscape.
Essential Elements:
- Miniature doors (wood, resin, or metal)
- Tiny windows with shutters
- Micro hardware (hinges, doorknobs)
- Window boxes
- Miniature plants
- Moss and ground cover
- Small decorative stones
- Tiny garden tools
- LED fairy lights
- Weather-resistant sealant
To implement fairy doors and windows effectively, select locations that appear natural and somewhat hidden – the base of trees, within rock gardens, or along garden walls work particularly well. Install the pieces securely using weather-resistant adhesive or small screws, ensuring they can withstand outdoor conditions.
Create tiny garden beds around each entrance using moss, small-leaved ground covers, and miniature plants to establish scale and integration with the surrounding landscape. Position doors and windows at varying heights and angles to create depth and interest, as if multiple fairy families inhabit different levels of your garden.
Install small solar-powered or battery-operated LED lights nearby to create a magical glow during evening hours, and consider adding miniature pathways leading to each entrance using small pebbles or broken pottery pieces.
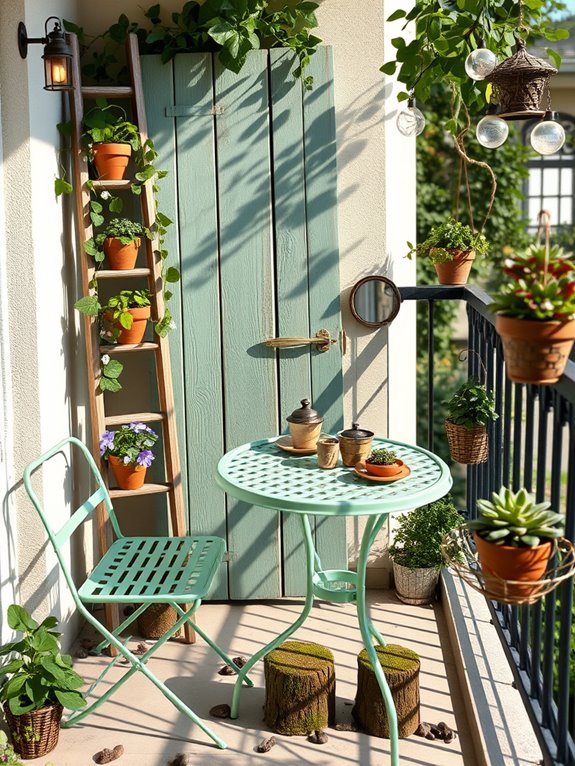
Design Tips: For smaller spaces or balcony gardens, use vertical surfaces like trellises or wall planters to mount fairy doors and windows, creating the illusion of fairy apartments or townhouses. Weather-proof all wooden elements with multiple coats of sealant, and choose UV-resistant materials when possible.
Consider seasonal changes when placing doors and windows, ensuring they remain visible when surrounding plants reach full growth. For maximum impact in limited spaces, cluster several smaller doors and windows together to create a fairy village effect, using varying styles and colors to suggest different fairy dwellings.
Designing Winding Pathways With Natural Materials

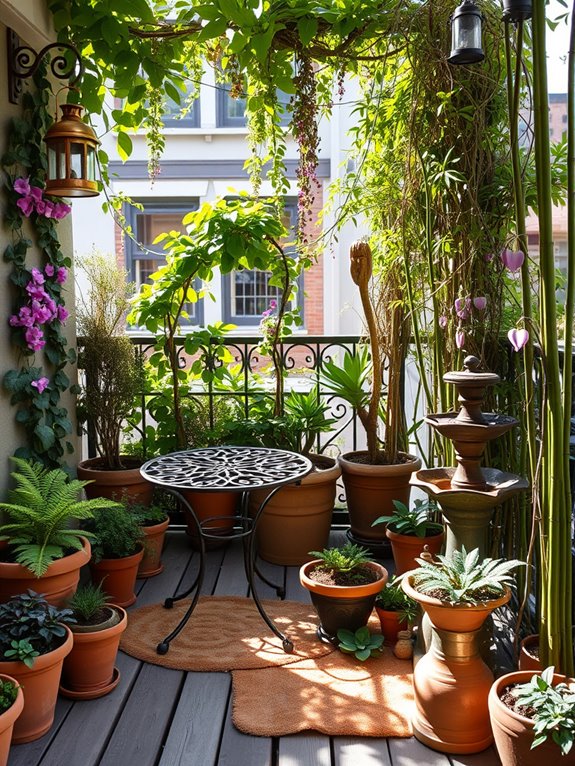
Meandering pathways crafted from natural materials transform an ordinary garden into an enchanted journey through a fairy tale landscape. Stepping stones of weathered flagstone weave between clusters of chamomile and thyme, while crushed seashells and river pebbles create glittering trails that catch the morning light.
Moss-covered logs serve as natural borders, with delicate woodland flowers like forget-me-nots and wild violets spilling onto the edges of these whimsical routes. The paths twist and turn, revealing hidden treasures at every bend – perhaps a small reflecting pool, a curved wooden bridge, or an ancient-looking stone archway draped in climbing roses.
Natural materials like bark mulch and pinecones create soft transitions between different path sections, while strategically placed ferns and ornamental grasses add movement and mystery to the journey, making visitors wonder what lies just around the next corner.
Essential Elements:
- Natural stone pavers or flagstones
- River rocks and pebbles
- Crushed shells or gravel
- Moss and ground covers
- Wooden elements (logs, bridges, archways)
- Border plants (thyme, chamomile, creeping jenny)
- Shade-loving plants for path edges
- Solar path lights
- Decorative elements (miniature houses, fairy doors)
- Mulch or wood chips
Creating these magical pathways begins with mapping out a flowing design that incorporates gentle curves rather than straight lines.
Layer the foundation with landscape fabric to prevent weed growth, then arrange larger elements like flagstones or wooden walkway sections first. Fill gaps between stepping stones with smaller materials like pebbles or crushed shells, ensuring proper drainage and stable footing.
Edge the paths with larger rocks or logs to create natural boundaries, then plant low-growing ground covers between and around the hardscape elements.
For smaller spaces or balcony gardens, create the illusion of winding paths using container gardens arranged in curved patterns, with miniature pathways created from mosaic tiles or small pebbles between pots.
Consider vertical elements like climbing vines on trellises to add depth, and use mirrors strategically to create the impression of paths continuing beyond their actual end points.
Weather-resistant materials are crucial for long-term durability, and regular maintenance of path edges will keep the magic alive throughout the seasons.
Incorporating Twinkling Garden Lights

Transform your garden into a magical wonderland with the enchanting glow of twinkling garden lights. As dusk settles, delicate strands of fairy lights emerge among the foliage, creating a mesmerizing display that dances through branches and illuminates secret garden paths. Solar-powered lanterns nestled between flowering plants cast gentle shadows, while moonflower vines and evening primrose add their natural luminescence to the ethereal scene.
The strategic placement of warm white LED strings weaves through climbing roses and wisteria, creating the illusion of floating stars caught in the garden’s embrace. Ground-level lighting highlights the textures of moss-covered stones and illuminates the bases of ornamental grasses, while uplighting on feature trees creates dramatic silhouettes against the night sky. This layered lighting approach transforms the garden into an otherworldly realm where magic seems possible.
Essential Elements:
- Solar-powered fairy lights
- LED string lights in warm white
- Garden lanterns with frosted glass
- Path lighting fixtures
- Tree uplighting spots
- Motion-sensor decorative lights
- Light-reflecting garden ornaments
- Timer controls for automated operation
- Weather-resistant extension cords
- Light-catching crystals or mirrors
Install the lighting system by first mapping out your garden’s focal points and pathways. Begin with base lighting along main walkways for safety, then layer in fairy lights at varying heights among trees and shrubs. Secure weather-resistant fixtures to stable surfaces and ensure all electrical connections are properly protected from moisture.
Consider installing a mix of permanent and temporary lighting solutions to allow for seasonal adjustments and special occasions. To maintain the enchanted atmosphere, regularly check and replace bulbs, clean fixtures, and adjust timing settings with the seasons. Solar lights should be positioned to receive adequate daylight, while electric lights need proper voltage distribution to prevent overloading circuits.
Integrate lighting with your garden’s natural features by weaving strands through climbing plants and around permanent structures. For adaptability, consider your garden’s specific needs. Small balcony gardens can create depth with vertical lighting and wall-mounted fixtures, while larger spaces might incorporate illuminated water features or lit garden structures.
Use timers to conserve energy and create different lighting scenes for various times of night. In areas with strict light pollution regulations, opt for downward-facing fixtures and lower wattage bulbs to maintain the magical ambiance while respecting dark sky initiatives.
Selecting Enchanted Garden Plants and Flowers
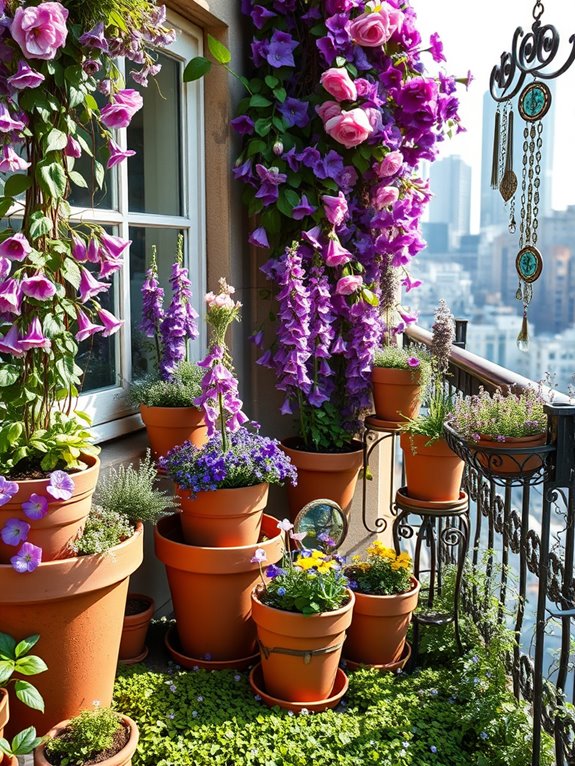
Creating a magical fairy tale garden begins with selecting delicate, whimsical plants that evoke enchantment and wonder. Soft, ethereal flowers like foxgloves reaching skyward with their speckled bell-shaped blooms, dainty lily-of-the-valley creating miniature white bell carpets, and dreamy blue delphiniums swaying gently in the breeze set the perfect backdrop. Fragrant herbs such as lavender, thyme, and chamomile release their soothing scents while providing texture and traditional cottage garden charm.
The color palette should mirror an enchanted forest, with rich purples from clematis vines, soft pinks from bleeding hearts, and pops of jewel-toned blooms from columbine and hollyhocks. Incorporate plants with silvery foliage like lamb’s ear and dusty miller to create an ethereal glow, especially in moonlight. Climbing roses and morning glories can transform ordinary structures into magical towers and archways, while delicate ferns and moss create mysterious ground coverage.
Key Elements:
- Foxgloves, delphiniums, bleeding hearts
- Lily-of-the-valley, columbine, hollyhocks
- Climbing roses and clematis
- Fragrant herbs (lavender, thyme, chamomile)
- Silver-leafed plants (lamb’s ear, dusty miller)
- Ferns and moss
- Morning glories
- Forget-me-nots
- Sweet peas
- Moonflowers
Plant arrangement should follow a naturalistic pattern, with taller specimens like foxgloves and delphiniums creating a backdrop against walls or fences. Layer medium-height plants like columbine and bleeding hearts in the middle ground, allowing them to intermingle naturally.
Edge pathways and borders with low-growing herbs and ground covers, encouraging them to spill over onto walking surfaces. Create vertical interest by training climbing varieties on trellises, arbors, or shepherd’s hooks positioned throughout the space.
For smaller spaces or balcony gardens, focus on container groupings with varying heights and incorporate trailing plants that cascade over pot edges. Choose dwarf varieties of larger plants and use vertical gardening techniques to maximize space.
Consider using self-watering containers to maintain consistent moisture levels, especially important for delicate fairy tale garden specimens. Remember to group plants with similar water and light requirements together, and incorporate slow-release fertilizers to maintain healthy growth throughout the growing season.
Building Tiny Fairy Houses and Cottages
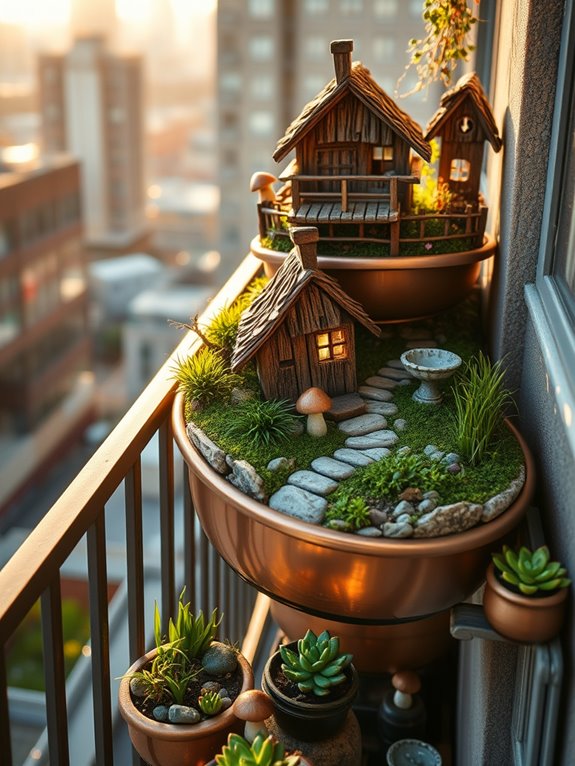
Nestled among lush moss and delicate groundcover, miniature fairy houses and cottages transform an ordinary garden into an enchanted realm where magic seems possible. These tiny dwellings, crafted from natural materials like bark, twigs, and stone, peek out from beneath fern fronds and create hidden storylines within your garden space. Each diminutive structure, whether a rustic woodland cottage or an elegant toadstool house, serves as a focal point that draws the eye and sparks imagination.
The whimsical architecture of fairy houses can range from simple one-room cottages to elaborate multi-level dwellings complete with tiny windows, doors, and thatched roofs made from dried grass or moss. Surrounding these magical homes with appropriately scaled plants like miniature varieties of thyme, baby tears, and Irish moss creates a sense of proportion that makes the houses appear lived-in and natural.
Small decorative elements such as pebble pathways, tiny garden tools, or miniature furniture pieces add layers of detail that bring the scene to life.
Essential Elements:
- Natural building materials (bark, twigs, stones, moss)
- Miniature doors and windows
- Thatching materials (dried grass, moss, small leaves)
- Tiny furniture and accessories
- Small-scale plants
- Decorative pebbles and rocks
- LED fairy lights
- Weatherproof sealant
- Ground cover plants
- Miniature gardening tools
Creating fairy houses requires careful planning and placement within the garden. Start by selecting locations that offer natural protection from harsh weather, such as beneath larger plants or against garden walls. Build your structures using weather-resistant materials and seal wooden elements with outdoor sealant to extend their lifespan.
Position houses at varying heights and angles to create visual interest, and establish clear pathways between dwellings using tiny pebbles or mulch. Incorporate live plants around the structures, ensuring they won’t overwhelm the houses as they grow.
When designing this whimsical garden feature, consider scale as your primary guide. Choose plants that won’t outgrow their space and overwhelm the tiny structures, and opt for slow-growing varieties near house foundations.
For balcony gardens, create vertical fairy villages using wall-mounted boxes or tiered planters, and select compact plants that maintain proportion. Weather resistance is crucial – protect delicate features during harsh conditions and refresh natural elements like bark and moss as needed throughout the growing season.
Adding Magical Water Features and Fountains
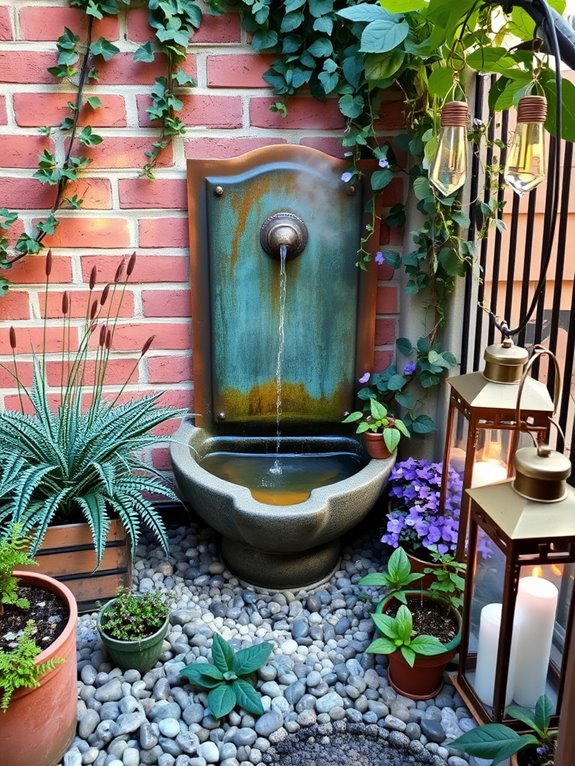
Water features and fountains transform an ordinary garden into an enchanted realm where the gentle sounds of flowing water create a mesmerizing atmosphere. Miniature waterfalls cascading over moss-covered stones, delicate fountain sprays dancing in the sunlight, and small reflecting pools bordered by glittering pebbles all contribute to the magical ambiance.
Surround these water elements with moisture-loving plants like Japanese forest grass, fairy ferns, and forget-me-nots to enhance the ethereal setting. Crystal-clear water catching the light and creating rainbow prisms adds another dimension of wonder to your fairy tale garden.
Small copper or brass fountains with patina finishes, ceramic mushroom fountains, or repurposed vintage teapots converted into water features can serve as whimsical focal points. The sound of trickling water not only masks urban noise but also attracts butterflies and birds, bringing additional life and movement to your enchanted space.
Essential Elements:
- Solar-powered or electric fountain pump
- Water-resistant basin or pond liner
- Decorative stones and pebbles
- Moisture-loving plants
- LED underwater lights
- Water-safe decorative elements
- Filtration system
- Child-safe grating (if needed)
- Water-level indicator
- Weather-resistant fountain piece
Install your water feature by first selecting a level area with access to power (if needed). Create a stable base using compacted gravel and sand, then position your water basin or install the pond liner. Arrange stones and plants around the feature, ensuring proper drainage and stability.
Install the pump according to manufacturer specifications, and test water flow before adding decorative elements. Regular maintenance includes checking water levels, cleaning filters, and treating the water to prevent algae growth.
Scale your water feature to your available space. Balconies can accommodate tabletop fountains or wall-mounted water features, while larger gardens might support multiple connected water elements. Consider using self-contained units for easier maintenance, and incorporate smart water-saving features like recirculating pumps.
In colder climates, either choose frost-resistant materials or plan to winterize your water features during freezing temperatures. Always ensure proper electrical safety and consider using solar options for areas without power access.
Crafting Whimsical Garden Furniture
Whimsical garden furniture transforms an ordinary outdoor space into an enchanted realm where imagination takes root. Miniature teacup tables crafted from vintage china, toadstool seats painted in vibrant reds and whites, and twisted branch benches adorned with moss create intimate seating areas that seem plucked from storybook illustrations.
Weathered wooden doors mounted on tree stumps suggest secret passages, while diminutive archways wrapped in climbing vines form magical thresholds between garden rooms.
Repurposed items take on new life as fairy tale furniture pieces, with old ladders becoming tiered plant displays, wooden spools transformed into charming side tables, and hollow logs carved into whimsical seating.
These elements, when paired with soft lighting from lanterns and strategic placement of mirror fragments, create an otherworldly atmosphere that beckons visitors to pause and dream, especially during twilight hours when shadows dance and play.
Essential Elements:
- Toadstool seats or stumps
- Miniature tea tables
- Twisted branch furniture
- Vintage doors and windows
- Hollow log seating
- Decorative archways
- Garden mirrors
- Lanterns and fairy lights
- Moss-covered surfaces
- Climbing vines
- Vintage teacups and saucers
- Weathered wooden elements
Position furniture pieces along winding pathways, creating intimate nooks and secret sitting areas that invite exploration. Ensure stability by securing larger pieces into the ground and treating wooden elements with weather-resistant sealants.
Layer various heights of furniture to create visual interest, with taller pieces like archways framing lower seating areas. Incorporate natural elements by allowing moss to grow on wooden surfaces and training vines to weave through furniture pieces.
Adapt your whimsical furniture design based on available space and climate conditions. For small balconies, use vertical elements like repurposed ladder shelving and wall-mounted miniature doors.
Consider lightweight, moveable pieces for flexibility, and choose weather-resistant materials appropriate for your climate. Install furniture away from areas prone to flooding, and create clear pathways that maintain the garden’s accessibility while preserving its magical atmosphere.
Setting Up Secret Garden Nooks
Secret garden nooks transform ordinary outdoor spaces into enchanting hideaways that spark imagination and provide peaceful retreat spaces. Curved pathways lined with climbing roses and jasmine lead to intimate sitting areas, partially concealed by gracefully arching branches and strategic placement of tall ornamental grasses.
Weathered stone benches nestle against vine-covered walls, while delicate ferns and shade-loving hostas create a lush groundcover that softens the edges and adds layers of green texture.
The magic of these hidden spaces comes alive through careful placement of whimsical elements like vintage garden gates, moss-covered statuary, and antique lanterns hanging from shepherd’s hooks. Small-flowered clematis and morning glories scramble up trellises, creating living walls that enhance the sense of discovery.
The gentle sound of water from a small fountain or birdbath adds another sensory layer, while patches of shade-tolerant flowers like lily of the valley and bleeding hearts provide subtle pops of color.
Essential Elements:
- Curved pathways (gravel, stepping stones, or brick)
- Seating (benches, vintage chairs, or built-in stone seating)
- Climbing plants (roses, jasmine, clematis, ivy)
- Screening plants (tall grasses, bamboo, or dense shrubs)
- Shade-loving perennials
- Garden structures (arbors, gates, or trellises)
- Water feature
- Lighting elements
- Decorative accents (statuary, vintage finds, containers)
- Ground cover plants
Creating a secret garden nook begins with identifying the perfect location – ideally a corner or side area that can be naturally screened from view.
Start by installing structural elements like arbors or trellises, which will support climbing plants and create immediate vertical interest. Layer the space with taller plants at the back, medium-height plants in the middle, and ground covers in front, ensuring there’s a clear path to and through the space.
Install seating early in the process, as it serves as a focal point around which other elements can be arranged. The key to successful maintenance lies in regular pruning of climbing plants and monitoring the growth of screening vegetation to maintain the balance between privacy and accessibility.
Water features should be cleaned periodically, and pathways kept clear of debris. Seasonal adjustments might include adding winter protection for tender plants and refreshing mulch layers to retain moisture and suppress weeds.
For smaller spaces or balconies, the secret garden concept can be scaled down using container gardens, vertical gardening techniques, and strategic use of mirrors to create the illusion of depth.
Consider using dwarf varieties of climbing plants and compact shrubs, and incorporate folding furniture to maximize space. Weather-resistant fabric panels or bamboo screens can provide privacy in lieu of living walls, while hanging baskets and wall-mounted planters maximize vertical growing space without sacrificing the enchanted atmosphere.
Installing Mystical Garden Art and Sculptures
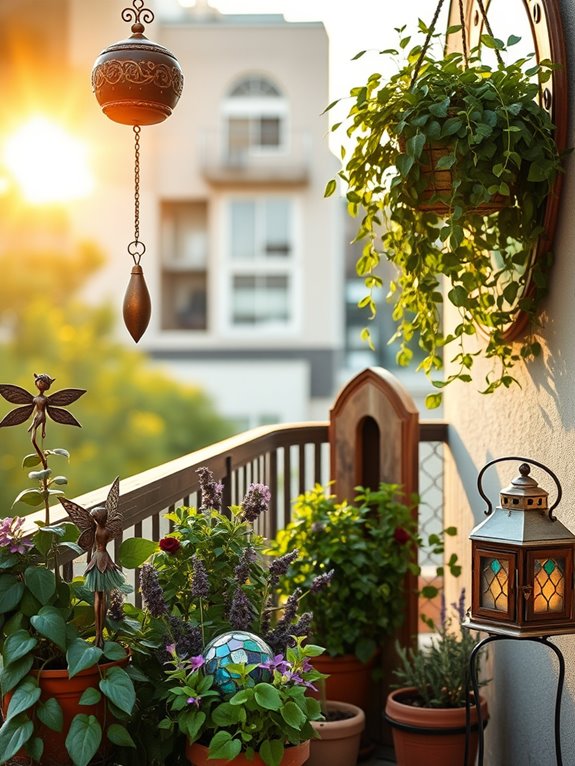
Transform your garden into an enchanted realm by thoughtfully placing mystical garden art and sculptures throughout the space. Weathered stone dragons peek through climbing ivy, while delicate fairy figures dance among flowering bushes. Metal sculptures catch the sunlight, creating mesmerizing patterns on garden paths, while hand-painted mushrooms and gnomes add whimsical charm to hidden corners. Glass gazing balls reflect the surrounding greenery, creating the illusion of magical portals within the landscape.
Carefully positioned statuary and artistic elements work together to tell a story, drawing visitors deeper into the garden’s narrative. Windchimes crafted from crystals and copper create ethereal music, while mosaic stepping stones lead to mysterious garden nooks. Illuminated lanterns cast soft, otherworldly glows at dusk, transforming ordinary garden features into magical vignettes that spark imagination and wonder.
Key Elements:
- Stone or resin mythical creatures (dragons, unicorns, fairies)
- Ornate metal garden gates or arches
- Glass gazing balls in various sizes
- Decorative mushrooms and gnomes
- Crystal or copper wind chimes
- Mosaic stepping stones
- Solar-powered or wired garden lanterns
- Weathered urns and pedestals
- Miniature fairy doors and windows
- Celestial-themed sculptures
Position larger sculptures as focal points in garden beds or at path intersections, ensuring they’re visible from multiple angles. Layer smaller decorative elements throughout the space, creating discovery moments that reveal themselves gradually. Install lighting to highlight key pieces and create dramatic evening shadows.
Secure all sculptures properly using appropriate anchoring methods for their size and weight, considering seasonal weather changes.
Garden art and sculpture adaptation tips: For small spaces or balconies, focus on vertical elements like wall-mounted fairy doors or hanging mystical mobiles. Choose weather-resistant materials appropriate for your climate, and apply protective sealants to extend their lifespan.
Consider incorporating mirrors strategically to create depth and reflect decorative elements, making the space appear larger and more magical. Rotate smaller pieces seasonally to maintain visual interest and protect delicate items from harsh weather.
Planting a Fairy Tale Herb Garden
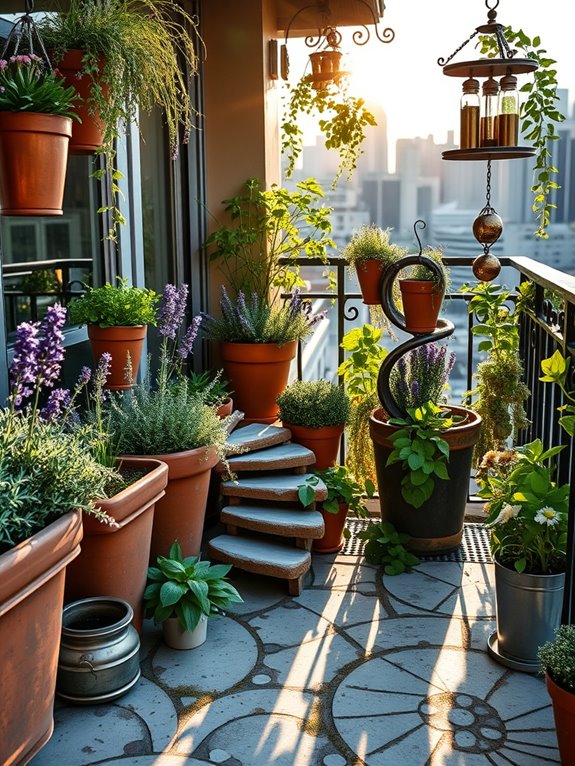
A fairy tale herb garden transforms an ordinary growing space into an enchanted realm where medicinal and culinary herbs intermingle with whimsical touches. Winding pathways of crushed seashells or tiny pebbles meander between clusters of sage, thyme, and chamomile, while tall stalks of lavender and rosemary create mysterious archways. The ethereal scents of mint and lemon balm drift through the air, mingling with the sweet perfume of flowering herbs, creating an aromatic sanctuary that feels plucked from the pages of a storybook.
Throughout the garden, traditional witch’s herbs like mugwort and yarrow stand alongside cheerful patches of calendula and borage, their flowers attracting butterflies and bees that add movement and life to the space. Weathered copper plant markers, small crystal clusters, and vintage apothecary bottles repurposed as vases accent the beds, while moss-covered stones provide stepping places between the fragrant plantings. The overall effect is both practical and magical, offering a space that serves both the imagination and the kitchen.
Essential Elements:
- Aromatic herbs (lavender, rosemary, sage, thyme)
- Medicinal herbs (chamomile, calendula, yarrow)
- Culinary herbs (basil, mint, oregano)
- Crushed shell or pebble pathways
- Vintage or antique garden accessories
- Copper or brass plant markers
- Crystal clusters or polished stones
- Moss-covered rocks
- Small archways or trellises
- Weathered terra cotta pots
Begin implementation by sketching a basic design that incorporates circular or spiral patterns, allowing for both tall and creeping herbs to have their space.
Plant taller herbs like rosemary and lavender toward the back or center, with lower-growing varieties such as thyme and chamomile at the edges. Create defined borders using stones or vintage bricks, and establish clear pathways that allow easy access for harvesting and maintenance. Layer plants according to height and spread, ensuring each has room to reach mature size while maintaining the garden’s intimate feel.
When designing this garden style for different spaces, consider vertical elements for small areas or balconies. Use tiered planters, wall-mounted herb gardens, or spiral herb towers to maximize growing space. Choose dwarf varieties of larger herbs for container growing, and focus on plants that serve multiple purposes – both decorative and practical.
Remember to position sun-loving Mediterranean herbs in the brightest spots while allowing shade-tolerant varieties like mint to flourish in darker corners.