
10 Garden Ideas for Entertaining Outdoors
You’ll be amazed at how a few strategic changes can transform your backyard into an inviting entertainment oasis. Whether you’re hosting summer barbecues or intimate evening gatherings, your outdoor space holds untapped potential for creating memorable experiences. From cozy fire pits that spark conversation to cleverly zoned areas that maximize flow, there’s a world of possibilities waiting in your garden. Let’s explore how you can turn your outdoor dreams into a beautiful, functional reality.
Contents
- 1 Design a Multi-Level Seating Area
- 2 Install Strategic Outdoor Lighting
- 3 Create an Outdoor Kitchen Station
- 4 Add a Fire Pit or Fireplace
- 5 Set Up a Weather-Resistant Entertainment System
- 6 Build a Covered Dining Space
- 7 Incorporate Water Features
- 8 Plant a Functional Herb Garden
- 9 Establish Zones for Different Activities
- 10 Install Privacy Landscaping
Design a Multi-Level Seating Area

Transform your outdoor space into an enchanting multi-level seating sanctuary where cascading platforms create distinct conversation zones and intimate gathering spots.
Natural stone steps weave between lush plantings of ornamental grasses, while climbing jasmine and wisteria drape gracefully over pergolas spanning different levels. Low-maintenance sedums and creeping thyme soften the edges of each tier, creating a seamless blend between hardscaping and greenery.
The varying heights add visual drama while naturally dividing the space into purposeful areas – perhaps a sunken fire pit lounge on the lowest level, a casual dining area mid-way up, and an elevated cocktail space offering the best views.
Strategic lighting illuminates the pathways between levels, while potted citrus trees and architectural plants like bamboo create natural privacy screens between zones. The multi-level design maximizes even modest spaces by taking advantage of vertical real estate.
Key Elements:
- Retaining walls (stone, brick, or timber)
- Wide steps or gradual transitions between levels
- Built-in benches
- Weather-resistant furniture
- Shade structures (pergolas or umbrellas)
- Level-appropriate plants
- Path lighting
- Handrails where needed
- Drainage solutions
- Non-slip surface materials
Creating a multi-level seating area starts with careful planning and grading. Begin by mapping out the natural slope of your yard and determining how many levels will work best – typically 2-3 tiers for residential spaces.
Each level should be properly supported by professional-grade retaining walls, with adequate drainage installed behind them. Ensure platforms are large enough to comfortably accommodate their intended use, with a minimum of 100 square feet for dining areas and 64 square feet for conversation zones.
Install lighting early in the process, running electrical before finalizing hardscaping.
Consider each level’s exposure to sun and wind when selecting materials and positioning seating. Upper levels often receive more sun and wind, making shade structures essential. Choose plants appropriate for each level’s microclimate – drought-tolerant varieties for upper tiers and shade-loving plants for lower areas.
Incorporate built-in seating where possible to maximize space efficiency and create a cohesive look.
Design Tips: For smaller spaces, consider using mirrors to create the illusion of depth, and utilize vertical gardening techniques to maximize green space without consuming precious square footage.
Modular furniture can help adapt spaces for different gathering sizes, while retractable awnings provide flexible shade options. If working with a balcony, create the illusion of levels using raised platforms or deck tiles, and employ container gardens of varying heights to achieve the multi-level effect without permanent construction.
Install Strategic Outdoor Lighting
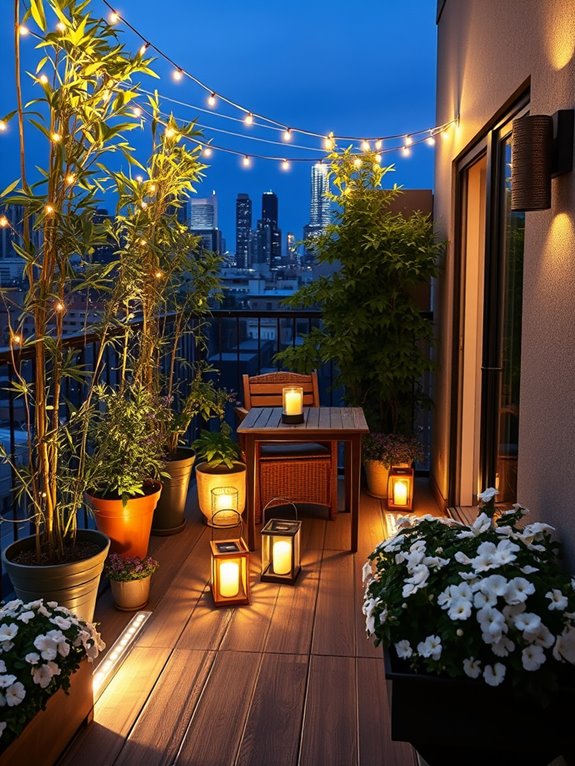
Transform your outdoor space into a magical evening retreat with strategic lighting that creates an enchanting atmosphere perfect for entertaining. Twinkling string lights weave through tree branches and along pergolas, casting a soft, warm glow that mimics starlight. Solar-powered path lights illuminate winding garden walkways, while carefully positioned spotlights highlight architectural features and showcase the natural beauty of ornamental grasses, flowering shrubs, and statement trees.
The layered lighting approach brings depth and dimension to your garden after sunset, turning it into an intimate entertainment venue. Subtle uplighting on mature trees creates dramatic shadows, while contemporary bollard lights provide practical illumination for dining areas and conversation spaces. LED strip lighting under bench seating and along steps adds both safety and ambiance, creating an inviting environment that encourages guests to linger well into the evening.
Key Elements:
- String lights or fairy lights
- Solar-powered path lights
- LED spotlights
- Motion sensor security lights
- Bollard lights
- Strip lighting
- Timer controls or smart lighting system
- Weather-resistant electrical outlets
- Transformers for low-voltage lighting
- Light-reflecting plants (silver-leaved varieties)
Begin by mapping out your garden’s activity zones and identifying key features that deserve highlighting. Install a combination of ambient, task, and accent lighting, ensuring proper electrical planning with weather-resistant connections and strategic outlet placement.
Layer your lighting by starting with essential path and security lighting, then add decorative elements like string lights and spotlights. Consider installing a smart lighting system or timers to automate your outdoor lighting schedule and conserve energy.
Professional installation of electrical components is recommended for safety and longevity. Position lights to avoid glare and light pollution, using shields or directional fixtures where necessary.
Remember to install lighting in stages, testing the effect each evening before adding more elements. For different garden sizes, adjust the scale and number of lighting elements accordingly. Small spaces might focus on string lights and a few strategic spotlights, while larger gardens can incorporate multiple lighting zones and techniques.
Consider using battery-operated or solar options for areas without easy access to electrical outlets, and always choose fixtures rated for outdoor use in your climate. Regular maintenance, including cleaning fixtures and replacing bulbs, will ensure your outdoor lighting continues to create the perfect ambiance for entertaining.
Create an Outdoor Kitchen Station
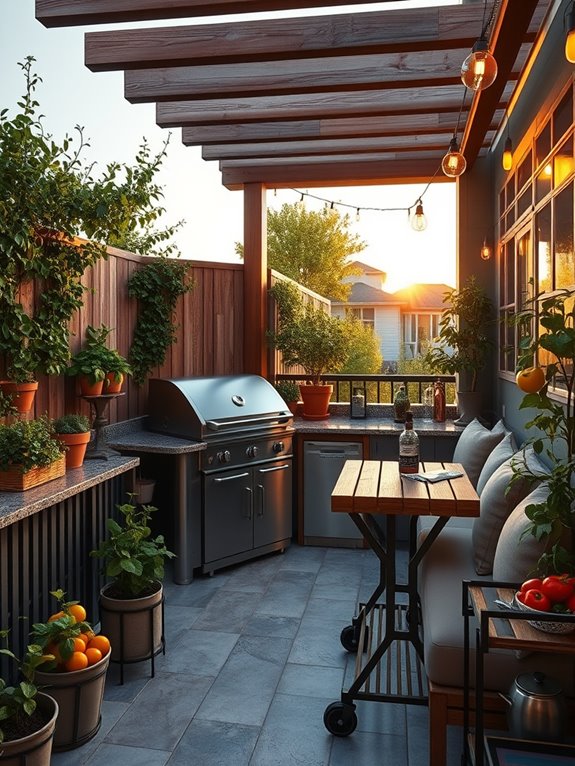
Transform your outdoor space into a culinary paradise with a thoughtfully designed outdoor kitchen station that seamlessly blends functionality with natural beauty. Aromatic herbs like rosemary, thyme, and sage border the cooking area, while climbing jasmine and wisteria create an enchanting canopy overhead. The natural stone countertops and weathered wooden cabinetry harmonize with the surrounding landscape, creating a space that feels both sophisticated and organically integrated into your garden.
String lights weave through the pergola beams, casting a warm glow over the cooking and dining area as evening approaches. Potted citrus trees add both visual interest and practical functionality, while container gardens filled with colorful edibles like cherry tomatoes and sweet peppers create an immediate farm-to-table experience. The space becomes a natural gathering point, where the boundaries between indoor and outdoor living dissolve.
Essential Elements:
- Built-in grill or cooking station
- Weather-resistant countertops and storage
- Sink with running water
- Refrigeration unit
- Task lighting
- Herb garden section
- Pergola or overhead covering
- Storage for cooking tools and supplies
- All-weather electrical outlets
- Ventilation system
- Non-slip flooring or decking
- Adjacent dining area
The implementation begins with establishing a solid foundation, typically concrete or stone pavers, ensuring proper drainage and stability. Position the cooking station to take advantage of natural wind patterns for ventilation while protecting it from strong gusts.
Install utilities early in the process, including water lines, electrical connections, and gas lines if needed. Create zones for food preparation, cooking, and cleaning, maintaining a workflow similar to an indoor kitchen while incorporating surrounding plantings to soften the hardscape elements.
When designing your outdoor kitchen station, consider your climate and adjust materials and coverage accordingly. For smaller spaces, opt for mobile cart solutions and fold-down countertops that can be tucked away when not in use.
Choose low-maintenance materials that can withstand your local weather conditions, and incorporate heating elements or fans to extend the usable season. If space is limited, vertical herb gardens and wall-mounted storage can maximize functionality while maintaining the aesthetic appeal of your outdoor cooking haven.
Add a Fire Pit or Fireplace
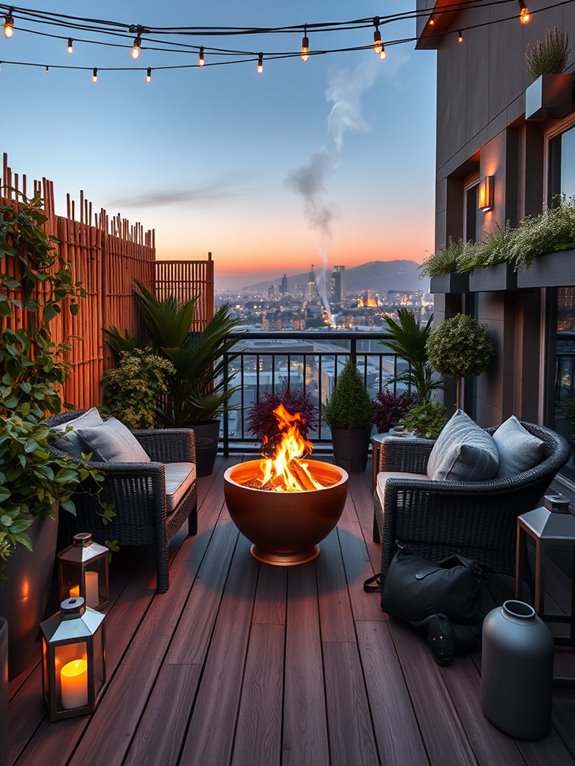
A fire pit or outdoor fireplace transforms an ordinary garden into a mesmerizing gathering space where flickering flames cast dancing shadows across surrounding foliage. Circular stone seating walls embrace the fire feature, while tall ornamental grasses like Miscanthus and Pennisetum sway gently behind comfortable cushioned benches.
Strategic lighting illuminates pathways lined with low-growing sedums and creeping thyme, creating an enchanting journey to this cozy destination. The space comes alive at dusk when the fire’s warm glow highlights the textural contrasts between smooth river rocks, rough-hewn pavers, and soft plant materials.
Fragrant herbs like lavender and rosemary border the seating area, releasing their soothing scents when brushed against. Deciduous trees provide a natural canopy, while strategic gaps in the foliage reveal starlit skies above.
Key Elements:
- Built-in fire pit or outdoor fireplace
- Weather-resistant seating
- Stone or concrete pavers
- Ornamental grasses
- Low-growing ground covers
- Ambient lighting
- Fragrant herbs
- Decorative rocks or gravel
- Weather-proof cushions
- Fire safety equipment
Begin installation by selecting a level location at least 10 feet from structures and overhanging branches. Create a solid foundation using compacted gravel and pavers, ensuring proper drainage.
Install the fire feature according to local building codes, incorporating gas lines if using natural gas, or creating a proper wood-burning setup with ventilation and spark protection. Arrange seating in a comfortable conversational pattern, typically in a semicircle or full circle around the fire feature.
Surround the hardscaping with layers of plants, starting with taller specimens at the perimeter and working inward with progressively shorter varieties. Ensure all plantings are far enough from the heat source to prevent damage, typically maintaining a 3-5 foot clear zone around the fire feature.
Install lighting along pathways and in planting beds, using a combination of permanent fixtures and movable options like lanterns. For smaller spaces or balconies, consider portable fire bowls or tabletop fire features that provide the ambiance without permanent installation.
Use container gardens to create the layered plant effect, and opt for fold-away seating to maximize flexibility. Always verify local regulations regarding open flames on balconies or in communal spaces, and consider smokeless fuel options for confined areas.
Set Up a Weather-Resistant Entertainment System
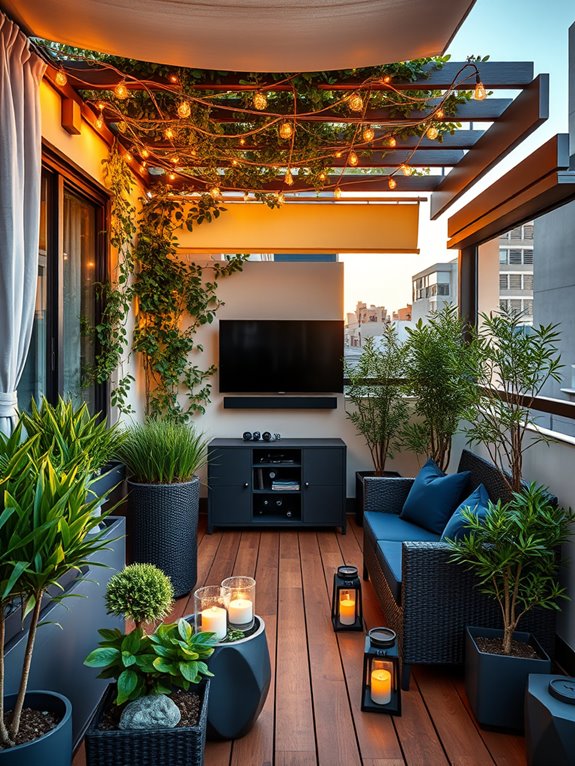
Transform your outdoor space into an all-weather entertainment oasis where music, movies, and ambiance merge seamlessly with nature. Weatherproof speakers disguised as decorative rocks nestle among lush ferns and hardy ornamental grasses, while a retractable projection screen hangs discreetly between mature cedar trees.
Strategic lighting, including rope lights woven through pergola beams and waterproof LED strips along pathways, creates a magical atmosphere when the sun sets. Weather-resistant wicker furniture with quick-dry cushions surrounds a central entertainment zone, complemented by potted plants like Japanese Forest Grass and Blue Star Junipers that add texture without blocking sightlines.
A covered pavilion or retractable awning protects sensitive equipment while providing shelter for guests, draped with flowing outdoor curtains that soften the structure’s lines and offer additional weather protection when needed.
Key Elements:
- Weatherproof audio speakers
- Outdoor projection screen and housing
- Weather-resistant TV enclosure
- Waterproof electrical outlets and covers
- Outdoor-rated cables and connections
- Protected networking equipment
- All-weather seating and cushions
- Retractable awning or permanent cover
- Outdoor-rated lighting systems
- Protective storage solutions
Begin installation by establishing a proper electrical foundation with weatherproof outlets and underground conduit for cables. Mount entertainment components under covered areas, using marine-grade materials and specialized outdoor enclosures.
Create zones for different activities, with the main viewing area positioned to minimize glare and maximize comfort. Install speakers at ear level when seated, angled toward the primary gathering space while being mindful of neighbors.
Consider coverage options based on your climate. In rainy regions, permanent structures offer better protection, while retractable solutions work well in variable weather. Ensure all electronic components are properly grounded and protected from moisture.
Regular maintenance checks of seals, connections, and protective covers will extend the life of your entertainment system.
Extra Tips: For smaller spaces, opt for wall-mounted speakers and fold-down screens that can be tucked away when not in use. Balcony gardens can utilize vertical space with mounted TV enclosures and compact sound bars.
Consider bluetooth-enabled components to minimize wiring needs, and invest in quality covers for additional protection during severe weather. Multiple smaller speakers provide better sound distribution than fewer large ones, and modern WiFi mesh systems can ensure stable streaming throughout your outdoor space.
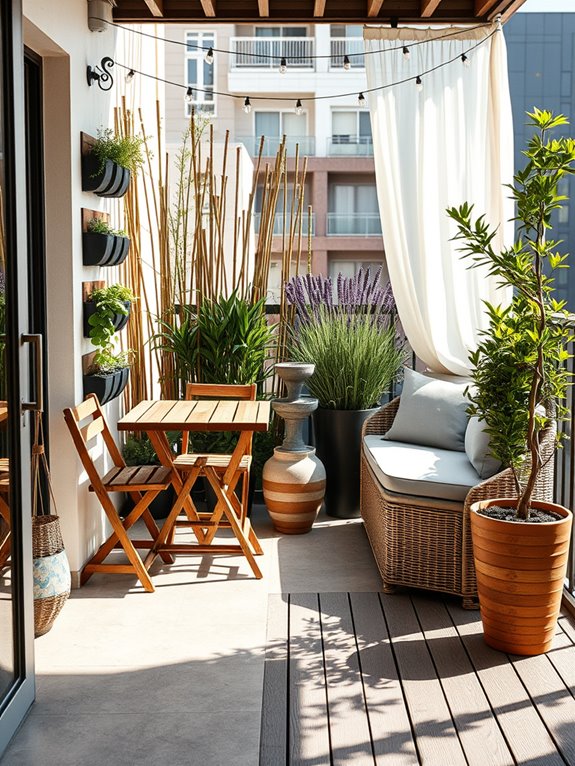
Build a Covered Dining Space

Transform your outdoor space into an enchanting covered dining area where nature meets comfort and style. Climbing vines like wisteria or jasmine cascade gracefully over a sturdy pergola structure, creating a living ceiling that filters sunlight and provides natural shade.
Potted herbs line the perimeter, releasing aromatic scents while decorative planters filled with colorful annuals add vibrant pops of color around the dining space.
The dining area becomes a natural extension of your home, featuring weather-resistant furniture arranged beneath the covered structure. String lights weave through the overhead beams, creating a magical ambiance for evening entertaining, while outdoor curtains can be drawn to provide additional shade or privacy.
The space seamlessly blends garden elements with dining functionality, making it perfect for both casual family meals and elegant outdoor gatherings.
Key Elements:
- Pergola or pavilion structure
- Weather-resistant dining furniture
- Climbing vines
- String lights or pendant lighting
- Outdoor curtains
- Container gardens
- Potted herbs
- All-weather cushions and textiles
- Outdoor rug
- Side tables or serving station
- Planter boxes
- Weather-resistant storage solutions
Begin implementation by installing a sturdy pergola or pavilion structure, ensuring proper anchoring and weather protection.
Position the structure to maximize natural light while considering seasonal sun patterns. Install climbing plant supports and prepare planting areas around the structure’s base.
Arrange the dining furniture in a configuration that allows easy movement and conversation flow, keeping the space’s primary function in mind.
Create layers of comfort and functionality by adding weather-resistant cushions, an outdoor rug, and adequate lighting.
Position container gardens and herbs strategically to enhance the atmosphere without impeding traffic flow. Consider installing a retractable awning or shade sail for additional weather protection.
Design Tips: Consider your climate when selecting materials and plants, opting for weather-resistant options that can withstand local conditions.
For smaller spaces, utilize vertical gardening techniques and multi-functional furniture pieces. Install proper drainage systems beneath the covered area to prevent water accumulation.
In compact areas, use folding furniture or built-in seating to maximize space, and select dwarf varieties of climbing plants that won’t overwhelm the structure.
Include adequate ventilation in the design to prevent heat buildup during summer months.
Incorporate Water Features
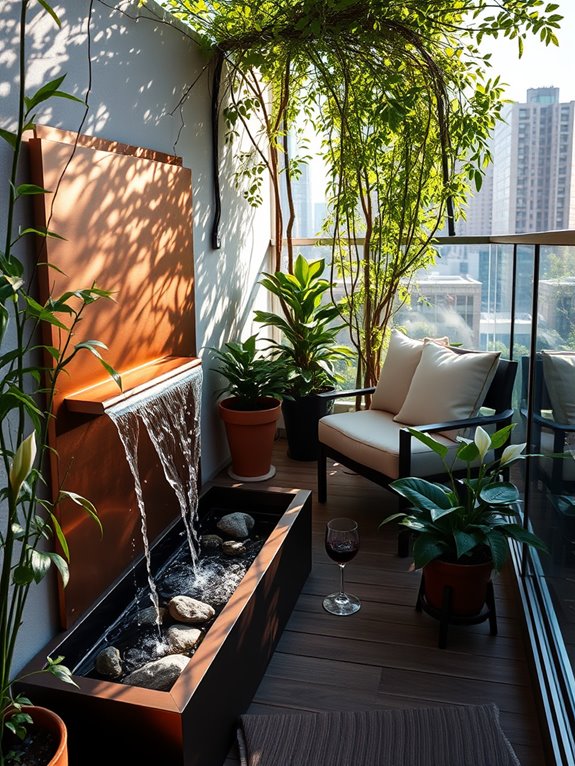
Transform your outdoor entertaining space into a serene oasis with the gentle sounds of flowing water. Whether it’s a dramatic cascading waterfall, a sophisticated wall fountain, or a simple bubbling birdbath, water features create an immediate focal point that draws guests in while masking urban noise. The mesmerizing movement of water against natural stone or contemporary metals adds a dynamic element to your garden, while providing a cooling effect during warm gatherings.
Surrounding your water feature with moisture-loving plants like Japanese iris, hostas, and ornamental grasses creates a lush, natural atmosphere. Strategic lighting can illuminate the water’s movement after sunset, casting enchanting reflections and shadows that enhance evening entertainment. The combination of flowing water and carefully selected vegetation creates a multi-sensory experience that helps guests feel transported to a peaceful retreat.
Key Elements:
- Water pump and filtration system
- Basin or reservoir
- Natural stone or architectural materials
- Underwater lighting
- Moisture-resistant plants
- Seating arrangements
- Water-safe electrical connections
- Drainage system
- Decorative rocks and pebbles
- Maintenance tools
Installing a water feature requires careful planning and proper infrastructure. Begin by selecting a location that’s visible from main entertaining areas but won’t overwhelm conversation spaces. Ensure proper electrical and water supplies are available, and install necessary plumbing and drainage systems before constructing the visible elements.
Layer plants around the feature in graduated heights, with taller specimens at the back and shorter ones in front, creating a natural frame that guides the eye toward the water element.
Design Tips: Consider the scale of your space when selecting a water feature – wall fountains work well in smaller areas, while freestanding features suit larger gardens. For balconies, try self-contained tabletop fountains or slim vertical water walls.
Always include easy access points for maintenance, and install an automatic fill system to maintain consistent water levels. In regions with freezing winters, choose features that can be easily drained or protected, or opt for designs that can be moved indoors during cold months.
Plant a Functional Herb Garden
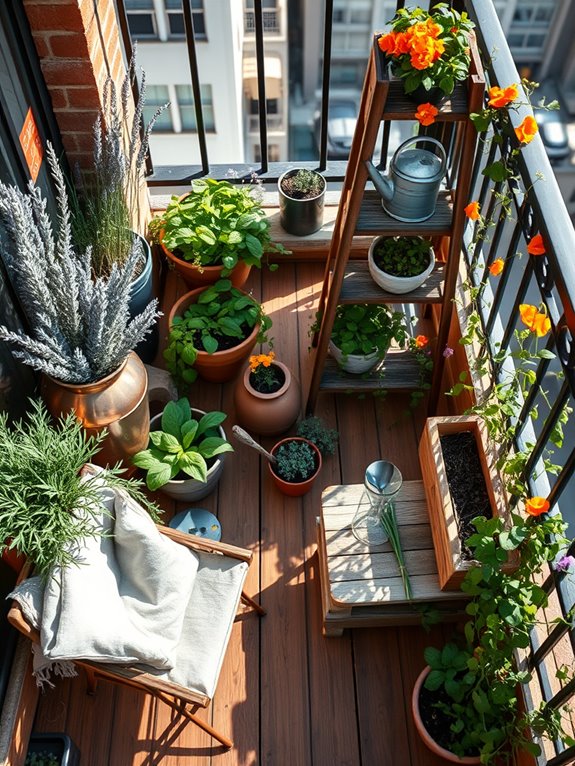
Transform your outdoor entertaining space with a vibrant herb garden that delights both the senses and your culinary pursuits. Lush clusters of aromatic basil, thyme, and rosemary create a tapestry of greens and silvers, while delicate purple chive blossoms and sunny calendula flowers add splashes of color throughout the seasons.
Strategically placed terracotta pots and raised wooden planters elevate the herbs to varying heights, creating an engaging visual display that invites guests to explore and interact with the garden. The functional herb garden becomes a natural conversation piece during outdoor gatherings, where guests can witness you snipping fresh herbs for cocktails or garnishing dishes straight from the garden.
Stone pathways weaving between plantings allow easy access to all herbs, while weathered wooden markers identify each variety with rustic charm. The garden comes alive with the gentle buzzing of pollinators drawn to flowering herbs, creating a serene atmosphere perfect for afternoon tea or evening entertaining.
Key Elements:
- Raised wooden planters
- Terracotta pots in varying sizes
- Plant markers
- Stone or gravel pathways
- Culinary herbs (basil, thyme, rosemary, sage, mint)
- Medicinal herbs (lavender, chamomile, lemon balm)
- Edible flowers (nasturtiums, calendula, borage)
- Garden tools storage
- Irrigation system or watering cans
- Seating area
Begin implementation by selecting a sunny location that receives at least 6 hours of direct sunlight daily. Install raised beds or arrange containers to ensure proper drainage, filling them with well-draining, organic herb soil mix.
Group herbs according to their water needs – Mediterranean herbs like rosemary and thyme prefer drier conditions, while basil and mint thrive in consistently moist soil. Create clear paths between planting areas, ensuring herbs are easily accessible for both maintenance and harvesting.
Place taller herbs like rosemary and sage toward the back of beds or in larger containers, with cascading varieties like thyme and oregano at the edges. Maintain the garden by regular pruning to encourage bushier growth and prevent flowering in leafy herbs like basil. Harvest herbs frequently to promote continued growth and maintain neat appearance.
For smaller spaces or balconies, focus on compact varieties and vertical growing solutions. Use wall-mounted planters or tiered stands to maximize growing space, and select dwarf varieties of larger herbs.
Consider self-watering containers for consistent moisture in container gardens, and group plants with similar care requirements together. For year-round interest, include both annual and perennial herbs, and plan for seasonal rotation of certain varieties to maintain continuous harvest and visual appeal.
Establish Zones for Different Activities
Creating distinct zones in your outdoor space transforms a simple garden into an engaging entertainment venue where different activities flow naturally from one area to the next. Imagine stepping into a garden where comfortable conversation areas nestle beneath pergolas draped with climbing jasmine and wisteria, while a dedicated dining zone features a rustic wooden table surrounded by ornamental grasses and lavender.
Strategic placement of container gardens and tall bamboo creates natural boundaries between spaces, while pathways of stepping stones guide guests between activity areas.
The ambiance shifts subtly as you move through each zone – from the lively atmosphere of the grilling and dining area, accented with herb gardens and citrus trees in decorative pots, to the peaceful relaxation zone featuring a collection of deep-seated furniture surrounded by softly rustling ornamental grasses and the gentle sounds of a water feature.
String lights crisscross overhead, creating an enchanting evening atmosphere that ties all zones together while maintaining their distinct purposes.
Essential Elements:
- Pergola or shade structure
- Outdoor dining furniture
- Lounge seating group
- Portable fire pit or fireplace
- Outdoor kitchen or grill station
- Path lighting and string lights
- Container plants for zone separation
- Water feature
- Weather-resistant throw pillows and cushions
- Side tables and serving surfaces
- Stepping stones or pathway materials
- Screen plants (bamboo, ornamental grasses, hedges)
Start by mapping out your space according to natural traffic patterns and sunlight exposure. Position the dining area where it’s convenient to the indoor kitchen, using weather-resistant flooring materials to define the space.
Create conversation areas in spots with optimal shade during peak entertainment hours, and ensure they’re oriented to take advantage of garden views or architectural features. Install lighting at varying heights – path lights for safety, pendant lights for dining areas, and ambient lighting for lounge spaces.
When implementing multiple zones, consider both visual and physical transitions between areas. Use a combination of hardscaping and plants to create subtle barriers – think raised planters, decorative screens, or changes in flooring materials.
Maintain clear sight lines between zones to encourage flow while still defining separate spaces. Install adequate electrical outlets throughout the garden to support entertainment needs in each zone.
For smaller spaces or balconies, focus on creating multi-functional zones that can transform as needed. Use lightweight, movable furniture that can be easily rearranged, and opt for vertical gardening solutions to maximize space.
Consider folding or nesting furniture that can be stored when not in use, and choose plants that provide maximum impact in minimal space. For larger gardens, create transitional spaces between main zones using elements like herb gardens or sculpture displays that add interest while maintaining flow.
Install Privacy Landscaping
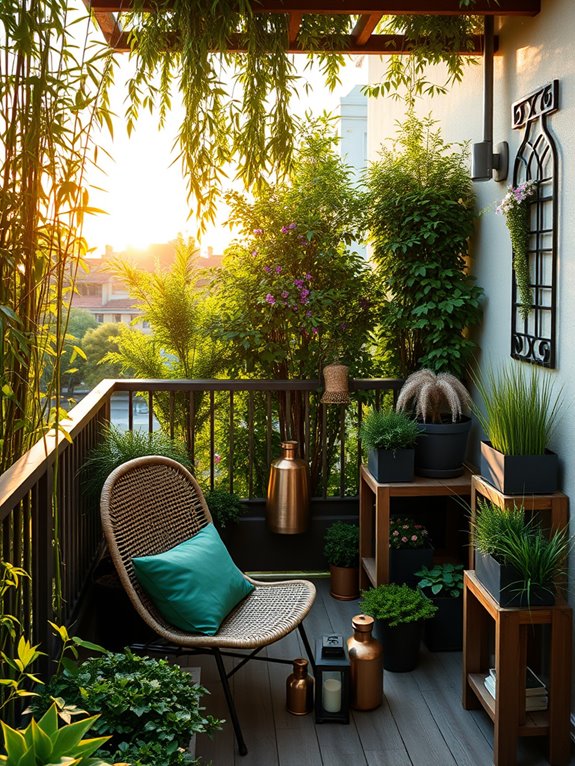
Transform your outdoor space into a secluded sanctuary with strategic privacy landscaping that creates natural walls and intimate gathering spaces. Towering bamboo shoots sway gently in the breeze, while dense evergreen shrubs like holly and juniper form living barriers that block unwanted views. Climbing vines such as jasmine and clematis cascade over decorative trellises, adding layers of greenery and subtle fragrance to your private retreat.
The combination of different heights and textures creates a cocoon-like atmosphere that feels both protected and organic. Ornamental grasses provide movement and sound barriers, while flowering shrubs like hydrangeas and rhododendrons add bursts of color throughout the seasons. Strategic placement of small trees or large shrubs creates natural “rooms” within your garden, perfect for intimate conversations or quiet contemplation.
Key Elements:
- Tall bamboo or cypress trees
- Dense evergreen shrubs
- Climbing vines
- Decorative trellises or lattice panels
- Ornamental grasses
- Flowering shrubs
- Container plants
- Privacy screens or panels
- Garden structures (pergolas, arbors)
- Strategic lighting
Begin your privacy landscaping by establishing anchor points with larger plants or structures at key sight lines from neighboring properties or streets. Layer plants of varying heights, starting with taller specimens at the back and gradually decreasing height toward seating areas.
Create depth by incorporating plants with different leaf sizes, colors, and textures. Install support structures like trellises or pergolas early in the process to allow climbing plants time to establish and fill in.
When selecting plants, consider their mature size and growth rate to avoid overcrowding. Position faster-growing species strategically for quick privacy, while slower-growing specimens can fill in over time.
Maintain clear pathways and ensure proper spacing between plants to allow for air circulation and prevent disease. Regular pruning and shaping will keep your living walls looking neat while maintaining their screening function.
For smaller spaces or balconies, utilize vertical gardening techniques with wall-mounted planters or columnar plants in containers. Consider movable privacy screens or potted bamboo for flexibility.
Layer container plants at different heights using plant stands or tiered shelving to maximize screening potential in limited space. Choose dwarf varieties of screening plants for contained growth, and incorporate multi-functional elements like herb walls that provide both privacy and practical benefits.