
9 Garden Ideas for DIY Enthusiasts
You’ll discover how to transform your outdoor space into a sustainable and charming garden oasis with these creative DIY projects. From building vertical gardens that maximize limited spaces to crafting beautiful stepping stone pathways, each idea combines practicality with natural beauty. Whether you’re a seasoned gardener or just starting out, these nine innovative projects offer the perfect blend of eco-friendly solutions and artistic expression that’ll make your garden uniquely yours. Let’s explore how you can bring these inspiring ideas to life.
Contents
- 1 Create a Vertical Pallet Garden
- 2 Build a Rain Barrel Water Collection System
- 3 Design a Stepping Stone Pathway
- 4 Construct a Bamboo Trellis Wall
- 5 Upcycle Vintage Containers for Herb Gardens
- 6 Make a Composting Station From Wood Pallets
- 7 Craft a Solar-Powered Garden Fountain
- 8 Build Raised Beds From Reclaimed Materials
- 9 Design a Butterfly Garden With Recycled Borders
Create a Vertical Pallet Garden
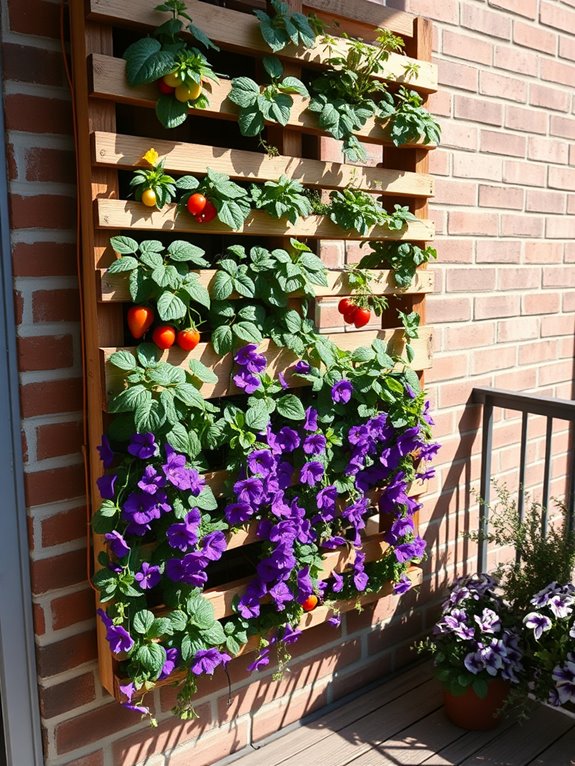
Transform your outdoor space into a living wall of greenery with a vertical pallet garden, where cascading herbs, vibrant flowers, and lush foliage create a stunning tapestry of color and texture. Trailing plants like creeping jenny and wave petunias spill gracefully from between weathered wooden slats, while compact herbs such as thyme, sage, and mint fill pockets with aromatic clusters. The natural wood tones of the pallet provide a rustic backdrop that enhances the organic beauty of your chosen plants.
This space-saving garden solution turns ordinary walls into enchanting botanical displays, perfect for urban environments or small patios. Imagine stepping onto your balcony to find strawberry plants bearing fruit at eye level, while butterfly-attracting lantanas and compact vegetables like cherry tomatoes create a productive vertical ecosystem. The vertical arrangement not only maximizes growing space but also creates an artistic living installation that changes with the seasons.
Key Elements:
- Wooden pallet (heat-treated)
- Landscape fabric
- Potting soil
- Plants suitable for vertical growing
- Mounting brackets and hardware
- Drip irrigation system or watering can
- Hand tools
- Wood preservative or outdoor paint
- Drainage materials
- Plant markers
Start by preparing your pallet by sanding rough edges and treating the wood with a weather-resistant sealant. Line the back and sides with landscape fabric, creating individual pockets between the slats for planting. Mount the pallet securely to your wall, ensuring it can support the weight when fully planted and watered.
Fill each pocket with quality potting soil mixed with slow-release fertilizer, then arrange plants according to their light and water needs, placing sun-loving varieties at the top and shade-tolerant species below. For those working with different spaces, consider multiple configurations: a single pallet works well for narrow balconies, while larger areas can accommodate several pallets arranged in patterns.
Ensure proper drainage by slightly tilting the pallet forward and drilling small holes if needed. Choose drought-resistant plants for upper levels which tend to dry out faster, and incorporate a simple irrigation system for consistent watering. Remember to leave adequate space between plants for growth, and regularly trim back aggressive spreaders to maintain the garden’s intended design.
Build a Rain Barrel Water Collection System

A rain barrel water collection system transforms an ordinary garden into an eco-conscious oasis, where the natural rhythm of rainfall becomes part of your garden’s sustainable story. The gentle sound of water collecting during rainstorms creates a peaceful atmosphere, while the barrel itself can become an artistic focal point when decorated with climbing vines, painted designs, or surrounded by moisture-loving plants like ferns and hostas.
The system seamlessly integrates with your garden’s aesthetic while serving a vital purpose. Whether positioned beneath a decorative downspout or cunningly disguised within a wooden enclosure, the rain barrel adds architectural interest to your outdoor space. Native plants strategically placed around the collection area thrive on the natural overflow, creating a lush microenvironment that attracts beneficial wildlife like birds and butterflies.
Key Elements:
- 55-gallon food-grade barrel or rain tank
- Downspout diverter
- Spigot and overflow valve
- Mesh screen for debris filtering
- Concrete or gravel base
- PVC pipes and fittings
- Waterproof sealant
- Garden hose attachment
- Optional decorative elements
- Surrounding moisture-loving plants
Installing a rain barrel system requires careful planning and proper elevation. Begin by selecting a stable, level location near your home’s downspout, creating a raised platform using concrete blocks or a sturdy stand to allow for gravity-fed water flow.
Install the barrel with the diverter kit, ensuring all connections are watertight and the overflow valve is directed away from your home’s foundation. Connect your garden hose to the spigot and establish a simple drip irrigation system to maximize water usage efficiency.
Essential tips for success include choosing a location that receives partial shade to prevent algae growth, installing multiple barrels in series for increased capacity, and considering a first-flush diverter to improve water quality.
For smaller spaces or balconies, opt for slim-line designs or wall-mounted systems that maximize vertical space. During winter months in cold climates, either empty and disconnect the system or install freeze-proof spigots to prevent damage.
Remember to check local regulations regarding rainwater harvesting and ensure your system complies with building codes.
Design a Stepping Stone Pathway
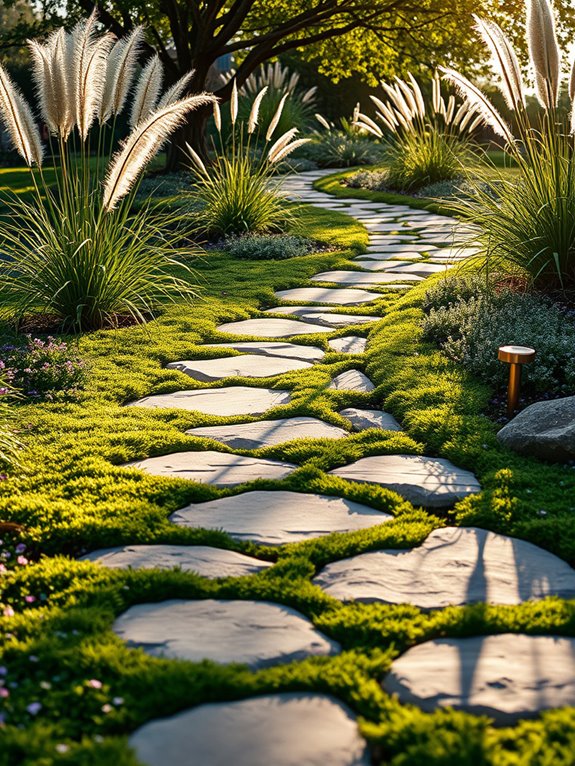
A stepping stone pathway transforms an ordinary garden into an enchanting journey, where each carefully placed stone creates a sense of discovery and movement through the space.
Natural stone pavers nestled among creeping thyme, Irish moss, and delicate baby’s tears create a soft, living carpet that frames each step. The meandering path draws the eye forward while ornamental grasses sway gently alongside, their feathery plumes adding movement and texture to the scene.
The pathway’s organic flow echoes the natural contours of the landscape, leading visitors past garden highlights like flowering perennials, compact shrubs, and architectural features.
Low-growing sedums and Alpine plants soften the edges of each stone, while strategically placed solar lights illuminate the path at dusk, creating a magical atmosphere as shadows play across the textured surfaces.
Key Elements:
- Stepping stones (natural or manufactured)
- Ground cover plants
- Edge plants
- Solar path lights
- Landscape fabric
- Gravel or sand for base
- Garden soil
- Measuring tape
- Level
- Shovel and trowel
Creating a successful stepping stone pathway begins with careful planning and preparation.
Map out the route using string or garden hose to visualize the flow, ensuring comfortable step distances of 24-30 inches between stones. Excavate each stone location to a depth of 4-6 inches, add a layer of gravel for drainage, and set stones on a bed of sand. Use a level to ensure each stone sits firmly and evenly with the ground surface.
Plant selection and placement are crucial for long-term success. Choose hardy ground covers that can withstand foot traffic and maintain a neat appearance. Space plants closely around stones for a lush look, but avoid covering the walking surface.
Water newly planted areas frequently until established, and trim back growth regularly to prevent stones from becoming slippery or obscured.
Design Adaptations and Tips: For smaller spaces, consider using smaller stones or creating a more geometric pattern to maximize space efficiency. In shaded areas, opt for shade-tolerant ground covers like sweet woodruff or ajuga.
Weather-resistant materials like bluestone or concrete pavers provide durability in harsh climates. For sloped areas, incorporate shallow steps and ensure proper drainage to prevent erosion and stone shifting.
Regular maintenance should include sweeping stones clean and trimming plant edges twice per season.
Construct a Bamboo Trellis Wall
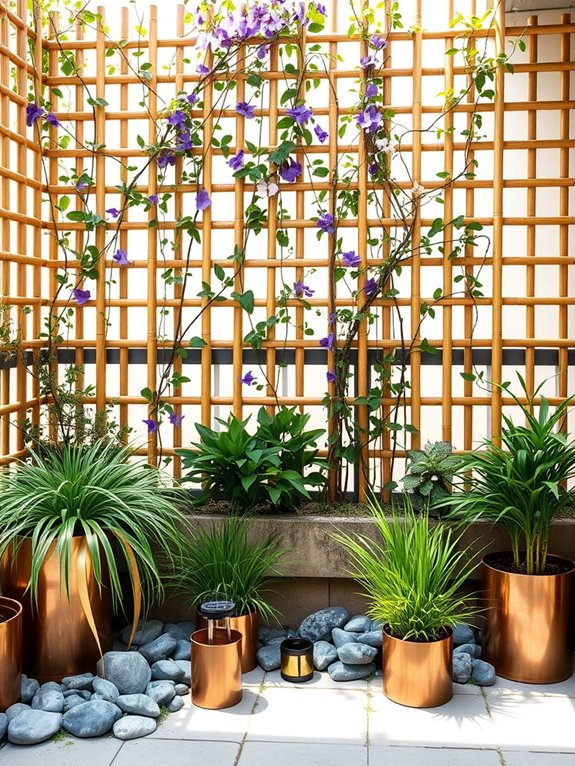
A bamboo trellis wall transforms an ordinary garden space into a serene Asian-inspired retreat, where climbing vines and delicate flowers weave through the natural lattice pattern. The warm honey tones of bamboo poles create a stunning backdrop that simultaneously provides privacy and visual interest, while jasmine, clematis, or morning glories add bursts of color and fragrance as they wind their way upward.
The vertical garden structure serves as both a functional growing space and an architectural element, drawing the eye upward and creating the illusion of expanded space. When complemented with potted bamboo plants, Japanese forest grass, and strategically placed river rocks at the base, the trellis wall becomes the centerpiece of a tranquil garden sanctuary that appeals to all senses.
Essential Elements:
- Bamboo poles (1-2 inch diameter)
- Natural twine or copper wire
- Ground anchors or posts
- Climbing plants
- Decorative pots
- River rocks
- Small fountain (optional)
- Japanese forest grass
- Solar lanterns
- Plant supports
Construction begins with securing vertical bamboo poles into the ground or containers at 12-inch intervals, ensuring they’re firmly anchored. Horizontal bamboo poles are then attached at 8-inch spacing using natural twine or copper wire at each intersection point, creating a grid pattern.
The completed structure should be sealed with weather-resistant bamboo oil to extend its lifespan and maintain its natural beauty. Plant selection and placement follow, with climbers positioned at the base of the trellis and complementary plants arranged in layers moving outward.
Design Tips: Consider your climate zone when selecting climbing plants, as some varieties may be too aggressive for smaller spaces. For compact balconies, create a modified version using a single trellis panel with container-friendly climbers.
Incorporate adjustable plant ties to guide growth patterns, and install the structure where it receives at least 4-6 hours of sunlight daily. Weather protection may be necessary in harsh climates, and regular maintenance of both bamboo and plants will ensure long-term success.
Upcycle Vintage Containers for Herb Gardens
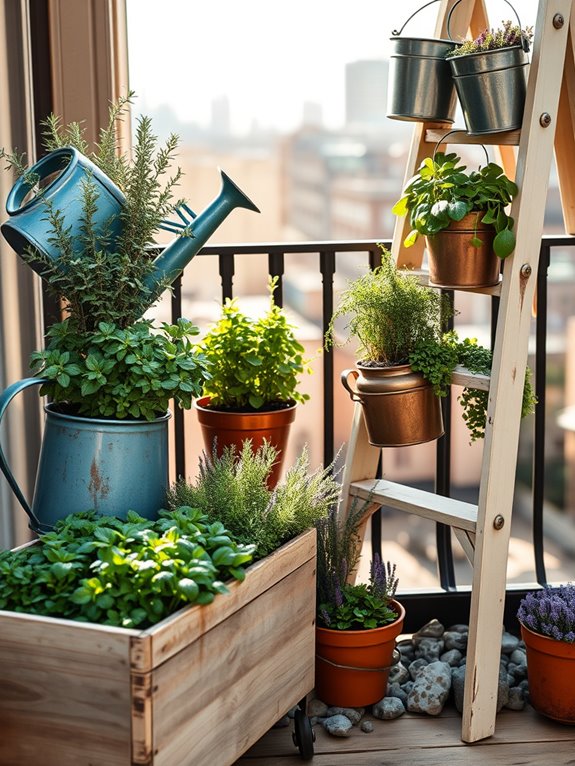
Transform ordinary vintage treasures into charming herb gardens that blend nostalgia with functionality. Picture weathered metal watering cans sprouting fragrant basil leaves, antique teapots housing delicate thyme sprigs, and rustic wooden crates filled with cascading oregano and mint.
These repurposed containers create an enchanting display that adds character and whimsy to any outdoor space, while providing fresh herbs for your kitchen.
The beauty of vintage container herb gardens lies in their eclectic mix of textures and heights. Imagine dainty chive blossoms peeking out of a porcelain pitcher, alongside rosemary standing tall in a painted milk can. Old wooden toolboxes become miniature herb beds, while enamelware bowls cradle compact varieties of sage and parsley.
The combination of weathered patinas and vibrant greenery creates a captivating visual story that evolves with each growing season.
Key Elements:
- Vintage containers (teapots, watering cans, crates, toolboxes)
- Drainage materials (gravel, broken pottery)
- High-quality potting soil
- Selection of herb plants
- Vintage garden tools for decoration
- Plant markers
- Natural twine or wire for hanging
- Weather-resistant paint or sealant
- Small trellis or support structures
Begin by selecting containers with adequate depth for root growth and drilling drainage holes if needed. Clean containers thoroughly and apply weather-resistant sealant to wooden items.
Layer the bottom with drainage materials, then fill with potting soil, leaving appropriate space for each herb’s root system. Position taller herbs like rosemary and sage in deeper containers at the back, with trailing varieties in elevated containers that allow for cascading growth.
Group containers according to water needs and sunlight requirements.
Extra Tips: Consider weight distribution when placing containers on balconies or elevated surfaces. For smaller spaces, focus on vertical arrangements using wall-mounted containers or tiered displays.
Herbs with similar growing requirements can share larger containers, maximizing space efficiency. In urban settings, choose compact varieties and consider using self-watering systems for consistent moisture.
Remember that metal containers can heat up quickly in direct sun, so position these thoughtfully or use them for heat-loving Mediterranean herbs.
Make a Composting Station From Wood Pallets
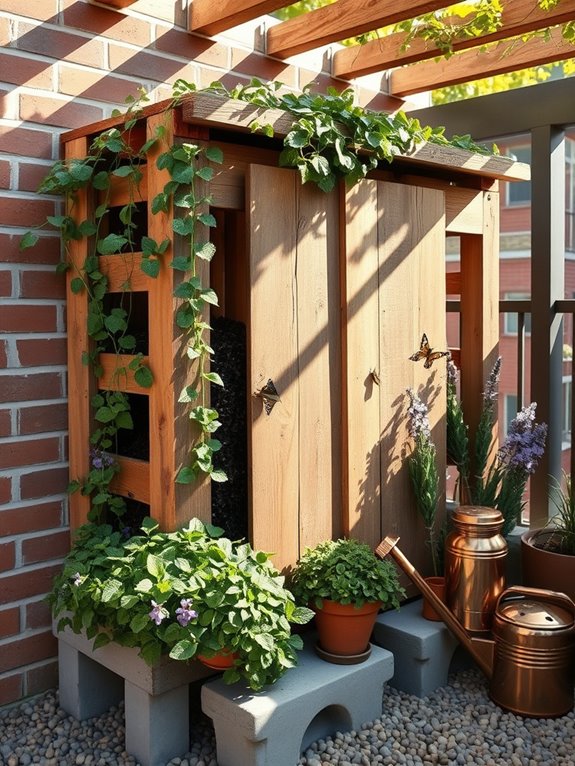
Transform your outdoor space into an eco-friendly oasis with a rustic composting station crafted from reclaimed wood pallets. The natural weathered look of the pallets creates an organic, farm-to-table aesthetic that blends seamlessly with climbing vines like Virginia creeper or English ivy.
The vertical walls of the station can become living green surfaces, softening the industrial feel of the pallets while providing habitat for beneficial insects and birds. Surrounding the composting station with aromatic herbs like mint, lemon balm, and lavender helps mask any potential odors while adding visual interest through varying textures and heights.
The combination of functional design and natural elements creates a sustainable corner that feels purposeful yet aesthetically pleasing, especially when bordered by flowering perennials that attract pollinators and add splashes of color throughout the growing season.
Key Elements:
- 6-8 wooden pallets (heat-treated, chemical-free)
- Heavy-duty hinges and screws
- Wire mesh or hardware cloth
- Garden staples or U-nails
- Ground stakes or concrete blocks
- Climbing plants or vines
- Aromatic herbs
- Mulch or gravel for base
- Optional roof material
The construction process begins with selecting a level, well-draining location that receives partial shade. Arrange three pallets in a U-shape configuration, securing them together at the corners and anchoring them to the ground using stakes or blocks.
Create a hinged front access panel with another pallet, ensuring easy access for turning compost. Line the interior walls with wire mesh to contain materials while allowing airflow. The remaining pallets can be used to create a slatted bottom that elevates the pile for better drainage and aeration.
For optimal composting conditions, maintain three distinct sections: fresh materials, active decomposition, and finished compost. This setup allows for continuous cycling of materials while keeping the process organized and efficient.
Install a simple slanted roof using corrugated plastic or repurposed materials to protect the contents from excessive rain while maintaining necessary moisture levels.
Adaptation Tips: For smaller spaces, create a compact single-bin system using just four pallets, or build vertically by stacking bins. Urban gardeners can incorporate smaller composting solutions like tumbling bins or bokashi systems that fit on balconies.
Consider adding wheels to the base for mobility, and paint or seal the pallets to extend their lifespan. If odor is a concern in close quarters, increase the ratio of brown materials (dried leaves, paper) to green materials (kitchen scraps) and maintain proper aeration through regular turning.
Craft a Solar-Powered Garden Fountain
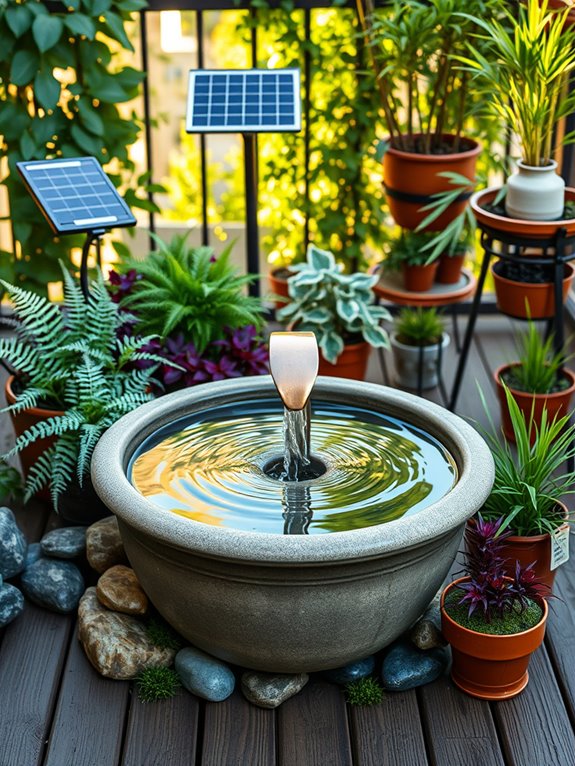
A solar-powered garden fountain creates an enchanting focal point that transforms any outdoor space into a peaceful sanctuary. The gentle sound of cascading water mingles with the rustling of ornamental grasses and the subtle movement of water-loving plants like Japanese iris and marsh marigolds surrounding the fountain’s base. During daylight hours, the fountain’s crystal-clear streams catch sunlight, creating mesmerizing patterns while providing a sustainable water feature that requires no electrical hookup.
The fountain area becomes a natural gathering spot, drawing both wildlife and human visitors to its refreshing presence. Strategically placed river rocks and smooth pebbles frame the fountain, while moisture-loving ferns and mosses create a lush groundcover that thrives in the fountain’s spray zone. Solar panels discreetly positioned to capture maximum sunlight power the fountain’s pump, seamlessly blending technology with nature.
Key Elements:
- Solar fountain pump kit with panel
- Collection basin or pre-formed pond liner
- Decorative stones and river rocks
- Moisture-loving plants
- Water-resistant sealant
- Copper or bamboo water spouts
- Level base materials
- Filter medium
- Plant containers
- Solar panel mounting hardware
Installation begins with selecting a sunny location and creating a stable, level foundation using crushed stone or concrete pavers. The collection basin should be properly sealed and partially buried, surrounded by good drainage material. Position the solar panel facing south at a 45-degree angle, ensuring no shadows fall across it during peak sunlight hours. Connect the pump system according to manufacturer specifications, testing water flow before adding decorative elements.
Garden design success depends on proper plant selection and maintenance routines. Choose plants that complement your local climate and can handle varying moisture levels. Regular cleaning of the pump filter, occasional water top-offs, and seasonal maintenance of surrounding plants will keep the fountain operating efficiently. During winter months in cold climates, either drain the system or use a fountain heater to prevent freeze damage.
[TIPS]:
For smaller spaces, consider wall-mounted solar fountains or compact tabletop versions that provide the same peaceful ambiance in a reduced footprint. Balcony gardeners can use self-contained units with built-in reservoirs, while larger gardens might incorporate multiple interconnected fountain features. Adjust water flow rates based on your space’s size to create appropriate sound levels, and consider using timers to conserve water during peak evaporation hours.
Build Raised Beds From Reclaimed Materials

Weathered wooden planks, vintage doors, and repurposed metal sheets come together to create charming raised beds that tell stories through their worn patinas and rustic character.
These upcycled materials transform into elegant growing spaces, where heirloom tomatoes climb weathered trellises, and cascading herbs spill over time-worn edges. The varying heights and textures of reclaimed materials create visual interest while providing optimal growing conditions for vegetables, flowers, and aromatic herbs.
The garden takes on an artistic quality as old windows become cold frames, and industrial metal pieces serve as edging and decorative elements. Vintage hardware adds distinctive touches, while the natural aging of reclaimed wood creates a lived-in feel that blends seamlessly with the surrounding landscape.
These beds become conversation pieces, each telling its own story while providing a sustainable solution for growing fresh produce and beautiful blooms.
Key Elements:
- Reclaimed wooden planks, pallets, or boards
- Salvaged metal sheets or corrugated panels
- Vintage doors or windows
- Corner brackets and hardware
- Landscape fabric
- Quality soil mix
- Drainage materials
- Hand tools
- Weather-resistant screws
- Wood preservative (food-safe)
To implement this garden style, begin by selecting materials that are free from harmful chemicals and structural damage. Layer the beds starting with a solid frame of the largest reclaimed pieces, ensuring corners are properly reinforced.
Create depth by stacking materials to at least 12 inches high, incorporating cross-supports every 4 feet to prevent bowing. Line the beds with landscape fabric to protect the wood and prevent soil leakage, then add a layer of drainage material before filling with quality growing medium.
Essential tips: Consider the weight of soil when selecting locations and reinforcement needs. For balcony gardens, use lighter materials and create modular designs that can be easily moved or reconfigured.
Weather-proof all wooden elements with food-safe sealants, and ensure adequate drainage holes are drilled in solid-bottom containers. Monitor the condition of materials annually, replacing any deteriorating pieces to maintain structural integrity and safety.
Design a Butterfly Garden With Recycled Borders
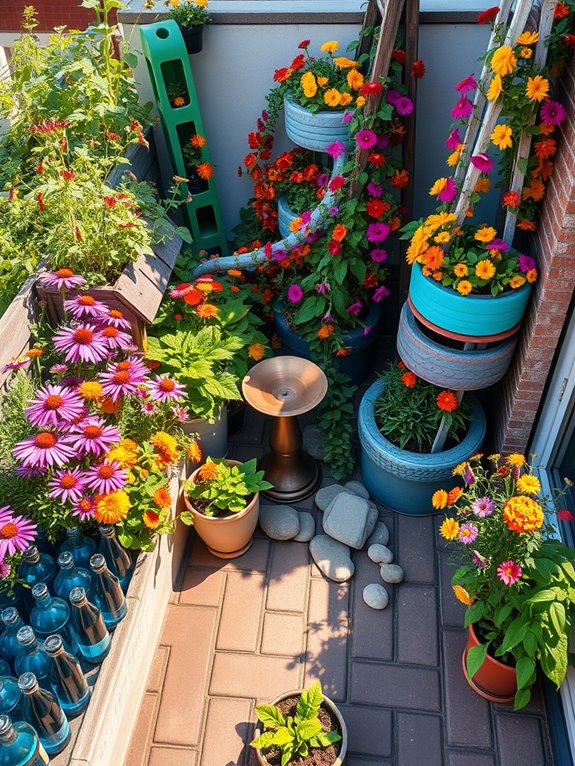
Transform your outdoor space into a vibrant sanctuary for butterflies with a thoughtfully designed garden bordered by repurposed materials. Imagine stepping into a kaleidoscope of colors where purple coneflowers, bright orange butterfly weed, and delicate pink cosmos dance in the breeze.
Recycled elements like weathered brick paths, glass bottle borders, and painted tire planters create an eco-friendly boundary that adds character while guiding these winged visitors through their natural habitat. The garden comes alive with layers of nectar-rich blooms at varying heights, creating a three-dimensional feast for both butterflies and human eyes.
Salvaged wooden pallets, transformed into vertical growing spaces, showcase cascading lantana and climbing nasturtiums. Repurposed metal containers filled with native wildflowers add rustic charm while providing essential feeding stations for your butterfly visitors.
Essential Elements:
- Butterfly-attracting plants (milkweed, zinnia, verbena, lantana)
- Native flowering plants
- Shallow water source
- Flat rocks for basking
- Recycled border materials (bottles, bricks, tires)
- Vertical growing structures
- Multiple height levels
- Sheltered areas
- Full sun location
- Natural mulch
Begin implementation by selecting a sunny location and clearing the space of grass and weeds. Arrange your recycled border materials to create defined edges, ensuring proper drainage holes in repurposed containers.
Plant tall species like joe-pye weed and butterfly bush toward the back, medium-height plants in the middle, and shorter flowers in front. Include both nectar plants for adult butterflies and host plants for caterpillars, grouping similar species together for visual impact and easier maintenance.
For maintenance, water deeply but infrequently to encourage deep root growth, and avoid using pesticides which can harm butterflies. Deadhead spent blooms to encourage continuous flowering, and maintain clean water sources. Leave some open areas with flat rocks for butterflies to bask in the sun, and consider adding protective structures like brush piles or decorative log stacks for shelter.
Small-space adaptation tips: Focus on compact varieties for balcony gardens, using vertical growing solutions like wall-mounted recycled containers or hanging baskets. Container groupings can create similar layered effects as ground gardens, while movable pots allow flexibility in arrangement.
Even minimal spaces can support butterfly populations with careful plant selection and strategic placement of water sources and basking spots. Consider dwarf varieties of butterfly-friendly plants and use multi-functional elements that serve both aesthetic and practical purposes.