
10 Garden Ideas for Creating Focal Points
When you’re looking to transform your garden from ordinary to extraordinary, focal points become your secret weapon. You’ll discover that strategic placement of eye-catching elements can guide visitors through your outdoor space while creating memorable moments of wonder and delight. From the gentle splash of a copper fountain to the bold silhouette of a modern sculpture, these attention-grabbing features serve as anchor points that give your garden structure and personality. Let’s explore ten creative ways to establish these magnetic destinations in your landscape.
Contents
- 1 Water Features and Reflecting Pools
- 2 Statement Garden Sculptures and Art Installations
- 3 Dramatic Container Gardens and Planters
- 4 Architectural Plants and Specimen Trees
- 5 Garden Structures and Pergolas
- 6 Vintage and Repurposed Design Elements
- 7 Stone Features and Rock Gardens
- 8 Living Walls and Vertical Gardens
- 9 Garden Seating and Entertainment Areas
- 10 Lighting Features and Illuminated Displays
Water Features and Reflecting Pools
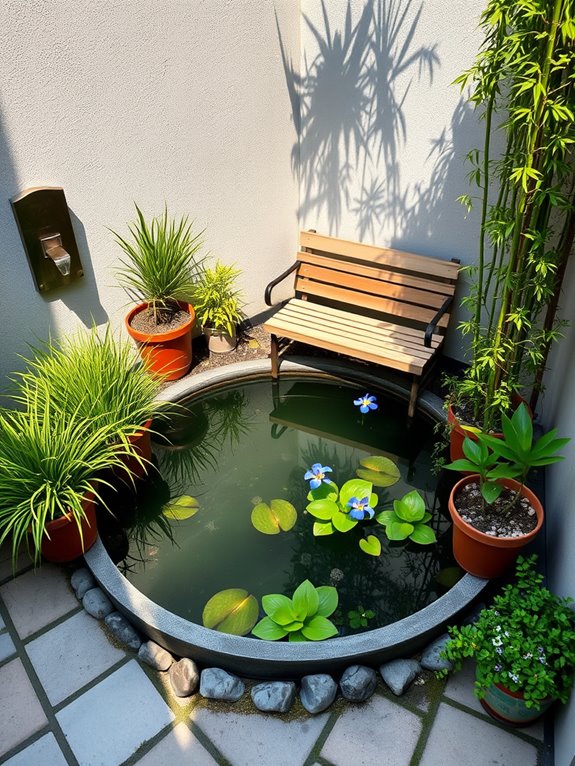
The gentle sound of cascading water creates an immediate sense of tranquility in any garden space, while reflecting pools mirror the sky and surrounding foliage, doubling the visual impact of carefully chosen plants. A thoughtfully designed water feature becomes nature’s mirror, drawing the eye and creating a mesmerizing focal point that transforms an ordinary garden into an enchanting retreat.
Whether it’s a small wall fountain surrounded by climbing jasmine or a serene reflecting pool edged with blue iris and water lilies, these aquatic elements bring movement, light, and life to the landscape.
Japanese forest grass, variegated hostas, and deep green moss create soft textural layers around the water’s edge, while vertical elements like bamboo or ornamental grasses provide dramatic reflections in the still water. The interplay of light on water throughout the day creates ever-changing patterns, while strategic lighting transforms the space into a magical evening garden. Stone pathways and carefully placed benches invite visitors to pause and reflect, completing the contemplative atmosphere.
Key Elements:
- Water pump and filtration system
- Waterproof basin or pool liner
- Natural stone or precast concrete edging
- Aquatic plants (water lilies, iris, rushes)
- Shade plants for surroundings
- Underwater lighting
- Decorative rocks and pebbles
- Seating area
- Water-safe electrical connections
- Maintenance equipment
Installation begins with careful planning of the water feature’s location, considering natural viewing angles and existing terrain. The site must be perfectly level, with proper drainage and access to electricity for pumps and lighting. For reflecting pools, excavate to the desired depth plus additional space for underlayment and liner, ensuring absolute levelness.
Install a quality rubber liner or pre-formed shell, securing edges with heavy stones or purpose-built edging. The pump and filtration system should be concealed but accessible for maintenance.
Complete the installation by adding appropriate aquatic plants in submerged containers, positioning them at various depths according to their needs. Edge plantings should be installed in well-draining soil, with careful attention to creating natural-looking groupings. Regular maintenance includes checking water levels, cleaning filters, and managing algae growth through proper chemical balance or natural solutions.
For smaller spaces or balconies, consider wall-mounted fountains, ceramic water bowls, or compact reflecting pools in containers. These scaled-down versions can create the same atmospheric effect while requiring less space and maintenance. Use mirrors strategically to amplify the reflective qualities, and choose dwarf varieties of aquatic plants.
Remember that even minimal water features require winter protection in cold climates, either through draining and covering or moving portable features indoors.
Statement Garden Sculptures and Art Installations
Statement garden sculptures and art installations transform ordinary outdoor spaces into captivating galleries where nature and human creativity intertwine. Bold metal sculptures rise from beds of ornamental grasses, their modern forms creating dramatic silhouettes against greenery like Mexican feather grass and purple fountain grass. Glass installations catch and reflect light, while stone figures emerge from clusters of flowering perennials, including purple coneflowers and black-eyed susans, creating an artistic narrative throughout the landscape.
The interplay between art and vegetation creates dynamic seasonal changes as plants grow and shift around permanent artistic focal points. Large-scale pieces command attention year-round, while smaller sculptures tucked among plantings offer delightful discoveries along garden paths. Weather-resistant materials like bronze, steel, or concrete develop natural patinas over time, integrating seamlessly with the surrounding environment.
Key Elements:
- Statement sculptures (metal, stone, or glass)
- Architectural plants (ornamental grasses, topiary)
- Spotlighting or landscape lighting
- Complementary background plants
- Hardscaping elements (gravel, pavers)
- Viewing spaces or seating areas
- Plant varieties that enhance artwork
- Base materials or platforms
- Weather-resistant art materials
When implementing garden sculptures, start by selecting pieces that match your garden’s scale and style. Position larger sculptures where they can be viewed from multiple angles and distances, creating clear sight lines through strategic plant placement. Install proper foundations or bases to ensure stability, and incorporate lighting to enhance dramatic effects after dark.
Consider the sculpture’s relationship to existing landscape features and plan complementary plantings that won’t overshadow or compete with the artwork. Extra design considerations include scale adaptation for different spaces – smaller gardens might focus on one significant piece, while larger areas can accommodate multiple installations. For balcony gardens, consider wall-mounted sculptures or suspended art pieces that maximize vertical space.
Choose materials appropriate for your climate, and ensure artwork is properly secured against wind and weather. Consider seasonal changes in surrounding vegetation when positioning pieces, and plan for maintenance access to both the artwork and nearby plants.
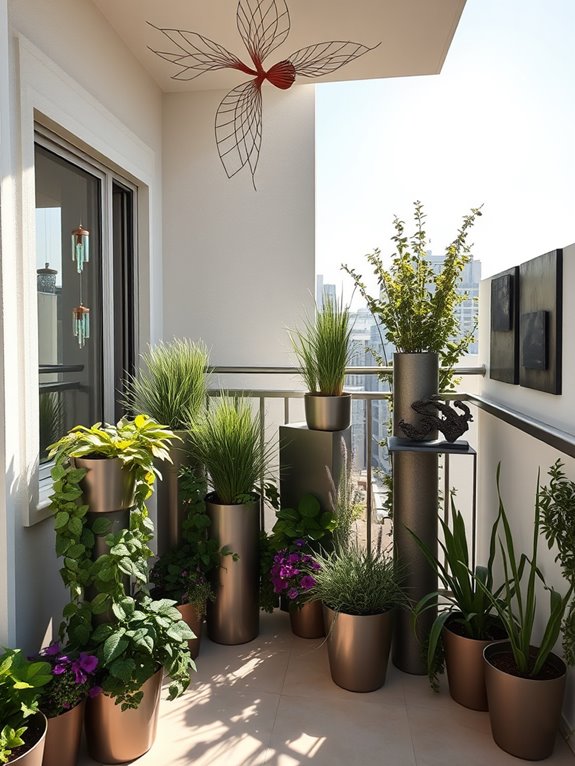
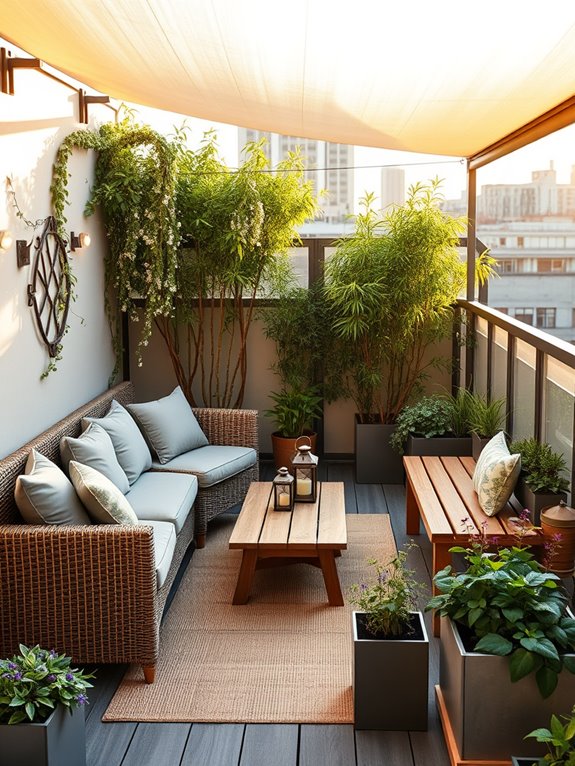
Dramatic Container Gardens and Planters
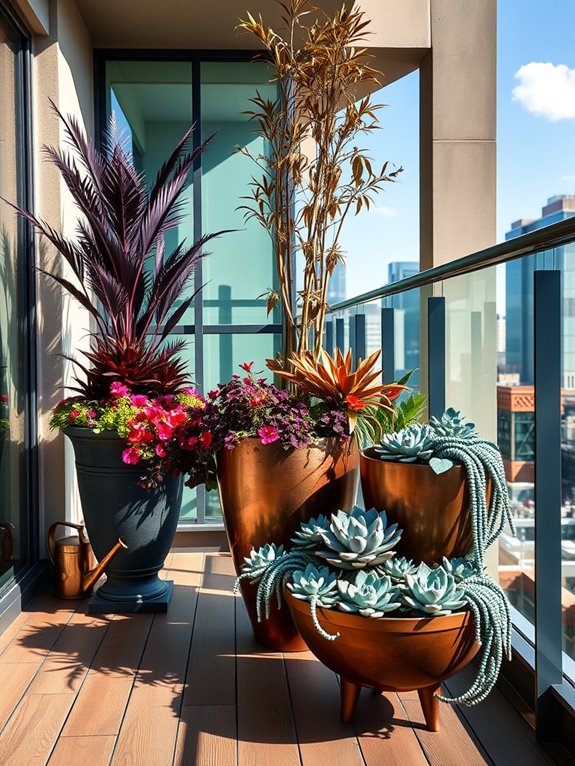
Transform your outdoor space into a living masterpiece with dramatic container gardens and planters that command attention. Towering ceramic urns overflow with cascading purple petunias and silver dichondra, while sleek modern planters showcase architectural succulents and spiky cordylines. Multi-level arrangements create visual intrigue, with tall bamboo stems rising from bronze containers alongside mid-height flowering shrubs and ground-hugging sedums in complementary vessels.
The artistic composition of containers allows for bold color statements and textural contrasts impossible in traditional garden beds. Copper and zinc planters develop striking patinas over time, providing sophisticated backdrops for vibrant tropical foliage. Mix container materials and styles – weathered terracotta, glossy glazed ceramics, and industrial metal – to create engaging visual rhythms while maintaining cohesion through repeated plant varieties or color schemes.
Key Elements:
- Large statement containers (minimum 24″ diameter)
- Varying container heights and materials
- Thriller plants (tall focal points)
- Filler plants (mid-height, full)
- Spiller plants (cascading)
- Container pedestals or risers
- Quality potting soil
- Irrigation system or self-watering containers
- Decorative mulch or top dressing
- Accent lighting
Begin implementation by positioning your largest containers first, typically in corners or central viewing areas. Create triangular groupings of three containers with varying heights, ensuring the tallest plants face north to prevent shadowing.
Layer plants within each container using the “thriller, filler, spiller” technique – position tall architectural plants in the center, surround with full-bodied plants, and edge with trailing varieties. Maintain proper spacing between container groupings to allow comfortable passage and viewing from multiple angles.
For successful container gardens in any setting, consider weight restrictions for elevated spaces, wind exposure at different heights, and water requirements. Small balconies benefit from vertical gardening techniques with wall-mounted containers or tiered stands.
Use lightweight containers and potting mix for upper floors, and install drip irrigation systems to maintain consistent moisture levels. Select plants with similar water and light needs for each container to simplify maintenance and ensure long-term success.
Architectural Plants and Specimen Trees
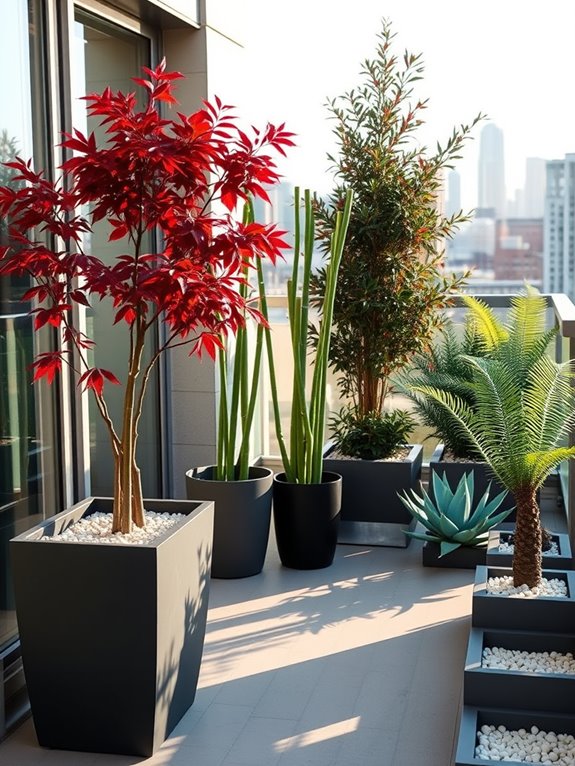
Towering palms with their dramatic silhouettes pierce the sky while sculptural agaves spread their geometric patterns below, creating a bold architectural statement that commands attention in any garden space.
These living sculptures form natural focal points, drawing the eye through the landscape with their striking forms and distinctive shapes. The clean lines of New Zealand flax and the spiral symmetry of aloes provide year-round structure, while specimen trees like Japanese maples or weeping cherry trees add height and seasonal drama.
The interplay of different heights, textures, and forms creates a sophisticated outdoor gallery where each plant serves as a natural work of art. Bamboo groves sway gracefully in the breeze, their vertical lines contrasting with the horizontal spread of tree ferns, while the architectural leaves of Fatsia japonica create deep shadows and interesting patterns.
This style of garden brings a sense of permanence and gravitas to the space, with each carefully chosen specimen adding its unique character to the overall composition.
Key Elements:
- Specimen trees (Japanese maple, weeping cherry, olive)
- Large architectural plants (palm trees, tree ferns, bamboo)
- Sculptural succulents (agaves, aloes, yuccas)
- Structural grasses (New Zealand flax, pampas grass)
- Bold-leaved plants (Fatsia japonica, Gunnera, banana plants)
- Contemporary containers or raised beds
- Strategic lighting
- Quality mulch or gravel
- Adequate spacing between specimens
Implementation begins with selecting a focal point location that can be viewed from multiple angles, typically visible from indoor living spaces. Position your largest specimen first, considering its mature size and the shadow it will cast.
Create layers around this centerpiece, placing medium-sized architectural plants in groups of three or five, maintaining enough space between them to appreciate their individual forms. Edge the design with smaller sculptural plants, ensuring each has room to develop its characteristic shape.
When designing with architectural plants and specimen trees, soil preparation is crucial. Create planting holes twice the width of the root ball and incorporate organic matter to ensure good drainage.
Regular maintenance includes removing dead foliage, strategic pruning to maintain shape, and protecting sensitive specimens during extreme weather. Add uplighting to showcase dramatic forms after dark and create year-round impact.
Design Adaptations:
For smaller spaces or balconies, focus on container specimens that provide vertical interest without overwhelming the area. Choose dwarf varieties of architectural plants, such as compact bamboo or smaller palm species, and use lightweight containers that can be moved as needed.
Consider using mirrors to amplify the impact of specimen plants and create the illusion of more space. In windy locations, ensure tall plants are securely staked and consider installing windbreaks to protect delicate foliage.
Garden Structures and Pergolas
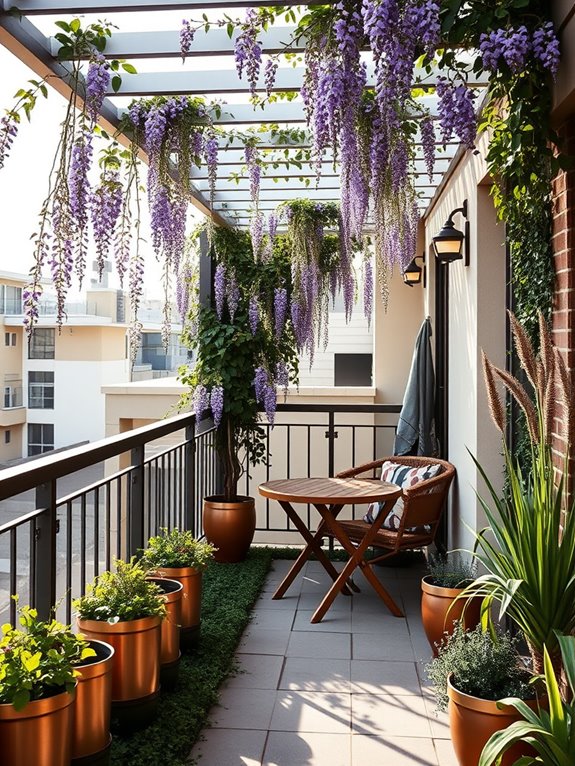
Garden structures and pergolas transform ordinary outdoor spaces into enchanting destinations that draw the eye and invite exploration. Sturdy wooden or metal frames rise gracefully overhead, supporting cascading wisteria, climbing roses, or vibrant clematis that create living canopies.
These architectural elements add vertical interest while casting intricate shadow patterns across pathways and seating areas, creating an ever-changing display throughout the day. The combination of solid structure and delicate plantings creates a perfect balance between man-made and natural elements.
Whether serving as an entry point, a transition between garden rooms, or a dedicated space for outdoor living, these structures provide both function and beauty. Hanging baskets suspended from pergola beams can showcase trailing petunias or ferns, while strategically placed containers at the base can feature seasonal blooms or architectural plants like ornamental grasses.
Key Elements:
- Pergola frame (wood, metal, or vinyl)
- Climbing plants and vines
- Support cables or lattice panels
- Seating area or furniture
- Container plants
- Lighting fixtures
- Ground cover or paving
- Plant supports and ties
- Weather-resistant hardware
- Decorative post caps or finials
Begin implementation by selecting a location that receives appropriate sunlight for your chosen climbing plants and ensures the structure will be visible from key viewing points.
Install the pergola on a level surface, using proper footings or anchors for stability. Prepare the soil around the posts for climbing plants, incorporating organic matter and ensuring good drainage. Install support systems like cables or lattice panels before introducing plants, spacing them strategically to achieve desired coverage over time.
Extra Tips: Consider the mature size of climbing plants when spacing supports and selecting structure dimensions. For smaller spaces or balconies, opt for modular or wall-mounted pergola designs that can be scaled appropriately.
Choose materials and finishes that complement your home’s architecture and ensure all wood is properly treated for outdoor use. In urban settings, consider incorporating retractable shade covers or clear roofing panels to extend the usability of the space during inclement weather while maintaining light transmission for plants.
Vintage and Repurposed Design Elements
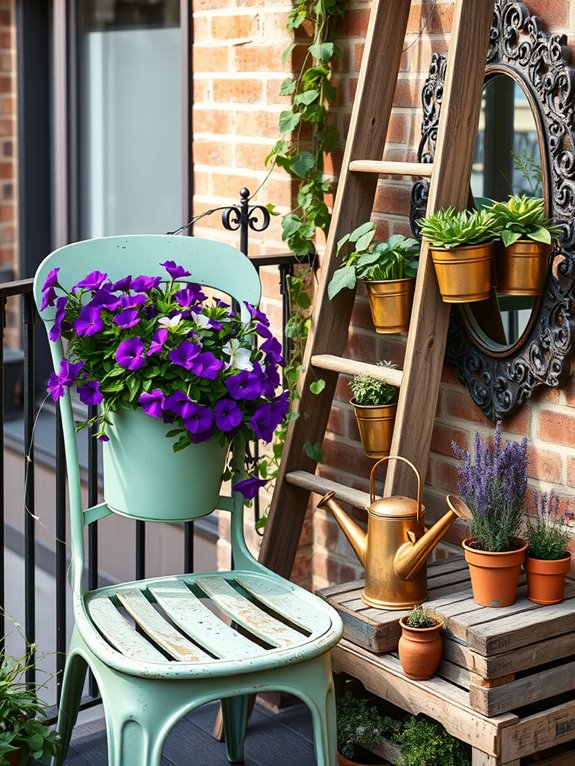
Transform your garden into a charming wonderland by incorporating vintage treasures and repurposed items that tell stories of the past. Old metal watering cans overflow with trailing ivy, while weathered wooden ladders become vertical gardens draped with climbing roses and clematis. Antique bicycle wheels serve as whimsical trellises, their spokes embraced by morning glories, creating an enchanting blend of history and natural beauty. Rustic wheelbarrows burst with colorful annuals, and patinated copper pots cradle succulents, adding layers of visual interest and nostalgic charm.
The garden comes alive with carefully curated pieces that bridge past and present. Reclaimed window frames hang from tree branches, creating magical portals framed by wisteria vines. Vintage tea cups and mason jars become delightful succulent planters, while old brass bed frames transform into stunning garden benches surrounded by lavender and catmint. The overall effect is a sophisticated yet playful space that celebrates both horticultural beauty and architectural salvage.
Key Elements:
- Vintage containers (watering cans, wheelbarrows, tea cups)
- Architectural salvage pieces
- Old metal or wooden ladders
- Antique windows and frames
- Reclaimed furniture
- Industrial artifacts
- Heritage plants and flowers
- Weathered wood elements
- Metal garden tools
- Period-appropriate hardware
- Patinated metals
- Vintage signage
Begin implementation by selecting a focal point piece, such as an old door or window frame, positioning it where it can be viewed from multiple angles.
Create layers by placing larger items like wheelbarrows or furniture pieces in the background, with smaller vintage containers arranged in graduating heights toward the front. Ensure proper drainage in repurposed containers by drilling holes and adding gravel before soil. Group similar materials or eras together to create cohesive vignettes, and secure tall items firmly in the ground for safety.
When designing a vintage garden space, consider your local climate’s effect on materials – some items may need weather protection or seasonal storage.
For small spaces like balconies, focus on vertical elements and wall-mounted pieces. Choose compact varieties of climbing plants for container gardens, and rotate seasonal displays to maintain year-round interest. Remember that less is often more – too many vintage pieces can create visual clutter rather than the desired romantic atmosphere.
Stone Features and Rock Gardens
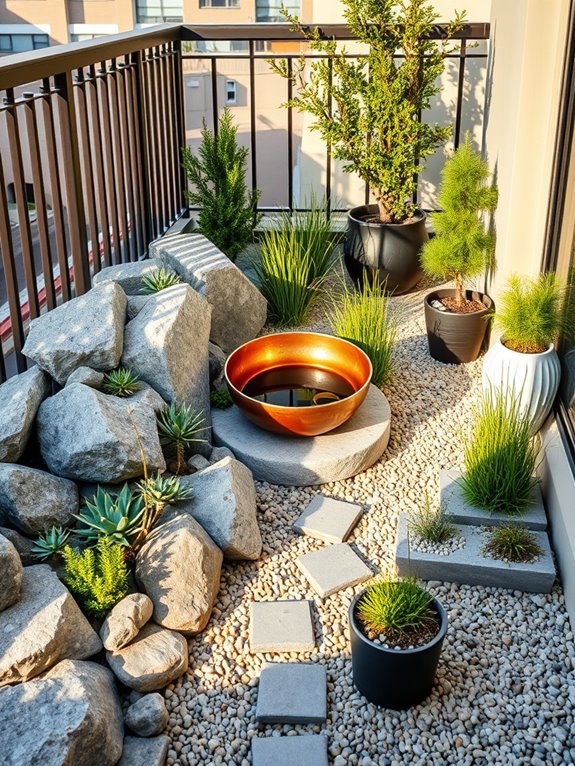
Stone Features and Rock Gardens transform ordinary garden spaces into dramatic natural landscapes that evoke the rugged beauty of mountain terrain and ancient zen gardens. Weathered boulders, artfully arranged river rocks, and carefully positioned stepping stones create a foundation of permanence and strength, while drought-resistant plants like sedums, sempervivums, and low-growing alpines soften the harsh edges with their delicate textures and subtle colors.
The interplay between stone and vegetation creates a dynamic visual rhythm that changes throughout the seasons. Cascading creepers spill over rock faces, while upright ornamental grasses provide vertical interest and movement. Small water features incorporated among the rocks can add a peaceful soundtrack of gentle trickling, while carefully positioned lighting transforms the space into a moonlit sanctuary after dark.
Key Elements:
- Various sized rocks and boulders
- Alpine and drought-resistant plants
- Gravel or crushed stone
- Stepping stones
- Small water feature (optional)
- Ground cover plants
- Ornamental grasses
- LED landscape lighting
- Soil appropriate for rock garden plants
- Landscape fabric for weed control
Begin implementation by creating a slight slope or mound for better drainage and visual interest. Position larger rocks first, burying them partially to appear natural and ensure stability.
Layer smaller stones and gravel between the larger elements, creating pockets for planting. Install irrigation if needed before adding plants, ensuring proper drainage throughout the design. Select plants based on your climate zone and position them in groups of odd numbers for natural clustering.
Work with the natural contours of your space and consider sight lines from different viewing angles. If incorporating a water feature, position it where it can be both seen and heard from primary viewing areas.
Create clear pathways through the garden using stepping stones or gravel paths to allow easy maintenance access.
For smaller spaces or balconies, consider creating a miniature rock garden using a selection of smaller stones and compact alpine plants in containers. Use vertical elements like tall grasses or small columnar shrubs to add height without overwhelming the space.
Consider lightweight materials like pumice or artificial rocks for rooftop gardens where weight restrictions apply. Always ensure proper drainage and use containers with adequate depth for root development.
Living Walls and Vertical Gardens
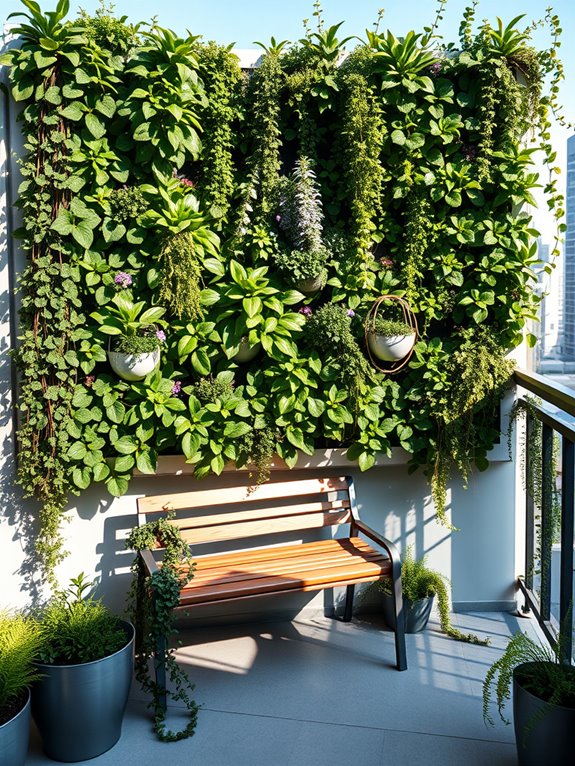
Transform your vertical space into a breathtaking living tapestry with a vibrant living wall or vertical garden. Cascading ferns drape elegantly alongside colorful succulents, while climbing vines and trailing pothos create an enchanting green curtain that draws the eye upward.
Compact flowering plants like petunias, begonias, and lobelia add bursts of color throughout the seasons, creating a dynamic display that changes with each bloom cycle. The vertical arrangement maximizes limited space while providing a stunning architectural element that can serve as both a natural privacy screen and a conversation piece.
Whether installed on a sunny exterior wall or brightening an indoor living space, these gardens create an immediate connection to nature. The gentle rustling of leaves and the subtle interplay of textures – from soft mosses to structural air plants – transform ordinary walls into living, breathing ecosystems.
Key Elements:
- Mounting system or frame structure
- Irrigation system with timer
- Growing medium or soil pockets
- Plant selection suitable for vertical growth
- Drainage system
- Waterproof backing
- Support cables or brackets
- Growth medium containers or pouches
- Lighting (for indoor installations)
Begin installation by securing a sturdy mounting system to your wall, ensuring proper waterproofing behind the structure. Install the irrigation system, connecting it to a water source and timer for consistent moisture distribution.
Create planting pockets or install pre-made panels, filling them with appropriate growing medium. Position plants strategically, placing larger specimens at the bottom and trailing varieties where they can cascade naturally. Establish a regular maintenance schedule including pruning, fertilizing, and system checks.
Implementation success depends on careful planning of the support structure and irrigation system. For balcony installations, consider weight restrictions and wind exposure.
Small balconies can utilize pocket planters or modular systems, while larger spaces might accommodate more elaborate panel systems. Always check building regulations before installation, and ensure proper drainage to protect underlying structures.
Consider incorporating automatic watering systems and selecting plants based on available light conditions and local climate.
Garden Seating and Entertainment Areas
Transform your garden into an inviting outdoor living room with a thoughtfully designed seating and entertainment area that beckons family and friends to gather and unwind. Comfortable weatherproof furniture arranged around a central focal point, such as a fire pit or decorative coffee table, creates an intimate atmosphere perfect for conversation and relaxation.
Surrounding plantings of ornamental grasses like Miscanthus and Pennisetum sway gently in the breeze, while climbing jasmine and wisteria drape overhead pergolas with cascading blooms and intoxicating fragrance. The space comes alive with strategic lighting, from string lights twinkling above to LED path lights guiding guests through evening gatherings.
Potted plants in varying heights – perhaps Mediterranean herbs, colorful Calibrachoa, or structural box plants – define the boundaries while keeping the space feeling natural and garden-connected. Weather-resistant cushions and throws in coordinating colors add comfort and style, making the outdoor room feel as cozy as any indoor space.
Key Elements:
- Weather-resistant seating (chairs, sofas, benches)
- Central focal point (fire pit, table, or water feature)
- Overhead structure (pergola, gazebo, or large umbrella)
- Outdoor lighting system
- Container plants and surrounding greenery
- Weather-resistant cushions and textiles
- Side tables or surfaces for drinks and plates
- Outdoor rug or defined floor space
- Storage solutions for cushions
- Shade options for sun protection
Creating an effective entertainment area requires careful space planning and zoning. Start by establishing the primary seating area on a level surface, ideally on decking or paving, positioning furniture to encourage conversation while maintaining clear pathways for movement.
Layer the space with different heights – low seating, mid-height tables, and tall planters or structures – to create visual interest and define the area’s boundaries. Install lighting early in the process, ensuring electrical connections are properly weatherproofed and positioned for both ambiance and safety.
The key to maintaining an inviting entertainment space lies in selecting appropriate materials and incorporating practical storage solutions. Choose furniture that can withstand local weather conditions, opt for quick-drying cushions, and consider how elements will be protected or stored during severe weather.
Regular maintenance of both hardscape and plantings will keep the space looking fresh and welcoming.
Design Tip: For smaller spaces or balconies, consider modular furniture that can be rearranged as needed, and focus on vertical gardening opportunities like wall-mounted planters or climbing plants. Foldable furniture and nested tables can provide flexibility, while built-in bench seating along walls maximizes space efficiency. Even the smallest balcony can become an enchanting entertainment space by carefully selecting scaled-down versions of these elements and emphasizing multi-functional pieces.
Lighting Features and Illuminated Displays
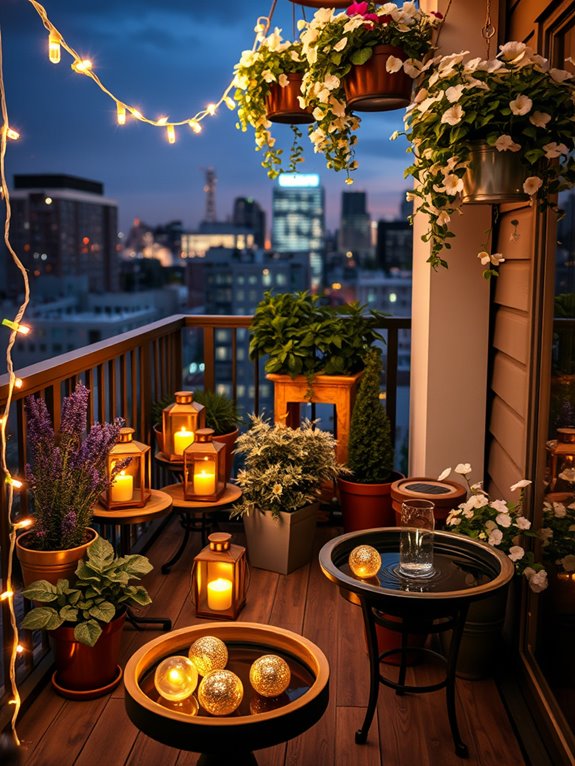
Transform your garden into a magical nighttime wonderland with strategically placed lighting features and illuminated displays. Solar-powered path lights cast gentle pools of illumination along winding walkways, while carefully positioned uplights dramatically highlight the sculptural forms of ornamental grasses and architectural plants like Japanese maples and towering bamboo.
Hanging lanterns suspended from tree branches create a romantic ambiance, complemented by the soft glow of LED string lights woven through pergolas and trellises. The evening garden comes alive with illuminated water features, where submersible lights create mesmerizing reflections across pond surfaces and within fountain displays. Statement pieces like oversized glowing orbs nestled among flowering shrubs add contemporary flair, while traditional copper torches flicker with warmth against dark foliage.
The combination of light and shadow creates depth and mystery, transforming familiar daytime spaces into enchanting nocturnal retreats.
Key Elements:
- Solar-powered path lights
- LED uplighting fixtures
- Hanging lanterns
- String lights
- Illuminated water features
- Glowing garden ornaments
- Motion-sensor security lights
- Timer controls
- Weather-resistant electrical outlets
- Light-reflecting plants
- White-flowering plants
- Silver-leaved plants
Begin the installation by mapping out your electrical needs and installing weather-resistant outlets where necessary. Position path lights at regular intervals along walkways, ensuring even illumination without creating harsh spotlight effects. Install uplights at the base of specimen plants and architectural features, angling them slightly away from viewing areas to prevent glare.
Layer your lighting by combining different heights and intensities, from ground-level marker lights to elevated hanging fixtures. For maintenance and optimal performance, regularly clean light fixtures and check for water damage or loose connections. Replace bulbs proactively to maintain consistent illumination levels, and adjust timer settings seasonally to accommodate changing daylight hours.
Consider installing a smart lighting system for automated control and energy efficiency. When designing illuminated garden spaces, remember that less is often more – avoid over-lighting which can create harsh effects and disturb local wildlife.
For smaller spaces like balconies, focus on versatile string lights and compact solar fixtures that can be easily repositioned. In larger gardens, create separate lighting zones to manage energy use and maintain intimate spaces. Consider your neighbors when positioning lights, and use shields or directional fixtures to prevent light pollution.