
8 Garden Ideas for Container Vegetables
You’ll discover that growing vegetables in containers opens up endless possibilities, even in the smallest spaces. From vertical wall gardens bursting with leafy greens to clever companion plantings of tomatoes and basil, container gardening brings fresh produce right to your doorstep. Whether you’re working with a tiny balcony or a sunny patio, these eight innovative growing solutions help you create a productive garden that’s both beautiful and space-efficient. Let’s explore how to transform your available space into a thriving container vegetable paradise.
Contents
Vertical Growing Systems for Small Spaces
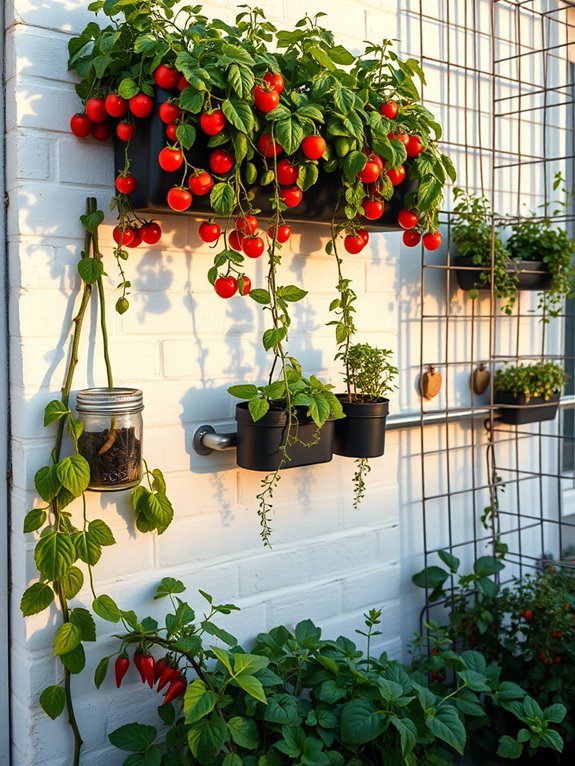
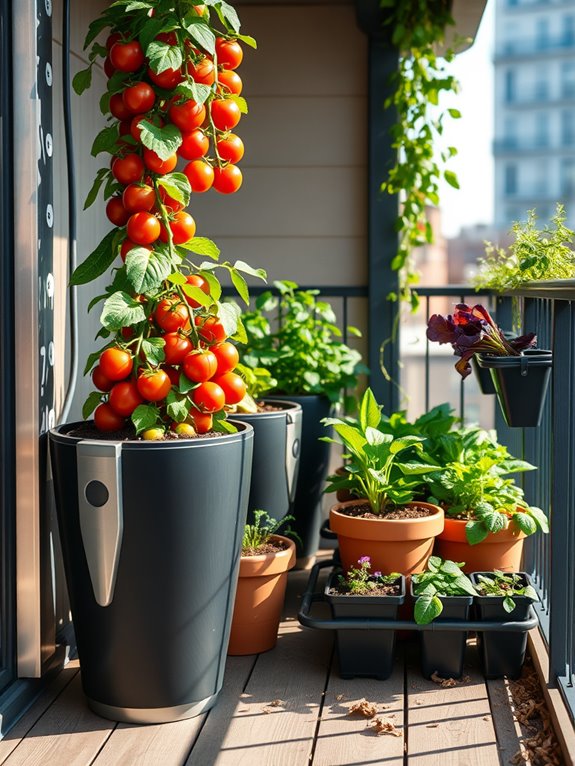
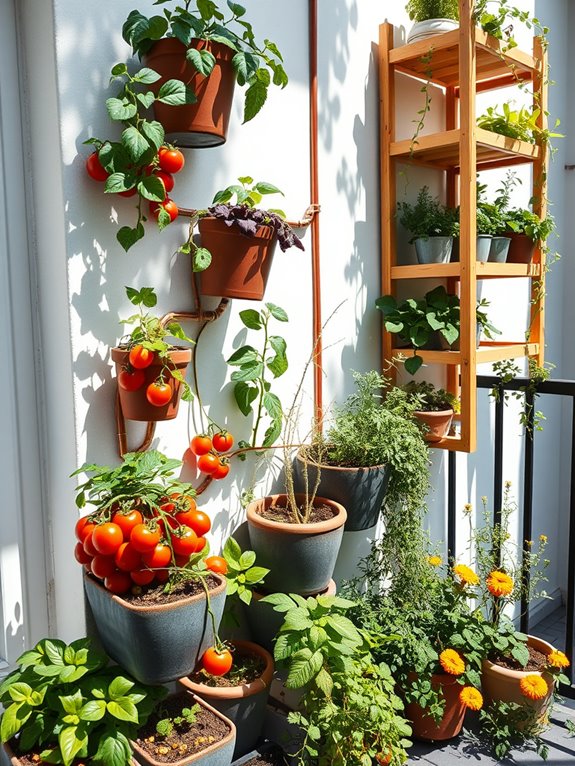
Transform your compact outdoor space into a living wall of edible abundance with a vertical vegetable garden that defies spatial limitations. Cascading cherry tomatoes tumble from mounted planters, while cucumber vines wind their way up string trellises, creating an enchanting green tapestry against your wall or fence.
Leafy greens nestle in tiered pocket planters, their varied textures and shades of green creating a lush, natural artwork that changes with each growing season. The vertical design brings your garden to eye level, making it both a functional growing space and an engaging focal point.
Herbs planted in wall-mounted mason jars add aromatic charm, while recycled gutters filled with strawberries and compact lettuce varieties create clean horizontal lines that complement modern architectural elements. Solar-powered string lights weaved through the structure transform the space into a magical evening retreat.
Key Elements:
- Wall-mounted planters or pocket systems
- Sturdy trellises or grid panels
- Hanging containers with drainage
- Drip irrigation system
- Support cables or garden twine
- Plant clips or ties
- Lightweight growing medium
- Weather-resistant mounting hardware
- Multi-level planting systems
- Timer-controlled watering components
Begin installation by securing a strong mounting framework to your wall or fence, ensuring it can support the weight of plants, soil, and water. Install the irrigation system first, running tubes discreetly along the framework.
Arrange containers from bottom to top, considering plant height potential and sun exposure patterns. Position taller growing vegetables like pole beans and indeterminate tomatoes at the base where they can climb upward, while placing compact crops like herbs and lettuce in upper containers for easy harvesting.
Space management becomes crucial in vertical gardens, so choose plants that naturally grow upward or can be trained to climb. Reserve the lowest level for deep-rooted vegetables that need more soil volume, and use the upper levels for shallow-rooted crops. Implement a regular maintenance schedule that includes checking support structures, adjusting ties, and monitoring irrigation flow.
When designing your vertical garden, consider weight distribution and available sunlight throughout the day. For narrow balconies, use lightweight fabric growing pouches instead of heavy containers, and install planters on wheels for mobility.
Incorporate collapsible trellises for seasonal flexibility, and plan for plant succession to maintain visual interest year-round. Remember that south-facing walls typically offer optimal growing conditions, but reflective materials can help maximize light exposure on less ideal orientations.
Mixed Herb and Vegetable Combinations
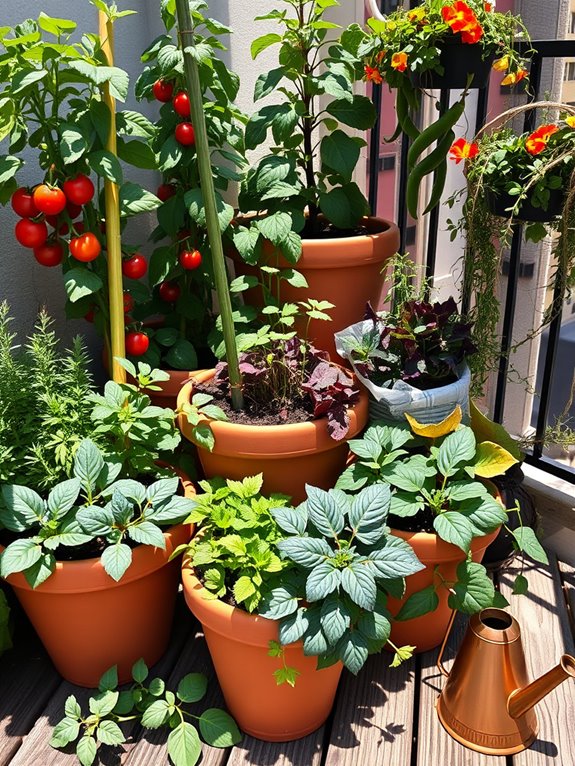
A mixed herb and vegetable container garden creates a vibrant tapestry of textures and colors, where silvery sage leaves contrast with deep purple basil and bright green parsley. Cascading thyme spills over terracotta pot edges while compact cherry tomatoes reach skyward, creating an enchanting vertical display. The arrangement marries ornamental appeal with practical harvesting, offering a feast for both eyes and palate.
This living pantry transforms any outdoor space into an aromatic retreat, where brushing against fragrant rosemary and lavender releases their essential oils into the air. Colorful Swiss chard stands like painted sentinels among clustering chives and oregano, while compact bush beans provide architectural interest with their upright growth. The combination of flowering herbs and productive vegetables ensures the display remains dynamic throughout the growing season.
Key Elements:
- Various-sized containers (minimum 12-inch diameter)
- Quality potting soil with organic matter
- Herb varieties (basil, thyme, rosemary, sage, oregano)
- Compact vegetable varieties (cherry tomatoes, bush beans, Swiss chard)
- Container-friendly flowers (nasturtiums, calendula)
- Drip irrigation system or self-watering containers
- Plant supports and stakes
- Organic fertilizer
- Decorative mulch
Arrange containers in layers, placing larger pots with tall vegetables at the back and cascading herbs toward the front. Group plants with similar water needs together, ensuring each container has adequate drainage. Combine plants that complement each other’s growth habits – tall tomatoes can provide afternoon shade for moisture-loving herbs, while spreading herbs act as living mulch for vegetable roots.
Maintain regular harvesting schedules to encourage continuous production and prevent overcrowding.
Space-saving adaptations include vertical growing systems for small balconies, utilizing wall-mounted planters or tiered stands. For maximum production in limited spaces, focus on high-yield vegetables and frequently-used herbs. Consider microclimate variations created by surrounding buildings, and adjust plant selection accordingly.
Container mobility allows for seasonal adjustments, moving plants to optimize sun exposure as angles change throughout the year.
Upcycled Container Gardens
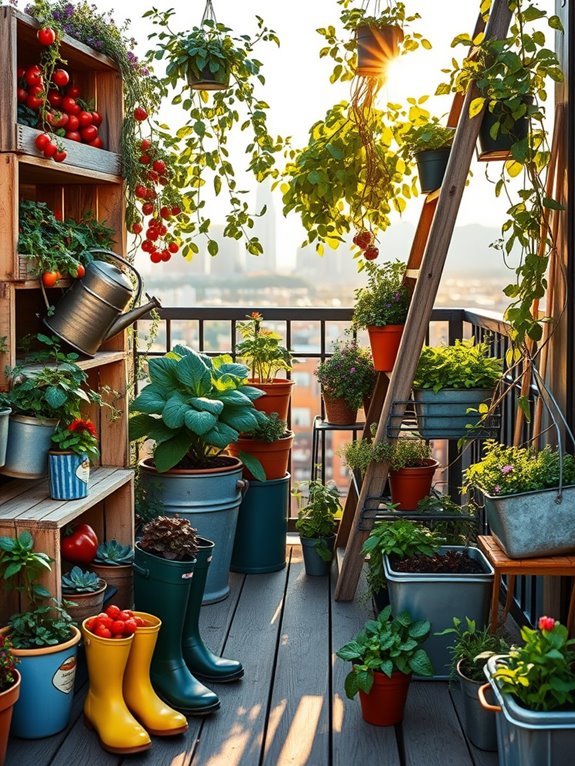
Transform your outdoor space into an eco-friendly haven with upcycled container gardens that breathe new life into everyday objects. Old wooden crates burst with cascading cherry tomatoes, while vintage teapots showcase trailing herbs like thyme and oregano. Repurposed rain boots display cheerful marigolds alongside practical kitchen herbs, creating whimsical vertical interest. Rustic metal watering cans and weathered wooden toolboxes house compact vegetable varieties, their worn patinas adding character to your growing space.
The garden takes on a collected, curated feel as recycled tin cans, painted in complementary colors, line window sills with fresh basil and chives. Retired colanders serve as perfect planters for strawberries, their drainage holes ready-made for healthy root systems. Old wooden ladders, transformed into tiered plant stands, maximize vertical growing space while providing an artistic focal point that draws the eye upward.
Key Elements:
- Repurposed containers (crates, boots, teapots, toolboxes)
- Drainage materials (gravel, broken pottery)
- Quality potting soil
- Compact vegetable varieties
- Trailing herbs and flowers
- Paint or sealants for wood/metal
- Mounting hardware
- Plant supports and stakes
- Container-specific fertilizer
- Vintage decorative elements
Begin implementation by thoroughly cleaning all containers and adding drainage holes if needed. Seal wooden items with outdoor-safe finishes and line metal containers with landscape fabric to prevent rust contact with soil.
Arrange larger containers at ground level, positioning them based on sun requirements and creating paths for easy access. Install vertical elements like ladder planters against walls or railings, ensuring they’re securely anchored. Layer containers at varying heights to create visual interest and maximize growing space.
When designing your upcycled container garden, consider weight distribution and structural support, especially for balcony gardens. Small balconies benefit from vertical solutions and wall-mounted containers, while larger spaces can accommodate grouped arrangements of varying sizes.
Integrate self-watering solutions by adding water reservoirs to deeper containers and choose trailing varieties for upper containers to create a lush, overflow effect. Consider incorporating a rain barrel or irrigation system to maintain consistent moisture levels across all containers.
Companion Planting in Pots
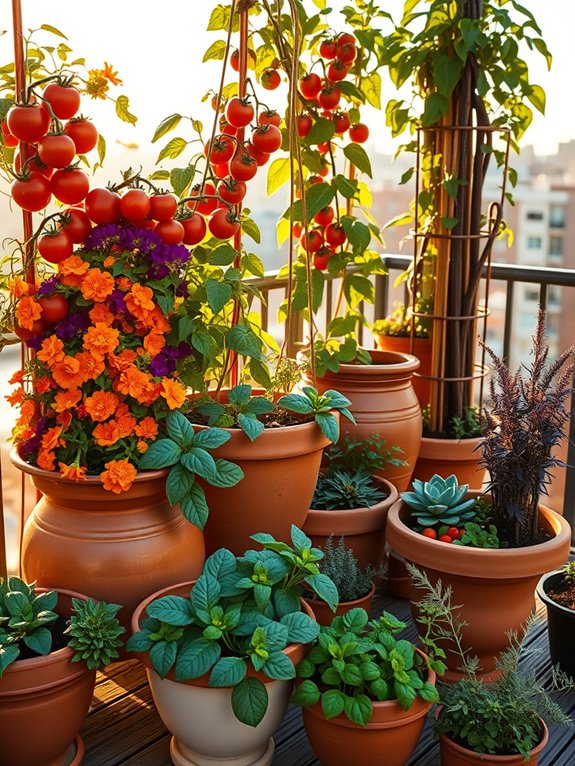
Picture a vibrant display of thoughtfully paired container gardens where basil nestles alongside tomato plants, their aromatic leaves creating a natural pest barrier while enhancing the growth of their companions.
Marigolds add splashes of orange and yellow between vegetable containers, while climbing nasturtiums cascade over pot edges, their edible flowers providing both beauty and functionality in this harmonious garden space.
The strategic placement of herbs and flowers among vegetable containers creates an ecosystem in miniature, where each plant supports its neighbors.
Purple pole beans climb upward on decorative trellises next to containers of leafy greens, while compact strawberry plants thrive alongside chives and parsley, forming beautiful layers of edible greenery at varying heights.
Essential Elements:
- Large containers (12-inch minimum diameter)
- Container-friendly vegetable varieties
- Companion herbs and flowers
- Vertical growing supports
- Quality potting soil
- Plant markers
- Organic fertilizer
- Drainage materials
- Watering system
- Multi-level display stands
To implement companion planting in containers, start by selecting vegetables that grow well together and have similar water and sunlight requirements.
Place larger containers at the back, creating a staged effect, and position companion plants within the same pot or in adjacent containers that touch.
Ensure each container has proper drainage and is filled with nutrient-rich potting mix.
When combining plants, maintain appropriate spacing to prevent overcrowding while still allowing beneficial interactions between species.
For maintenance, monitor water needs carefully, as containers with multiple plants may require more frequent watering.
Feed plants regularly with organic fertilizer, and rotate containers periodically to ensure even sun exposure.
Prune and harvest regularly to maintain healthy growth and prevent plants from overwhelming their companions.
Tips for adapting this garden style include using vertical space efficiently with stackable containers or wall-mounted systems for small balconies.
For tiny spaces, focus on dwarf varieties and high-value companions like herbs and edible flowers.
Consider mobile container platforms with wheels for flexibility in arrangement, and use self-watering containers to reduce maintenance time.
Weather protection may be necessary for exposed balconies, so incorporate temporary covers or moveable screens to shield sensitive plant combinations during extreme conditions.
Self-Watering Container Solutions
Imagine a sleek collection of modern containers adorned with lush vegetables, where clever engineering meets natural beauty. Self-watering containers create an effortless oasis of thriving tomatoes, peppers, and leafy greens, their foliage cascading over stylish reservoirs in perfect health. The containers themselves become artistic elements, ranging from sophisticated charcoal grays to terra cotta hues, each one supporting a different edible masterpiece while maintaining consistent moisture levels beneath.
The garden space exudes both efficiency and tranquility, with neat rows of containers featuring built-in water indicators glowing like jewels among the greenery. Compact herbs flourish alongside climbing peas that reach upward on space-saving trellises, while bushy cucumber plants spread their tender vines across connecting containers. The entire setup whispers of modern innovation while celebrating the timeless art of growing food.
Key Elements:
- Self-watering containers with water reservoirs
- Water level indicators
- Wicking systems
- Quality potting mix designed for self-watering systems
- Container-appropriate vegetables and herbs
- Vertical growing supports
- Moisture-retaining mulch
- Liquid organic fertilizer
- Connecting tubes for multi-pot systems
Begin by selecting containers with appropriate reservoir sizes for your chosen plants – larger vegetables need at least 5-gallon capacity. Position containers in your sunniest spot, filling the reservoir chamber with clean water and the growing chamber with specialized self-watering potting mix. Create planting holes that accommodate your seedlings’ root balls, ensuring they’re deep enough to stabilize plants but not so deep they touch the water reservoir.
Connect multiple containers using watering tubes if desired, creating an efficient irrigation network. Layer mulch around your plants to further reduce water evaporation and maintain consistent soil moisture. Monitor water indicators regularly, refilling reservoirs before they empty completely. Feed plants monthly with liquid organic fertilizer through the top soil rather than adding it to the reservoir. Clean and flush the reservoir system seasonally to prevent mineral buildup and maintain optimal performance.
Extra Tips: For smaller balconies, choose stackable self-watering containers or vertical systems that maximize growing space while minimizing footprint. Consider installing a rain barrel with a gravity-fed connection to your containers for sustainable irrigation.
In windy locations, secure tall plants with additional supports and position containers against walls or railings for protection. For variety, mix container sizes and heights to create visual interest while accommodating different plant needs – shallow containers for herbs and greens, deeper ones for root vegetables and tomatoes.
Stackable Container Arrangements
Transform your limited outdoor space into a living wall of abundance with stackable container arrangements that create a vertical vegetable paradise. Imagine terra cotta pots cascading down custom shelving units, with trailing cherry tomatoes spilling over the edges while compact bush beans and leaf lettuce create layers of lush greenery.
The architectural elements of stacked containers add visual interest through height variation, while strategic placement of herbs like trailing thyme and cascading oregano softens the structured arrangement.
The vertical design maximizes growing space while creating an enchanting garden atmosphere that draws the eye upward. Bright peppers and eggplants add pops of color at varying heights, while climbing peas weave their way up trellises between container levels.
This arrangement style transforms ordinary balconies and patios into productive growing spaces that double as living art installations, complete with the gentle sound of water trickling down through self-watering container systems.
Essential Elements:
- Stackable container systems or tiered shelving
- Self-watering containers in varying sizes
- Vertical supports and trellises
- Drip irrigation components
- Container-friendly soil mix
- Plant varieties suitable for containers
- Weather-resistant plant markers
- Bottom containers with wheels
- Drainage collection trays
Begin implementation by selecting a sturdy shelving system or purpose-built stackable containers that can support the weight of wet soil and mature plants. Position the largest containers at the base, ensuring proper drainage and easy access for maintenance.
Create a stable foundation by using level ground or adjustable feet, then work upward, positioning containers to allow adequate light penetration to lower levels. Install a drip irrigation system that connects to each container level, ensuring consistent watering throughout the vertical arrangement.
The key to long-term success lies in proper plant placement. Position larger vegetables like tomatoes and peppers in bottom containers where they’re easily accessible for harvesting. Reserve middle-tier containers for medium-sized plants such as bush beans and compact cucumbers, and use top levels for herbs and greens that require less soil depth.
Adapt your stackable design based on available space by using corner units for small balconies or creating multiple tiers along walls for larger areas. Consider incorporating fold-down shelves or modular units that can be reconfigured as needed.
For wind exposure in high-rise settings, secure containers to their supports and choose compact plant varieties. In areas with limited direct sunlight, use reflective backing materials and position light-loving plants on upper levels while saving lower tiers for shade-tolerant species.
Hanging Basket Vegetable Gardens
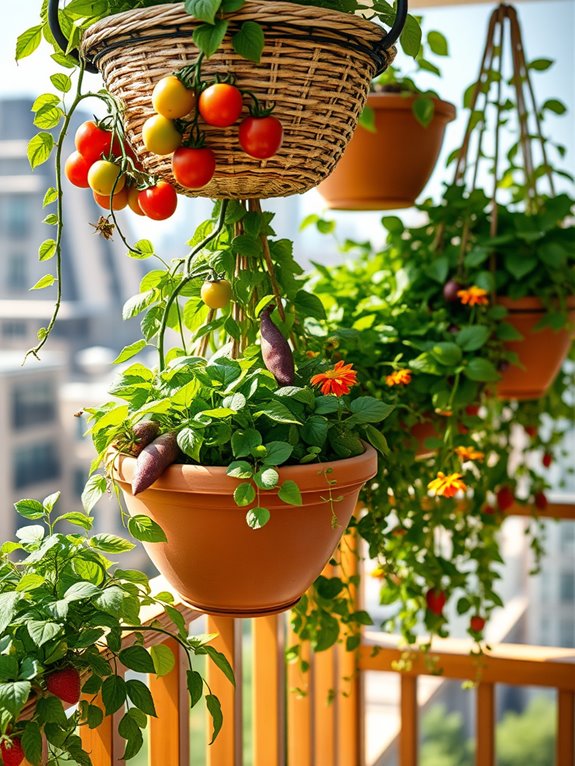
Transform your balcony or patio into a lush, cascading oasis with hanging basket vegetable gardens that combine beauty and functionality. Imagine vibrant cherry tomatoes dangling like jewels alongside trailing herbs, while compact varieties of peppers and strawberries create stunning vertical displays. The gentle movement of trailing plants in the breeze adds a dynamic element to your outdoor space, turning even the smallest area into a productive garden that draws the eye upward.
These suspended gardens create an enchanting atmosphere, with different layers of edible plants creating visual interest at varying heights. Picture delicate flowers of climbing nasturtiums intermingling with cascading cucumbers, while compact bush beans and leafy greens add fullness to each basket. The arrangement allows for creative combinations of colors and textures, from the silver-green leaves of trailing thyme to the bright purple blooms of sweet potato vines.
Essential Elements:
- Sturdy hanging baskets with drainage holes
- Strong mounting brackets or shepherd’s hooks
- Quality potting soil mixed with water-retaining crystals
- Drip irrigation system or self-watering mechanisms
- Compact vegetable varieties suitable for containers
- Complementary trailing herbs and edible flowers
- Support nets or strings for climbing varieties
- Plant labels and garden markers
Position your hanging baskets where they’ll receive adequate sunlight, typically 6-8 hours daily, while remaining accessible for maintenance. Install brackets or hooks at staggered heights to create visual interest and ensure all plants receive sufficient light.
When planting, combine upright vegetables with trailing varieties, positioning taller plants in the center and allowing cascading plants to spill over the edges. Incorporate a reliable watering system, as hanging baskets dry out more quickly than ground-level containers.
Adapt your hanging garden to any space by considering weight limitations and available light. For smaller balconies, focus on lightweight containers and compact varieties, while larger spaces can accommodate multiple baskets at varying heights.
Install automatic watering systems with timers for consistent moisture, and choose plants that complement each other’s growth habits. Consider removable basket hooks for seasonal adjustments, and remember to rotate containers periodically to ensure even growth and prevent plants from growing toward the light source.
Movable Container Garden Design
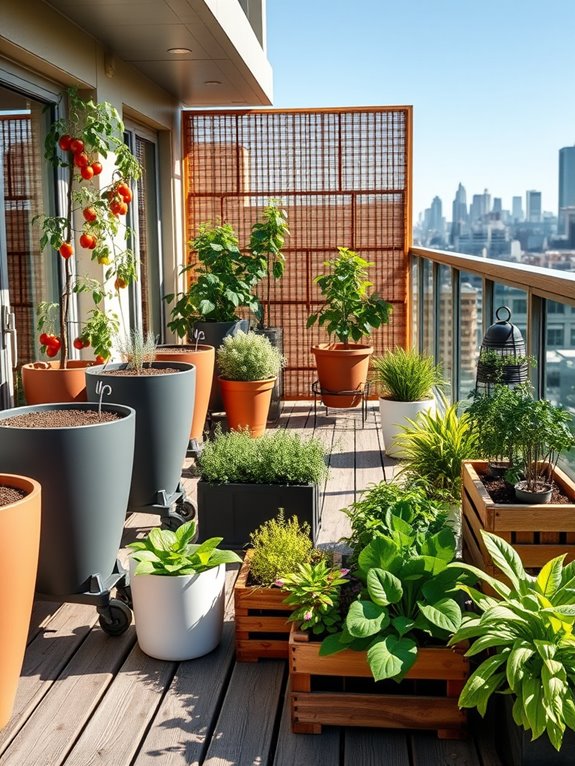
A movable container garden transforms any outdoor space into a dynamic living canvas, where terracotta pots, sleek modern planters, and rustic wooden boxes create an ever-changing display of edible beauty. Vibrant cherry tomatoes cascade from hanging baskets, while compact bush beans and climbing peas add vertical interest through portable trellises. Mediterranean herbs like basil, thyme, and oregano spill over container edges, releasing their aromatic essence with every gentle breeze.
The beauty of this garden style lies in its adaptability. Containers on wheels or lightweight planters allow you to chase the sun throughout the day or rearrange your space for entertaining. Wooden crates filled with leafy greens can nestle against bright ceramic pots bursting with rainbow chard, while elevated containers of different heights create visual interest and maximize growing space. The overall effect is both practical and aesthetically pleasing, offering a perfect blend of form and function.
Essential Elements:
- Variety of containers (different sizes, materials, and heights)
- Wheeled plant dollies or casters
- Lightweight potting mix
- Compact vegetable varieties
- Portable trellises and supports
- Multi-level plant stands
- Self-watering containers
- Decorative pot feet or risers
- Container-specific fertilizers
Position your largest containers along the perimeter of your space, using wheeled platforms underneath for mobility. Create clusters of three to five containers varying in height, with tall plants like tomatoes and peppers in deeper containers at the back, medium-height plants like bush beans in the middle, and trailing herbs or compact greens in front.
Ensure each grouping has adequate spacing for air circulation and maintenance access. Install simple irrigation systems using connecting tubing between containers to simplify watering.
When designing your movable container garden, consider weight distribution and surface protection. Use pot feet or risers to prevent water damage to decking or pavement, and distribute heavy containers evenly across your space.
For smaller balconies, focus on vertical growing systems with stackable containers or wall-mounted planters that can be easily relocated. Consider multi-purpose furniture like bench planters or storage units that double as growing spaces, and always leave clear pathways for maintenance and harvest activities.