
6 Garden Ideas for Colorful Pots
You’ll discover that transforming ordinary garden pots into vibrant statements doesn’t require professional expertise or a huge budget. Whether you’re drawn to hand-painted patterns, color-block designs, or creative upcycling, there’s a perfect approach to match your style and space. From weathered terra cotta to sleek ceramic containers, each pot offers a blank canvas for expressing your personality through colors, textures, and artistic touches. Let’s explore six creative ways to bring fresh energy to your outdoor containers.
Contents
Paint and Pattern Techniques for Terra Cotta Pots
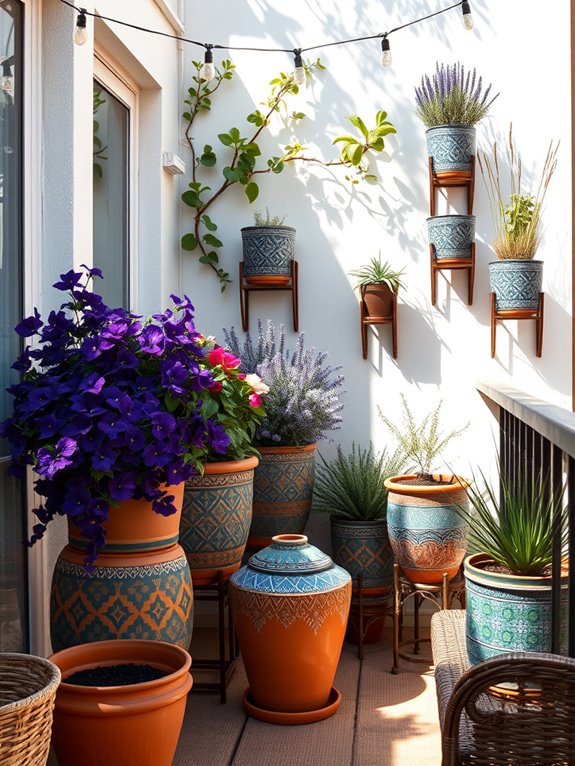
Transform ordinary terra cotta pots into vibrant works of art that bring personality and charm to your garden space. Hand-painted designs ranging from geometric patterns to whimsical florals create a bohemian atmosphere, while color-blocked sections in Mediterranean blues, sunset oranges, and garden greens establish a cohesive visual story throughout your outdoor sanctuary.
These personalized containers become focal points that complement trailing vines, cascading petunias, and upright salvias, creating layers of interest at varying heights. The combination of painted patterns and natural terracotta textures adds depth and dimension to your garden display. Metallic accents catch the sunlight, while weathered finishes provide vintage appeal.
Arranged in clusters or positioned as standalone statement pieces, these artistic containers transform a simple plant collection into an outdoor gallery where nature and creativity merge seamlessly.
Key Elements:
- Terra cotta pots in various sizes
- Exterior-grade acrylic paints
- Waterproof sealant
- Paint brushes and sponges
- Stencils and painter’s tape
- Primer specifically for terra cotta
- Clear protective topcoat
- Plants suitable for container growing
- Potting soil
- Drainage materials
Begin by thoroughly cleaning and drying your terra cotta pots, then apply a primer designed for porous surfaces. Plan your designs ahead using sketches or stencils, working from light to dark colors. Layer patterns carefully, allowing each section to dry completely before adding adjacent designs.
Seal your finished work with multiple coats of weather-resistant protective finish to ensure longevity. When planting, maintain proper drainage by adding gravel at the bottom and using high-quality potting mix suited for container gardens.
Consider your climate and exposure when choosing paint types and protective finishes. For small balconies, create vertical interest by mounting painted pots on walls or railings, or stack them using tiered plant stands. Test your color combinations in advance, and remember that bold patterns are more effective when balanced with some solid-colored pots.
During winter months, store painted containers in a protected area to prevent frost damage and extend their lifespan.
Creating Color-Blocked Container Designs

Color-blocked container designs transform ordinary garden spaces into striking visual compositions, where bold blocks of coordinated colors create dramatic impact and modern appeal. Clusters of containers in complementary or contrasting hues, filled with flowers and foliage in matching color schemes, establish distinct zones that draw the eye and create rhythm throughout the space.
Imagine deep purple containers housing velvety petunias alongside copper-toned pots overflowing with orange lantana, creating a sophisticated interplay of color and texture.
The artistic arrangement of these color-coordinated container groupings allows gardeners to paint with plants, creating living masterpieces that change with the seasons. By selecting containers in three to four primary colors and filling them with plants in corresponding or harmonious shades, the design achieves a cohesive yet dynamic appearance. The result is a garden that feels both organized and organic, with each color block contributing to the overall composition while maintaining its distinct personality.
Key Elements:
- Containers in 3-4 coordinating colors
- Plants with matching or complementary blooms
- Varying container heights and sizes
- Quality potting soil
- Proper drainage materials
- Color wheel for reference
- Container spacing tools
- Plant markers
- Fertilizer
- Watering system
To implement a color-blocked container design, begin by selecting your color scheme and acquiring containers in corresponding hues. Position larger containers first, creating anchor points in your space, then arrange medium and small pots around them in coordinated groupings.
Each color block should contain at least three containers of varying heights, with plants selected to echo or complement the container colors. Ensure proper spacing between groups to allow for plant growth and maintenance access.
When placing your containers, consider the visual weight of each color block and aim for balance across the space. Dark colors tend to feel heavier and work well as anchor points, while lighter colors can help transition between deeper hues.
Layer plants within each container using the “thriller, filler, spiller” technique to create depth and interest within each color block.
Extra Tips: For smaller balconies, focus on two complementary colors rather than three or four, and use vertical space with wall-mounted containers or tiered stands to maximize impact.
Consider using self-watering containers to reduce maintenance needs, and incorporate plants with varying bloom times to maintain color throughout the growing season. In windy locations, choose heavier containers or secure them to prevent tipping, and consider the direction of sunlight when placing color blocks to ensure all plants receive appropriate light levels for optimal growth and flowering.
Upcycling Household Items Into Unique Planters
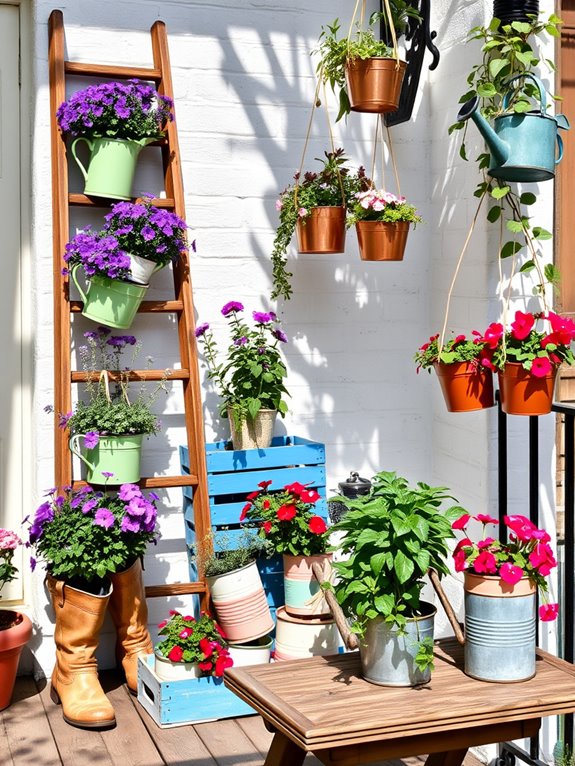
Transform everyday items into an enchanting garden display where vintage teapots sprout cascading lobelia, old wooden crates burst with cheerful petunias, and well-worn rain boots showcase hardy succulents. This eclectic collection of repurposed containers creates a whimsical atmosphere that tells a story through each unique vessel, while colorful blooms and trailing vines soften the industrial edges of recycled tin cans and weathered toolboxes.
The artistic arrangement combines different heights and textures, from suspended colanders filled with trailing string-of-pearls to antique drawer sets hosting a variety of herbs. Rustic ladders display tiered collections of transformed coffee tins painted in pastel hues, while old bicycle baskets mounted on fences cradle vibrant impatiens and creeping thyme, creating a vertical garden that maximizes space while minimizing waste.
Essential Elements:
- Household items (teapots, crates, boots, colanders, drawers)
- Drainage materials (gravel, broken pottery)
- Quality potting soil
- Various plant types (trailing, upright, flowering)
- Weather-resistant paint
- Mounting hardware
- Wire for hanging
- Waterproofing sealant
- Basic tools (drill, scissors, wire cutters)
Begin by selecting items that can withstand outdoor conditions and drilling drainage holes where needed. Apply waterproof sealant to wooden items and rust-resistant paint to metal containers. Arrange larger pieces like crates and drawer sets first to establish anchor points, then layer smaller containers at varying heights.
Create visual balance by grouping containers in odd numbers and varying plant heights and textures within each grouping.
When selecting plants, consider each container’s depth and drainage capabilities. Deep containers like boots work well for root vegetables or tall plants, while shallow vessels like teacups are perfect for succulents or small herbs. Regular maintenance includes checking drainage holes remain clear and monitoring moisture levels, as unconventional containers may dry out differently than traditional pots.
Adapt this garden style to any space by thinking vertically – use wall-mounted shelving units for small balconies or create a freestanding display using old ladders for larger areas. Consider weight restrictions for elevated spaces and ensure all mounted items are securely fastened.
For year-round interest, incorporate both permanent and seasonal plantings, and remember that lighter containers can be easily moved indoors during harsh weather conditions.
Mixing and Matching Container Collections
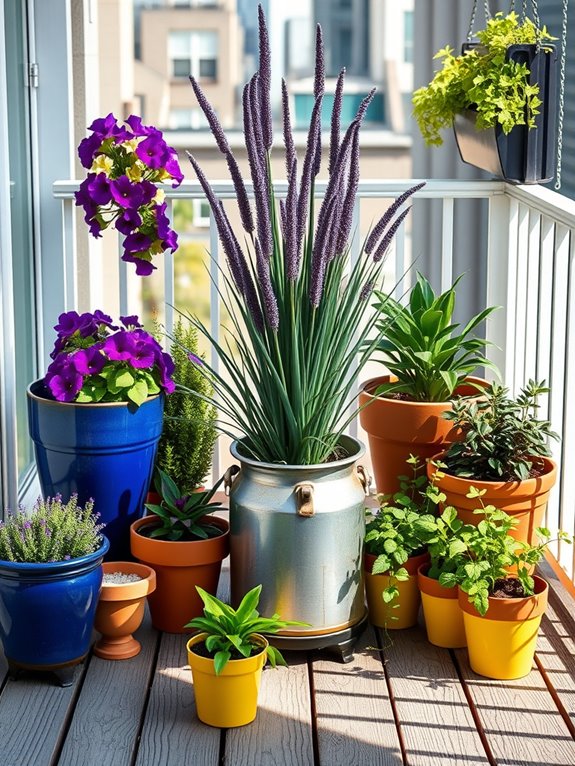
Creating a vibrant collection of mixed and matched containers transforms an ordinary garden space into a dynamic tapestry of colors, textures, and heights. Terra cotta pots in varying sizes mingle with glazed ceramic planters in cobalt blue and sunshine yellow, while sleek modern vessels in metallic finishes add contemporary flair.
Tall containers showcase dramatic purple fountain grass and climbing jasmine, while lower pots burst with cascading petunias, compact zinnias, and spreading calibrachoa in complementary color schemes. The artful arrangement creates distinct visual zones, with clusters of three to five containers grouped to maximize impact.
Weather-resistant containers in different materials create year-round interest, even when plants go dormant. Vintage finds like repurposed wooden crates and antique milk jugs add character among more traditional planters, while strategic placement of varying heights creates a natural flow that draws the eye through the space.
Key Elements:
- Containers in 3-4 different materials (ceramic, terra cotta, metal, composite)
- Pots in at least 3 different sizes (small, medium, large)
- Color palette of 3-4 coordinating colors for containers
- Mix of upright and trailing plants
- Plant varieties with different blooming seasons
- Container drainage materials
- Quality potting soil
- Plant supports and stakes
- Decorative mulch or topdressing
Begin by selecting a focal point for your main container grouping, typically using the largest pot as an anchor. Create triangular arrangements with containers of descending heights, ensuring each pot has adequate space for root growth and maintenance access. Position taller containers toward the back or center of groupings, with medium-height pots flanking them and smaller containers in front.
Consider the mature size of plants when spacing containers, allowing room for spread while maintaining visual connections between groupings. When selecting and placing containers, consider weight distribution and stability, especially for rooftop or balcony gardens. Use pot feet or risers under containers to ensure proper drainage and protect surfaces.
Group plants with similar water and light requirements together to simplify maintenance. Consider using self-watering containers for consistent moisture levels and reduced maintenance needs. For different sized spaces, adapt the number and scale of container groupings accordingly.
Smaller balconies benefit from vertical arrangements using wall-mounted planters or tiered stands, while larger areas can accommodate multiple themed container collections. Use lightweight containers in upper-story locations, and consider mobile planting solutions like containers with wheels for flexibility in arrangement.
Incorporate automated irrigation systems for larger collections to maintain consistent care, and select plant varieties based on your specific exposure and climate conditions.
Adding Decorative Elements to Plain Garden Pots
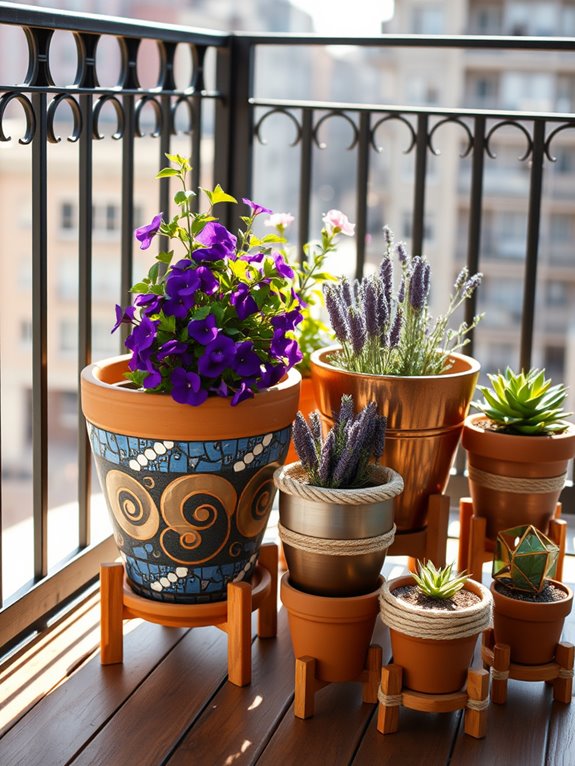
Transform ordinary garden pots into vibrant works of art by incorporating decorative elements that reflect your personality and enhance your outdoor space. Plain terracotta and ceramic containers burst with new life when adorned with mosaic tiles, painted patterns, or wrapped in weather-resistant ribbons and ropes. These personalized touches create focal points throughout the garden, drawing the eye from one stunning arrangement to the next while complementing the natural beauty of your plants.
The possibilities for pot decoration are endless, from simple hand-painted designs to elaborate mixed-media applications. Imagine copper wire wrapping catching the sunlight around a succulent display, or metallic paint accents highlighting the curves of a container filled with trailing vines. These artistic additions can coordinate with your home’s exterior colors or create striking contrasts that make your garden space truly unique.
Key Elements:
- Weather-resistant paint
- Mosaic tiles and grout
- Decorative rope or wire
- Metallic finishing materials
- Waterproof adhesives
- Clear sealant
- Embellishments (buttons, beads, shells)
- Stencils and brushes
- Sandpaper
- Primer
Begin by thoroughly cleaning and preparing your pots, ensuring surfaces are smooth and free from debris. Apply primer to areas that will be painted or decorated, allowing proper drying time between coats.
When adding decorative elements, work in small sections, securing each piece firmly and allowing adhesives to cure completely. For mosaic designs, apply grout carefully and seal the finished work to protect against moisture and weathering.
Remember to consider the weight of decorative materials, as heavy embellishments can make large pots difficult to move. Choose weather-appropriate materials and secure them well to prevent deterioration or loosening over time.
When incorporating multiple decorated pots, create a cohesive theme through coordinating colors or patterns while varying the sizes and heights for visual interest. For different-sized spaces, adjust the scale and number of decorated containers accordingly.
Smaller balconies benefit from a few statement pieces with simple, bold designs, while larger areas can accommodate more elaborate arrangements and multiple decorative styles. Consider using lightweight materials for upper-floor balconies, and ensure all decorations are securely attached to prevent damage from wind or handling.
Always leave enough undecorated space at the top of pots for proper plant maintenance and watering.
Choosing Plants to Complement Colorful Containers
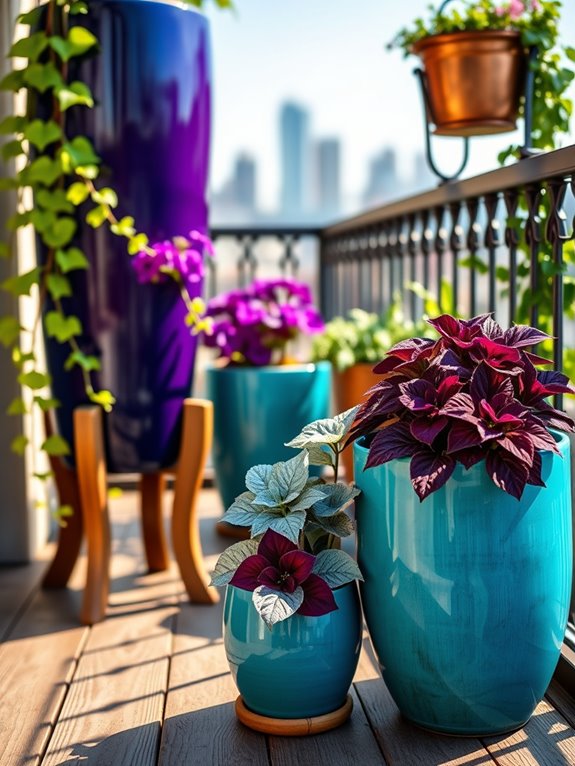
A vibrant collection of colorful containers becomes a living artist’s palette when thoughtfully paired with complementary plants. Deep purple pot glazes sing alongside chartreuse sweet potato vines, while coral-hued containers create striking harmony with cascading silver dichondra and deep blue lobelia. Each pot becomes its own miniature composition, where flower and foliage colors either echo or beautifully contrast with their vessels, creating dynamic visual relationships throughout the garden space.
The art of matching plants to colorful containers transforms an ordinary patio or balcony into an expertly curated display. Burgundy coleus amplifies the rich tones of terra cotta, while white calibrachoa softens bright turquoise ceramics. Trailing plants like purple petunias and lime green creeping jenny spill over the edges of jewel-toned containers, adding movement and depth to the composition while drawing the eye to the interplay between pot and plant.
Key Elements:
- Colorful glazed containers in various sizes
- Plants with contrasting or complementary foliage colors
- Trailing plants for vertical interest
- Upright focal point plants
- Container-friendly soil mix
- Drainage materials
- Color wheel for reference
- Plant markers
- Fertilizer appropriate for container plants
Select containers first, arranging them in groups of odd numbers while considering height variations. Choose plants that either match or contrast with each pot’s color, using the color wheel as a guide. For blue containers, consider orange or yellow blooms; for red pots, pair with silver foliage or white flowers.
Ensure proper drainage by adding gravel at the bottom of each pot and using quality potting mix. Position taller plants toward the back or center of groupings, with trailing varieties at the edges.
When designing your container garden, consider seasonal changes and plant lifecycle. Group containers with similar water needs together for easier maintenance, and plan for continuous blooming by incorporating plants with different flowering periods. Remember that dark-colored pots may heat up more quickly in direct sun, potentially affecting root health, while lighter containers reflect heat and help maintain more stable soil temperatures.
For smaller balconies, focus on vertical arrangements using wall-mounted containers or tiered stands to maximize space. Adjust plant selections based on available light conditions, choosing shade-tolerant varieties for north-facing spaces and sun-loving plants for southern exposures.
Consider using lightweight containers for rooftop gardens or balconies with weight restrictions, and group pots closer together in windy locations to create microenvironments that protect delicate plants.