
8 Garden Ideas for Artistic Displays
Your garden can become a stunning outdoor art gallery where nature and creativity unite in surprising ways. You’ll discover how everyday items like painted pots, vintage furniture, and simple mirrors transform into eye-catching displays that reflect your artistic vision. From vibrant vertical walls bursting with cascading flowers to sculptural pathways adorned with handcrafted mosaics, these eight innovative ideas will help you craft a space that’s both naturally beautiful and uniquely artistic. Let’s explore how to bring these imaginative concepts to life in your own backyard sanctuary.
Contents
- 1 Create a Vertical Garden Wall With Painted Pots
- 2 Design a Sculptural Garden Path With Mosaics
- 3 Upcycle Vintage Furniture Into Whimsical Planters
- 4 Arrange Color-Coordinated Flower Beds
- 5 Craft a Living Art Installation With Succulents
- 6 Install Mirror Features for Optical Illusions
- 7 Build a Natural Art Gallery With Driftwood and Stones
- 8 Transform Garden Fences Into Canvas Displays
Create a Vertical Garden Wall With Painted Pots
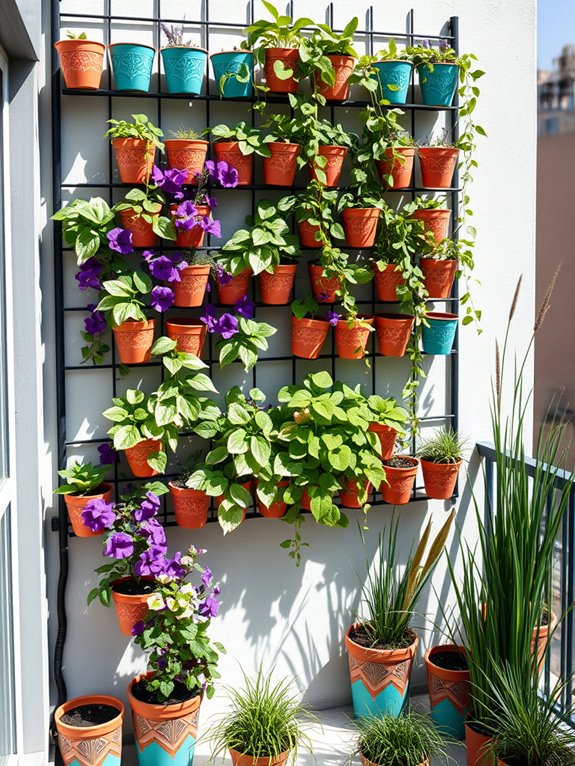
Transform your outdoor space into a living work of art with a vertical garden wall adorned with painted pots. Imagine a stunning tapestry of cascading plants emerging from vibrant containers, each uniquely painted to complement your garden’s color scheme. Trailing vines like pothos, string of pearls, and ivy create graceful green waterfalls, while compact flowering plants like petunias, pansies, and calibrachoa add bursts of color throughout the seasons.
The painted pots themselves become part of the artistic display, featuring geometric patterns, nature-inspired motifs, or abstract designs that make the wall a focal point even before the plants mature. This vertical masterpiece not only maximizes space but creates an immersive garden experience that draws the eye upward and adds dimension to otherwise flat surfaces.
The interplay between carefully chosen plant textures, pot designs, and strategic placement creates a dynamic visual rhythm. The wall comes alive with movement as breezes flutter through the foliage, while the painted containers catch sunlight at different angles throughout the day, creating an ever-changing display of light and shadow.
Key Elements:
- Mounting system (grid panels, fence, or strong trellis)
- Terra cotta or plastic pots in varying sizes
- Exterior paint suitable for pots
- Mounting brackets or pot holders
- Drought-resistant plants
- Quality potting soil
- Drip irrigation system
- Paint brushes and sealant
- Basic hand tools
- Plant-safe fertilizer
Begin installation by securing a sturdy mounting system to your wall, ensuring it can support the weight of multiple planted containers. Paint your pots with weather-resistant colors and designs, applying a protective sealant once dry. Arrange the pots in a pleasing pattern before mounting, considering plant heights and growing habits.
Install a drip irrigation system that connects to each pot, ensuring consistent watering throughout the vertical display. The key to success lies in proper plant selection and pot preparation. Choose plants based on your wall’s sun exposure and local climate. Drill adequate drainage holes in pots and use high-quality potting soil mixed with moisture-retaining materials.
Position larger plants at the bottom and lighter, trailing varieties toward the top for visual balance and practical weight distribution. For adaptability, consider starting with a smaller section if space is limited, or create multiple panels that can be rearranged. On tiny balconies, use lightweight materials and focus on compact plants.
Install the system in modules to allow for easy maintenance and seasonal updates. Consider incorporating removable pots for indoor protection during harsh weather, and plan for proper drainage management to protect underlying surfaces.
Design a Sculptural Garden Path With Mosaics
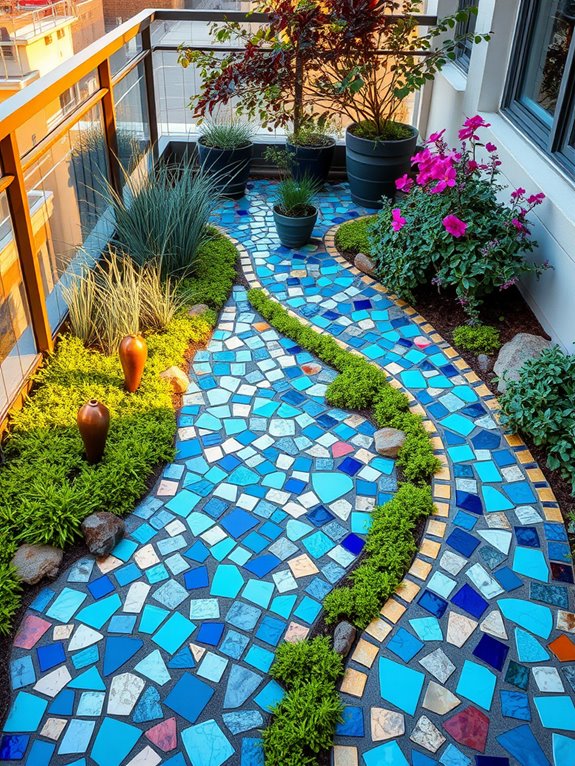
Transform your garden pathway into a mesmerizing artistic journey with a sculptural mosaic design that captures light, color, and imagination. Winding paths adorned with intricate tile patterns, embedded glass pieces, and polished stones create a kaleidoscope of colors that shift throughout the day as sunlight plays across their surfaces.
Ornamental grasses like blue fescue and Japanese forest grass frame the edges, their gentle movement adding life to the static mosaic elements. The path itself becomes an evolving art gallery, where each step reveals new patterns and hidden details.
Strategically placed sculptural elements rise from beds of creeping thyme and Irish moss, while carefully positioned mirrors and metallic elements reflect light and create depth. The combination of organic plant shapes with geometric mosaic patterns creates a compelling contrast that draws the eye forward, inviting exploration of the space.
Key Elements:
- Mosaic tiles in complementary colors
- Decorative stones and glass pieces
- Concrete or mortar base
- Edge restraints or borders
- Low-growing ground covers
- Ornamental grasses
- Sculptural elements
- Mirrors or metallic accents
- Solar path lights
- Weather-resistant sealant
To implement this design, start by plotting your path’s course using rope or garden hoses to visualize the flow. Prepare a stable base of compacted gravel and concrete, then begin creating your mosaic pattern working in small sections.
Arrange tiles, stones, and glass pieces in your chosen design, ensuring proper spacing and secure adhesion. Install edge restraints to maintain the path’s integrity and prevent spreading. Plant ground covers and grasses along the borders, allowing space for growth while maintaining clear path boundaries.
Essential Tips: Consider your climate when selecting materials, as some tiles may crack in freeze-thaw cycles. For smaller spaces or balconies, create miniature versions using container gardens with mosaic-decorated planters and smaller sculptural elements.
Use light-colored materials in shaded areas to brighten the space, and incorporate glow-in-the-dark elements for evening appeal. Ensure proper drainage by slightly sloping the path away from structures, and apply a UV-resistant sealant annually to protect your mosaic work.
Upcycle Vintage Furniture Into Whimsical Planters
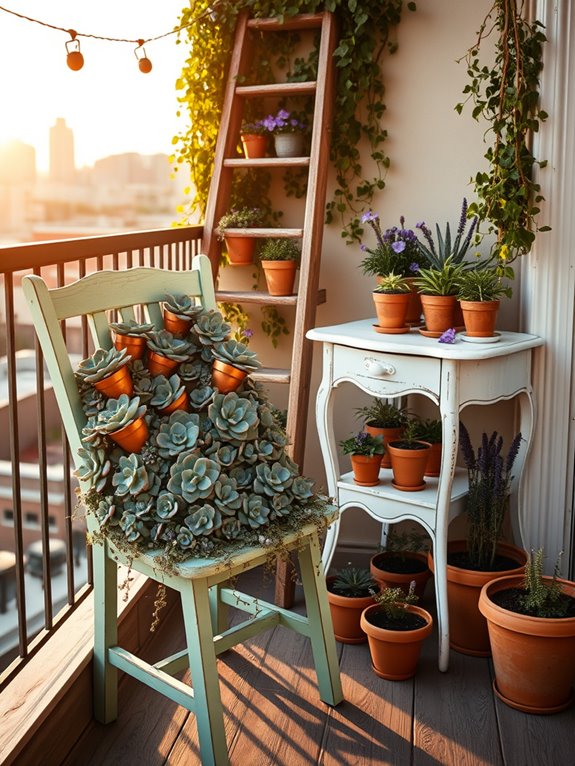
Transform outdated furniture into enchanting garden focal points by reimagining vintage dressers, chairs, and tables as unique planters. Weathered wooden drawers burst with cascading petunias and trailing ivy, while antique metal bedframes become vertical gardens dotted with climbing roses and clematis. The patina of aged furniture pieces creates a nostalgic backdrop for vibrant blooms, turning forgotten treasures into living art installations that tell stories of both past and present.
Old wooden chairs cradle succulent gardens in their seats, while painted metal tea carts showcase collections of herbs and flowering perennials. Repurposed armoires become miniature greenhouse displays, their glass doors protecting delicate ferns and orchids. This whimsical approach to gardening merges vintage charm with natural beauty, creating conversation pieces that elevate ordinary garden spaces into extraordinary outdoor galleries.
Key Elements:
- Vintage furniture pieces (dressers, chairs, tables, bedframes)
- Weather-resistant paint or sealant
- Drainage materials (gravel, broken pottery)
- Quality potting soil
- Mix of trailing and upright plants
- Decorative moss or ground cover
- Hardware for mounting/securing
- Vintage accessories (teapots, books, picture frames)
Select furniture pieces with good structural integrity and treat them with weather-resistant finishes to prevent deterioration. Drill drainage holes in appropriate locations and layer containers with gravel before adding soil. Position larger pieces as anchor points in the garden, creating levels and depths with smaller items arranged around them. Ensure furniture is properly secured, especially vertical pieces, and maintain proper watering schedules based on each plant’s specific needs.
Adapt this garden style to any space by scaling furniture pieces appropriately. For small balconies, focus on compact pieces like side tables or single chairs, while larger gardens can accommodate full bedroom sets or multiple furniture groupings. Consider using lighter-weight reproductions for upper-story installations, and always check weight restrictions for elevated spaces.
Protect wooden pieces with extra sealant in humid climates, and choose plants that match your local growing conditions.
Arrange Color-Coordinated Flower Beds
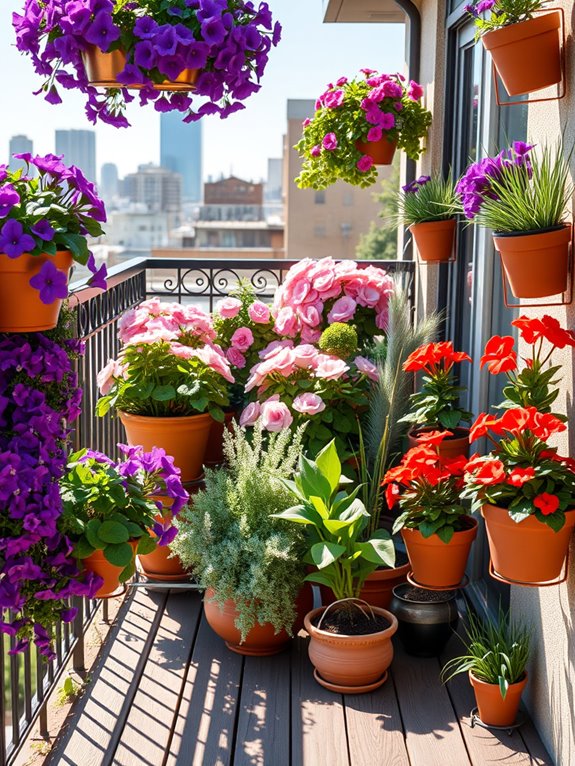
Color-coordinated flower beds transform ordinary garden spaces into living works of art, where carefully chosen blooms create a harmonious spectrum of hues that flow seamlessly from one shade to the next. Imagine sweeping curves of deep purples transitioning to soft lavenders, then dancing through pink roses and coral snapdragons before culminating in bold crimson salvias. This thoughtful arrangement of colors creates a sense of movement and rhythm, drawing the eye naturally through the garden while maintaining a sophisticated, cohesive appearance.
The magic of color coordination extends beyond just flowers, incorporating foliage textures and heights to add depth and dimension. Silver-leafed dusty miller provides subtle contrast against deep blue delphiniums, while copper-toned heuchera leaves complement orange marigolds. Ornamental grasses in varying heights add vertical interest, their subtle tones serving as natural dividers between color schemes while maintaining the garden’s flowing aesthetic.
Key Elements:
- Color wheel for planning complementary and analogous combinations
- Varying heights of plants (tall, medium, short)
- Mix of perennials and annuals
- Garden edging materials
- Quality soil and mulch
- Irrigation system
- Plant markers
- Garden layout plan
- Seasonal bloom calendar
Begin implementation by sketching your garden layout, dividing it into distinct color zones that flow naturally into each other. Start with anchor plants – typically larger perennials or shrubs – positioning them first to establish the backbone of your design.
Plant in layers, with taller specimens at the back or center, medium-height plants in the middle, and shorter varieties along the edges. Ensure proper spacing between plants to accommodate mature sizes and maintain good air circulation.
Work with your local climate and sunlight conditions, selecting plants that will thrive in your specific environment while maintaining your chosen color scheme. Remember that flowers bloom at different times, so include a mix of early, mid-season, and late-blooming varieties to maintain consistent color throughout the growing season. Consider incorporating evergreen plants or those with colorful foliage to provide year-round interest.
Adaptation Tips: For smaller spaces or balcony gardens, focus on creating mini color schemes using containers of different sizes and heights. Use vertical gardening techniques with climbing plants or hanging baskets to maximize space.
Choose dwarf varieties of your favorite plants, and consider using a monochromatic color scheme which can make small spaces appear larger. Incorporate mirrors or reflective surfaces to amplify the visual impact of your color coordination while maintaining the artistic flow in a condensed area.
Craft a Living Art Installation With Succulents

Transform your outdoor space into a mesmerizing living canvas by crafting an artistic succulent installation that combines nature’s geometry with creative expression. Picture a tapestry of diverse succulents – from rosette-forming Echeverias and spiral Aeoniums to trailing Burro’s Tail and spiky Agaves – arranged in captivating patterns that draw the eye and create dynamic visual movement. The natural color palette ranges from soft sage greens to deep purples, punctuated by occasional bursts of yellow, pink, or red blooms.
This living artwork gains depth through varied heights and textures, incorporating decorative elements like weathered driftwood, polished river rocks, or vintage frames repurposed as plant holders. The installation can be vertical, horizontal, or multi-dimensional, adapting to your space while creating an ever-evolving piece that changes with the seasons and growth patterns of your chosen specimens.
Essential Elements:
- Selection of varied succulent species
- Well-draining succulent soil mix
- Container system (vertical panels, tiered planters, or frame boxes)
- Decorative hardscape materials (rocks, wood, metal accents)
- Drainage materials (gravel, ceramic pieces)
- Garden tools for planting and maintenance
- Moisture meter
- Fine spray bottle
- Natural fertilizer suitable for succulents
Begin installation by selecting a location that receives proper sunlight – typically 4-6 hours of filtered light daily. Prepare your chosen container system with adequate drainage holes and fill with high-quality succulent soil mix. Create your design on paper first, considering plant growth patterns and mature sizes.
Start planting larger specimens as focal points, then work outward with smaller varieties, ensuring proper spacing for growth. Secure trailing varieties at higher points to create natural cascades.
When maintaining your living art installation, practice restraint with watering, allowing soil to dry completely between sessions. Prune carefully to maintain desired shapes and remove any dead foliage. Rotate the installation periodically if growth becomes uneven due to light exposure. For seasonal care, reduce watering in winter and protect sensitive varieties from frost.
Design Adaptations: For small balconies, consider creating modular installations that can be rearranged or expanded over time. Use vertical space effectively with wall-mounted panels or hanging containers.
In limited spaces, focus on miniature varieties and create depth through careful layering rather than spreading horizontally. For weather protection, install adjustable covers or choose hardy varieties suited to your climate zone, and position the installation where it can be easily moved if extreme weather threatens.
Install Mirror Features for Optical Illusions
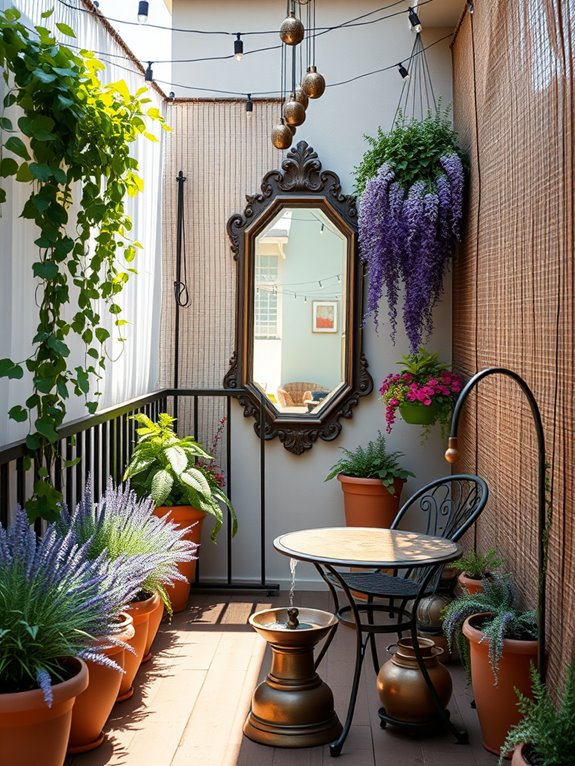
Transform your garden into a mesmerizing wonderland by strategically placing mirrors to create depth and intrigue. Weatherproof mirrors nestled among climbing roses, wisteria, and verdant ferns multiply the visual impact of your plantings while reflecting natural light into shadowy corners. The mirrors catch glimpses of colorful blooms, dancing leaves, and garden wildlife, making your space appear twice as large and infinitely more mysterious.
These reflective features work particularly well when positioned to capture the movement of ornamental grasses, the shimmer of water features, or the gentle sway of bamboo stands. Ancient garden designers used mirrors to create the illusion of endless pathways and secret gardens beyond walls. Today’s moisture-resistant mirror panels can be mounted on fences, incorporated into trellises, or positioned as freestanding elements to achieve similar enchanting effects.
Key Elements:
- Weather-resistant mirror panels
- Mounting hardware and brackets
- Protective sealants
- Strategic lighting fixtures
- Climbing plants and vines
- Ornamental grasses
- Reflective water features
- Decorative frames or borders
- Garden path materials
- Plant screening elements
Position mirrors where they’ll reflect the most attractive garden features while avoiding direct sunlight that could create harsh glare or potentially harmful reflections. Install larger mirrors at slight angles to prevent birds from flying into them, and ensure all mounting hardware is properly sealed against moisture.
Create layers of plantings in front of mirrors to soften their edges and integrate them naturally into the landscape. For optimal results, clean mirrors regularly with non-abrasive materials and check mountings seasonally to maintain security. Consider using multiple smaller mirrors rather than one large panel to create various points of interest throughout the garden.
In winter, position mirrors to capture and reflect whatever sunlight is available, maximizing natural light during darker months.
Adaptation Tips: For smaller spaces or balconies, use mirrored tiles arranged in patterns, or install slim mirror panels vertically to emphasize height rather than width. Consider removable mirror features that can be adjusted seasonally, and incorporate LED lighting near mirrors to enhance their impact after dark.
In urban settings, position mirrors to reflect sky views rather than neighboring buildings, and use frosted or antiqued mirror surfaces in areas where privacy is a concern.
Build a Natural Art Gallery With Driftwood and Stones
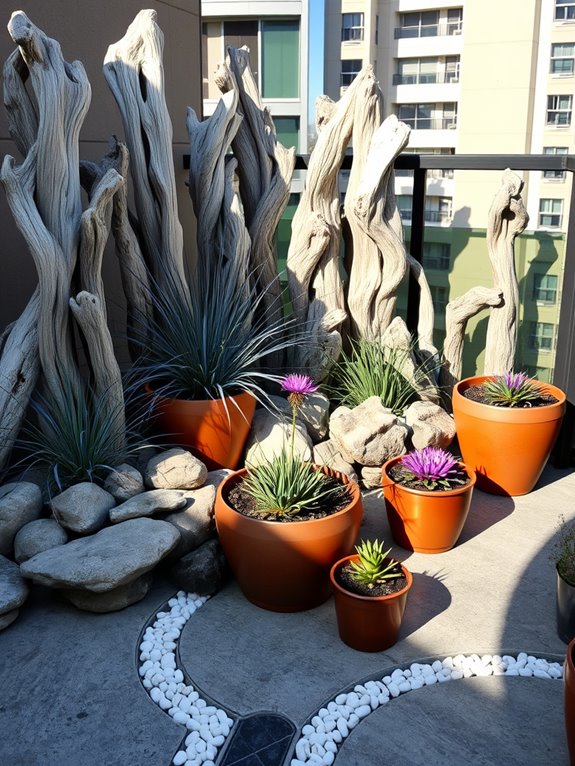
Transform your garden into a captivating outdoor gallery where nature’s sculptures take center stage. Weathered driftwood pieces rise from beds of smooth river stones, their silvery surfaces catching sunlight and creating dramatic shadows across the landscape. Native grasses like blue fescue and Mexican feather grass sway gently around these natural art pieces, while hardy succulents and low-growing sedums provide living texture at ground level.
The arrangement mimics a curated museum exhibition, with each driftwood piece positioned thoughtfully to create visual flow and interest. Small clusters of white pebbles form pathways between larger stone installations, while vertical pieces of driftwood serve as natural sculptures. Purple coneflowers and black-eyed susans add strategic pops of color, their blooms complementing the earthy palette of the wood and stone elements.
Key Elements:
- Assorted driftwood pieces (various sizes)
- River rocks and smooth stones
- White pebbles for pathways
- Ornamental grasses
- Drought-resistant perennials
- Succulents and sedums
- Solar-powered accent lighting
- Natural mulch
- Weather-resistant sealant for wood
Begin implementation by clearing the designated area and laying a foundation of well-draining soil mixed with gravel.
Position larger driftwood pieces first, anchoring them securely in the ground and treating them with weather-resistant sealant to extend their lifespan. Create zones around these focal points using river rocks and pebbles, leaving spaces for plant installation. Layer in ornamental grasses and perennials, ensuring they’ve room to mature without overwhelming the structural elements.
When designing this natural gallery, consider seasonal changes and maintenance requirements.
Choose driftwood pieces that are thoroughly dried and free from insects, and position them to prevent water pooling. For smaller spaces or balconies, use container arrangements with miniature driftwood pieces and create levels using stacked stones. Incorporate proper drainage systems and ensure weight restrictions are considered for elevated installations.
Regular maintenance should include removing debris from stone arrangements and checking driftwood stability after severe weather events.
Transform Garden Fences Into Canvas Displays
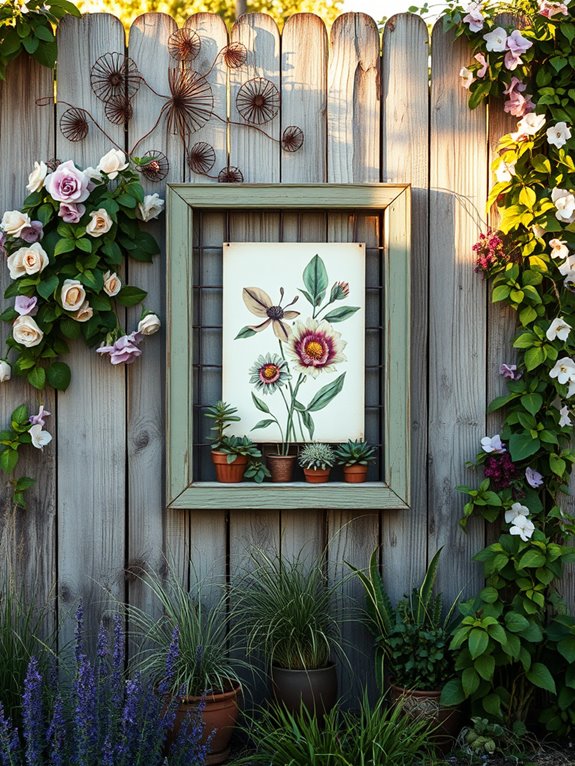
Transform your ordinary garden fence into a living masterpiece where art and nature intertwine to create an enchanting outdoor gallery. Climbing roses in deep burgundy and soft pink weave between hand-painted panels, while copper wire sculptures catch the sunlight and cast dancing shadows across weathered wood. Trailing jasmine and clematis add layers of natural texture, their blooms creating organic frames around carefully curated artistic displays of metal work, mosaics, and weather-resistant canvas prints.
The fence becomes more than a boundary – it evolves into a dynamic backdrop that changes with the seasons. Spring brings forth clusters of wisteria cascading over industrial-style metal frames, while summer showcases vibrant morning glories twining through suspended geometric sculptures. Vintage window frames mounted on the fence panels create depth and dimension, housing collections of air plants and succulent arrangements that add living elements to this vertical art installation.
Key Elements:
- Weather-resistant art pieces (paintings, prints, sculptures)
- Climbing plant supports and trellises
- Flowering vines and climbers
- Decorative frames and panels
- Mounting hardware and brackets
- Wire grid systems
- Plant containers and holders
- Lighting fixtures
- Weatherproofing materials
- Shade-tolerant plants
- Artistic hooks and hangers
Transform your fence by first establishing a solid framework of supports and mounting systems. Install a combination of traditional trellises, wire grids, and custom mounting brackets at varying heights and depths to create visual interest.
Consider the weight-bearing capacity of your fence and use appropriate anchoring methods. Layer your artistic elements starting with larger backdrop pieces, then add dimensional items like planters and sculptures, finishing with climbing plants strategically placed to soften edges and create natural frames.
For protection against weather elements, apply protective sealants to wooden fence panels and use UV-resistant materials for artwork. Select plants based on your fence’s exposure to sun and shade, ensuring proper irrigation systems are in place to maintain healthy growth. Regular pruning and training of climbing plants will prevent overcrowding and maintain clear visibility of art pieces.
Design Adaptations and Tips: Scale your display according to available space by using vertical gardening techniques for smaller areas. In windy locations, secure lightweight items with additional fasteners and choose wind-resistant plants.
For rental properties, consider free-standing panels or removable mounting systems. Maximize impact in shaded areas by incorporating reflective elements and choosing shade-loving plants with interesting foliage patterns. For year-round interest, include evergreen climbers and permanent artistic features that look attractive even in winter months.