
8 Garden Ideas for All-Weather Enjoyment
Picture Sarah’s backyard transformation: what was once a weather-restricted patio is now a year-round retreat with a cedar pergola, weather-resistant furniture, and strategic landscaping that blocks winter winds. You’ll discover how to create your own outdoor sanctuary that’s beautiful and functional in every season, from cozy entertainment zones to smart lighting solutions that illuminate evening gatherings. These eight proven ideas will help you maximize your garden’s potential, no matter what Mother Nature brings your way.
Contents
- 1 Install a Multi-Purpose Covered Pergola
- 2 Choose Weather-Resistant Outdoor Furniture
- 3 Create Strategic Wind Barriers and Shelter
- 4 Design a Four-Season Plant Layout
- 5 Incorporate Smart Lighting Solutions
- 6 Build an All-Weather Entertainment Zone
- 7 Add a Stylish Rain Management System
- 8 Set Up Climate-Controlled Garden Spaces
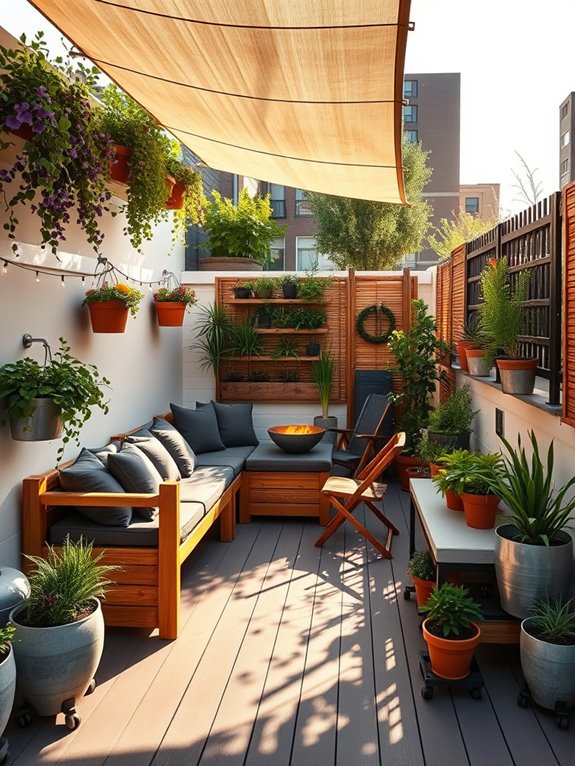
Install a Multi-Purpose Covered Pergola
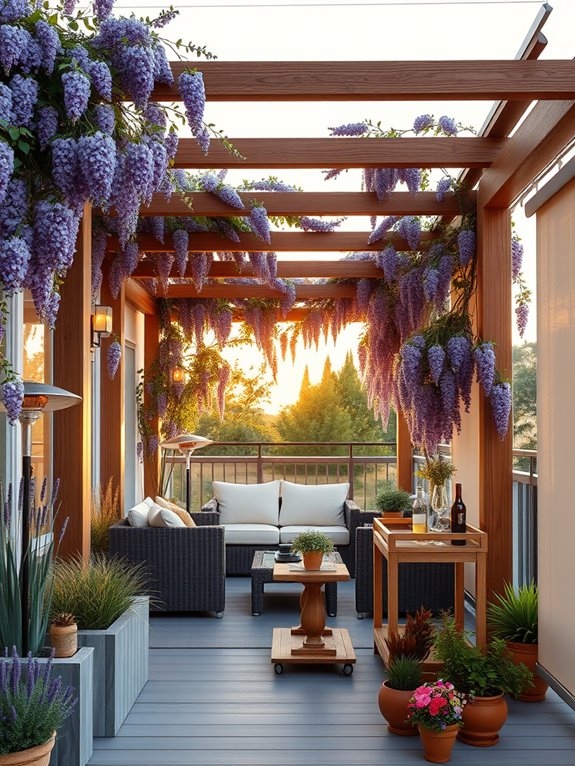
A multi-purpose covered pergola transforms an ordinary garden into an elegant outdoor living space that beckons throughout the seasons. The sturdy wooden or metal framework, draped with weather-resistant fabric or lined with clear polycarbonate panels, creates a sheltered sanctuary where climbing vines like wisteria, jasmine, or grape vines intertwine with the structure.
Pendant lights or string lights cascade overhead, casting a warm glow during evening gatherings, while potted plants strategically placed around the perimeter bring nature closer to this transitional space. The pergola becomes a natural extension of indoor living, featuring comfortable all-weather furniture, plush cushions in waterproof fabrics, and perhaps a small outdoor kitchen or bar cart for entertaining.
Surrounding beds of drought-resistant perennials like lavender, salvias, and ornamental grasses create a lush backdrop, while container gardens filled with seasonal blooms can be easily moved to create different arrangements throughout the year. The sound of rain on the cover adds a mesmerizing ambient element without disturbing the dry comfort below.
Key Elements:
- Sturdy pergola framework
- Weather-resistant roof covering
- Climbing vine support system
- All-weather furniture
- Outdoor lighting fixtures
- Container plants
- Surrounding perennial beds
- Weatherproof cushions and textiles
- Small storage solution
- Drainage system
Implementation begins with selecting an ideal location that balances sun exposure and proximity to the house. Install the pergola on a level surface, preferably with a slight grade for water runoff, and ensure the foundation is properly anchored.
Create designated zones within the space: a seating area, perhaps a dining section, and space for portable elements like heaters or fans. Install support systems for climbing plants early, allowing them to establish and grow naturally over the structure.
Additional Tip: When designing a covered pergola space, consider incorporating modular or folding furniture that can be easily rearranged or stored. For smaller areas, utilize vertical gardening techniques with wall-mounted planters, and choose multi-functional pieces like storage benches. Consider installing retractable side panels or screens for additional weather protection, and ensure your chosen covering material complements your local climate conditions while meeting local building codes.
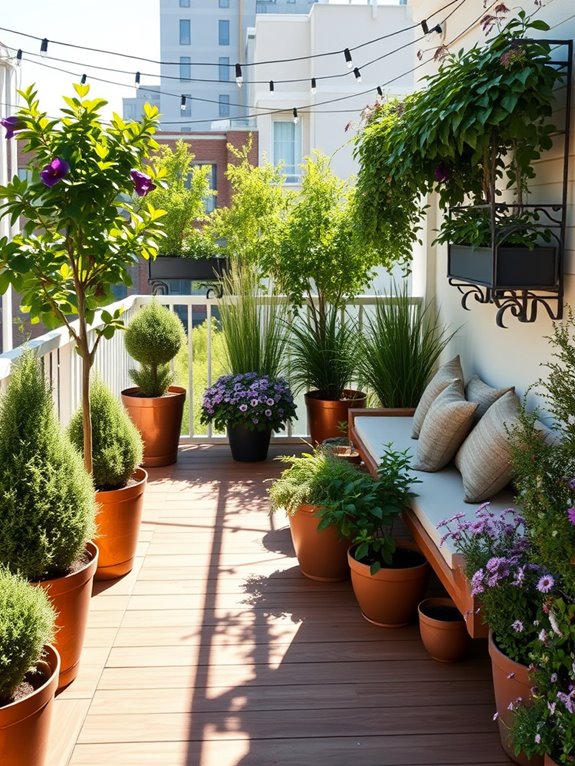
Choose Weather-Resistant Outdoor Furniture

Creating an inviting outdoor living space begins with selecting furniture that can withstand nature’s elements while maintaining its beauty and functionality. Picture elegant teak loungers adorned with weather-resistant Sunbrella cushions in soothing coastal blues and sandy neutrals, complemented by streamlined aluminum side tables with tempered glass tops that catch the sunlight.
Surrounding these durable pieces, potted lavender and rosemary release their gentle fragrance, while ornamental grasses sway gracefully in the breeze.
The furniture arrangement creates natural conversation areas beneath a pergola draped with fade-resistant outdoor curtains, offering flexible shade options throughout the day. Powder-coated steel chairs with quick-dry mesh seating cluster around a substantial concrete dining table, creating an anchor point for outdoor entertaining that remains impervious to rain and sun exposure.
Weatherproof storage ottomans double as extra seating while protecting cushions and throws during unexpected weather changes.
Essential Elements:
- Teak or aluminum-frame seating
- Weather-resistant cushions and fabrics
- Concrete or composite dining table
- Powder-coated metal accent furniture
- Quick-dry mesh seating options
- Weatherproof storage solutions
- UV-resistant outdoor curtains
- All-weather throw pillows
- Rust-resistant hardware
- Weather-sealed accent lighting
Implementation requires strategic placement of furniture pieces to maximize both functionality and protection. Position larger items like sofas and dining sets under covered areas or close to shelter, with easy paths to move them if needed.
Create layered zones starting with the most weather-resistant pieces in exposed areas, transitioning to more delicate items in protected spaces. Incorporate modular pieces that can be easily rearranged or stored, and ensure all furniture has proper drainage and airflow to prevent water accumulation.
Design adaptations should consider your specific climate challenges. For compact spaces, opt for stackable chairs and folding tables that can be easily stored. Choose multi-functional pieces like storage benches for small balconies, and consider wall-mounted folding tables or rail-mounted planters to maximize limited square footage.
In areas with extreme weather, invest in high-quality furniture covers and create designated storage spaces for cushions and accessories during severe conditions.
Create Strategic Wind Barriers and Shelter
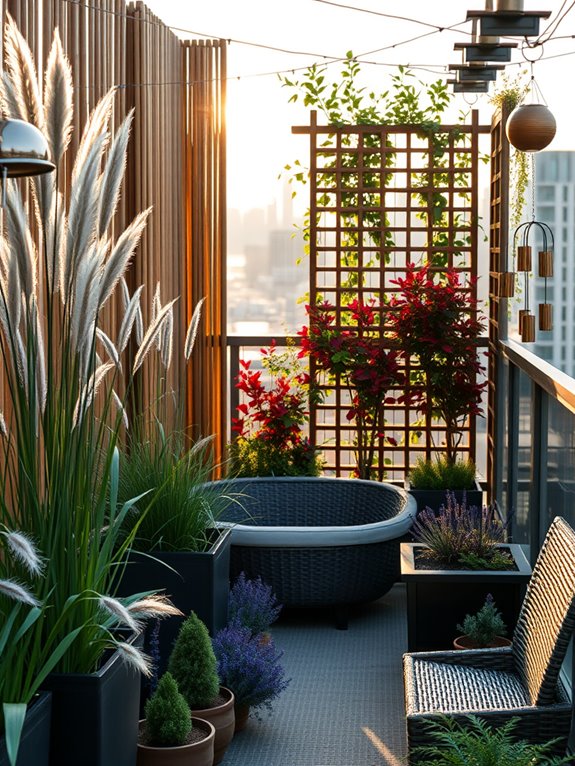
Strategic wind barriers and sheltered garden spaces create an enchanting sanctuary where nature’s harsher elements are transformed into gentle whispers. Layered plantings of tall ornamental grasses like Miscanthus and Pennisetum sway gracefully in the breeze, while dense evergreen hedges of Thuja or Bamboo form living walls that protect delicate flowering plants.
Artistic wooden screens and lattice panels, adorned with climbing roses and clematis, add architectural interest while deflecting gusts into peaceful eddies. The protected spaces within these barriers become intimate garden rooms where comfortable seating invites lingering conversations and peaceful meditation.
Potted Japanese Maples and compact fruit trees thrive in these sheltered microclimates, their delicate foliage dancing without damage. Strategic placement of decorative stone walls and curved garden screens creates pockets of tranquility where even the most delicate flowers can flourish year-round.
Essential Elements:
- Tall ornamental grasses (Miscanthus, Pennisetum, Stipa)
- Evergreen hedge plants (Thuja, Bamboo, Boxwood)
- Climbing plants (Roses, Clematis, Jasmine)
- Wooden screens or lattice panels
- Stone or brick walls
- Curved garden screens
- Compact trees and shrubs
- Weather-resistant seating
- Container plants
- Windchimes or garden art
Implementation begins with mapping prevailing wind patterns and identifying areas requiring protection. Install permanent structures like walls or wooden screens first, positioning them at 45-degree angles to redirect wind flow rather than creating turbulence.
Layer plantings with the tallest specimens at the perimeter, gradually decreasing height toward interior spaces. Ensure adequate spacing between barrier plants to allow for mature growth while maintaining dense coverage. Create multiple smaller sheltered areas rather than attempting to block wind from an entire garden.
When designing wind barriers for different spaces, consider scale and proportion carefully. Balcony gardens benefit from portable screens and container-grown columnar plants that can be rearranged as needed.
Large properties may incorporate berms or terracing to naturally redirect wind patterns. Add lighting to illuminate barriers at night, creating dramatic shadows and extending garden enjoyment. Regular maintenance, including pruning and structural checks, ensures barriers remain effective and aesthetically pleasing throughout the seasons.
Design a Four-Season Plant Layout
A four-season garden layout transforms your outdoor space into a living canvas that evolves throughout the year, offering continuous beauty and interest regardless of the weather.
Spring awakens with early bloomers like hellebores and snowdrops pushing through frost-kissed soil, followed by waves of tulips and daffodils.
Summer brings lush perennials such as coneflowers and black-eyed susans, while ornamental grasses add movement and texture. The careful placement of evergreen shrubs creates permanent structure and winter interest.
As autumn approaches, the garden shifts to warm hues with Japanese maples displaying brilliant reds and oranges, while winter berries and dried seedheads provide food for birds and visual interest against the snow.
Strategic placement of both deciduous and evergreen plants ensures that bare patches never dominate the landscape. Incorporating features like stone pathways, garden benches, and all-weather sculptures maintains visual appeal even during dormant periods.
Key Elements:
- Evergreen foundation plants (boxwood, holly, spruce)
- Early spring bloomers (hellebores, crocus, snowdrops)
- Summer perennials (echinacea, rudbeckia, salvia)
- Fall foliage plants (Japanese maple, burning bush)
- Winter interest plants (red-twig dogwood, winterberry)
- Ornamental grasses (miscanthus, feather reed grass)
- All-weather hardscaping elements
- Year-round seating areas
- Four-season containers
- Strategic lighting fixtures
Start the layout by establishing permanent features like pathways and seating areas, then position evergreen shrubs as anchor points throughout the space.
Layer deciduous shrubs and perennials around these anchors, ensuring plants with different blooming periods are intermingled. Create depth by placing taller plants toward the back and shorter ones in front, incorporating ground covers to eliminate bare soil.
Consider microclimates within your garden – south-facing areas for sun-loving plants, sheltered spots for delicate specimens, and shadier locations for shade-tolerant varieties.
Group plants with similar water needs together to simplify maintenance. Implement a flexible irrigation system that can be adjusted seasonally.
When adapting this design for different spaces, focus on vertical gardening for small areas using wall-mounted planters and climbing plants.
Container gardens can be easily modified by swapping seasonal plants while maintaining permanent evergreen elements. For balconies, use lightweight containers on wheels for flexibility, and select dwarf varieties of larger plants.
Always consider the weight restrictions of your space and ensure adequate drainage for all containers.
Incorporate Smart Lighting Solutions
Transform your garden into a magical nighttime retreat with strategically placed lighting that creates depth, drama, and year-round ambiance. Twinkling string lights weave through climbing jasmine and wisteria, casting gentle shadows on stone pathways, while carefully positioned spotlights illuminate sculptural plants like ornamental grasses and Japanese maples.
Solar-powered lanterns nestled among flowerbeds create pools of warm light, highlighting texture and movement in the garden even after sunset. Modern LED garden lights in various colors can transform ordinary spaces into extraordinary nighttime sanctuaries. Uplighting on feature trees creates dramatic silhouettes, while subtle path lighting ensures safe navigation through the space.
Waterproof strip lighting under benches and along deck edges adds a contemporary touch, while motion-sensor security lights seamlessly blend with decorative fixtures to provide both safety and style.
Key Elements:
- Solar-powered path lights
- LED strip lighting
- Motion-sensor security lights
- Decorative string lights
- Spotlights for trees and focal points
- Garden lanterns
- Timer controls
- Weatherproof power outlets
- Light-reflecting plants (silver-leaved varieties)
- Reflective water features
Implementation requires careful planning of power sources and cable routing. Begin by mapping out walking paths and key features that need illumination, then layer lighting types for different purposes.
Install main power sources and weatherproof junction boxes first, followed by permanent fixtures like spotlights and path lighting. Add decorative elements last, ensuring all cables are properly concealed and protected. Consider zoning your lighting system to create different moods and conserve energy.
Essential Tips: Choose lighting fixtures rated for outdoor use and your specific climate zone. For small spaces like balconies, focus on multi-functional lights that provide both ambiance and security.
Use warm white lights (2700-3000K) for natural-looking illumination, and consider smart lighting systems that can be controlled via smartphone. In windy areas, secure string lights with additional support, and regularly check all fixtures for water damage or loose connections.
For maximum impact in limited spaces, combine lighting with reflective surfaces like mirrors or metallic planters to amplify the illumination.
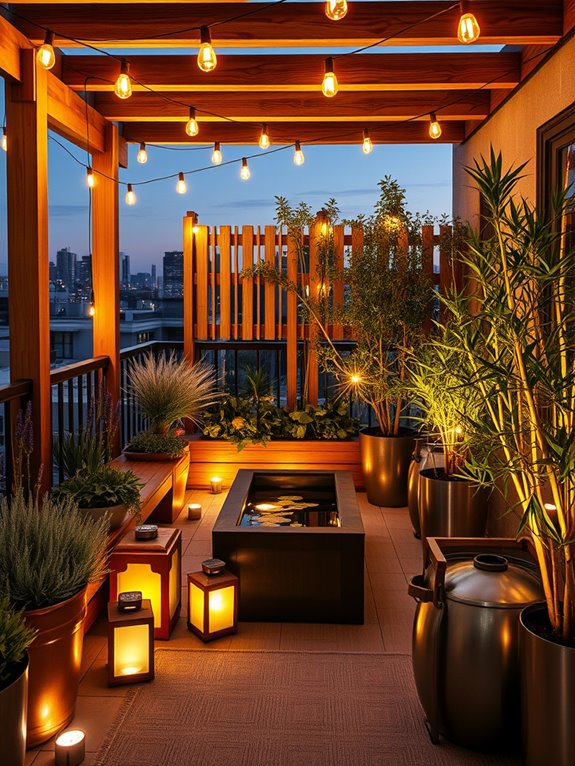
Build an All-Weather Entertainment Zone
Transform your outdoor space into a year-round haven with a thoughtfully designed entertainment zone that seamlessly blends comfort with natural beauty. Picture a welcoming retreat where climbing jasmine and wisteria drape gracefully over a sturdy pergola, creating a living ceiling that offers dappled shade in summer and architectural interest in winter.
Weather-resistant furniture in deep earth tones nestles among container gardens filled with evergreen boxwoods and seasonal blooms, while ambient lighting casts a warm glow through ornamental grasses.
The space comes alive with strategic layers of texture and color, incorporating both hardscape and botanical elements. A modern outdoor fireplace or fire pit serves as a striking focal point, surrounded by comfortable seating and versatile surfaces for dining and socializing.
Potted citrus trees and hardy herbs add fragrance and functionality, while contemporary water features provide soothing background sounds that mask urban noise.
Key Elements:
- Pergola or pavilion structure
- Weather-resistant seating and dining furniture
- Outdoor fireplace or fire pit
- All-weather flooring (composite decking or stone pavers)
- Container gardens with mixed plantings
- Outdoor lighting system
- Retractable awning or shade sails
- Built-in storage solutions
- Weather-resistant outdoor speakers
- Durable outdoor kitchen or bar area
Begin implementation by establishing the foundational structure – install the pergola or pavilion as your anchor point, ensuring proper drainage and stable footing.
Layer the space with zones for different activities, creating clear pathways between areas while maintaining an open flow. Position the fire feature where it won’t compete with seating arrangements or impede traffic flow, and install lighting at various heights to create ambiance and ensure safety.
When selecting plants and materials, prioritize durability and low maintenance. Choose containers with adequate drainage and group plants with similar water needs together.
Install irrigation systems with smart controls to maintain consistent moisture levels, and incorporate storage solutions that protect cushions and accessories during inclement weather.
For smaller spaces or balconies, consider vertical gardening techniques and multi-functional furniture pieces that can be easily rearranged or stored. Use lightweight, movable planters on casters, and opt for folding or nesting furniture to maximize flexibility.
Install retractable privacy screens or plantings that can be easily maintained in confined spaces, and choose compact versions of traditional entertainment elements like tabletop fire bowls or wall-mounted heaters.
Add a Stylish Rain Management System
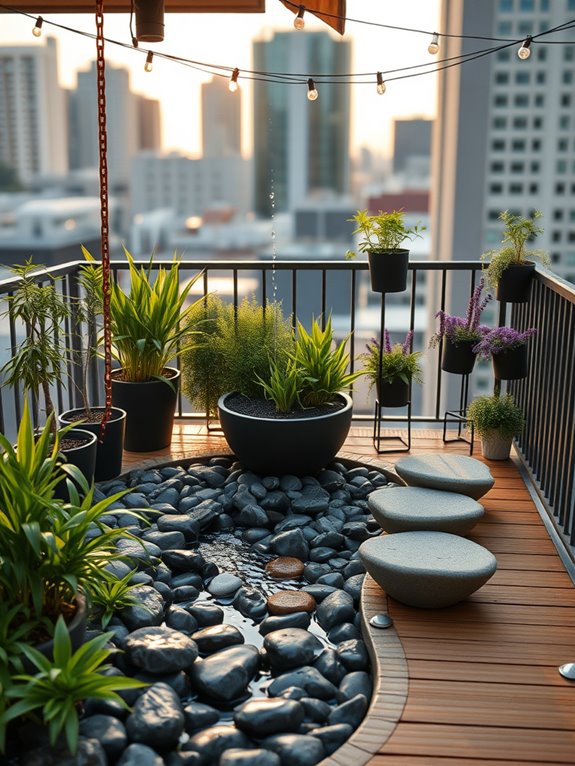
Transform your garden into a sophisticated water management sanctuary where functionality meets beauty. Copper rain chains cascade elegantly from gutters, creating mesmerizing water features during rainfall while directing water to strategically placed collection barrels adorned with climbing jasmine and trailing ivy.
Decorative stone channels lined with moisture-loving ferns and hostas weave through the garden, carrying excess water to a charming rain garden filled with purple coneflowers, black-eyed susans, and swaying ornamental grasses.
The garden’s centerpiece features a contemporary dry creek bed design using smooth river rocks of varying sizes, bordered by Japanese forest grass and dwarf bamboo. During dry spells, this architectural element provides visual interest, while during rain, it springs to life as a functioning waterway.
Strategically placed stepping stones cross the creek bed, creating an engaging pathway that invites exploration while managing water flow.
Key Elements:
- Copper rain chains
- Decorative rain barrels
- Stone drainage channels
- River rocks of various sizes
- Moisture-resistant hardwood decking
- Rain garden plants
- Permeable pavers
- Underground drainage pipes
- Water-directing berms
- Collection basin or bog garden
Installation begins with mapping water flow patterns and creating a slight grade away from structures. Install underground drainage pipes first, then layer the dry creek bed with landscape fabric and progressively smaller rocks, from large boulders to pea gravel.
Position rain barrels under downspouts, connecting them with decorative chains and ensuring overflow mechanisms are in place. Create the rain garden in a natural depression or excavate one, amending the soil with sand and compost for proper drainage.
When designing your rain management system, consider seasonal changes and maintenance requirements. Choose plants that can handle both wet and dry conditions, and ensure all water features have proper overflow protection.
For smaller spaces or balconies, utilize vertical rain chains connected to compact collection vessels, and incorporate wall-mounted planters with built-in drainage systems. Scale elements proportionally, focusing on space-efficient solutions that maintain both functionality and aesthetic appeal.
Set Up Climate-Controlled Garden Spaces
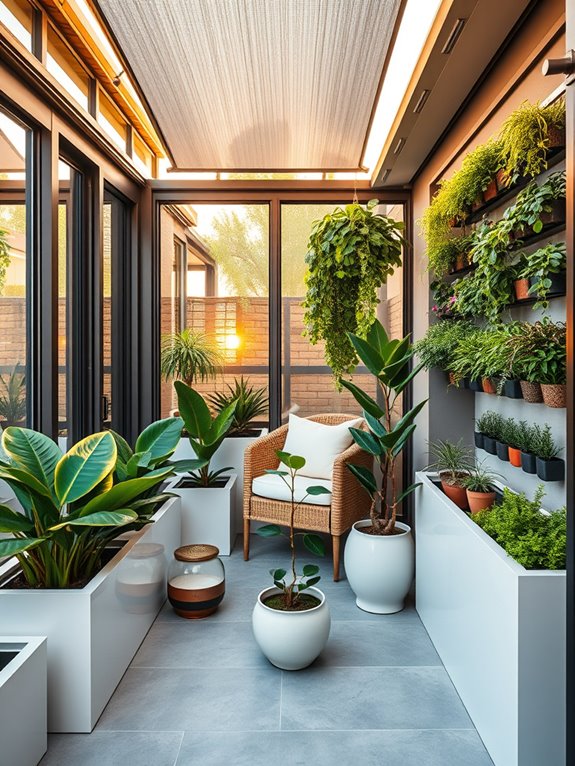
A climate-controlled garden space transforms an ordinary outdoor area into a sanctuary that can be enjoyed throughout the year. Glass walls rise gracefully from stone foundations, creating a luminous refuge filled with lush tropical plants and delicate flowers that would typically struggle in the local climate.
Elegant hanging orchids cascade from overhead beams, while dwarf citrus trees add both fragrance and visual interest, their glossy leaves catching the filtered sunlight that streams through the transparent ceiling.
The space combines the best elements of indoor and outdoor living, featuring comfortable seating arranged around a central water feature that maintains optimal humidity levels. Stone pathways wind between raised beds filled with exotic ferns and flowering vines that climb decorative trellises, creating intimate green nooks perfect for reading or meditation.
The controlled environment allows for a mix of tropical and temperate plants that wouldn’t normally coexist, creating a unique botanical showcase.
Essential Elements:
- Glass or polycarbonate walls and roof panels
- Climate control system (heating/cooling)
- Humidity management system
- Proper ventilation and air circulation
- Irrigation system
- Growing lights for winter months
- Raised planting beds
- Drainage system
- Temperature monitoring equipment
- Shade cloths or screens
- Seating areas
- Water features
Creating a climate-controlled garden space begins with proper structural planning and installation of the enclosure. The foundation must be level and well-draining, with utilities properly routed for climate control equipment.
Install the glass or polycarbonate panels with attention to proper sealing and ventilation points. Arrange planting beds in tiers or zones based on light requirements, with shade-loving plants positioned away from direct sunlight. Install the irrigation system before adding soil and plants, ensuring even water distribution throughout the space.
The climate control system should maintain temperatures between 65-80°F (18-27°C) year-round, with humidity levels between 50-70%. Position fans strategically to maintain air circulation, preventing stagnant areas where fungal issues could develop.
Create designated spaces for different plant communities based on their specific temperature and humidity needs, using micro-climates within the larger controlled environment.
When designing a climate-controlled garden space, consider the structure’s orientation to maximize natural light while minimizing heat gain in summer.
For smaller spaces or balconies, utilize vertical growing systems and modular units that can be adjusted seasonally. Incorporate automated systems for temperature control and irrigation to maintain optimal growing conditions even when you’re away.
Select plants that will thrive at similar temperature and humidity levels to simplify maintenance and create a more sustainable environment.