
7 Garden Ideas for a Rock Garden
You’ll be surprised to learn that rock gardens originated in ancient China, where they symbolized mountains and represented spiritual harmony. Today, you can transform any outdoor space into a striking rock garden that combines natural stone, drought-resistant plants, and artistic design elements. Whether you’re working with a small corner or an entire yard, these seven innovative approaches will help you create a low-maintenance landscape that captures attention throughout every season.
Contents
- 1 Choose the Perfect Location for Your Rock Garden
- 2 Layer Natural Stone Types for Visual Impact
- 3 Incorporate Water Features Among the Rocks
- 4 Select Drought-Resistant Plants and Succulents
- 5 Create Meandering Pathways Through Rock Formations
- 6 Design Multi-Level Rock Terraces
- 7 Add Lighting Elements to Highlight Rock Structures
Choose the Perfect Location for Your Rock Garden
A rock garden‘s perfect location transforms an ordinary landscape into a dramatic fusion of natural elements. Imagine a gently sloping area where sunlight plays across weathered stone faces, creating an ever-changing canvas of light and shadow throughout the day. Alpine plants nestle between carefully positioned boulders, while drought-resistant succulents add pops of blue-green and silver foliage, creating a tapestry of textures that mimics nature’s own design.
The ideal spot combines practical drainage with aesthetic appeal, perhaps incorporating a natural slope or creating an artificial elevation that draws the eye upward. Small flowering plants like creeping thyme and sedum cascade over rock edges, while vertical elements such as tall ornamental grasses or dwarf conifers provide height variation and year-round interest. The location should showcase these elements while seamlessly connecting to the surrounding landscape.
Key Elements:
- Well-draining soil mix
- Various sized rocks and boulders
- Alpine and drought-resistant plants
- Proper sun exposure
- Natural or created elevation
- Adequate spacing between rocks
- Gravel or stone mulch
- Strategic water access
- Clear sight lines
- Erosion control measures
Select a location that receives at least 6 hours of sunlight daily and offers excellent drainage. South or southeast-facing slopes are ideal, but flat areas can be modified by creating berms or raised beds. Ensure the site has good air circulation but provides some protection from harsh winds. The location should be easily accessible for maintenance while remaining visible from key viewing areas in your yard or home.
When implementing your rock garden, start by preparing the soil with proper amendments and establishing a solid foundation of larger rocks. Work from the back to the front, positioning larger specimens first and filling in with smaller rocks and plants. Create pockets of soil between rocks for planting, ensuring each plant has adequate room for root growth and future expansion.
For adaptation considerations, smaller spaces can focus on vertical elements and miniature plant varieties. Container rock gardens work well on balconies, using lightweight materials and proper drainage systems. Consider incorporating mirrors or reflective surfaces to create the illusion of more space, and choose compact plant varieties that won’t overwhelm the area.
Regular maintenance should include checking soil moisture levels and removing any debris that could compromise plant health or aesthetic appeal.
Layer Natural Stone Types for Visual Impact
The dramatic interplay of layered natural stones creates a striking visual foundation that transforms an ordinary garden into a mesmerizing landscape feature. Stacked slate, rugged limestone, and smooth river rocks work together in harmony, forming natural terraces and walls that evoke the feeling of an ancient mountainside.
Purple creeping thyme cascades over weathered granite edges, while compact sedums nestle into the crevices between sandstone layers, creating a tapestry of colors and textures that change with each passing season.
The multi-dimensional aspect of layered stone brings depth and sophistication to the garden space, with each carefully positioned rock contributing to the overall composition. Taller stones at the back create a natural backdrop for shorter, broader stones in the foreground, mimicking the organic flow of natural rock formations.
Small alpines and cushion plants tucked between the layers add spots of color, while ornamental grasses provide movement and softness against the sturdy stone surfaces.
Key Elements:
- Various sizes of natural stone (limestone, slate, granite, sandstone)
- Creeping ground covers
- Alpine plants
- Ornamental grasses
- Crushed rock or gravel for drainage
- Landscape fabric
- Topsoil
- Sand or stone dust
- Edge restraints
- Drainage materials
Begin implementation by preparing the site with proper drainage and a stable foundation of compacted gravel. Layer larger stones at the base, ensuring each one is firmly seated and slightly tilted backward for stability.
Work upward, staggering the stones and creating small planting pockets between layers. Fill these spaces with well-draining soil mix specifically formulated for rock gardens. When positioning plants, consider their mature size and growth habits to maintain the designed look over time.
Design success depends on thorough planning and attention to local climate conditions. Consider incorporating drip irrigation systems between stone layers for efficient watering, and select plants that match your specific hardiness zone.
For smaller spaces or balconies, create miniature versions using smaller stones and dwarf varieties of plants, focusing on vertical arrangements to maximize limited space. Remember to account for the weight-bearing capacity of balconies when planning stone installations.
Incorporate Water Features Among the Rocks
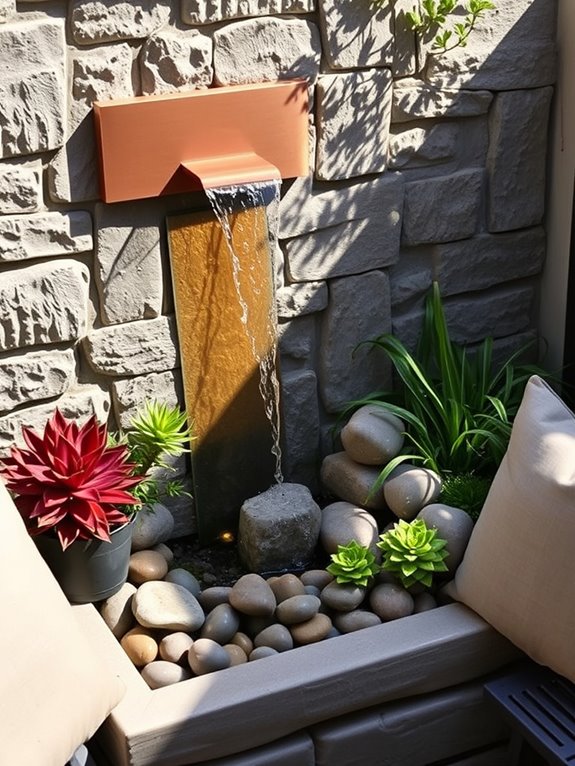
The gentle sound of cascading water weaving through artfully placed rocks creates an enchanting symphony in a rock garden setting. Whether it’s a small bubbling fountain nestled among low-growing sedums and moss, or a series of interconnected pools flowing down natural stone steps, water features transform a static rock garden into a dynamic, living space.
Alpine plants like Saxifraga and Sempervivum frame the water’s edge, while ornamental grasses sway gracefully, their movements echoing the water’s gentle ripples. The combination of smooth, water-polished stones and rough, angular rocks creates compelling textural contrasts that catch both light and shadow throughout the day.
Small waterfalls can be designed to splash onto flat rocks, creating mesmerizing patterns and a cooling mist that benefits moisture-loving plants like Japanese Forest Grass and Astilbe. The sound of moving water masks urban noise while attracting birds and beneficial insects, making the garden a sanctuary for wildlife and humans alike.
Key Elements:
- Submersible water pump
- Flexible water tubing
- Waterproof liner
- Collection basin or reservoir
- Natural stone in varying sizes
- Moisture-loving plants
- Water-safe lighting
- Filter system
- Decorative pebbles
- Aquatic plants (optional)
Creating a water feature begins with careful planning of the water’s path and ensuring proper drainage. The foundation should be level and stable, with a deep enough reservoir to maintain consistent water flow.
Layer different-sized rocks to create natural-looking cascades, ensuring larger stones are firmly anchored. Install the pump and tubing before completing the rock arrangement, leaving access points for maintenance. Seal all connections and test the water flow thoroughly before adding smaller stones and plants.
For optimal maintenance, use a filter system to prevent debris accumulation and ensure proper water circulation. Regular cleaning of the pump and periodic water treatment will maintain clear, healthy water. In winter, either drain the system or install a small heater to prevent freezing damage to the pump and tubing.
Design Tips: Scale your water feature appropriately to your space – even a small self-contained fountain can create impressive impact in a tiny garden. For balconies, consider wall-mounted water features or compact tabletop designs that recirculate water.
Use submersible LED lights to create dramatic evening effects, and position the water feature where it can be seen and heard from seating areas. In windy locations, adjust water flow to prevent excessive splashing and water loss.
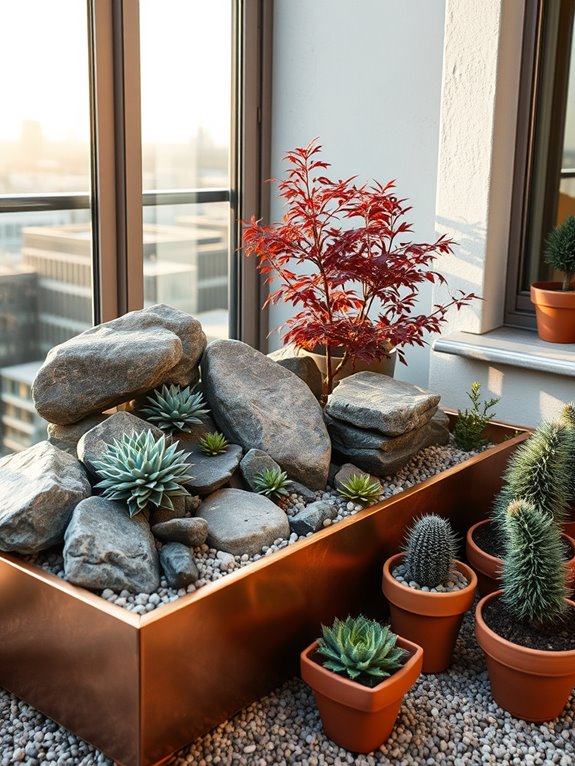
Select Drought-Resistant Plants and Succulents
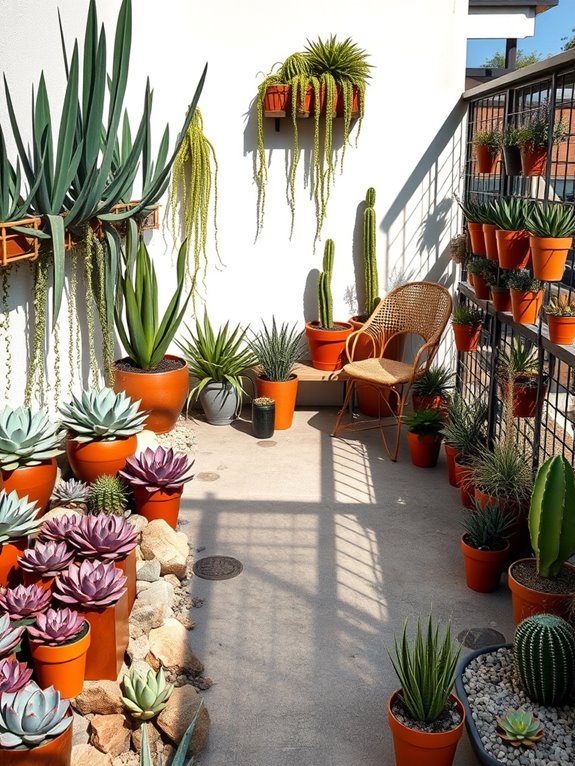
Transform your rock garden into a striking desert oasis with drought-resistant plants and succulents that paint a vivid tapestry of colors and textures. Picture bold agave plants stretching their spiky blue-green leaves skyward, while clusters of echeveria form living rosettes in shades of purple, pink, and sage. Drought-resistant lavender and sage add bursts of color and fragrance, swaying gently in the breeze against a backdrop of warm-toned rocks and gravel.
The natural geometry of succulents creates an almost otherworldly landscape, where compact sempervivum colonies spread between rocks like living sculptures. Golden barrel cacti stand as sentinels among flowing ornamental grasses, while trailing sedums cascade over rock edges, their fleshy leaves changing colors with the seasons. This low-maintenance garden style brings the dramatic beauty of arid landscapes to any space, requiring minimal water while delivering maximum visual impact.
Key Elements:
- Drought-resistant plants (lavender, sage, yarrow)
- Succulent varieties (echeveria, sempervivum, sedum)
- Ornamental grasses
- Cacti specimens
- Gravel or decomposed granite
- Large and small rocks
- Landscape fabric
- Proper drainage materials
- Plant markers
- Soil amendments for succulents
Begin implementation by preparing well-draining soil, mixing regular garden soil with coarse sand and gravel. Arrange larger rocks first to create the structural framework, ensuring they’re partially buried for stability. Plant larger specimens like agave or ornamental grasses as focal points, then group smaller succulents in odd-numbered clusters, considering their mature sizes.
Space plants generously to allow for growth and maintain good air circulation, using gravel mulch to suppress weeds and retain soil moisture.
Extra Tips: Adapt this garden style to any space by using containers of varying heights for smaller areas or creating vertical succulent walls for balconies. In regions with heavy rainfall, incorporate more drainage materials and elevate sensitive plants on rock mounds.
Consider adding solar-powered accent lighting to highlight architectural plants and create dramatic evening shadows. For north-facing spaces, choose shade-tolerant succulents like Aloe vera or Haworthia, and protect tender varieties from frost in colder climates by using portable covers or bringing containers indoors during winter.
Create Meandering Pathways Through Rock Formations
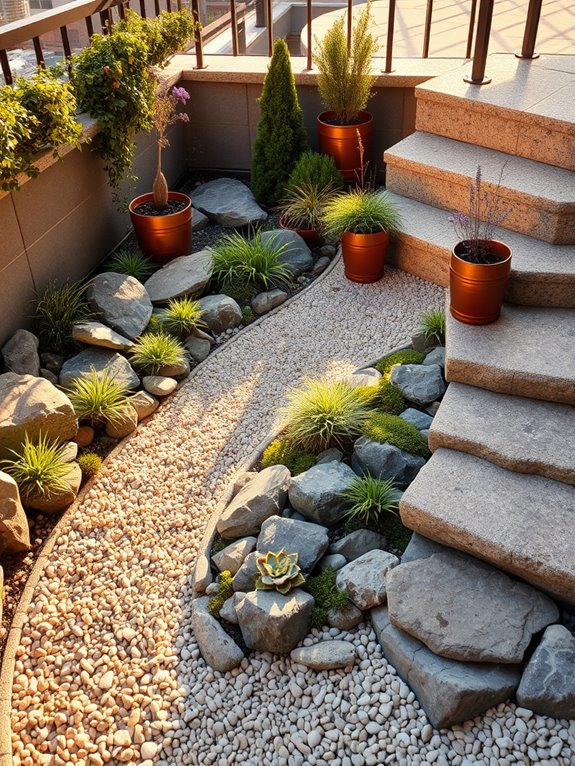
Winding pathways through artfully arranged rock formations create a sense of discovery and adventure in any garden space. Natural stone steps and crushed gravel paths meander between weathered boulders and carefully positioned rock clusters, while low-growing alpine plants and succulents spill over the edges, softening harsh lines.
The interplay of textures between smooth river rocks, jagged granite pieces, and delicate flowering plants like creeping thyme and sedum creates an enchanting visual tapestry that draws the eye forward. The journey through these rocky passages evokes the feeling of hiking mountain trails or exploring ancient stone gardens.
Strategic placement of taller plants like ornamental grasses and dwarf conifers creates mystery around gentle curves, while occasional benches or meditation spots tucked between rock formations provide peaceful resting places.
The pathways can be designed to create different zones within the garden, each with its own character and plant palette.
Key Elements:
- Varied sizes of natural stone and rock
- Crushed gravel or stepping stones for path surface
- Alpine and rock garden plants
- Drought-resistant ground covers
- Small shrubs and ornamental grasses
- Garden edging materials
- Landscape fabric for weed control
- Decorative gravel or mulch
- Garden lighting
- Seating elements
Begin implementation by plotting your pathway’s course using rope or garden hoses to visualize flow and ensure practical navigation through the space. Excavate the path area to a depth of 4-6 inches, install landscape fabric, and add a layer of compacted base material.
Position larger rocks and boulders first, creating natural-looking groupings that appear to emerge from the ground. Layer smaller rocks and plants around these anchor points, ensuring proper drainage and soil composition for rock garden plants.
When designing rock garden pathways for different spaces, consider scale carefully. For smaller areas or balcony gardens, create miniature versions using smaller stones and compact plants, focusing on container arrangements that simulate natural rock formations.
Use vertical space by incorporating wall-mounted planters or tiered rock displays, and choose slow-growing varieties that won’t overwhelm the space. Consider incorporating water features or small LED lights to enhance the pathway’s drama and extend enjoyment into evening hours.
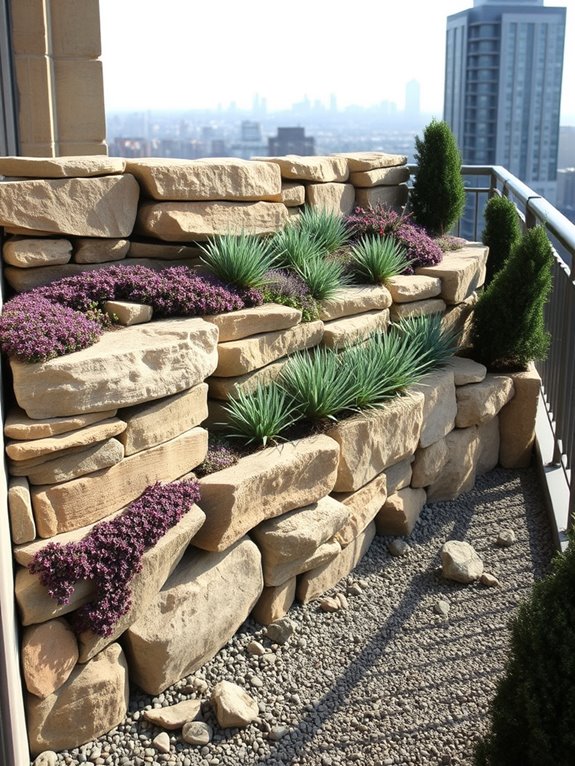
Design Multi-Level Rock Terraces
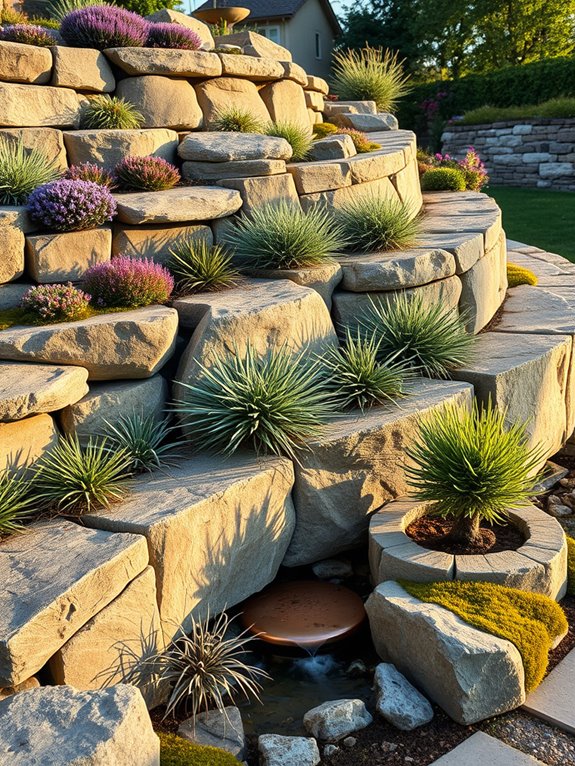
Multi-level rock terraces transform an ordinary garden into a dramatic mountainside landscape, creating a stunning visual journey through varying heights and depths. Natural stone walls rise in graceful tiers, hosting cascading plants like creeping phlox and candytuft that spill over rough-hewn edges. Each level presents a distinct ecosystem, from sun-loving sedums and yarrow at the top to shade-tolerant ferns and hostas nestled in lower reaches.
The terraced design captures the essence of alpine gardens, with carefully positioned rocks creating natural-looking outcrops that catch morning light and cast engaging shadows throughout the day. Drought-resistant ornamental grasses sway between levels, while compact evergreens provide year-round structure. Small water features can be incorporated between levels, creating peaceful sounds and drawing wildlife to this sculptural sanctuary.
Essential Elements:
- Large, flat stones for terrace walls
- Smaller rocks and pebbles for filling
- Alpine plants and succulents
- Drought-resistant perennials
- Ground cover plants
- Soil retention fabric
- Drainage materials
- Irrigation system components
- Edge restraints
- Safety railings (if height exceeds 2 feet)
Construction begins with careful planning of each level’s height and depth, ensuring proper drainage and structural integrity. Start by excavating the lowest level and work upward, building retaining walls with properly anchored stones and adequate backfill. Install drainage layers behind each wall using gravel and landscape fabric, then add irrigation systems before filling with appropriate soil mixtures for different plant types. Secure each level thoroughly before moving to the next, maintaining a slight backward tilt for stability.
The terraces should step back approximately 6-8 inches for every foot of height, creating a stable structure that prevents soil erosion and allows easy maintenance access. Plant selection must consider the varying microclimates created by the different levels, with sun-loving plants at the top and shade-tolerant species below.
Adaptations can range from minor slopes with just two or three small terraces for urban gardens to elaborate multi-level designs for larger spaces. For smaller areas, consider using lightweight materials like manufactured stone veneer or creating mini-terraces with container gardens. Maintenance access points should be incorporated into the design, and automatic irrigation systems can be installed to manage watering across different levels efficiently. Regular inspection of wall stability and drainage systems is essential for long-term success.
Add Lighting Elements to Highlight Rock Structures
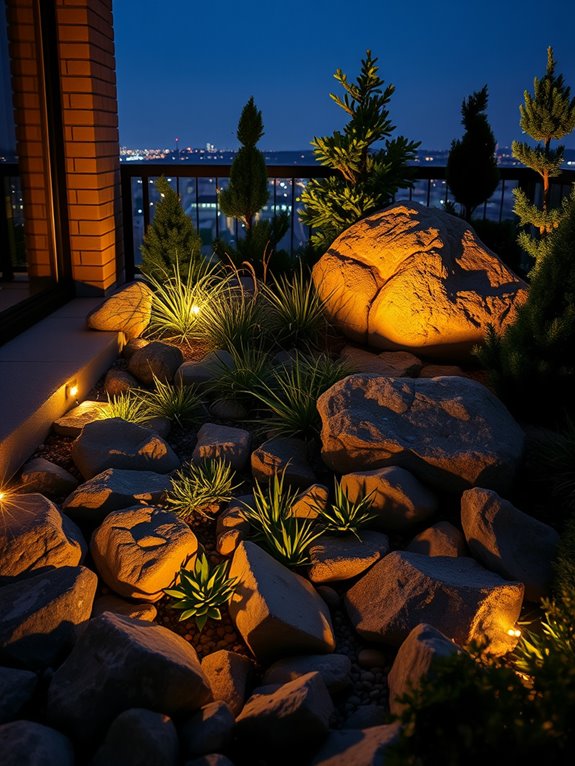
Transform your rock garden into a mesmerizing nighttime sanctuary by strategically placing lighting elements that cast dramatic shadows and create enchanting displays among your stone features. As daylight fades, carefully positioned spotlights and path lights illuminate the natural textures of rocks, creating an interplay of light and shadow that brings depth and mystery to your garden space. The soft glow highlights the angular faces of boulders while casting gentle illumination on surrounding low-growing plants like sedums and creeping thyme.
Ambient lighting transforms the rock garden into an ethereal landscape after sunset, with uplighting that emphasizes the sculptural qualities of larger rocks and architectural plants. Small LED lights nestled between stones create a starlit effect, while stronger focused beams showcase specimen plants like ornamental grasses and small conifers. This layered lighting approach creates a dramatic nighttime display that extends your garden’s enjoyment well into the evening hours.
Key Elements:
- Low-voltage LED landscape lights
- Solar-powered path lights
- Adjustable spotlights
- Well lights for uplighting
- Weatherproof electrical connections
- Timer or smart lighting controls
- Rock-mounted light fixtures
- Decorative lanterns
- Light-diffusing plants
- Reflective stone surfaces
Installation begins with creating a detailed lighting plan that identifies focal points and pathways requiring illumination. Position stronger lights near larger rock formations and specimen plants, keeping fixtures partially hidden behind stones or foliage.
Install path lights along garden edges and walkways, ensuring even spacing for consistent illumination. Connect all electrical components through weatherproof conduits, burying cables beneath soil or concealing them behind rocks.
When maintaining your illuminated rock garden, regularly check and adjust light fixtures to maintain optimal positioning as plants grow and seasons change. Clean light covers periodically to maintain brightness, and replace bulbs proactively to ensure consistent lighting throughout the space.
Consider incorporating automation systems to adjust lighting intensity and duration based on seasonal changes and outdoor activities.
Extra Tips: For smaller spaces or balcony rock gardens, use compact LED strips or battery-operated accent lights that can be easily repositioned.
Consider light pollution and neighbor sensitivity when selecting fixture brightness and positioning. In areas with limited electrical access, rely more heavily on solar-powered options and reflective elements like metallic planters or mirrored decorative pieces that maximize available light.
Choose fixtures with warm color temperatures (2700-3000K) to create a more natural and inviting atmosphere.