
10 Garden Ideas for a Green Wall
Did you know that vertical gardens can reduce your home’s energy costs by up to 23% through natural insulation? You’ll find that transforming blank walls into lush, living tapestries isn’t just visually stunning—it’s a practical way to maximize your growing space in any setting. From simple pocket planters to elaborate hydroponic systems, there’s a green wall solution that’ll match your style, budget, and gardening expertise. Let’s explore ten creative approaches that’ll turn your vertical space into a thriving garden oasis.
Contents
DIY Pocket Garden Wall
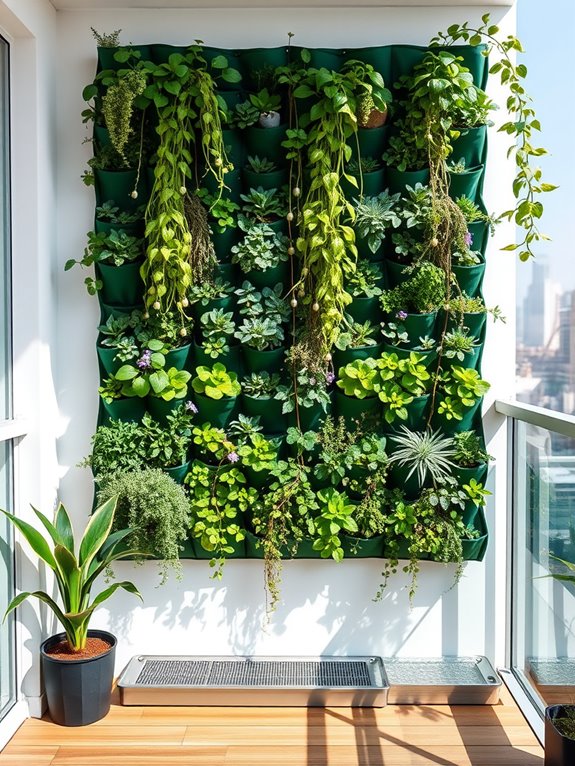
A DIY pocket garden wall transforms a vertical space into a lush, living tapestry of cascading plants and vibrant foliage. Fabric pockets filled with trailing herbs, colorful succulents, and delicate ferns create an eye-catching display that appears to defy gravity. The varying textures and heights of plants like string of pearls, creeping thyme, and baby tears spill gracefully from each pocket, while upright specimens such as pothos and spider plants add structural diversity.
The pocket garden becomes a dynamic, ever-changing artwork that brings life to previously unused vertical spaces. Small flowering plants like lobelia and million bells add bursts of color among the greenery, while aromatic herbs including mint, oregano, and rosemary infuse the air with their pleasant fragrances. The overall effect is both modern and organic, creating an intimate garden space that maximizes growing area in even the smallest environments.
Key Elements:
- Heavy-duty fabric pocket organizers or specialized plant pouches
- Strong mounting hardware and brackets
- Lightweight, well-draining potting soil
- Irrigation system or water reservoir
- Selection of suitable trailing and compact plants
- Waterproof backing material
- Drainage collection tray
- Plant fertilizer
- Pruning shears
- Small gardening tools
The installation begins with securing a waterproof backing to the wall and mounting the pocket organizer system firmly in place. Each pocket should be filled one-third full with lightweight potting mix, then planted with appropriate specimens, considering growth patterns and water needs.
Position drought-tolerant plants at the top and moisture-loving varieties at the bottom to accommodate natural water flow. Install an irrigation system or ensure easy access for manual watering, and place a drainage collection system at the base.
For maintenance and longevity, regularly check the mounting system’s security and adjust watering frequency based on season and plant needs. Prune regularly to maintain desired shape and prevent overcrowding.
Replace plants as needed and monitor for signs of stress or disease.
When adapting this garden style to different spaces, consider weight restrictions and available light. For smaller balconies, use fewer pockets or lighter-weight plants, and select compact varieties that won’t overwhelm the space.
In areas with limited natural light, incorporate grow lights or choose shade-tolerant species. Monitor wall moisture levels regularly, especially for indoor installations, and ensure proper ventilation to prevent mold growth.
Consider incorporating a mix of seasonal and perennial plants to maintain year-round interest while allowing for periodic updates to the design.
Modular Living Wall Systems
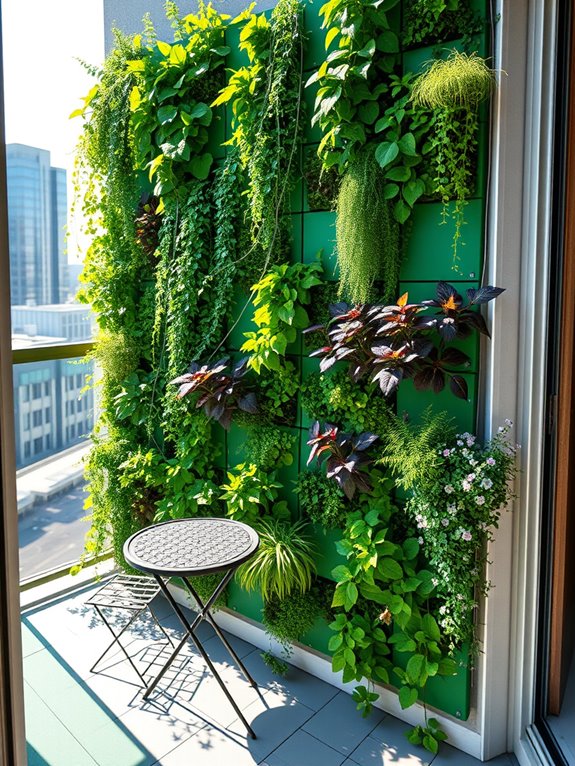
Transform any vertical space into a living tapestry with a modular living wall system that brings nature to new heights. These innovative garden installations create a mesmerizing display of cascading foliage, vibrant flowers, and textural plants arranged in a geometric pattern of individual growing modules. The systematic arrangement allows for stunning visual effects, from ombre color gradients achieved with different flower varieties to intricate patterns created by contrasting leaf shapes and sizes.
The overall effect is both modern and organic, combining the clean lines of the modular framework with the wild beauty of growing plants. Small-leaved plants like sedums, ferns, and creeping thyme spill over the edges of their compartments, while upright specimens like heuchera, native grasses, and compact herbs create depth and dimension. The living wall becomes a dynamic piece of natural artwork that changes with the seasons, attracting butterflies and creating a peaceful, biophilic atmosphere in any space.
Key Elements:
- Modular wall panels or pocket planters
- Mounting brackets and framework
- Irrigation system with timer
- Growing medium suitable for vertical gardens
- Selection of appropriate plants
- Drainage collection system
- Waterproof backing material
- Plant food and fertilizers
- Maintenance tools
- LED grow lights (optional)
Installation begins with securing a sturdy waterproof backing to the wall and attaching the modular framework according to manufacturer specifications. Each module should be filled with lightweight, well-draining growing medium and planted with carefully selected species suitable for vertical growth.
Install the irrigation system, ensuring even water distribution throughout all modules. Position plants strategically, placing larger specimens in upper modules and trailing varieties in lower sections for optimal visual impact and growth patterns.
Consider light exposure, weight limitations, and maintenance accessibility when planning your modular wall garden. Choose plants with similar water and light requirements for each section to maintain consistent growing conditions. Regular maintenance includes pruning, fertilizing, and monitoring the irrigation system to ensure proper function. Replace any struggling plants promptly to maintain the wall’s aesthetic appeal.
For smaller spaces or balconies, opt for lightweight modular systems and focus on compact plant varieties. A partial wall installation can create significant impact without overwhelming the space.
Consider incorporating seasonal plants in easily accessible modules while maintaining evergreen species in harder-to-reach areas. Adjust the irrigation schedule based on exposure and climate conditions, and install wind barriers if necessary to protect delicate plants in exposed locations.
Recycled Pallet Vertical Garden
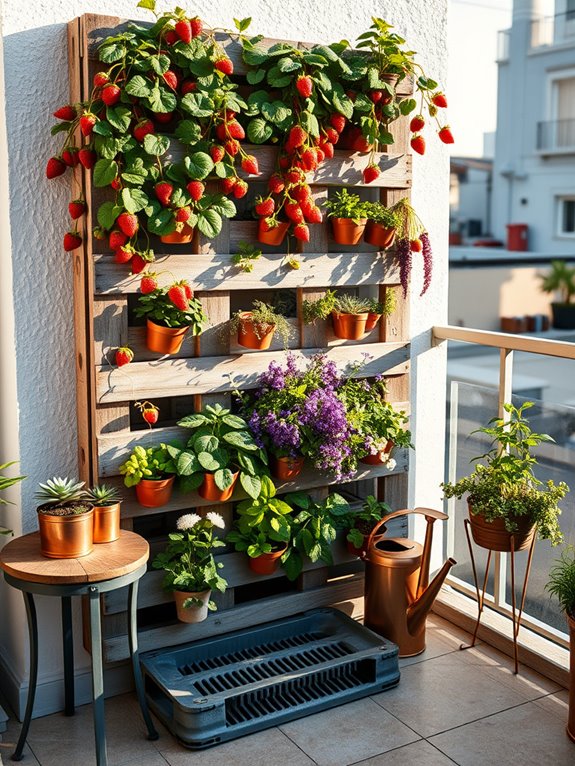
Transform your outdoor space into an eco-friendly oasis with a recycled pallet vertical garden that breathes new life into discarded materials. Weathered wooden pallets, artfully mounted on walls, create a rustic-industrial backdrop for cascading herbs, vibrant flowers, and trailing vines. The natural graying of the wood contrasts beautifully with the lush greenery, while succulents peek out from between the slats, creating an enchanting tapestry of textures and colors.
This vertical garden style maximizes space efficiency while making a bold environmental statement. Strawberry plants dangle their red fruits at eye level, mint and thyme release their aromatic scents with each passing breeze, and compact vegetables like lettuce and bush beans thrive in the vertical rows. Solar-powered fairy lights woven through the structure create a magical ambiance at dusk, transforming the garden into an enchanting evening retreat.
Key Elements:
- Recycled wooden pallets
- Weather-resistant backing material
- Landscape fabric
- Potting soil
- Irrigation system or watering can
- Plant containers or growing pouches
- Mounting brackets and hardware
- Selection of suitable plants
- Drainage trays
- Garden tools
Implementation begins with pallet selection and preparation. Choose pallets marked with “HT” (heat-treated) and clean them thoroughly. Sand rough edges and apply a weather-resistant sealant to extend longevity. Attach sturdy backing material to create planting pockets, line with landscape fabric, and secure firmly to the wall using appropriate mounting hardware. Ensure the structure can support the weight of soil, plants, and water.
When positioning plants, arrange them according to their light and water needs, with sun-loving varieties at the top and shade-tolerant species below. Install a drip irrigation system or plan for regular hand-watering, ensuring proper drainage to prevent wood rot. Consider the mature size of plants and their growing habits when spacing them within the pallet structure.
Adaptation Tips: For smaller balconies, use half-pallets or quarter sections mounted at intervals. Consider lightweight plants and shallow-rooting species to reduce structural stress. Install a collection system for excess water runoff, and rotate plants seasonally to maintain visual interest. In windy locations, secure trailing plants with garden twine and choose more compact varieties. For year-round appeal, incorporate evergreen specimens and cold-hardy succulents that can withstand temperature fluctuations.
Hydroponic Green Wall Design

A hydroponic green wall transforms vertical space into a living tapestry of lush foliage and cascading plants. Vibrant ferns unfurl their delicate fronds alongside compact philodendrons, while trailing pothos and spider plants create flowing curtains of green. The modular panels, arranged in a geometric pattern, house plants of varying textures and shades, creating depth and visual interest that draws the eye upward and makes even small spaces feel expansive and dynamic.
The modern design elements of exposed irrigation lines and subtle LED grow lights add an artistic, industrial edge to the natural beauty of the plants. As water trickles silently through the system, it creates a sense of tranquility while nourishing the vegetation. The vertical garden becomes a striking focal point, offering a contemporary solution to traditional gardening that merges technology with nature.
Key Elements:
- Modular hydroponic wall panels
- Automated irrigation system
- LED grow lights
- Growing medium (rockwool or coco coir)
- Nutrient solution reservoir
- Water pump
- Timer system
- Drainage collection tray
- Plant varieties suitable for vertical growing
- Mounting brackets and hardware
Installation begins with securing a waterproof backing board to the wall and attaching the modular panels using heavy-duty mounting brackets. The irrigation system is installed with main supply lines running horizontally across the top of each panel section, while smaller distribution tubes feed water to individual plant pods.
Plants are inserted into pre-cut holes in the panels, secured with growing medium, and connected to the irrigation network. The nutrient reservoir and pump system are typically housed in a concealed base unit, programmed to deliver regular feeding cycles.
The key to successful maintenance lies in monitoring water pH, nutrient levels, and ensuring proper light exposure. Regular pruning keeps plants balanced and prevents overcrowding, while periodic system checks maintain optimal water flow. Cleaning filters and checking for any blockages in the irrigation system should be done monthly.
For adaptation to different spaces, consider starting with a single panel system for small balconies, which can be expanded modularly as space and confidence grow. South-facing walls typically require additional shade protection, while north-facing installations may need supplemental lighting.
Choose plant varieties based on available light conditions, and consider incorporating a mix of flowering and foliage plants for year-round interest. For areas with limited floor space, wall-mounted reservoir systems can be used instead of floor-standing units.
Succulent Feature Wall
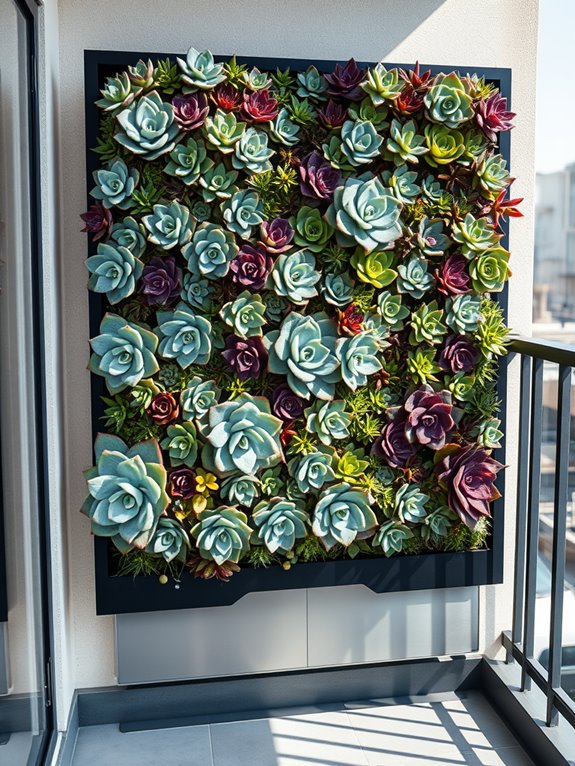
Transform your vertical space into a living tapestry with a stunning succulent feature wall that captures the eye and sparks conversation. Diverse rosette patterns in sage greens, dusty blues, and subtle purples create a natural mosaic, while varying textures from fuzzy Echeveria to smooth Sempervivum add dimensional interest.
The geometric arrangement of these drought-resistant plants offers a contemporary aesthetic that brings modern sophistication to any outdoor or indoor space.
The wall becomes a dynamic piece of living art as the succulents grow and change throughout the seasons, with some varieties producing delicate flower stalks that add pops of yellow, pink, and red.
The compact nature of succulents allows for dense planting, creating a lush, full appearance that maintains clean lines and structured beauty. This low-maintenance display provides year-round interest while requiring minimal water and care.
Key Elements:
- Vertical garden panel system or frame
- Soil-less growing medium
- Irrigation system
- Various succulent species (Echeveria, Sedum, Sempervivum)
- Landscape fabric
- Mounting hardware
- Drainage collection tray
- Plant food specifically for succulents
- Small gardening tools
Installation begins with securing a sturdy mounting frame to your wall, ensuring it can support the weight of plants and growing medium. Layer the frame with landscape fabric to contain the growing medium, then install an efficient drip irrigation system that provides consistent moisture without oversaturation.
Plant succulents in a pre-planned design, considering color variations and growth patterns, working from bottom to top. Space plants closely together to achieve immediate impact while allowing room for growth.
The maintenance routine for your succulent wall should include monthly fertilizing during growing seasons, periodic pruning of dead leaves, and monitoring water levels. Adjust irrigation based on season and climate, reducing water during dormant periods.
Watch for signs of stress or overcrowding, and replace any struggling plants promptly to maintain the wall’s aesthetic appeal.
Extra Tips: For smaller spaces, consider creating modular panels that can be expanded over time or opt for a single statement piece rather than a full wall.
Ensure adequate light exposure – most succulents need at least 6 hours of indirect sunlight daily. In areas with extreme temperatures, choose hardy varieties suited to your climate zone, and consider installing a protective covering for harsh weather conditions.
For indoor installations, supplement natural light with growing lights and ensure proper ventilation to prevent moisture-related issues.
Herb Garden Grid System
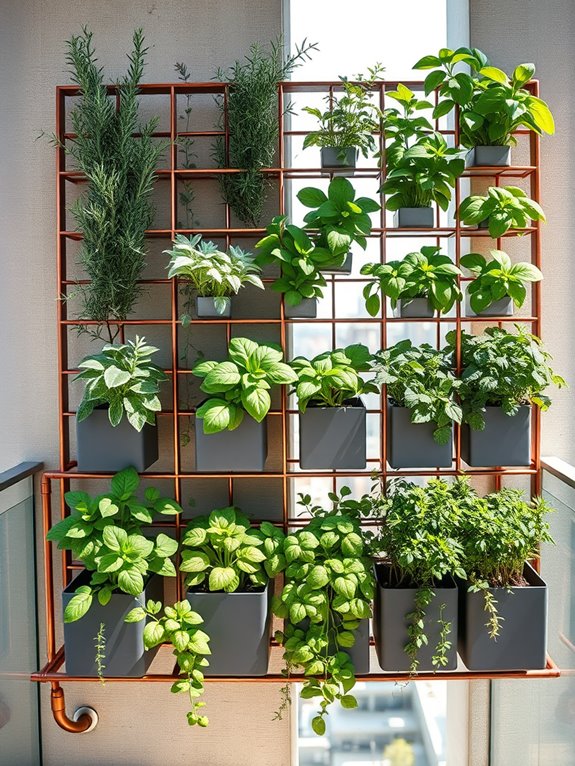
A vertical herb garden grid system transforms an ordinary wall into a living tapestry of aromatic greens, creating an organized yet natural display that combines form and function. The geometric pattern of squares and rectangles filled with various herbs creates a mesmerizing checkerboard effect, where silvery sage leaves contrast with deep green basil and bright parsley.
Copper or wooden grid frames provide structure while allowing the herbs to cascade and grow naturally within their designated spaces. The systematic arrangement offers a modern take on traditional herb gardens, bringing order to nature while maintaining an organic feel. Each compartment becomes its own micro-garden, hosting different varieties of culinary and medicinal herbs that create layers of texture and color.
The overall effect is both soothing and productive, offering a feast for the senses with fragrant rosemary, oregano, and mint greeting visitors with their distinctive aromas.
Essential Elements:
- Grid framework (metal, wood, or PVC)
- Mounting brackets and hardware
- Growing containers or pocket planters
- Irrigation system or watering apparatus
- Herb varieties (minimum 6-8 different types)
- Quality potting soil
- Drainage material
- Growth medium supplements
- Plant markers or labels
- Maintenance tools
Installation begins with securing a sturdy grid framework to the wall using appropriate anchors and ensuring proper weight distribution. Space the horizontal and vertical grid lines approximately 8-12 inches apart to create adequately sized growing compartments.
Install individual planters or growing pockets at each intersection point, ensuring they’re properly secured and level. Layer each container with drainage material, followed by nutrient-rich potting soil mixed with slow-release fertilizer.
When selecting and placing herbs, consider their growing habits and sunlight requirements. Position taller, more vigorous herbs like rosemary and sage in the upper grid sections, while trailing varieties such as thyme and oregano work well in lower compartments.
Create visual interest by alternating leaf colors, textures, and growth patterns throughout the grid system.
For successful adaptation, consider light exposure and wall capacity when determining grid size and plant selection. Small balconies can utilize compact grids with dwarf herb varieties, while larger spaces can accommodate expanded systems with multiple grid sections.
Include an easily accessible water source and consider installing a drip irrigation system for consistent moisture. Monitor plant growth regularly and trim herbs to maintain the grid’s organized appearance while preventing aggressive species from overwhelming their neighbors.
Hanging Planter Cascade
A cascading wall of hanging planters creates a mesmerizing vertical waterfall effect of greenery, transforming blank walls into living tapestries of color and texture. Trailing plants like String of Pearls, Pothos, and English Ivy cascade gracefully from staggered heights, while flowering varieties such as Trailing Petunias and Lobelia add bursts of vibrant color throughout the seasons. The gentle movement of leaves in the breeze adds a dynamic element to the display, making the wall appear alive and ever-changing.
This dramatic garden style creates an intimate atmosphere while maximizing vertical space, perfect for urban settings or small patios. The layered arrangement of planters allows for a mix of plant heights and growing habits, creating depth and visual interest. When illuminated, either by natural sunlight or strategic lighting, the cascading effect becomes even more pronounced, casting intricate shadows and highlighting the various textures of foliage.
Key Elements:
- Hanging planters of varying sizes
- Mounting brackets or hanging systems
- Trailing plants (flowering and foliage)
- Lightweight potting soil
- Drip irrigation system or watering can
- Plant supports or guides
- Weather-resistant wall anchors
- Drainage trays or catch systems
- Growth medium supplements
- Pruning tools
Implementation begins with securing strong mounting points at staggered heights along the wall, ensuring each bracket can support the weight of fully mature plants and wet soil. Start with larger planters at the top, gradually decreasing size as you move downward to create a natural flow.
Position plants with the strongest trailing habits at the highest points, allowing them to create lengthy cascades, while shorter trailing varieties fill middle and lower positions. Install a drip irrigation system or ensure easy access for manual watering, as elevated planters can dry out quickly.
When designing your hanging planter cascade, consider the weight capacity of your wall and the mature size of chosen plants. Balconies with limited space can utilize lighter-weight planters and focus on smaller trailing varieties, while larger areas can accommodate more substantial installations.
Include a mix of fast and slow-growing plants to achieve immediate impact while allowing for long-term development, and position planters to allow for easy maintenance access. For optimal results, choose plants with similar light and water requirements, and install planters with sufficient spacing to prevent overcrowding as plants mature.
Climbing Plant Trellis Wall
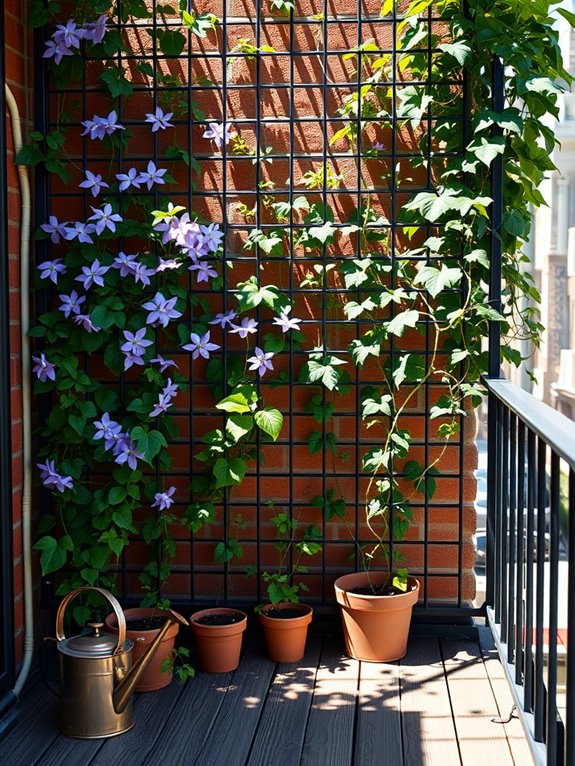
Transform your vertical space into a living tapestry with a climbing plant trellis wall that creates an enchanting natural screen. Delicate tendrils of jasmine and climbing roses weave through carefully positioned lattice work, while vibrant clematis adds bursts of color throughout the growing season. The strategic placement of different climbing varieties creates a layered effect, with some plants offering fragrant blooms while others provide dense, evergreen coverage.
As the seasons change, this living wall becomes a dynamic display of nature’s artistry. Morning glories open their blue-purple faces to greet the dawn, while moonflowers release their sweet perfume at dusk. The gentle rustling of leaves and the subtle movement of vines in the breeze brings a sense of tranquility to your outdoor space, while also attracting butterflies and beneficial pollinators.
Essential Elements:
- Metal or wooden trellis framework
- Support brackets and mounting hardware
- Selection of climbing plants (mix of perennial and annual)
- High-quality potting soil
- Large planters or ground soil bed
- Irrigation system or watering equipment
- Plant ties and training wires
- Pruning tools
Installing a successful climbing plant trellis wall begins with securing a sturdy framework to your existing wall or fence, ensuring adequate spacing from the surface to allow air circulation. Position your climbing plants at the base, using a combination of deep planters or prepared soil beds that provide ample room for root development.
Space plants according to their mature spread, typically 18-24 inches apart, and install a reliable irrigation system to maintain consistent moisture levels. Create visual interest by varying the heights and growing patterns of your selected plants, with faster-growing varieties like ivy or clematis providing quick coverage while slower-growing specimens develop.
Regular maintenance includes training new growth along the trellis, pruning to maintain desired shape, and monitoring for proper soil moisture and nutrient levels. When designing your climbing wall, consider the weight-bearing capacity of your structure and choose appropriate plants for your specific light conditions.
For smaller balconies, opt for compact climbers like container-friendly clematis varieties or annual vines, and utilize vertical space efficiently with multi-tiered planting systems. In larger spaces, incorporate different trellis patterns and varying depths to create a more dramatic, three-dimensional effect.
Remember to account for seasonal changes and plan for year-round interest by combining deciduous and evergreen varieties.
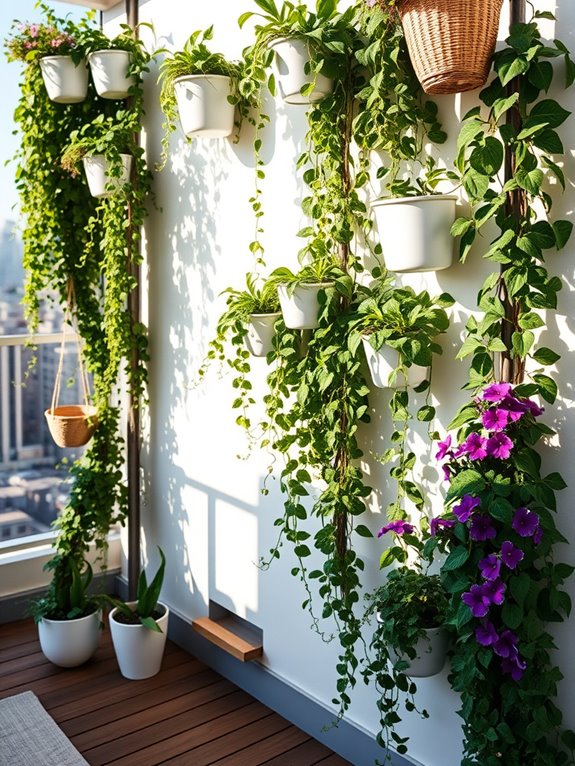
Container Garden Wall Mount

Transform your vertical space into a living tapestry with a container garden wall mount that brings nature to new heights. Sleek mounted containers cascade with vibrant trailing plants like ivy, pothos, and string of pearls, while compact herbs and flowering specimens like pansies and petunias add splashes of color at eye level. The arrangement creates a dynamic interplay of textures and hues, turning a plain wall into an artistic display of botanical beauty.
The mounted containers, whether metal, wood, or recycled materials, become architectural elements themselves, adding depth and dimension to the space. Small-space gardeners can appreciate how these vertical gardens maximize growing area while maintaining an organized, contemporary aesthetic. The setup allows for seasonal rotation of plants, ensuring year-round interest with winter-hardy specimens like ornamental kale giving way to summer bloomers.
Essential Elements:
- Wall-mounted planter boxes or containers
- Mounting brackets and hardware
- Drainage system
- Lightweight potting soil
- Selection of suitable plants
- Drip irrigation system
- Weather-resistant materials
- Plant support structures
- Growth medium barriers
- Maintenance tools
Begin installation by securing sturdy mounting brackets to wall studs, ensuring proper weight distribution and allowing adequate spacing between containers for plant growth.
Install a proper drainage system to prevent water damage to walls, potentially incorporating a collection tray at the base. Choose containers with built-in drainage holes and fill with lightweight, well-draining potting mix specifically formulated for container gardens.
Position plants strategically, placing larger specimens toward the back and trailing varieties at the edges where they can cascade naturally.
Consider your microclimate when selecting plants – north-facing walls suit shade-loving species while south-facing locations accommodate sun-worshipping varieties. For smaller balconies, opt for narrow containers and vertical-growing plants to maximize space efficiency.
Incorporate automated irrigation systems to maintain consistent moisture levels, and select plants with similar water requirements for each horizontal row to simplify maintenance. Seasonal rotation of plants keeps the display fresh while allowing for necessary soil amendments and system checks throughout the year.
Moss and Fern Living Art
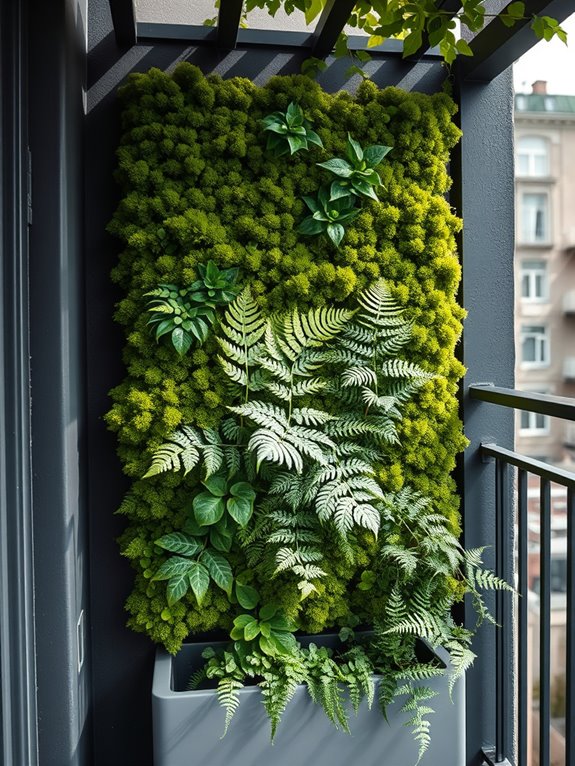
Transform your vertical space into a mesmerizing tapestry of emerald and jade with a moss and fern living art installation. Dense carpets of velvety moss create a lush backdrop, while delicate ferns cascade and unfurl their fronds in elegant layers. The combination creates a stunning natural artwork that evokes the feeling of a mystical woodland, bringing the untamed beauty of a forest floor to your vertical garden space.
This living masterpiece shifts and changes throughout the seasons, with new fern fiddleheads emerging in spring and moss taking on deeper, richer hues during periods of moisture. Japanese painted ferns add silvery highlights, while bird’s nest ferns contribute architectural structure with their crisp, wavy leaves.
The textural interplay between soft moss varieties like cushion moss and sheet moss, paired with the varied patterns of fern foliage, creates a dynamic visual experience that captivates viewers.
Key Elements:
- Wire mesh or wooden frame backing
- Moisture-retaining substrate
- Selection of moss varieties (cushion, sheet, club)
- Assorted ferns (Japanese painted, bird’s nest, button)
- Irrigation system or misting equipment
- LED grow lights (for low-light areas)
- Drainage tray
- Marine-grade plywood backing
- Moisture meter
- pH testing kit
Installation begins with creating a sturdy backing structure using marine-grade plywood covered with wire mesh. Layer this with a moisture-retaining substrate mixed with sphagnum moss and peat.
Carefully arrange larger ferns first, securing their root balls within the substrate. Fill spaces between ferns with moss patches, pressing firmly to ensure good contact with the growing medium. Install an irrigation system that provides consistent moisture through fine misting.
The key to success lies in maintaining proper humidity levels and avoiding direct sunlight, which can damage both moss and delicate fern fronds. Regular misting, especially during warmer months, keeps the installation thriving.
Monitor moisture levels daily at first, then adjust based on your specific environmental conditions. Trim dead fronds and remove any unwanted growth to maintain the desired aesthetic.
For smaller balconies, consider creating modular panels that can be rearranged or scaled according to available space. Choose compact fern varieties like button ferns or hart’s tongue ferns for limited areas.
Supplement natural light with grow lights in darker corners, and install a humidity tray beneath the installation to maintain moisture levels. In particularly sunny locations, install a shade cloth to protect sensitive species and consider incorporating more sun-tolerant varieties of both moss and ferns.