
6 Garden Ideas for a Mossy Retreat
You’ll find endless charm in transforming your outdoor space into a verdant mossy retreat, where nature’s softest greens create a peaceful sanctuary. A thoughtfully designed moss garden combines delicate textures, natural stone elements, and gentle water features to establish an enchanting atmosphere that feels both wild and curated. Whether you have a small patio or sprawling backyard, these six creative ideas will help you harness the magical qualities of moss to craft your own tranquil hideaway.
Contents
Create a Moss-Covered Stone Path
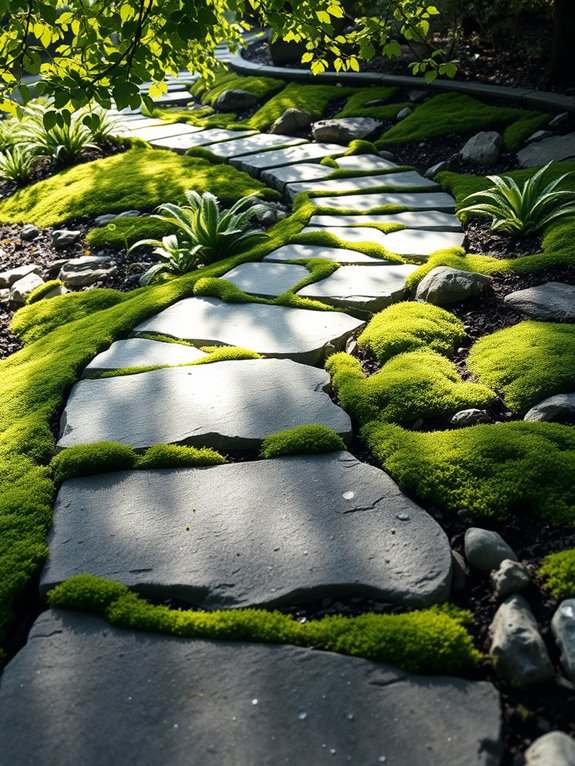
A moss-covered stone path transforms an ordinary garden walkway into an enchanted forest floor, where weathered stones peek through velvet-green moss like ancient ruins discovered in a mystical woodland. Each carefully placed stone creates a natural rhythm, while the moss softens harsh edges and fills the gaps with its lush, springy texture.
The interplay of smooth river rocks and rough-hewn flagstones provides visual interest, while the moss creates a seamless transition between path and surrounding garden. The path beckons visitors to slow their pace and appreciate the subtle beauty of these humble plants, especially after rain when the moss gleams with an emerald brilliance.
Morning dew catches on tiny moss fronds, creating miniature prisms that sparkle in early light. This living carpet muffles footsteps and adds a sense of timelessness to the garden, evoking images of ancient temple grounds and forgotten forest sanctuaries.
Key Elements:
- Flat stones or flagstones
- Sheet moss
- Shade-tolerant moss varieties
- River rocks
- Stone dust or sand
- Landscape fabric
- Garden soil
- Shade-providing plants
- Ground moisture meter
- Spray bottle or misting system
To create this moss-covered pathway, begin by laying landscape fabric along the intended path to prevent weed growth. Place stones in a pleasing pattern, leaving gaps of 1-2 inches between them. Fill these gaps with a mixture of stone dust and garden soil.
Select moss varieties suited to your climate and light conditions, pressing sheets or fragments firmly against stones and soil. Maintain consistent moisture during the establishment period, which typically takes 4-6 weeks. The moss will gradually spread to create a cohesive carpet, but patience is essential.
Regular misting and shade protection are crucial during the first growing season. Remove any fallen leaves promptly to prevent decay and maintain good air circulation around the moss.
When adapting this design for different spaces, consider using smaller stones and more compact moss varieties for limited areas. In particularly shady locations, choose moisture-loving moss species and incorporate adequate drainage to prevent waterlogging.
For sunnier spots, select drought-tolerant moss varieties and create additional shade using taller plants or architectural elements. Installing a simple irrigation system can help maintain consistent moisture levels, especially in smaller gardens where daily hand-misting might be impractical.
Design a Living Moss Wall
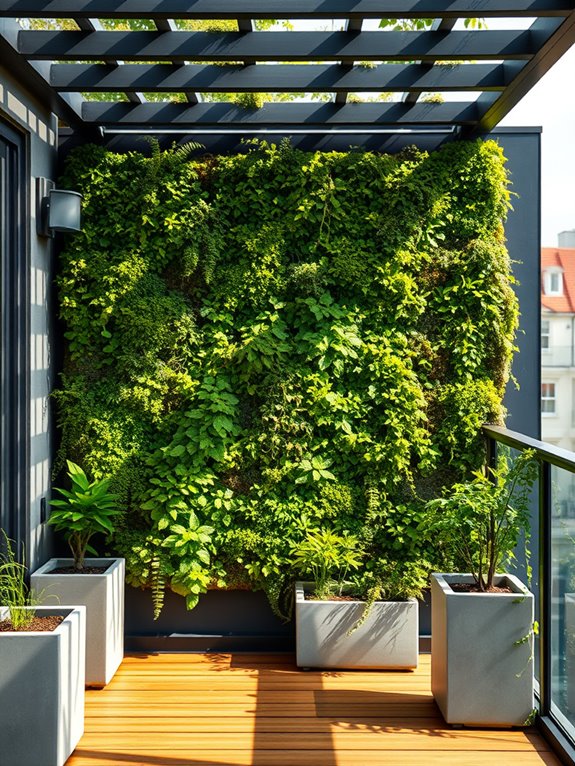
A living moss wall transforms an ordinary garden space into a mesmerizing vertical landscape that seems to have emerged from an enchanted forest. Various shades of emerald, jade, and forest green create a tapestry of textures, while different moss species – from cushion moss to sheet moss – form natural patterns that catch and reflect light throughout the day. The wall becomes a living artwork, offering a sense of ancient wisdom and natural tranquility that immediately soothes the soul.
The wall’s organic appearance belies its carefully planned structure, with moss varieties arranged to maximize visual impact while maintaining healthy growth conditions. Small ferns and miniature epiphytes can be incorporated to add dimensional interest, creating a multi-layered effect that mimics natural rock faces. The gentle presence of moisture in the air around the wall adds to the sensory experience, creating a microclimate that feels distinctly separate from the surrounding environment.
Essential Elements:
- Mounting framework or wall structure
- Moisture-resistant backing board
- Wire mesh or netting
- Selection of moss varieties (sheet moss, cushion moss, rock cap moss)
- Small-leaved ferns or epiphytes
- Irrigation system or misting equipment
- LED grow lights (for shaded areas)
- pH-balanced soil mix
- Moisture meters
- Natural rocks or driftwood accents
Creating a living moss wall begins with installing a sturdy, moisture-resistant framework that can support the weight of the growing medium and plants. A backing board covered with landscaping fabric provides the foundation, while a layer of wire mesh helps secure the moss in place. The growing medium should be pressed firmly into the mesh, creating a stable base for attaching moss pieces.
Installation of an irrigation system is crucial, whether it’s automated misters or a manual spraying schedule, to maintain consistent moisture levels. For maintenance and longevity, position the wall where it receives indirect light and maintains consistent humidity. In areas with less-than-ideal conditions, supplemental grow lights and regular misting can help create the perfect environment.
Monitor moisture levels regularly and adjust watering schedules seasonally. Trim any browning pieces and regularly check for signs of mold or pest issues. When designing your moss wall, consider scale and proportion relative to your space. For small balconies, create a framed moss panel that can serve as a focal point without overwhelming the area.
Larger spaces can accommodate multiple panels or an entire wall installation. Climate control becomes more critical in exposed areas, so consider installing a clear acrylic shield to protect from wind and direct rain. Choose moss varieties based on your local climate and light conditions, and be prepared to adjust care routines seasonally to maintain optimal growth.
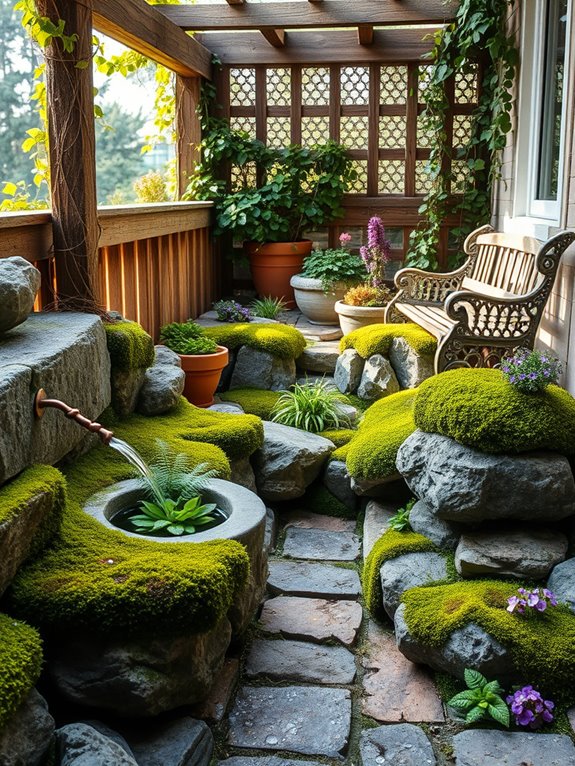
Build a Tranquil Moss Garden Fountain
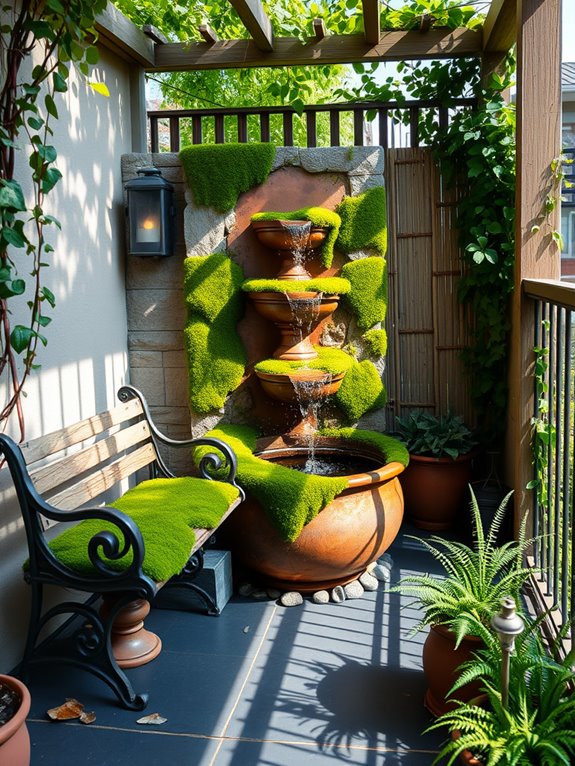
A moss garden fountain creates an enchanting focal point where glistening water trickles over stone surfaces draped in velvety moss varieties. The interplay between flowing water and different moss textures – from cushion moss to sheet moss – establishes a mesmerizing display that captures the essence of ancient forest streams.
Natural stone elements like granite or slate provide the perfect backdrop, while small ferns and miniature hostas nestle along the fountain’s edges. The gentle sound of cascading water combines with the lush green carpet of moss to transform any garden space into a meditative sanctuary.
This design draws inspiration from traditional Japanese gardens, where moss and water symbolize the flow of time and the connection between earth and sky. The fountain’s presence attracts birds and beneficial insects, adding movement and life to the peaceful setting while maintaining the garden’s serene atmosphere.
Key Elements:
- Recirculating fountain pump
- Natural stone or ceramic fountain structure
- Various moss species (cushion moss, sheet moss, rock cap moss)
- Small shade-loving companion plants
- River rocks or pebbles
- Solar-powered lighting
- Moisture-retaining soil
- Plant-safe fountain cleaner
- Timer for water flow
Creating a moss fountain begins with selecting a shaded location and installing a sturdy base for the fountain structure. The fountain should be positioned to allow for easy viewing from multiple angles while ensuring proper drainage.
Moss varieties should be carefully attached to the fountain surfaces using a slurry mixture of moss fragments, buttermilk, and water, allowing them to establish over several weeks while maintaining consistent moisture levels.
The fountain’s water flow must be gentle enough to prevent moss displacement while providing adequate circulation. Regular maintenance includes cleaning the pump filter, monitoring water levels, and trimming any overgrown moss or companion plants.
Creating subtle slopes and valleys in the surrounding ground helps direct excess water away from the foundation while maintaining the natural aesthetic.
For smaller spaces or balconies, consider wall-mounted fountain designs that incorporate moss pockets and vertical growing surfaces. Container-based systems can be scaled to fit available space, using self-contained water features with built-in reservoirs.
Light-colored surroundings help maximize available light for moss growth, while strategic placement of companion plants can create the illusion of a larger space. Always ensure weight restrictions are considered for elevated installations and that water spillage is properly managed to protect underlying structures.
Craft Moss-Adorned Garden Furniture
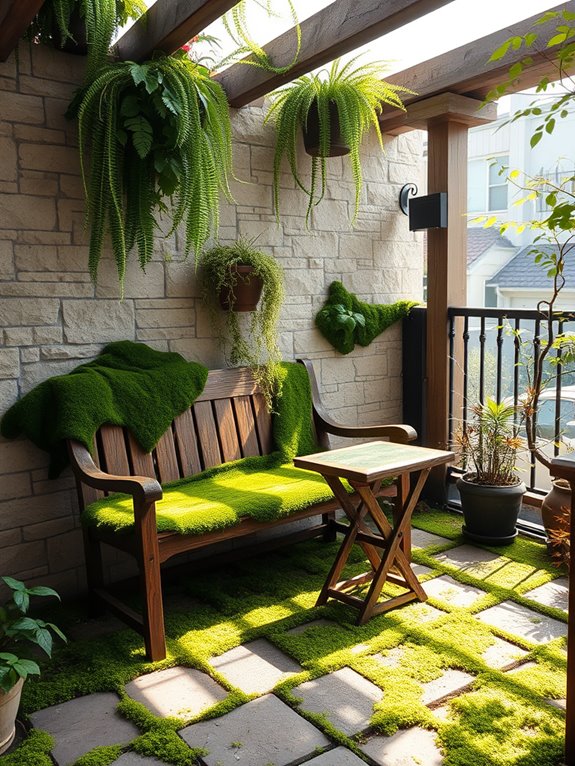
A moss-adorned garden furniture space transforms ordinary outdoor seating into enchanted forest thrones. Weathered wooden benches and stone seats draped in velvety moss create an ethereal atmosphere, where each piece appears to have emerged naturally from the earth itself.
The verdant cushions of moss soften hard edges while adding an ancient, timeless quality to modern furniture pieces. The interplay of textures becomes a focal point as different moss varieties – from star moss to cushion moss – colonize the furniture surfaces.
These living upholstery pieces thrive in shaded areas, creating intimate seating nooks beneath tree canopies or along garden walls. The moss-covered furniture pieces seem to whisper stories of forgotten woodland realms, especially when morning dew catches the light.
Key Elements:
- Wooden or stone garden furniture
- Sheet moss
- Cushion moss
- Star moss
- Moisture-retaining spray
- Yogurt or buttermilk solution
- Shade cloth or natural overhead coverage
- Misting system
- Natural adhesive
- Weather-resistant sealant
To create moss-adorned furniture, begin by selecting pieces made from porous materials like untreated wood or natural stone. Prepare the surfaces by cleaning thoroughly and creating a slightly rough texture for better moss adhesion.
Create a moss slurry using buttermilk or yogurt mixed with moss fragments, then paint this mixture onto the furniture surfaces. Position the pieces in shaded locations with consistent moisture levels, and install a misting system for regular hydration.
Extra Tips: Consider your climate zone when selecting moss varieties, as some species are more resilient to temperature fluctuations than others.
For small balconies, focus on vertical surfaces of furniture pieces to maximize space, and use compact furniture like fold-down tables or wall-mounted benches. Install moisture meters to monitor hydration levels and protect furniture during extreme weather conditions by covering with breathable fabric.
In drier climates, create micro-climates around furniture pieces using clustered shade plants and regular misting schedules.
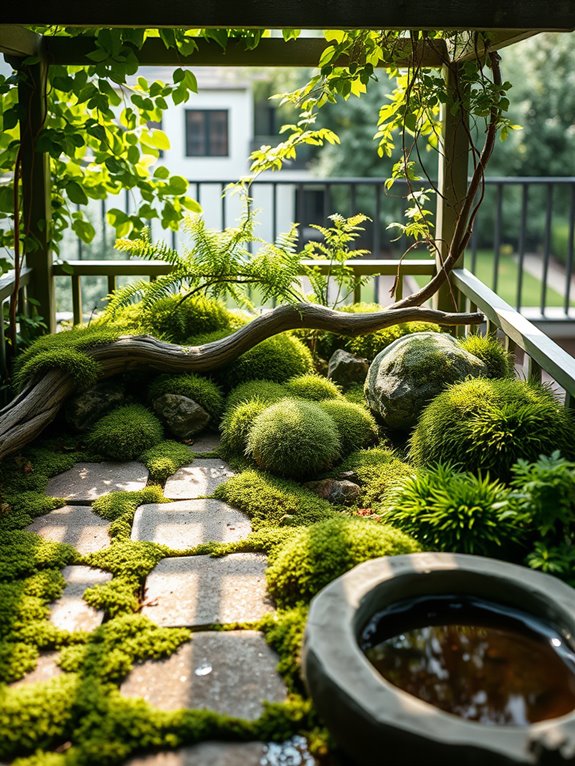
Plant a Mossy Rock Garden
A mossy rock garden transforms an ordinary outdoor space into a serene sanctuary reminiscent of ancient forest floors and mystical woodland retreats. Emerald-green moss carpets wind their way between weathered stones, creating soft, verdant pathways that seem to have existed for centuries.
Japanese forest moss, cushion moss, and sheet moss create varying textures and depths, while small ferns and wild violets peek through the gaps, adding delicate touches of natural beauty. The arrangement of rocks creates natural levels and focal points, with larger boulders serving as anchors amid smaller stones that appear to have tumbled naturally into place.
Morning dew glistens on the moss-covered surfaces, and shade-loving plants like tiny wild strawberries and creeping thyme add subtle touches of color. The overall effect is one of timeless tranquility, as if you’ve discovered a hidden grotto in an ancient forest.
Key Elements:
- Various sized rocks and boulders
- Multiple moss varieties (sheet, cushion, forest)
- Shade-tolerant ground cover plants
- Small woodland ferns
- Wild violets
- Creeping thyme
- Garden soil
- Sand or gravel for drainage
- Shade structures (if needed)
- Water feature (optional)
To create your mossy rock garden, begin by selecting a partially shaded location and preparing the soil with proper drainage using a mix of garden soil and sand. Arrange larger rocks first, creating natural-looking elevation changes and ensuring they’re firmly settled.
Layer smaller stones around these anchor points, leaving spaces for moss and small plants. Press moss fragments firmly against the rocks and soil, ensuring good contact for proper growth. Water thoroughly and maintain consistent moisture during the establishment period.
Design Tips: Consider your local climate when selecting moss varieties, as some are more drought-tolerant than others. For small spaces or balconies, create miniature versions using container gardens with dwarf varieties and smaller rocks.
Incorporate vertical elements by using wall-mounted planters or stacking stones to maximize limited space. In areas with intense afternoon sun, install shade cloth or position taller plants to protect delicate moss species. Remember that moss gardens thrive in humid, shaded environments, so plan your watering schedule accordingly.
Establish a Woodland Floor With Mixed Mosses
A woodland floor mosaic comes alive with patches of emerald, sage, and forest green mosses creating a living carpet beneath dappled shade. The varying textures – from cushiony pillow moss to delicate sheet moss and cascading mood moss – weave together in a tapestry that captures the essence of an ancient forest floor.
Natural stone pathways peek through the verdant groundcover, while fallen logs and weathered branches add architectural interest and provide additional surfaces for moss colonization. This tranquil space invites quiet contemplation, with the mosses creating a sense of timeless serenity.
Small ferns unfurl their fronds among the moss patches, while native woodland flowers like trillium and wild violets dot the landscape with subtle color. The space feels both wild and curated, offering a retreat that connects visitors to the peaceful energy of old-growth forests.
Essential Elements:
- Mixed moss varieties (cushion moss, sheet moss, mood moss)
- Shade-tolerant companion plants
- Natural stone pavers or stepping stones
- Fallen logs or branches
- Woodland flowers
- Large rocks or boulders
- Filtered shade source
- Good drainage system
- Acidic soil amendments
- Misting system or irrigation
Creating a woodland floor begins with preparing the site by removing existing vegetation and ensuring proper drainage. Install larger elements first – positioning rocks, logs, and pathways to create the basic structure.
Plant moss in patches, either by transplanting or using moss slurry, ensuring each variety has appropriate growing conditions. Establish borders with larger stones or natural edging to contain the moss garden and prevent encroachment from other plants.
The key to successful moss establishment lies in maintaining consistent moisture without waterlogging. Regular misting during establishment helps moss attach to surfaces and spread naturally.
Prevent leaf buildup by gentle removal during fall, and control foot traffic with clear pathways. Once established, moss requires minimal maintenance beyond moisture management and occasional weeding.
For smaller spaces or balconies, create a miniature woodland floor using containers or troughs. Select compact moss varieties and use vertical elements like small logs or rocks to maximize space.
Consider installing a humidity tray or small water feature to maintain moisture levels, and position the garden to receive morning sun but afternoon shade. Urban gardeners can recreate this style by using self-contained moss gardens in shallow containers, arranged in layers to mimic natural woodland topography.