
8 Garden Ideas to Frame Your View
While you might think framing garden views requires expensive installations, you’ll find that thoughtful design choices can create stunning perspectives on any budget. Your outdoor space holds endless potential for natural frames that draw the eye and create magical moments, from flowering arches that welcome visitors to carefully positioned trees that direct attention to favorite features. Let’s explore eight creative ways to transform your garden into a series of captivating scenes that unfold with each step.
Contents
Create a Living Archway With Climbing Plants
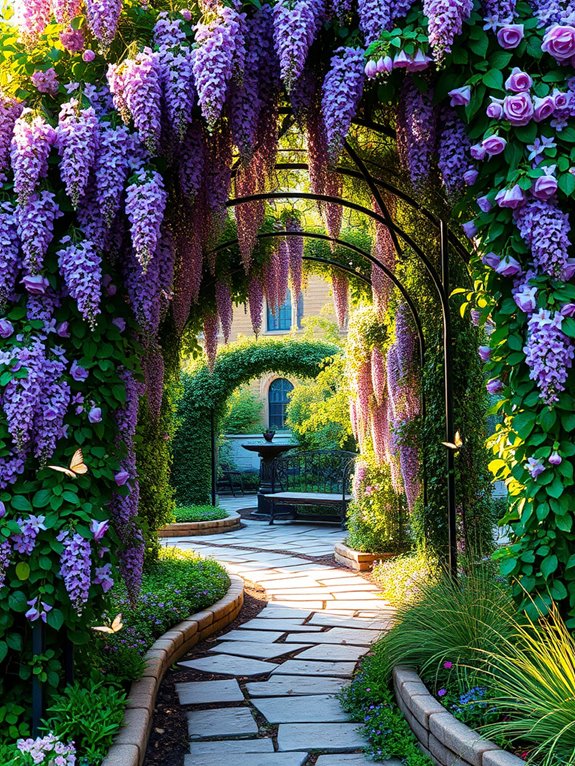
Transform your garden into an enchanting sanctuary with a living archway that creates a magical portal between spaces. Climbing roses, wisteria, and clematis intertwine their way up sturdy supports, creating a lush green tunnel that bursts with color during blooming seasons. The natural canopy provides dappled shade while framing the path beyond, inviting visitors to step through and discover what lies ahead.
This romantic garden feature combines architectural structure with nature’s wild beauty, offering a stunning focal point that changes with the seasons. The archway becomes a haven for butterflies and birds, while the sweet fragrance of flowering vines creates an immersive sensory experience. As the plants mature, they form a dense covering that appears to have grown naturally, despite the careful planning beneath.
Key Elements:
- Metal or wooden arch framework
- Support posts and concrete footings
- Climbing plant varieties (minimum 2-3 types)
- Quality soil and mulch
- Trellising materials or guide wires
- Garden edging materials
- Path materials (gravel, stepping stones, etc.)
- Plant ties and training supplies
- Pruning tools
Begin installation by securing strong support posts at least 2 feet deep in concrete footings, ensuring they can bear the weight of mature vines. Install the arch framework, making sure it’s wide enough for comfortable passage and tall enough to allow headroom as plants grow.
Prepare the soil around the base with organic matter and proper drainage. Plant climbers on both sides of the arch, using multiple varieties that bloom at different times for year-round interest. Train young vines by gently tying them to the support structure, directing their growth pattern.
Initially space plants 18-24 inches apart and alternate varieties for balanced coverage. Water deeply but infrequently to encourage deep root growth. Regular pruning is essential – trim after flowering to maintain shape and prevent the archway from becoming too heavy. Remove any dead or crossing branches, and thin out crowded areas to maintain air circulation.
Design adaptations can accommodate various spaces, from grand garden entrances to intimate patio settings. For smaller areas, choose compact climbers like climbing miniature roses or clematis, and use narrower arch designs. Consider removable arch structures for rental properties or temporary installations.
In windy locations, ensure extra sturdy construction and choose wind-resistant plant varieties. For year-round appeal in colder climates, incorporate evergreen climbers like ivy alongside deciduous flowering vines.
Install a Decorative Garden Arbor
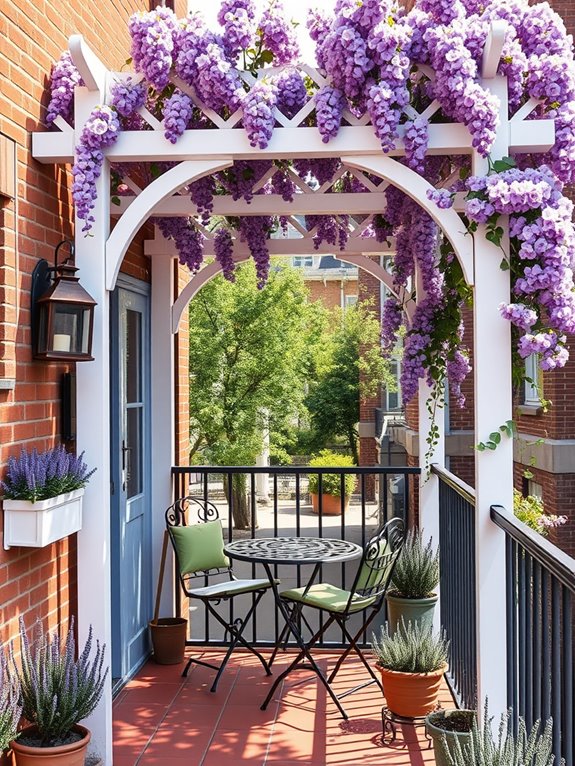
A decorative garden arbor creates a stunning architectural focal point that transforms an ordinary garden path or seating area into an enchanted gateway. Rising gracefully overhead, the curved or peaked framework provides the perfect support for climbing roses, wisteria, or fragrant jasmine to weave their way skyward, creating a living canopy that filters dappled sunlight onto the pathway below.
The structure itself, whether crafted from classic wrought iron, weather-resistant cedar, or painted trellis work, adds instant romance and vertical interest to the landscape.
As seasons change, the arbor offers an ever-evolving display of natural beauty. Spring brings forth tender new vines and abundant blooms, while summer showcases mature foliage creating cool, shaded refuge.
In autumn, the changing colors of leaves and late-blooming clematis provide rich visual texture, and winter reveals the arbor’s elegant architectural bones adorned with frost or snow, proving that this garden feature delivers year-round appeal.
Key Elements:
- Sturdy arbor framework (metal, wood, or vinyl)
- Climbing plants (roses, wisteria, clematis, jasmine)
- Ground anchoring system
- Complementary pathway materials
- Seating area or destination point
- Supporting plant materials at base
- Lighting elements
- Decorative hardware
- Weather-protective finish or paint
Creating a garden arbor begins with selecting the perfect location – typically along a pathway or framing a garden entrance. The structure must be firmly anchored into the ground, either set in concrete or secured with deep post anchors.
Once installed, establish your climbing plants at the base of each support, ensuring they’ve proper soil amendments and irrigation. Train young vines onto the framework using soft ties, allowing them to naturally weave through the structure as they grow.
Additional considerations include choosing plants appropriate for your climate zone, maintaining adequate spacing between the arbor and other structures, and ensuring proper drainage around the installation site.
For smaller spaces or balconies, consider a wall-mounted half-arbor or select dwarf climbing varieties that won’t overwhelm the space. Alternative materials like bamboo or repurposed materials can create unique, space-saving designs while maintaining the romantic appeal of a traditional garden arbor.
Design a Layered Plant Border
A layered plant border transforms an ordinary garden edge into a captivating tapestry of colors, textures, and heights. Tall, majestic delphiniums and hollyhocks create a dramatic backdrop, while mid-height phlox and coneflowers fill the middle ground with vibrant blooms. In the foreground, hardy geraniums and creeping thyme spill onto pathways, softening hard edges and creating an enchanting transition between spaces.
This thoughtfully designed arrangement mimics nature’s own layering patterns, offering continuous visual interest throughout the seasons. Spring bulbs emerge through low-growing ground covers, followed by summer perennials that burst with color, and finally, ornamental grasses that add movement and structure during fall and winter. The varying heights create depth and dimension, while different leaf shapes and flower forms contribute to a rich, garden tapestry.
Key Elements:
- Tall background plants (6+ feet)
- Medium-height plants (3-5 feet)
- Low-growing foreground plants (under 2 feet)
- Ground covers
- Ornamental grasses
- Spring bulbs
- Summer-blooming perennials
- Fall-interest plants
- Evergreen shrubs for structure
- Complementary color combinations
Begin the border design by establishing the back row with tall, architectural plants spaced according to their mature width. Plant medium-height specimens in curved, flowing groups of odd numbers, ensuring each group overlaps slightly with its neighbors.
Position shorter plants at the front in drifts, allowing them to spill naturally onto walking paths. Incorporate year-round interest by including at least 30% evergreen plants and choosing perennials with different blooming periods.
Maintain the layered border by regularly deadheading spent blooms and dividing overcrowded perennials every 3-4 years. Apply a thick layer of mulch in spring to suppress weeds and retain moisture, keeping the border looking neat while reducing maintenance needs.
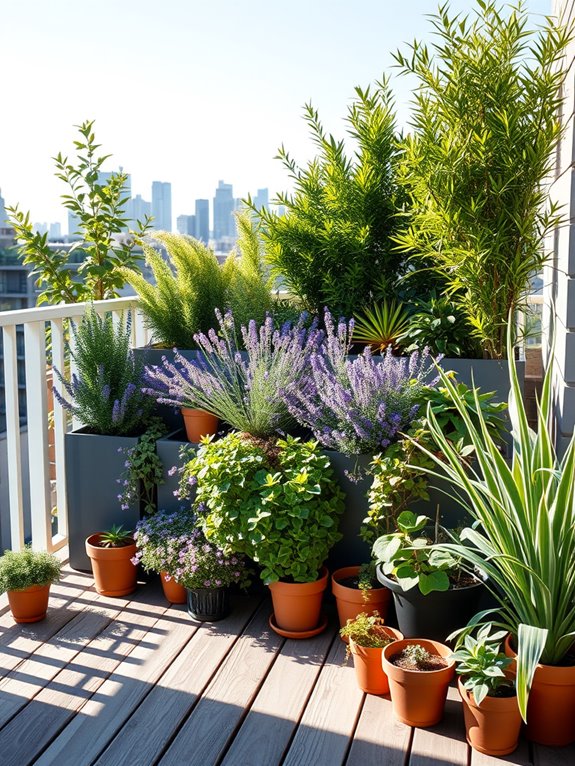
For smaller spaces or balcony gardens, adapt the layered concept using dwarf varieties and container gardening. Use tall containers at the back, medium-height pots in the middle, and trailing plants in front-row containers.
Consider vertical gardening elements like trellises or wall-mounted planters to maximize space and achieve the same layered effect in a compact area. Remember to group plants with similar water and light requirements together for easier maintenance.
Position Statement Trees Strategically
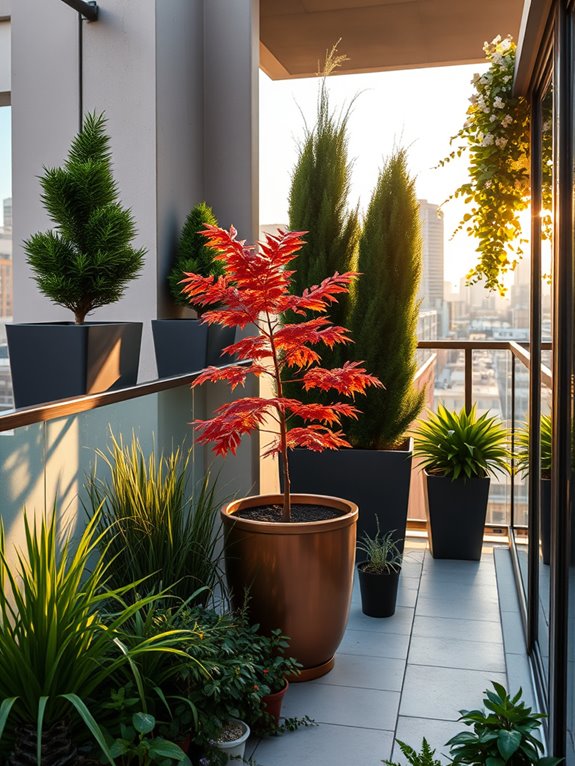
Trees stand as nature’s living architecture, creating an enchanting interplay of light and shadow throughout your garden space. Strategic tree placement transforms an ordinary yard into a thoughtfully composed landscape, where carefully selected specimens frame views, provide privacy screens, and create natural focal points. Flowering trees like dogwoods and Japanese maples offer seasonal drama, while evergreens provide year-round structure and establish the backbone of your garden’s design.
The art of positioning trees strategically extends beyond mere aesthetics – it’s about crafting outdoor rooms and controlling your garden’s microclimate. Deciduous trees planted along the southern exposure offer cooling shade in summer while allowing warming sunlight to penetrate during winter months. Creating layers of canopy heights develops visual depth, drawing the eye through the space while establishing distinct garden zones that flow naturally into one another.
Key Elements:
- Specimen trees for focal points
- Screen trees for privacy
- Shade trees for climate control
- Understory trees for layering
- Flowering trees for seasonal interest
- Evergreen trees for structure
- Root barriers
- Mulch rings
- Support stakes
- Irrigation system
When implementing strategic tree placement, begin by mapping your property’s sun patterns and identifying key viewpoints from both inside and outside your home. Allow adequate spacing between trees based on their mature size, typically 15-20 feet for medium-sized trees and 30+ feet for larger specimens.
Consider underground utilities and foundation distances, installing root barriers where necessary to protect structures. Create planting holes twice the width of the root ball and amend soil appropriately for each species.
For optimal growth, establish proper irrigation immediately after planting and maintain consistent moisture during the first growing season. Apply a 3-inch layer of mulch in a ring around each tree, keeping it away from the trunk to prevent rot. Stake young trees only if necessary, removing supports after one year to encourage strong root development.
Extra Tips: Adapt your tree strategy based on available space – smaller properties can utilize columnar varieties or multi-stemmed specimens to maximize vertical interest while minimizing horizontal spread. Consider dwarf varieties for tight spaces or container growing on balconies.
In urban settings, focus on pollution-tolerant species and those that provide habitat for local wildlife. Remember that trees take time to mature – plan for both immediate impact and long-term growth patterns when designing your space.
Build a Pergola-Framed Seating Area
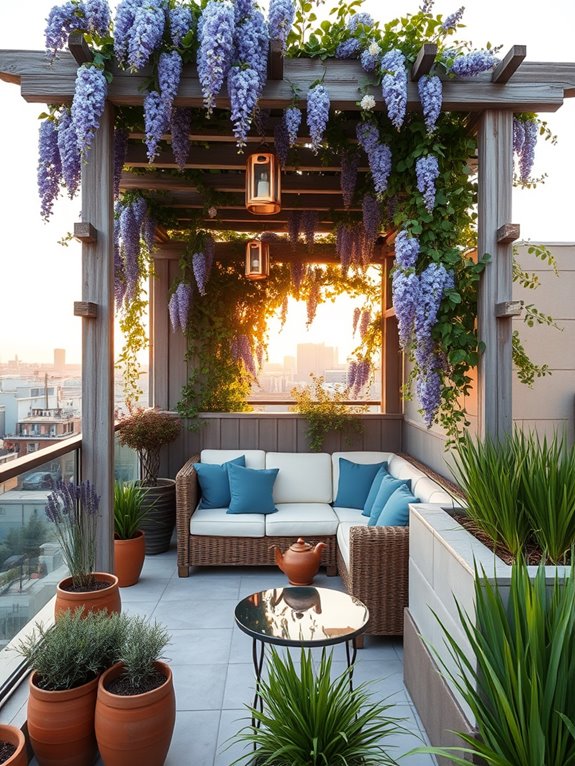
Transform your outdoor space into a captivating retreat with a pergola-framed seating area that combines architectural elegance with natural beauty. The sturdy wooden or metal framework creates a defined outdoor room, while climbing vines like wisteria, jasmine, or clematis weave their way up the posts and across the beams, providing a living ceiling that dapples sunlight and creates enchanting shadow patterns below.
Comfortable seating nestled beneath this natural canopy invites quiet contemplation or intimate gatherings. This garden sanctuary comes alive with strategic plantings that soften the pergola’s structural lines. Potted plants at the base of posts might include fragrant lavender, colorful salvias, or ornamental grasses that sway in the breeze.
String lights or lanterns suspended from the beams transform the space at dusk, creating a magical atmosphere perfect for evening entertainment while bordered beds filled with perennials provide seasonal color changes throughout the year.
Key Elements:
- Pergola structure (wood or metal)
- Climbing vines
- Outdoor seating (weather-resistant)
- Container plants
- Outdoor lighting
- Border plants
- Weather-resistant cushions and textiles
- Small side tables or surfaces
- Plant supports and training systems
- Irrigation system
Begin installation by selecting a level area with adequate drainage and preparing the ground for the pergola foundation. Install the main structure according to local building codes, ensuring posts are properly anchored and beams are level.
Position seating to maximize views and create conversation areas, leaving adequate pathways for movement. Install an irrigation system early in the process, and establish climbing plants at the base of posts with proper support systems to guide their growth.
Extra Design Tips: Consider the sun’s path when positioning your pergola to achieve desired shade levels throughout the day. For smaller spaces, opt for a lean-to pergola attached to an existing wall, or create a mini-version using corner posts only.
Incorporate retractable shade cloth for additional sun protection, and select appropriately scaled furniture that doesn’t overwhelm the space. In urban settings, use evergreen climbers for year-round privacy and consider incorporating built-in bench seating to maximize space efficiency.
Add Water Features as Focal Points
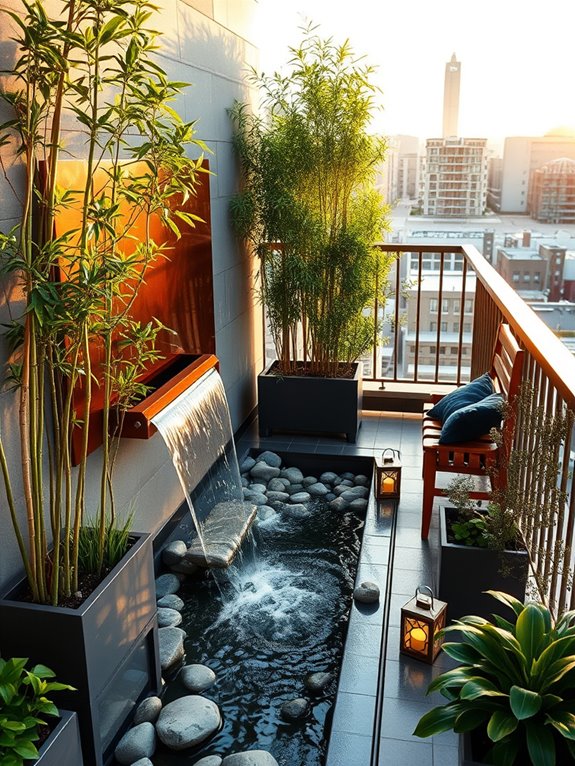
The gentle sound of cascading water creates an instant sanctuary in any garden space, transforming ordinary landscapes into tranquil retreats.
Whether it’s a dramatic tiered fountain commanding attention at the center of your garden or a subtle wall-mounted water feature nestled among climbing vines, water features serve as magnetic focal points that draw both the eye and spirit.
The interplay of light on moving water adds a dynamic element that changes throughout the day, while the soothing sounds mask urban noise and create a peaceful atmosphere.
Surrounding your water feature with moisture-loving plants like Japanese iris, water lilies, and ornamental grasses enhances the natural feeling while creating a cohesive design.
Strategic lighting can transform your water feature into a magical nighttime display, with underwater lights creating shimmering reflections and highlighting the water’s movement.
The combination of flowing water and carefully selected plantings creates a multi-sensory experience that makes your garden feel like a private oasis.
Essential Elements:
- Water feature (fountain, pond, or wall cascade)
- Submersible pump
- Water-resistant electrical outlet
- River rocks or decorative stones
- Moisture-loving plants
- Outdoor lighting
- Filter system
- Water treatment supplies
- Maintenance tools
- Weatherproof sealant
Installation begins with selecting an appropriate location that’s visible from key viewing areas and has access to electricity.
Ensure proper drainage by creating a stable base using gravel and sand, then install a waterproof liner if needed.
Position the pump and filter system according to manufacturer specifications, concealing cables and plumbing beneath rocks or plants.
Create depth and interest by varying the height of surrounding plants, with taller species behind the water feature and shorter ones in front.
When designing your water feature garden, consider the scale of your space and your maintenance capabilities.
For small balconies, wall-mounted features or compact tabletop fountains provide the benefits of moving water without overwhelming the space.
Choose self-contained units for easier maintenance, and incorporate automatic timers to control water flow and lighting.
In regions with freezing winters, select features that can be easily drained or protected, and use hardy plants that can withstand both moisture and seasonal changes.
Use Ornamental Grasses for Depth

Ornamental grasses dance and sway in the breeze, creating a mesmerizing display of movement and texture in the garden. Their feathery plumes catch the golden light of sunset, while their varied heights – from short Mexican feather grass to towering Miscanthus – create a natural rhythm that draws the eye through the space.
The architectural forms of these grasses provide year-round interest, from bright green spring growth to autumn’s warm golden hues, and even striking winter silhouettes against the snow.
When thoughtfully arranged, ornamental grasses transform an ordinary garden into a dynamic landscape that changes with the seasons. Purple Fountain Grass adds burgundy accents, while Blue Fescue creates pools of silvery-blue color. Combined with flowering perennials like Black-Eyed Susans or Purple Coneflowers, the grasses create a prairie-inspired haven that attracts butterflies and birds, making the space feel alive with natural energy.
Key Elements:
- Tall background grasses (Miscanthus, Pampas Grass)
- Medium-height grasses (Fountain Grass, Switch Grass)
- Low-growing grasses (Blue Fescue, Japanese Forest Grass)
- Complementary perennials
- Decorative rocks or boulders
- Mulch or gravel pathways
- Garden lighting
- Curved bed lines
- Container planters
Implementation begins with creating sweeping curves in your garden bed design, positioning taller grasses at the back or center of the space.
Plant grasses in odd-numbered groupings, spacing them according to their mature size to allow proper growth. Layer shorter varieties in front, creating drifts that mimic natural grasslands. Incorporate pathways that weave through the grasses, allowing visitors to experience their texture and movement up close.
Design adaptations can suit any space, from expansive yards to compact balconies. For small areas, focus on dwarf varieties in containers, arranging them at different heights using stands or tables.
Consider wind exposure when selecting species, as some grasses need protection while others thrive in breezy conditions. Maintain visual interest by mixing grasses with different flowering times, colors, and textures, and remember to cut back dead foliage in late winter before new growth emerges.
Frame Views With Garden Structures
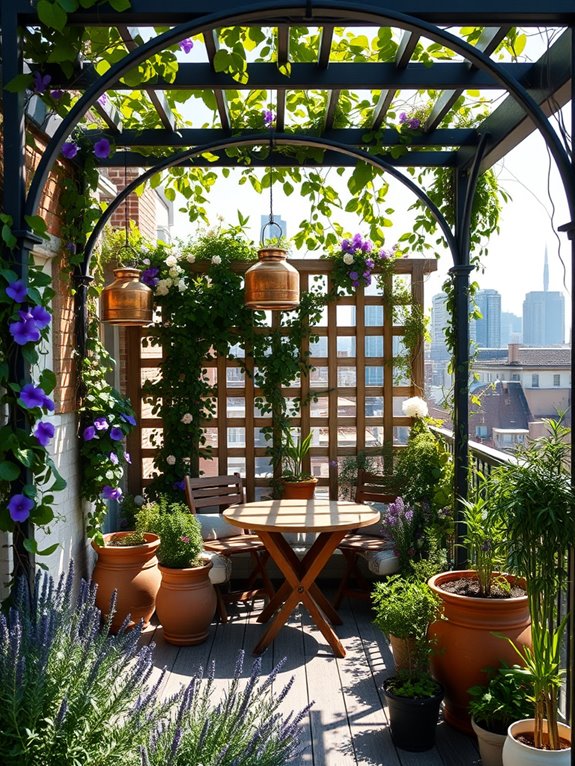
Framing garden views with strategic structures transforms an ordinary outdoor space into a series of captivating vignettes that draw the eye and create visual intrigue. Ornate archways draped with climbing roses, wisteria-covered pergolas, and decorative trellises work together to create enchanting portals that lead from one garden room to the next. These architectural elements add vertical interest while perfectly framing colorful flower beds, water features, or peaceful seating areas beyond.
The thoughtful placement of structures creates a sense of mystery and discovery as visitors move through the garden. A rustic wooden arbor might reveal a hidden herb garden, while an elegant metal arch could showcase a magnificent flowering tree or prized sculpture. The framed views act like living paintings, changing with the seasons as climbing vines mature and different plants come into bloom.
Key Elements:
- Arbors and archways
- Pergolas
- Decorative trellises
- Climbing vines and roses
- Strategic sight lines
- Focal points
- Garden rooms or sections
- Supporting structures
- Complementary plantings
- Pathway materials
Implementation begins with identifying key viewpoints and sight lines in your garden. Place structures where they’ll frame the most appealing features or create intrigue about what lies beyond. Install sturdy supports that can handle mature vine growth, ensuring proper anchoring and weather resistance.
Position climbing plants at the base of each structure, using ties or guides to train them as they grow. Create clear pathways that lead through or toward these framed views.
Extra tips: Consider the scale of structures relative to your space – smaller gardens benefit from more delicate frameworks while larger areas can support substantial architectural elements. For balcony gardens, use wall-mounted trellises or freestanding screens to create depth and frame views of surrounding landscapes.
Weather-resistant materials like powder-coated metal or cedar ensure longevity, while modular systems allow for future modifications as your garden evolves. Paint structures dark colors to make them recede visually, or choose bold colors to make them focal points themselves.