
8 Garden Ideas for a Geometric Layout
Like pieces of a living puzzle, geometric garden designs transform ordinary outdoor spaces into stunning architectural showcases. You’ll discover how crisp lines, repeating shapes, and balanced proportions can bring order and sophistication to your landscape through eight distinct approaches. From classic French parterres to modern grid layouts, these geometric patterns offer both visual drama and practical functionality. Let’s explore how these structured designs can revolutionize your garden’s potential.
Contents
- 1 Symmetrical Parterre Gardens With Box Hedging
- 2 Circular Pathways and Radial Bed Designs
- 3 Modern Grid Pattern Planting Layouts
- 4 Geometric Water Features and Reflection Pools
- 5 Diamond-Shaped Raised Bed Arrangements
- 6 Hexagonal Paving and Planting Zones
- 7 Triangular Terraced Garden Levels
- 8 Interlocking Square Garden Rooms
Symmetrical Parterre Gardens With Box Hedging
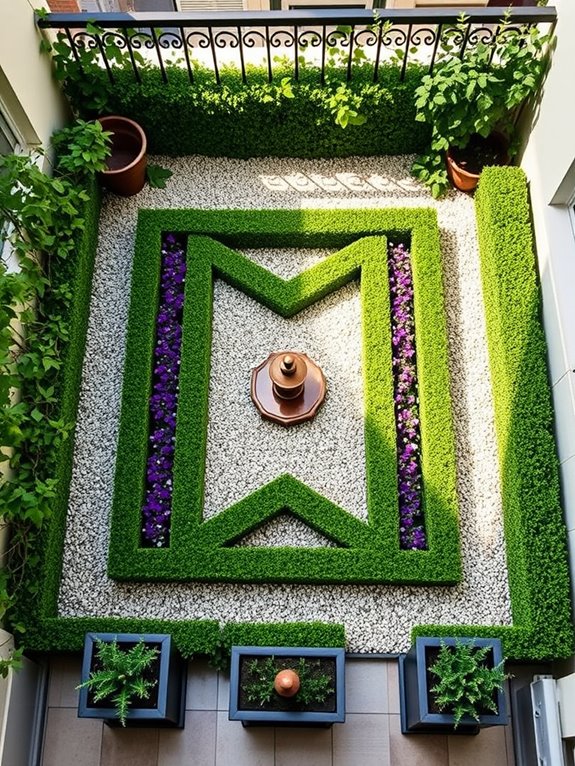
A symmetrical parterre garden with box hedging transforms any outdoor space into a masterpiece of classical elegance. Low-growing Buxus sempervirens hedges create intricate geometric patterns – mirror-image squares, diamonds, and scrolling curves that weave together like an ornate carpet spread across the ground.
These precise green lines frame beds filled with seasonal color: lavender stems swaying in summer breezes, white alyssum spilling over edges, and deep purple salvias standing at attention.
The formal beauty of a parterre garden captivates viewers from both ground level and above, offering different perspectives of its mathematical harmony. Gravel pathways intersect the design, their soft crunch underfoot adding to the sensory experience. Centered fountains or classical statuary serve as focal points, while meticulously trimmed box hedging maintains clean lines that look spectacular in every season, even when dusted with winter frost.
Key Elements:
- Box (Buxus) hedging plants
- Geometric design template
- Gravel pathways
- Seasonal flowering plants
- Central focal point (fountain/statue)
- Edge borders
- Quality topsoil
- Irrigation system
- Metal or wooden edging materials
- Mulch
- Pruning tools
Creating a parterre garden begins with careful planning and precise measurement. Draw your design on paper first, using graph paper to ensure symmetry, then transfer it to the ground using string lines and stakes.
Plant box hedging plants 12 inches apart along marked lines, ensuring soil is well-prepared with organic matter. Install a reliable irrigation system before planting, as consistent watering is crucial for establishing and maintaining healthy hedges.
Maintenance requires dedication to regular pruning, typically every 6-8 weeks during growing season, to maintain crisp lines and prevent the box hedging from becoming leggy. Clip hedges to a consistent height of 12-18 inches, keeping the top slightly narrower than the base to allow light to reach all parts of the plant.
Fill interior beds with flowering plants that complement your design’s formality while providing seasonal interest.
For smaller spaces or balconies, consider creating a miniature parterre using dwarf box varieties or alternative compact evergreens like germander or lavender. The design can be scaled down while maintaining the essential geometric principles – even a 4×4 foot space can accommodate a simple knot garden pattern.
Container-grown parterres offer flexibility and can be arranged symmetrically on patios, incorporating portable water features and potted topiary to complete the formal look.
Circular Pathways and Radial Bed Designs
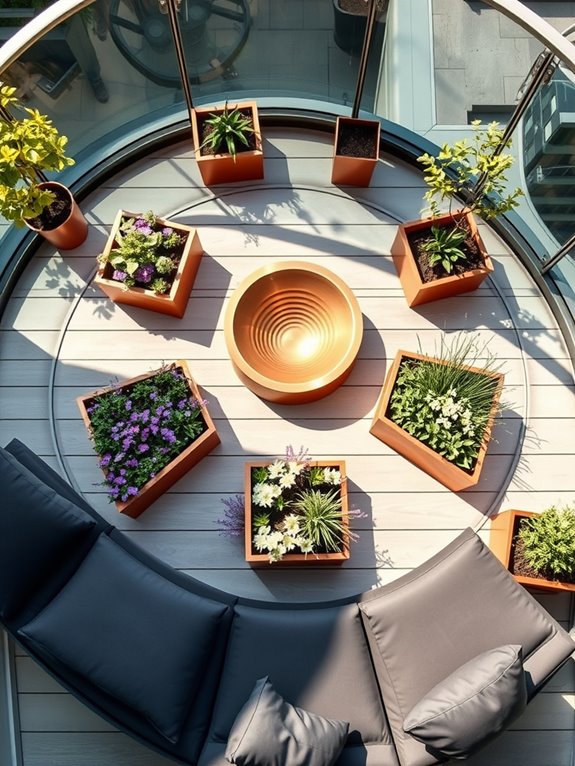
Gracefully sweeping circular pathways create an enchanting journey through the garden, drawing the eye inward toward a central focal point while leading visitors on a mesmerizing exploration. These rounded paths, crafted from materials like crushed granite or natural flagstone, curve elegantly between raised flower beds that radiate outward like the spokes of a wheel. Purple salvias, white echinacea, and yellow rudbeckia cascade over the edges of these wedge-shaped beds, creating a kaleidoscope of color that changes as one moves along the circular route.
The radial design transforms an ordinary garden into a sophisticated outdoor sanctuary where geometric precision meets natural beauty. A central water feature or sculptural element anchors the space, while carefully planned sight lines create dramatic views from every angle. Ornamental grasses like blue fescue and Mexican feather grass add movement and texture, swaying gently in the breeze as visitors follow the curved pathways through this thoughtfully orchestrated space.
Key Elements:
- Circular main pathway
- Radial bed segments
- Central focal point (fountain, statue, or specimen plant)
- Edge plants for path definition
- Geometric plant groupings
- Contrasting pathway materials
- Height-graduated plantings
- Accent lighting
- Border definition elements
- Curved bench seating
The implementation begins with establishing the central point and marking the primary circle using stakes and string. Divide the circle into equal segments using basic geometry, creating wedge-shaped beds that radiate outward.
Layer plants within each segment, placing taller specimens toward the center and gradually decreasing height toward the outer edges. Install pathway materials with proper drainage and grade, ensuring smooth transitions between surfaces.
When maintaining this design, regular pruning of border plants prevents pathway encroachment while preserving clean lines. Consider installing permanent edging between beds and paths to maintain crisp boundaries and prevent soil erosion.
Create planting zones within each radial segment to simplify maintenance routines and ensure consistent visual impact throughout the seasons.
For smaller spaces or balconies, this design can be adapted by using quarter-circles or semi-circles against walls or railings. Consider vertical elements to maximize space, such as climbing plants on trellises arranged in curved patterns.
Mini versions can incorporate container gardens arranged in circular patterns, with dwarf varieties of plants maintaining the same geometric principles on a reduced scale. Use lighter-weight materials for pathways, such as recycled rubber pavers or wooden decking, to accommodate weight restrictions on elevated surfaces.
Modern Grid Pattern Planting Layouts
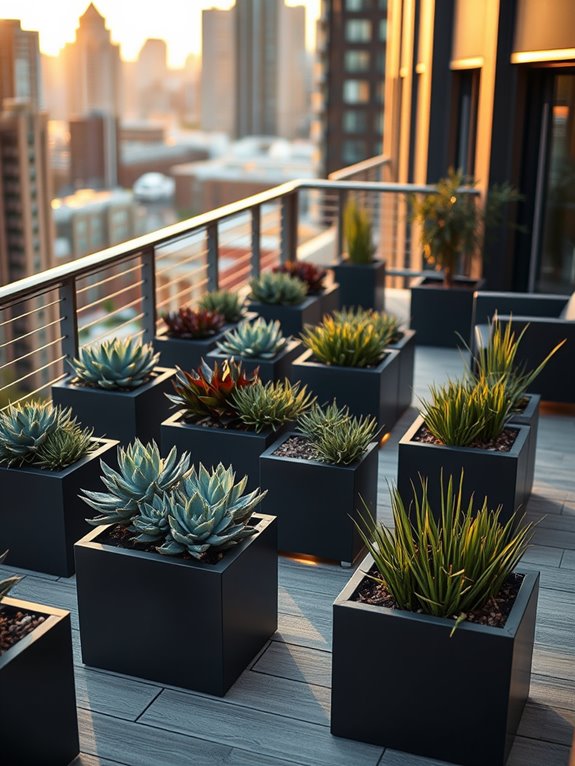
A modern grid pattern planting layout transforms your garden into a striking geometric masterpiece, where clean lines and repeated patterns create a sense of order and visual rhythm. Square or rectangular beds, arranged in precise mathematical formations, showcase carefully selected plants that complement the structured design. Ornamental grasses stand like living sculptures, while boxwood hedges and structural succulents maintain crisp edges that define each geometric space.
The interplay of height, texture, and color within each grid section creates a dynamic yet controlled landscape that appeals to our desire for symmetry and organization. Low-growing sedums and creeping thyme fill ground-level squares, while vertical elements like bamboo or tall perennials occupy strategic grid positions. The negative space between plantings becomes as important as the plants themselves, creating a sophisticated chess-board effect that’s both modern and timeless.
Key Elements:
- Graph paper or garden planning software
- String lines and stakes for marking grid
- Square or rectangular planting beds
- Geometric pavers or stepping stones
- Edge restraints or metal edging
- Uniform plant groupings
- Angular containers
- Modern lighting fixtures
- Minimalist garden furniture
- Irrigation system
To implement this design, begin by creating a scale drawing of your space divided into equal squares or rectangles, typically 2-4 feet wide. Mark your grid pattern on the ground using stakes and string, ensuring perfect right angles. Install edge restraints along the grid lines, then prepare individual bed sections with appropriate soil and drainage.
Select plants for each grid section based on height, maintaining taller specimens toward the back or center and shorter plants along the edges for clear visual definition. When selecting plants, consider their mature size to maintain the grid’s clean lines. Choose specimens that naturally grow in geometric shapes or can be easily trimmed to maintain form.
Install an irrigation system before planting, ensuring each grid section receives appropriate water coverage. Consider incorporating different levels using raised beds or sunken areas to add dimensional interest while maintaining the grid pattern.
For adaptation to different spaces, scale your grid proportionally to your available area. Smaller balconies can utilize miniature grids with compact plantings or container arrangements that mirror the larger concept. Consider vertical grid patterns using wall-mounted planters or trellises for limited spaces.
In larger areas, incorporate pathways that follow the grid pattern, using materials that echo the geometric theme. Always factor in maintenance requirements – smaller grids mean more edges to maintain, while larger sections require less frequent trimming but may lose some of the detailed pattern impact.
Geometric Water Features and Reflection Pools

Geometric water features and reflection pools transform ordinary garden spaces into mesmerizing sanctuaries where clean lines meet liquid serenity. Mirror-like surfaces of rectangular or circular pools create striking reflections of surrounding architectural elements, while precise geometric fountains add dynamic movement through carefully positioned water jets.
The interplay of light on water surfaces amplifies the geometric patterns, particularly when bordered by structured plantings of boxwood hedges, Japanese forest grass, or perfectly spaced horsetail reed. The combination of still water and architectural elements generates a sophisticated atmosphere that bridges modern design with classical garden principles.
Strategic lighting beneath the water’s surface or along pool edges extends the garden’s dramatic appeal into evening hours, while the gentle sound of flowing water from cubic fountains or cascading geometric tiers provides a soothing acoustic backdrop. The careful placement of angular planters containing water lilies or lotus flowers adds organic elements while maintaining geometric integrity.
Key Elements:
- Rectangular or circular reflection pool
- Geometric fountain features
- LED underwater lighting
- Angular stone or concrete edging
- Structured border plants
- Water filtration system
- Modern planters
- Geometric paving patterns
- Level base surface
- Weather-resistant seating
Implementation requires careful planning of the water feature’s location, ensuring proper drainage and structural support. Begin by creating a perfectly level foundation using concrete or compacted gravel, then install a high-quality liner or pre-formed pool shell.
Position filtration systems discreetly while ensuring easy maintenance access. Install lighting fixtures during construction, running electrical conduits beneath paving to maintain clean lines. When selecting materials, choose those that complement your home’s architecture while providing durability against water exposure.
Consider incorporating automated systems for water level maintenance and lighting control. Position seating areas to maximize views of reflective surfaces while maintaining practical circulation paths around the water feature.
Design Adaptations: For smaller spaces, consider wall-mounted geometric fountains or raised reflection pools that double as seating edges. Ensure proper scale by limiting water feature size to one-third of the available space.
In areas with strict weight restrictions, explore lightweight materials and shallow water depths. Consider incorporating mirrors behind vertical water features to amplify the sense of space and reflection, particularly effective in confined areas or balcony gardens.
Diamond-Shaped Raised Bed Arrangements
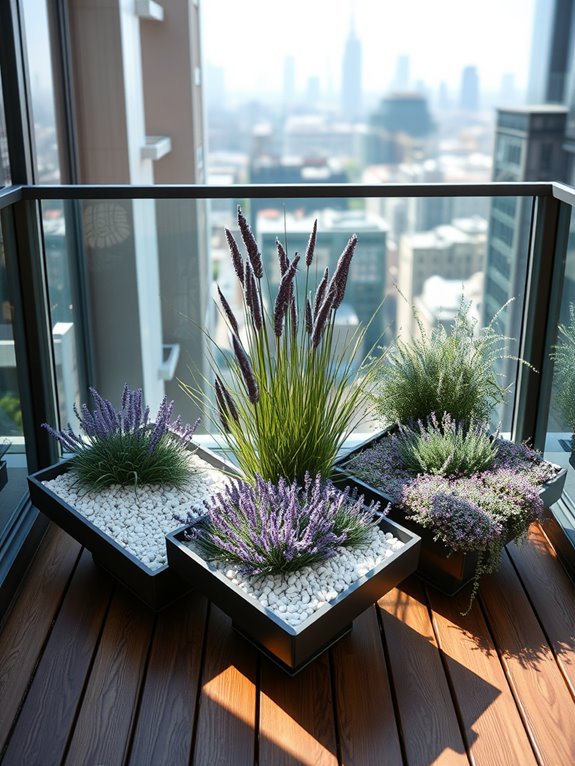
Diamond-shaped raised beds create a striking visual pattern that transforms an ordinary garden into a sophisticated geometric masterpiece. The angular design draws the eye naturally through the space, while the raised edges add depth and dimension to your garden landscape.
When planted with alternating heights of ornamental grasses, flowering perennials, and compact shrubs, these diamond formations create a mesmerizing tapestry of colors and textures that change with each season.
The beauty of diamond-shaped arrangements lies in their versatility and modern appeal. Whether filled with aromatic herbs like lavender and thyme along the edges, or showcasing statement plants like purple fountain grass and Russian sage in the centers, these geometric beds offer endless creative possibilities.
The negative space between the diamonds becomes an integral part of the design, especially when filled with light-colored gravel or stepping stones that contrast with the lush plantings.
Key Elements:
- Raised bed frame materials (wood, metal, or stone)
- Soil mix for raised beds
- Multi-level plants (tall, medium, and ground cover)
- Edging materials
- Gravel or stepping stones for pathways
- Irrigation system
- Garden stakes and string for layout
- Level and measuring tape
- Landscape fabric
- Decorative mulch
To implement this design, start by marking out your diamond shapes using garden stakes and string, ensuring each diamond has equal angles and sides. Standard diamonds should measure 6-8 feet on each side for adequate planting space.
Install landscape fabric before constructing the raised bed frames, then fill with quality soil mix. Arrange plants with taller specimens in the center, gradually decreasing height toward the edges. Create clear pathways between diamonds using gravel or stepping stones, ensuring adequate space for maintenance access.
When designing your diamond garden, consider sun exposure and drainage patterns. Adapt the size of diamonds to your available space – smaller 4-foot diamonds work well for compact yards or balconies, while larger spaces can accommodate grander arrangements.
Incorporate automatic irrigation systems during construction, and use consistent mulching materials to unite the design. For balcony gardens, consider creating a single diamond as a focal point, or use multiple smaller diamonds in lightweight materials that can be easily moved or reconfigured.
Hexagonal Paving and Planting Zones
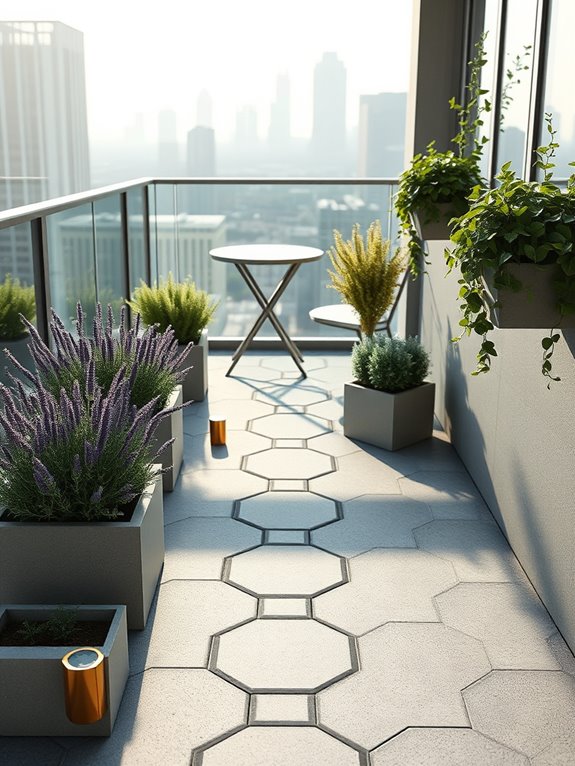
Interlocking hexagonal pavers create a striking honeycomb pattern that transforms an ordinary garden into a modern geometric masterpiece. The clean lines of gray or sandstone pavers contrast beautifully with lush plantings that emerge from hexagonal beds, creating a balanced interplay between structured hardscaping and organic growth.
Lavender, ornamental grasses, and compact boxwood shrubs fill these angular spaces, their natural forms softening the geometric edges while maintaining the garden’s contemporary appeal.
The hexagonal design naturally creates distinct planting zones that can host different botanical themes – from Mediterranean herbs to native wildflowers, each section becoming its own micro-garden within the larger space. This modular approach allows for creative plant combinations while maintaining a cohesive overall design.
Solar-powered ground lights installed at intersection points illuminate the honeycomb pattern at night, creating an enchanting atmosphere that highlights both the structural elements and plant silhouettes.
Key Elements:
- Hexagonal concrete or natural stone pavers
- Raised planting beds in hexagonal shapes
- Edge restraints and landscape fabric
- Drought-tolerant plants and ornamental grasses
- Ground-level lighting fixtures
- Crushed stone or sand for paver base
- Modern planters for accent points
- Irrigation system components
Implementation requires careful planning, starting with a scaled drawing to determine the optimal size of hexagons for your space.
Begin by preparing the ground with proper grading and installing a compacted base of crushed stone. Lay the pavers in a honeycomb pattern, using edge restraints to maintain stability. Create planting zones by either raising certain hexagonal sections or removing pavers to establish planting beds, ensuring proper drainage and soil depth for selected plants.
The key to successful maintenance lies in choosing plants that won’t overwhelm the geometric structure. Select specimens that naturally maintain compact growth habits or respond well to regular pruning.
Install an efficient drip irrigation system during the initial construction phase, with separate zones for different plant types.
When adapting this design for different spaces, consider scaling the hexagon size to match your area – smaller hexagons work well in compact gardens or balconies, while larger ones create bold statements in spacious yards.
For balconies, use lightweight composite pavers and containerized plantings that can be easily moved. Consider vertical elements by incorporating hexagonal wall planters or trellises to maximize limited space, and choose plants that thrive in your specific light conditions and exposure levels.
Triangular Terraced Garden Levels
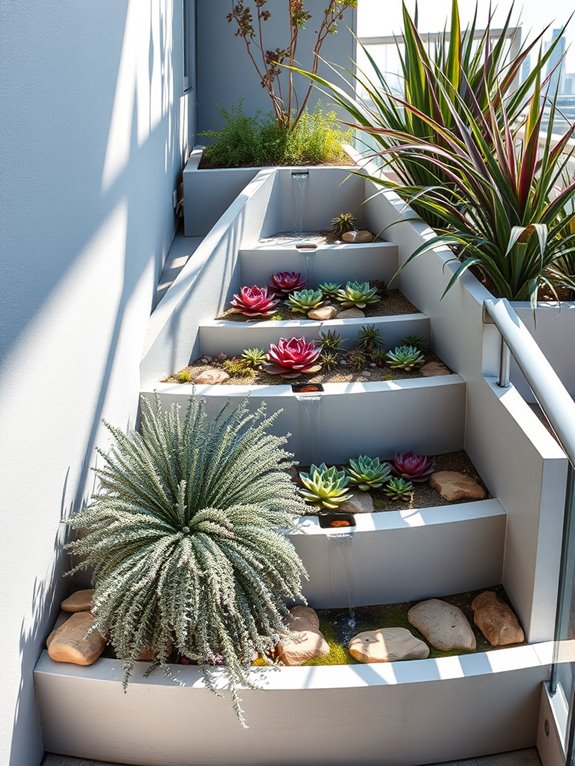
A triangular terraced garden creates a striking visual impact through its bold geometric layers that cascade downward in perfect symmetry. The angular design draws the eye upward while creating distinct planting zones that appear to float above one another.
Mediterranean herbs like lavender and rosemary spill over the edges of each terrace, their silver-green foliage contrasting beautifully with the clean lines of the hardscaping. Drought-tolerant succulents add architectural interest at each level, while ornamental grasses provide movement and texture.
The ascending triangular platforms offer an innovative solution for maximizing growing space while creating an artistic focal point. Each level can showcase different plant collections – perhaps starting with shade-loving ferns at the base, transitioning to sun-loving flowering perennials in the middle, and featuring alpine plants at the summit.
Stone or concrete retaining walls between levels can be enhanced with built-in lighting to create dramatic evening shadows and highlight the geometric patterns.
Key Elements:
- Retaining wall materials (stone, concrete, or timber)
- Drainage system for each level
- Irrigation setup
- Quality topsoil
- Plant selection for each tier
- Lighting fixtures
- Access steps or pathways
- Edge protection
- Mulch or ground cover
- Support structures for trailing plants
Creating triangular terraces requires careful planning and construction to ensure stability and proper drainage. Begin by marking out the footprint of each level, ensuring the base is completely level and properly compacted.
Install drainage pipes or gravel layers behind each retaining wall before backfilling with soil. The walls should angle slightly inward (about 1 inch per foot of height) to resist soil pressure. Space the terraces to allow comfortable access for maintenance, typically 2-3 feet in depth per level.
Design considerations should include climate conditions, sun exposure, and maintenance requirements. For smaller spaces or balconies, consider using modular planters arranged in a triangular pattern, or create mini-terraces using stepped containers.
Soil depth should be adjusted based on plant selection – shallow-rooted plants like herbs need only 6-8 inches, while larger perennials require 12-18 inches. Factor in mature plant sizes when spacing, and consider incorporating automatic irrigation to simplify maintenance on multiple levels.
Interlocking Square Garden Rooms
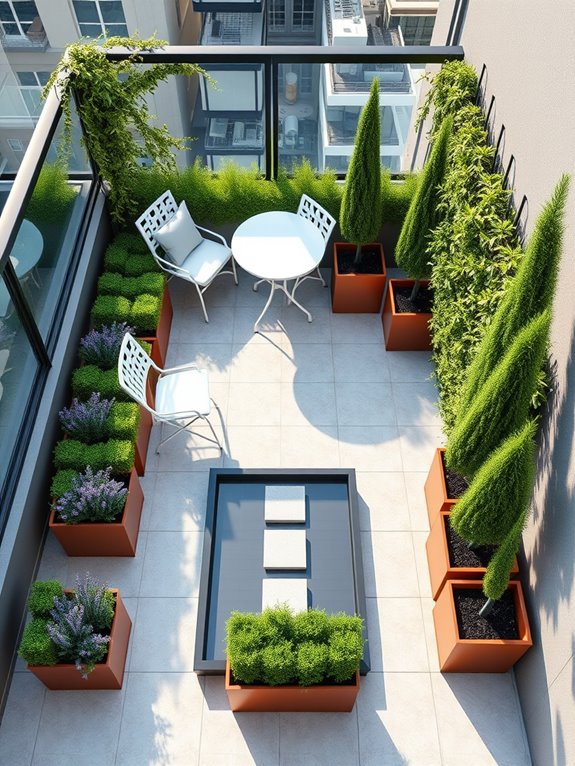
Interlocking square garden rooms create a mesmerizing tapestry of geometric precision, where carefully plotted spaces flow seamlessly into one another like an elegant architectural puzzle. Each square room serves as its own distinct habitat, yet connects harmoniously with adjacent spaces through shared pathways, repeated plant varieties, or complementary color schemes.
Boxwood hedges frame these rooms with crisp, clean lines while climbing roses cascade over metal archways that mark transitions between spaces.
The mathematical beauty of this design creates an enchanting journey through various garden experiences – from a serene meditation square filled with white flowering plants like candytuft and moon flowers, to a vibrant entertaining space featuring geometric containers bursting with colorful salvias and lavender.
Stone pathways intersect at precise right angles, leading visitors through these distinct yet interconnected outdoor rooms, each revealing its own character and purpose.
Key Elements:
- Boxwood or similar hedging plants for room divisions
- Metal archways or pergolas for transitions
- Stone or brick pathways
- Square or rectangular planters
- Geometric water features
- Corner accent plants
- Matching garden furniture sets
- Symmetrical lighting fixtures
- Repeated plant varieties
- Angular topiaries
To implement this design, begin by sketching a grid pattern that divides your available space into proportional squares or rectangles.
Install the foundational hedging first, creating clear boundaries between rooms while maintaining consistent heights. Establish primary pathways that intersect at right angles, using materials that complement your home’s architecture.
Position architectural features like arches or pergolas at key transition points between rooms, ensuring they align perfectly with the pathways.
Plant selection and placement should reinforce the geometric theme while providing year-round interest. Position larger specimens in corners where they can anchor the space, and repeat certain plants throughout different rooms to maintain visual continuity.
Install irrigation systems before completing the final planting to ensure easy maintenance of all areas.
For smaller spaces or balconies, this concept can be scaled down using container gardens arranged in geometric patterns, with mini hedges in rectangular planters defining separate areas.
Consider vertical elements like espaliered trees or climbing plants on trellises to maximize space usage. Using mirrors strategically can create the illusion of extended space, while maintaining the geometric principles that make this garden style so striking.
Light-colored paving and strategic lighting can help smaller spaces feel more expansive while preserving the formal, structured aesthetic.