
7 Garden Ideas for Stunning Spring Displays
You’ll transform your spring garden from ordinary to extraordinary with these seven creative display ideas. As winter fades, your outdoor space can burst with layered colors, textured containers, and eye-catching structural elements that draw the eye upward and outward. Whether you’re working with a compact urban patio or sprawling suburban lot, these design strategies combine practical growing techniques with artistic arrangements. Let’s explore how you can craft a garden that captivates from the first crocus to the last late-spring bloom.
Contents
- 1 Create a Layered Bulb Garden for Continuous Blooms
- 2 Design Eye-Catching Container Combinations
- 3 Build a Spring-Blooming Border Garden
- 4 Install Garden Structures for Climbing Plants
- 5 Plan a Cottage Garden Color Scheme
- 6 Incorporate Water Features Among Spring Flowers
- 7 Add Architectural Elements for Year-Round Interest
Create a Layered Bulb Garden for Continuous Blooms
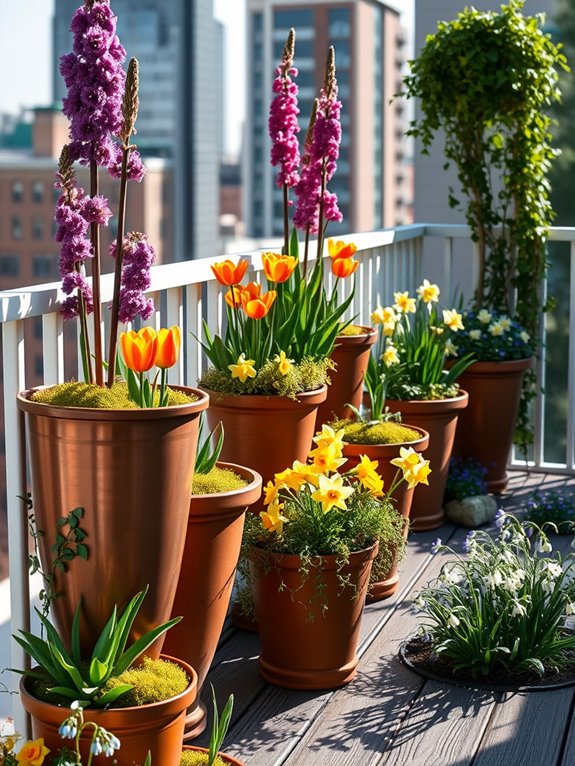
A layered bulb garden creates a mesmerizing symphony of colors that unfolds throughout the spring season, beginning with delicate snowdrops and crocuses pushing through late winter frost, followed by cheerful daffodils and tulips dancing in the spring breeze. This clever planting technique transforms ordinary garden beds into a living canvas that changes weekly, as different layers of bulbs emerge in succession, creating an ever-evolving display of botanical beauty.
The garden’s visual depth comes from strategically planted bulbs at varying heights and bloom times, with tall, majestic alliums creating purple spheres that float above mid-height tulips in sunset hues, while ground-level muscari creates a carpet of blue beneath. This layered approach maximizes limited space while providing a rich tapestry of textures and colors that naturally complement each other as the season progresses.
Key Elements:
- Spring bulbs of varying heights (snowdrops, crocus, daffodils, tulips, alliums)
- Well-draining soil
- Organic bulb fertilizer
- Garden trowel or bulb planter
- Layer marking stakes
- Mulch
- Container or garden bed with minimum 12-inch depth
- Bulb storage solutions for summer
To create a successful layered bulb garden, begin by preparing well-draining soil in autumn, at least six weeks before the first frost. Plant bulbs in layers, starting with the largest and latest-blooming varieties at the bottom (usually alliums and late tulips at 8-10 inches deep), followed by mid-season bulbs like daffodils and early tulips at 6-8 inches, and finally early-spring bulbs like crocus and snowdrops at 3-4 inches deep.
Place bulbs slightly closer together than typically recommended, as they’ll bloom at different times and won’t compete for space. After planting, water thoroughly and apply a layer of mulch to protect the bulbs through winter. When spring arrives, maintain consistent moisture but avoid overwatering, which can cause bulb rot. Once blooms fade, allow foliage to die back naturally to feed the bulbs for next year’s display.
Design Adaptations: For small spaces or balconies, create miniature versions in deep containers using the same layering principle but with fewer bulbs. Choose dwarf varieties for smaller spaces, and consider using clear-sided containers to showcase the layering effect. In warmer climates, pre-chill bulbs in the refrigerator for 6-8 weeks before planting, and in areas with heavy spring rainfall, incorporate extra drainage material at the bottom of containers or raised beds to prevent waterlogging.
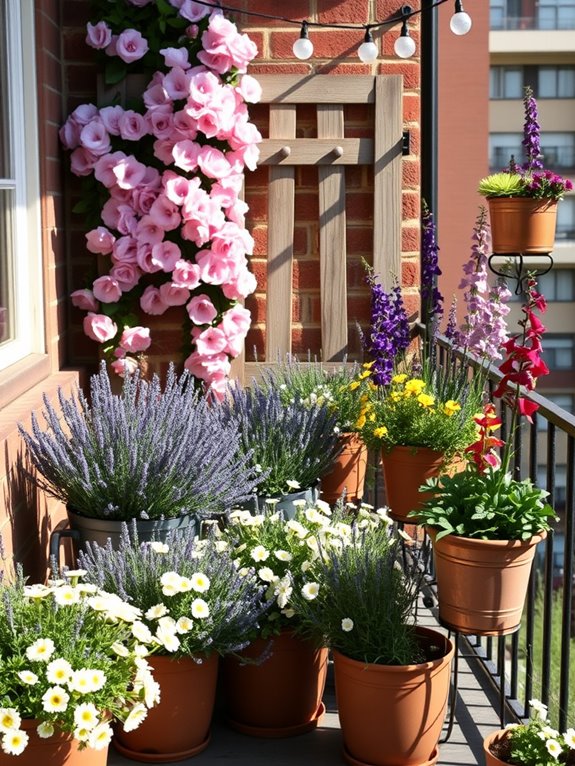
Design Eye-Catching Container Combinations
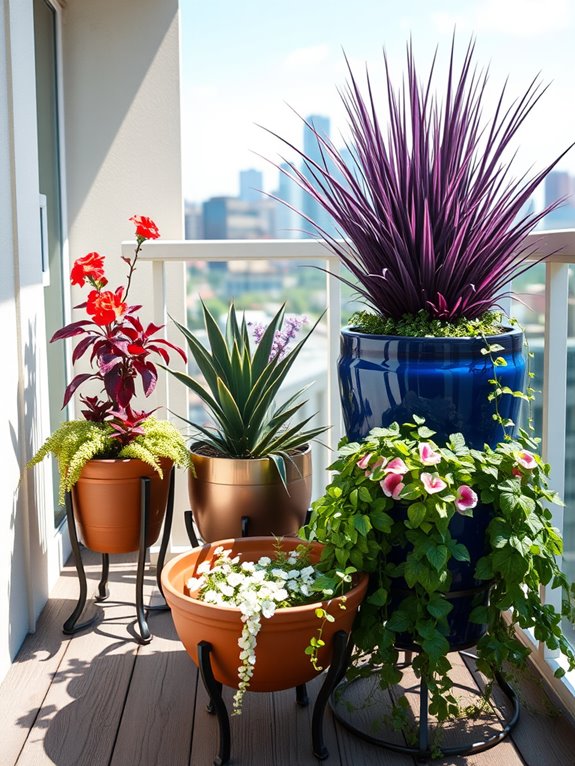
Container combinations burst with creative potential, offering a symphony of colors, textures, and heights that draw the eye and create instant focal points in any garden space. Thoughtfully arranged pots featuring thriller plants like purple fountain grass or canna lilies rise dramatically from the center, while cascading calibrachoa and trailing ivy spill gracefully over the edges.
The interplay between upright snapdragons, mounding geraniums, and spreading petunias creates a lush, layered effect that brings professional polish to patios, porches, and garden beds. These living arrangements become dynamic sculptures that change throughout the growing season, offering fresh visual interest as different plants reach their peak bloom times.
By combining plants with varying growth habits and complementary colors – perhaps pairing deep purple Persian shield with chartreuse sweet potato vine and pink million bells – each container becomes a miniature garden that tells its own story. The possibilities are endless, from monochromatic white gardens that glow in evening light to bold tropical displays that transport viewers to exotic locations.
Key Elements:
- Large containers with drainage holes
- Quality potting soil
- Thriller plants (tall, upright specimens)
- Filler plants (mounding, medium height)
- Spiller plants (trailing varieties)
- Slow-release fertilizer
- Decorative mulch
- Container feet or risers
- Watering can or irrigation system
- Plant supports or stakes
Start by selecting containers that complement your space and ensure proper drainage. Position them in their final location before filling, as they’ll become heavy once planted. Layer the bottom with a few inches of lightweight drainage material, then add high-quality potting mix.
Follow the “thriller, filler, spiller” principle: place your tallest, most dramatic plant slightly off-center, surround it with medium-height plants that add mass, and finish with trailing plants around the edges. Space plants more closely than you’d in garden beds, as containers need immediate impact.
For maintenance, water thoroughly when the top inch of soil feels dry, and feed regularly with a balanced fertilizer. Trim spent blooms and yellowing foliage to maintain appearance and encourage continued flowering. Monitor for signs of stress or crowding, and be prepared to replace seasonal plants as needed to maintain visual interest.
Container gardens adapt beautifully to any space – for smaller balconies, focus on vertical interest with narrow upright containers and climbing plants, while larger areas can accommodate grouped arrangements at varying heights. Consider using lightweight containers and wheels for heavy pots that may need to be moved.
In wind-prone areas, ensure containers are sufficiently weighted and plants are well-supported. For year-round appeal, incorporate evergreen specimens as anchor plants and rotate seasonal bloomers around them.
Build a Spring-Blooming Border Garden
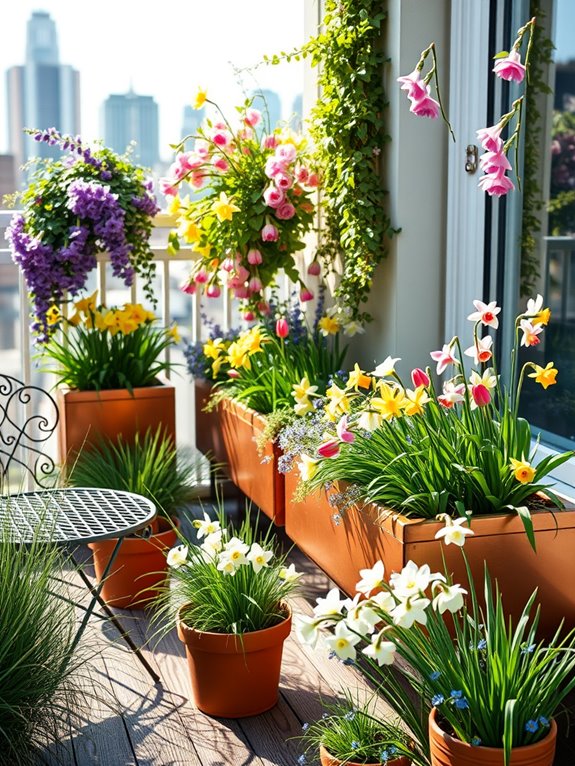
Transform your garden edge into a captivating spring spectacle with a thoughtfully designed border garden that unfolds in waves of color and texture.
Picture delicate daffodils swaying alongside vibrant tulips, while clusters of grape hyacinths create pools of purple beneath flowering cherry trees. Early bloomers like snowdrops and crocuses peek through the last remnants of winter, followed by the graceful nodding heads of hellebores and the cheerful faces of pansies, creating a dynamic progression of blooms that celebrates the season’s arrival.
The border’s layered design provides visual intrigue from ground level to eye height, with low-growing primroses and cushion spurge forming a lush groundcover, while mid-height bleeding hearts and columbines add architectural interest.
Tall bearded iris and fritillaria stand as natural exclamation points, drawing the eye upward and creating rhythm throughout the space. Strategic placement of ornamental features like antique watering cans, weathered stone paths, or artistic plant markers adds personality and year-round structure to the display.
Key Elements:
- Early spring bulbs (snowdrops, crocus, daffodils, tulips)
- Mid-spring perennials (hellebores, bleeding heart, columbine)
- Ground cover plants (primrose, creeping phlox)
- Flowering shrubs (dwarf cherry, forsythia)
- Decorative hardscape elements
- Garden edging material
- Quality soil amendments
- Mulch
- Plant markers
- Watering system
Implementation begins with thorough soil preparation in fall, incorporating organic matter and positioning spring bulbs according to height, with tallest varieties at the back of the border.
Layer bulb plantings at varying depths to create successive waves of bloom. In early spring, add perennials and shrubs, maintaining a minimum of 18 inches between plants to allow for growth.
Install edging material to define the space and contain mulch, which helps retain moisture and suppress weeds.
Ensure successful border gardening by considering mature plant sizes and bloom times when planning your layout.
For smaller spaces or balconies, focus on dwarf varieties and container-friendly bulbs, using tiered planters to maximize vertical space.
Consider incorporating climbing varieties on trellises for additional visual interest, and remember that even compact borders can create stunning displays when carefully planned with complementary color schemes and varying bloom times.
Install Garden Structures for Climbing Plants
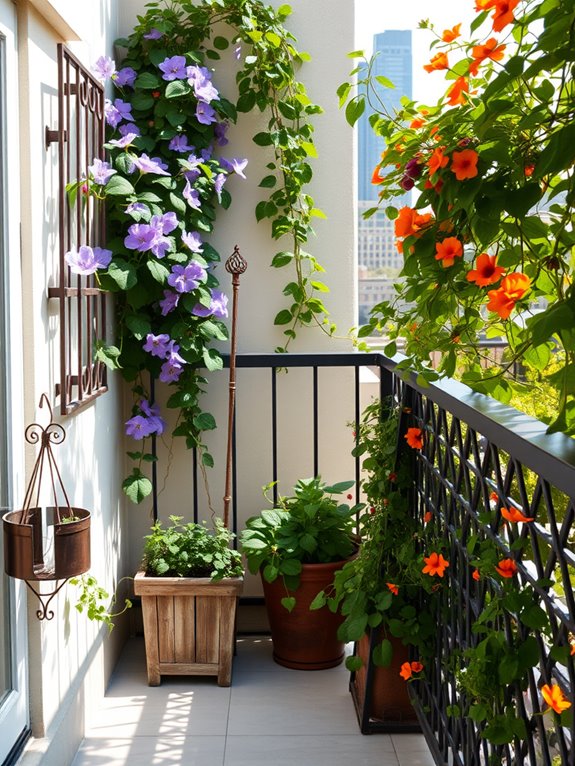
Transform your garden into a vertical paradise with graceful climbing structures that create living walls of color and texture. Elegant trellises, arches, and pergolas provide the perfect framework for cascading wisteria, climbing roses, and twining clematis, turning ordinary garden spaces into enchanting green sanctuaries. The vertical elements add dramatic height and depth, creating natural privacy screens while drawing the eye upward to appreciate the full scope of your outdoor sanctuary.
These garden structures become architectural focal points that evolve throughout the seasons, offering support for an ever-changing display of blooms and foliage. Morning glories greet the dawn with their vibrant trumpet flowers, while moonflowers unfurl their pristine white petals at dusk. Climbing hydrangeas clothe sturdy pergolas in layers of lacecap flowers, while jasmine fills evening air with its intoxicating fragrance.
Essential Elements:
- Sturdy trellises (wood or metal)
- Garden arches or arbors
- Pergola structures
- Climbing plant supports and ties
- Wire mesh or lattice panels
- Plant climbing rings and clips
- Selection of climbing plants
- Ground anchors and mounting hardware
- Weather-resistant paint or sealant
- Decorative finials or caps
Installing garden structures requires careful planning and proper anchoring for long-term stability. Begin by selecting locations that receive appropriate sunlight for your chosen climbing plants and provide adequate space for mature growth. Ensure all structures are firmly secured in the ground using concrete footings or ground anchors, and treat wooden elements with weather-resistant sealants.
Position structures against walls or as standalone features, considering the ultimate height and spread of your chosen plants. Space multiple structures to create rhythm and flow throughout the garden, allowing enough room for maintenance access.
Design Adaptations and Tips: For smaller spaces or balconies, consider using modular trellis panels that can be mounted to walls or railings, or opt for container-friendly obelisk structures. Choose appropriate plant varieties based on structure size – annual climbers for temporary displays, or slower-growing perennials for permanent features.
Incorporate lighting to highlight architectural elements after dark, and position scented climbers near seating areas or walkways for maximum enjoyment.
Plan a Cottage Garden Color Scheme
The enchanting allure of a cottage garden color scheme lies in its seemingly effortless blend of soft pastels and vibrant jewel tones that dance together in natural harmony. Delicate pink roses climb weathered trellises while clusters of purple delphiniums reach skyward, creating a romantic tapestry of color. Lavender spikes sway beside buttery yellow coreopsis, while azure blue forget-me-nots peek through drifts of white candytuft, mimicking the casual elegance of an English countryside.
This timeless palette weaves together perennials and annuals in a carefully orchestrated display that appears charmingly untamed. Soft peach foxgloves tower above burgundy penstemon, while salmon-colored hollyhocks provide vertical interest against a backdrop of silvery Russian sage. The overall effect creates a dreamy, nostalgic atmosphere that invites both pollinators and quiet contemplation, with colors that shift and evolve throughout the growing season.
Key Elements:
- Climbing roses in pink, white, or apricot
- Purple and blue delphiniums
- Lavender
- Yellow coreopsis
- White candytuft
- Blue forget-me-nots
- Peach foxgloves
- Burgundy penstemon
- Salmon hollyhocks
- Russian sage
- Weathered trellises or arbors
- Natural stone pathways
- Vintage garden accessories
To implement this color scheme, begin by establishing a framework of permanent structural elements like trellises and pathways. Plant taller specimens such as hollyhocks and delphiniums toward the back of borders, with medium-height plants like penstemon and foxgloves in the middle ground.
Edge the borders with low-growing candytuft and forget-me-nots, allowing them to spill naturally onto pathways. Incorporate climbing roses on vertical structures, training them to create graceful arches and cascades.
When adapting this style to different spaces, consider scale carefully. Balcony gardeners can capture the cottage garden essence using container combinations that echo the traditional color palette. Select dwarf varieties of classic cottage garden plants, and use vertical elements like wall-mounted trellises to maximize space.
For successful maintenance, group plants with similar water needs together, and implement a regular deadheading schedule to encourage continuous blooming throughout the season.
Incorporate Water Features Among Spring Flowers
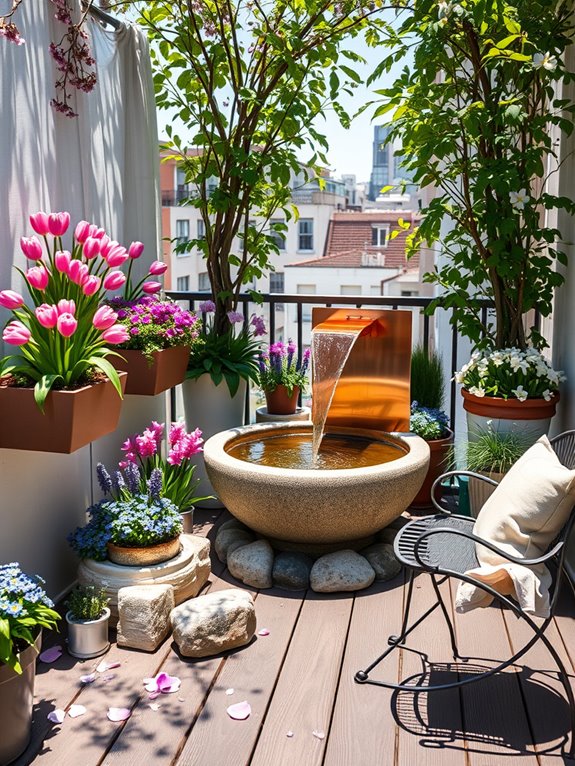
The gentle melody of trickling water weaves through a tapestry of spring blooms, creating a tranquil oasis where delicate primroses and forget-me-nots dance along the edges of a stylish fountain or natural-looking pond. Clusters of cheerful daffodils and tulips stand tall against the reflective surface of the water, their colors doubled in the mirror-like pools while water iris and marsh marigolds embrace the water’s edge, adding layers of texture and visual interest to the display.
Stone pathways wind between raised flower beds and small water features, leading visitors through a sensory experience where the sound of flowing water mingles with the sweet fragrance of hyacinths and muscari. Japanese maples and weeping cherry trees provide graceful architecture above the water features, their branches creating natural canopies that cast dancing shadows on the water’s surface while spring breeze carries petals across the peaceful scene.
Key Elements:
- Water fountain, pond, or cascading water feature
- Spring-flowering bulbs (tulips, daffodils, hyacinths)
- Water-loving plants (iris, marsh marigolds)
- Natural stone or concrete pavers
- Decorative rocks and pebbles
- Small ornamental trees
- Outdoor lighting
- Water pump and filtration system
- Waterproof liner (for ponds)
- Seating area or bench
Begin installation by selecting a level area that receives partial to full sun and planning the water feature’s location relative to viewing areas and existing garden elements.
Install the water feature first, ensuring proper drainage and electrical connections for pumps and lighting. Create raised beds or borders around the water feature using complementary materials like natural stone or wooden sleepers, then plant spring bulbs and perennials in groups, considering their mature sizes and bloom times for continuous interest.
For maintenance, regularly check water levels and pump function, clean filters monthly, and trim plants as needed. In winter, protect sensitive water features from freezing by using a pond heater or removing pump equipment. Replace seasonal plantings annually while maintaining perennial specimens through proper pruning and division as needed.
For smaller spaces or balconies, consider wall-mounted water features, tabletop fountains, or compact self-contained water bowls. These can be combined with container-grown spring bulbs and trailing plants to create the same atmospheric effect in a reduced footprint.
Position water features near seating areas to maximize their impact, and use vertical gardening techniques like wall planters or tiered displays to accommodate more plants in limited space. Remember to check weight restrictions for balconies and ensure proper drainage solutions are in place.
Add Architectural Elements for Year-Round Interest
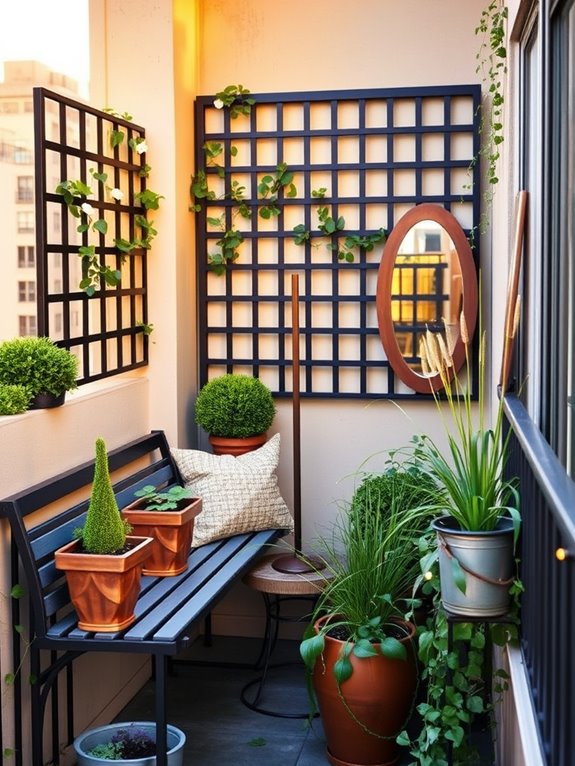
Transform your garden into a captivating year-round showcase by incorporating striking architectural elements that maintain visual interest long after flowers have faded. Elegant trellises, sculptural obelisks, and weathered stone pillars create dramatic vertical focal points, while decorative gates and archways frame enchanting garden transitions. These structural components provide a sophisticated backdrop for climbing roses, clematis, and wisteria during the growing season, then stand as artistic silhouettes against winter frost and snow.
Modern and classical architectural pieces can be artfully combined with carefully selected evergreen shrubs, ornamental grasses, and structural plants to establish a dynamic framework that anchors your garden through every season. Consider how copper or steel sculptures catch morning light, how curved pergolas guide the eye through the space, and how strategically placed mirrors create depth while reflecting surrounding greenery. These permanent features work in harmony with seasonal plantings to maintain continuous visual rhythm and flow.
Key Elements:
- Metal or wooden obelisks and trellises
- Stone or concrete pillars
- Decorative gates and archways
- Garden mirrors
- Sculptural art pieces
- Pergolas or arbors
- Weathered urns or containers
- Built-in seating elements
- Architectural salvage pieces
- Evergreen structural plants
Begin implementation by creating a scaled drawing of your space, marking permanent structural elements first. Position larger architectural pieces as anchor points, ensuring they’re properly secured and level. Install support systems for climbing plants near vertical structures, maintaining adequate spacing for mature growth.
Layer in evergreen shrubs and structural plants around these elements, considering their ultimate size and shape. Remember to incorporate pathways and sight lines that showcase your architectural features from multiple angles.
For successful integration of architectural elements in limited spaces like balconies or small gardens, focus on scale-appropriate pieces and multi-functional items. Consider folding screens, wall-mounted trellises, or compact obelisks that provide vertical interest without overwhelming the space. Install pieces that can withstand local weather conditions and choose materials that complement your home’s exterior.
For maintenance, regularly check structural integrity, clean surfaces as needed, and prune surrounding plants to maintain balanced proportions between living and non-living elements.