
8 Garden Ideas With Natural Materials
Natural materials transform an ordinary garden into a breathtaking oasis that celebrates Earth’s raw beauty. You’ll discover how to weave stone pathways through moss-covered grounds, craft rustic borders from reclaimed wood, and create living walls that burst with cascading greenery. From sustainable bamboo screens to tranquil water features, these eight garden ideas blend form and function while promoting biodiversity. Let’s explore how you can bring nature’s finest elements into your outdoor sanctuary.
Contents
- 1 Stone Pathways and Natural Stepping Stones
- 2 Reclaimed Wood Garden Borders and Edging
- 3 Bamboo Fencing and Privacy Screens
- 4 Natural Rock Gardens and Water Features
- 5 Woven Willow Garden Structures
- 6 Living Plant Walls and Green Barriers
- 7 Natural Wood Raised Garden Beds
- 8 Earth and Clay Garden Art Elements
Stone Pathways and Natural Stepping Stones

Stone pathways weaving through lush greenery create an enchanting journey through your garden space, reminiscent of ancient woodland trails. Natural stepping stones, whether slate, flagstone, or river rock, form a harmonious connection with the surrounding landscape, while moss and creeping thyme soften their edges, creating an established, timeless feel.
The interplay of textures between smooth stones and rough-hewn boulders adds visual intrigue, while low-growing plants like sedum and Irish moss create living carpets between the stones. The pathway design naturally draws the eye forward, creating moments of discovery as visitors traverse the garden. Ornamental grasses sway gently alongside the stone path, while strategic placement of flowering perennials like lavender and echinacea provide bursts of color.
Small-leaved ground covers cascade over the edges of stones, blurring the lines between hardscape and landscape, while occasional garden art or carefully placed boulders serve as focal points along the journey.
Key Elements:
- Natural stone slabs or stepping stones
- Gravel or pea stone for path foundation
- Ground cover plants
- Ornamental grasses
- Flowering perennials
- Moss varieties
- Edge plants
- Garden art or focal points
- Landscape lighting
- Mulch or wood chips
Begin implementation by plotting your pathway’s course, considering natural flow and destination points. Prepare the ground by removing grass and weeds, then laying a solid foundation of compacted gravel. Place stepping stones at comfortable walking distances, allowing space for ground covers between them.
Ensure stones are level and stable, using sand or additional gravel underneath for adjustment. Create planting pockets around the stones for ground covers and perennials, maintaining proper soil depth for root establishment.
When designing a stone pathway garden, consider seasonal changes and drainage patterns. Select stones with non-slip surfaces for safety, and choose plants that can withstand foot traffic near the path edges. For smaller spaces or balconies, create miniature versions using smaller stones and compact plant varieties, or design a container garden with strategic stone placement between pots.
Incorporate solar lighting for evening ambiance and safety, and plan for adequate spacing between stones to accommodate plant growth over time.
Reclaimed Wood Garden Borders and Edging
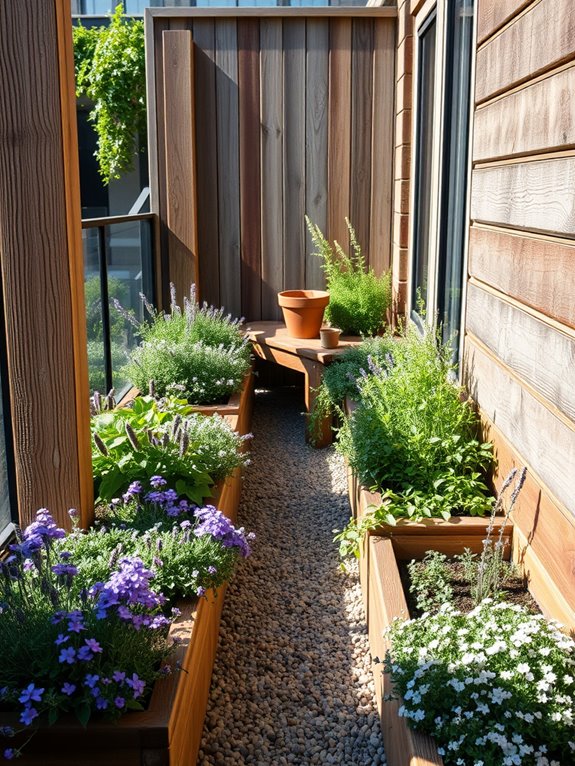
Transform your garden into a rustic sanctuary with reclaimed wood borders and edging that tell a story of sustainability and charm. Weather-worn planks and timber pieces create natural boundaries between flowering perennials, while defining pathways with an organic, lived-in appeal. The varying shades of gray and brown weathered wood complement blooming lavender, creeping thyme, and cascading sweet alyssum that soften the edges, creating a seamless blend between structured borders and wild garden elements.
These natural wooden boundaries serve as more than mere garden dividers – they become architectural features that ground the space and create depth. Weathered fence posts stand as sentinels marking garden room transitions, while horizontal planks guide the eye through the landscape. The wood’s natural patina develops character over time, hosting beneficial moss and lichen that add layers of texture and interest to your garden’s story.
Key Elements:
- Reclaimed wooden planks and boards
- Weather-resistant timber pieces
- Railroad ties or fence posts
- Galvanized nails or screws
- Landscape fabric
- Gravel or crushed stone
- Garden soil
- Edge-appropriate plants
- Wood preservative (eco-friendly)
- Corner brackets or joining plates
Installation begins with preparing the ground by removing grass and weeds, then laying landscape fabric to prevent unwanted growth. Position larger timber pieces first to establish main borders, securing them with stakes or by partially burying them. Connect smaller planks to create continuous edges, ensuring they’re level and properly anchored.
For curved areas, use shorter pieces of wood placed end-to-end to follow natural contours. Fill the borders with appropriate soil mixtures and add plants that will complement the rustic aesthetic.
Additional Considerations: Climate affects wood durability, so choose naturally resistant species like cedar or treat wood with eco-friendly preservatives. For small spaces or balconies, use narrow planks vertically as raised bed borders or create modular sections that can be easily reconfigured.
Consider incorporating built-in seating or storage elements within wider border sections to maximize functionality in limited spaces. Weather protection methods like adding rubber feet or elevating wood slightly off the ground can significantly extend the life of your garden borders.
Bamboo Fencing and Privacy Screens
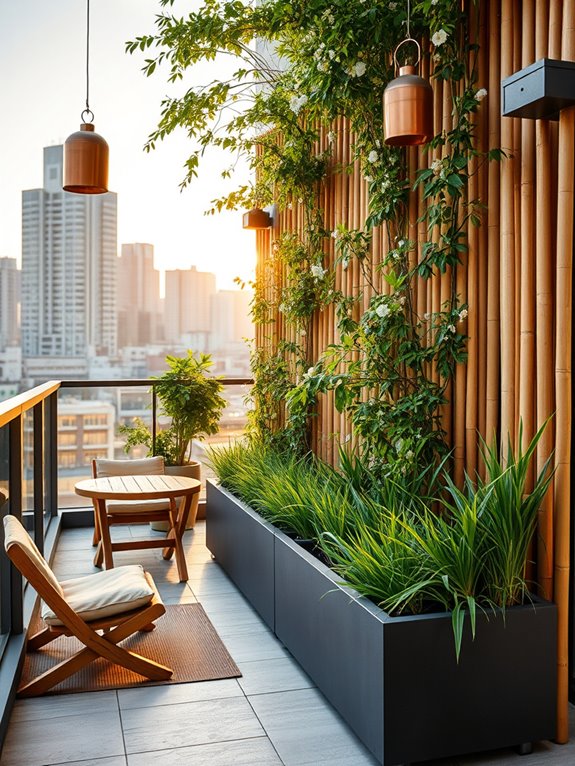
Transform your outdoor space into a serene sanctuary with elegant bamboo fencing and privacy screens that create an intimate tropical retreat. Tall, golden bamboo poles stand in perfect formation, filtering sunlight through their natural gaps while climbing jasmine and passion flower vines weave through the structures, adding layers of lush greenery and delicate blooms. The gentle rustle of bamboo in the breeze provides a soothing soundtrack to your private paradise.
Dark-stained bamboo panels alternate with living bamboo plantings to create depth and visual interest, while strategically placed Japanese forest grass and dwarf bamboo species soften the base of the structures. Natural stone pathways wind through the space, leading to hidden seating areas where bronze wind chimes and copper lanterns add warmth and ambiance to the Asian-inspired retreat.
Essential Elements:
- Bamboo poles or ready-made bamboo panels
- Steel or wooden support posts
- Concrete for post foundations
- Climbing vine varieties
- Ground cover plants
- Natural stone pavers
- Solar-powered lanterns
- Decorative plant containers
- Garden twine or wire
- Weather-resistant sealant
Installation begins with securing sturdy support posts in concrete at 6-8 foot intervals, ensuring they’re perfectly level and plumb. Bamboo panels or individual poles are then attached to these posts using rust-resistant screws or traditional twine binding methods, creating a stable framework.
For added stability, horizontal support beams should be installed at the top and bottom of the screen. When incorporating living elements, install planter boxes or prepare soil beds at the base of the screen, then plant climbing vines and ornamental grasses.
Apply a weather-resistant sealant to protect the bamboo from moisture damage, and maintain regular trimming of vines to prevent overwhelming the structure. Position solar lighting to highlight architectural elements and create evening ambiance, while ensuring proper drainage around the base of the screen to prevent water damage.
Size Adaptations: For small spaces or balconies, use modular bamboo panels that can be easily reconfigured or removed as needed. Consider incorporating portable planters with tall, narrow bamboo varieties for flexible screening options, and utilize vertical gardening techniques with climbing plants to maximize limited space.
In windy locations, ensure panels are securely anchored and choose shorter screen heights to reduce wind resistance, while maintaining privacy through strategic plant placement and panel positioning.
Natural Rock Gardens and Water Features
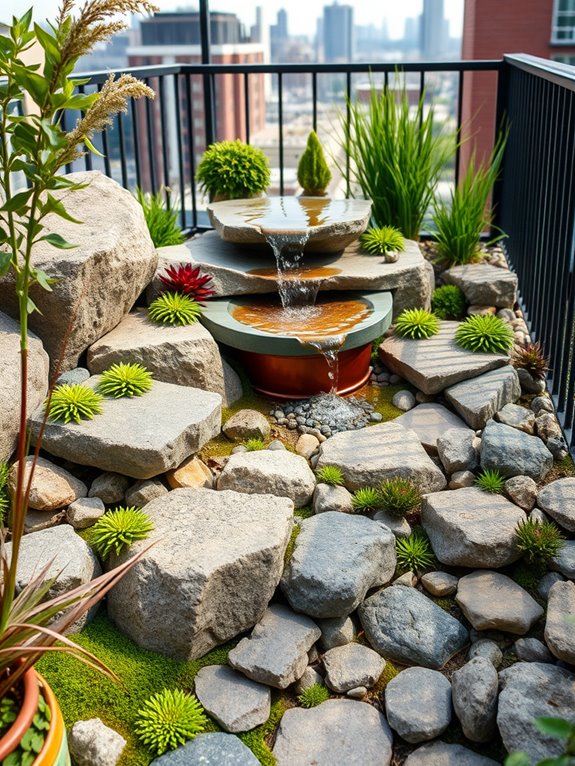
Cascading water trickles over weathered stones, creating a mesmerizing symphony that echoes through a carefully curated landscape of natural rock formations. Alpine plants and succulents nestle between granite boulders, while delicate moss spreads its emerald carpet across stone surfaces. The interplay of textures – smooth river rocks against jagged cliff-like formations – creates dramatic focal points that draw the eye through the garden’s natural progression.
This harmonious blend of water and stone transforms any outdoor space into a tranquil mountain-inspired retreat. Drought-resistant plants like sempervivum and sedum add bursts of color among the rocks, while ornamental grasses sway gently beside a bubbling fountain or peaceful pond. The combination of moving water and strategically placed boulders creates micro-climates that support diverse plant life while providing a haven for wildlife.
Key Elements:
- Large and medium-sized natural stones
- Water pump and basin
- Flexible tubing for water circulation
- Alpine plants and succulents
- Ground cover plants
- River rocks and pebbles
- Landscape fabric
- Drainage materials
- LED landscape lighting
- Aquatic plants (optional)
Creating a natural rock and water garden begins with proper site preparation and drainage. Layer landscape fabric beneath the intended rock placement area, then create elevation changes using larger stones as anchor points.
Install the water feature‘s pump and basin first, concealing plumbing beneath rocks and gravel. Build upward and outward from these focal points, ensuring stable rock placement and creating planting pockets between stones.
For ongoing maintenance, regularly check water levels and pump function, clean filters monthly, and trim plants as needed to maintain desired shape. During winter, protect pump systems from freezing, and ensure proper drainage continues functioning through all seasons.
Add seasonal interest by incorporating plants with varying bloom times and texture changes.
Space adaptation options abound for different settings – smaller spaces can utilize vertical rock walls with integrated mini-waterfalls, while compact self-contained water features work well for balconies.
Consider weight restrictions for elevated spaces, opt for lightweight artificial rocks when necessary, and choose appropriately sized pumps based on water feature scale. Container-based rock gardens with small recirculating fountains offer the same aesthetic for limited spaces while maintaining easier maintenance access.
Woven Willow Garden Structures
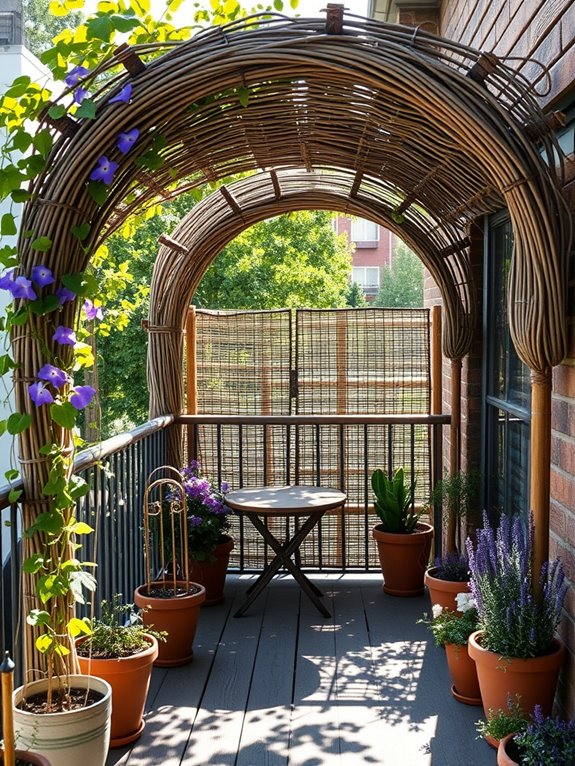
Transform your garden into a whimsical wonderland with woven willow structures that create an enchanting, natural atmosphere. Graceful willow arches curve overhead, their living branches intertwined to form magical tunnels and secret pathways. Climbing roses and clematis weave through the willow framework, adding bursts of color and fragrance while morning glory and jasmine trail delicately along the edges, creating a mesmerizing blend of cultivated and wild elements.
The woven willow structures serve as both architectural features and living art, casting intricate shadow patterns across garden paths and seating areas. These natural sculptures range from simple obelisks supporting flowering vines to elaborate domed gazebos that provide intimate seating spaces. The structures age beautifully, developing a silvery patina that complements the surrounding greenery and creates a timeless, organic feel throughout the seasons.
Key Elements:
- Living willow rods or dried willow branches
- Support stakes and ties
- Climbing plants (roses, clematis, jasmine)
- Mulch for willow root systems
- Garden twine or wire
- Pruning tools
- Complementary perennials
- Path materials (gravel, stepping stones)
Begin implementation by selecting locations for willow structures that receive adequate sunlight and have well-draining soil. Plant living willow rods in late winter or early spring, pushing them deeply into prepared soil beds. Weave the flexible branches in your desired pattern, securing them with natural twine as they grow. For immediate impact, create structures using pre-dried willow branches woven around permanent supports.
Regular maintenance is essential for willow structures. Prune new growth in late winter to maintain shape and encourage dense growth. Water deeply during the first growing season to establish strong roots. Train climbing plants through the framework as they grow, ensuring even coverage and preventing overcrowding that could damage the willow structure.
Adaptation Tips: For smaller spaces or balconies, create miniature willow obelisks or screens as focal points. Container-grown willow structures work well in limited spaces but require more frequent watering and feeding. Consider the mature size of both the structure and climbing plants when planning, and choose dwarf varieties for confined areas. Living willow requires regular maintenance, so dried willow structures might be more practical for those with limited gardening time.
Living Plant Walls and Green Barriers
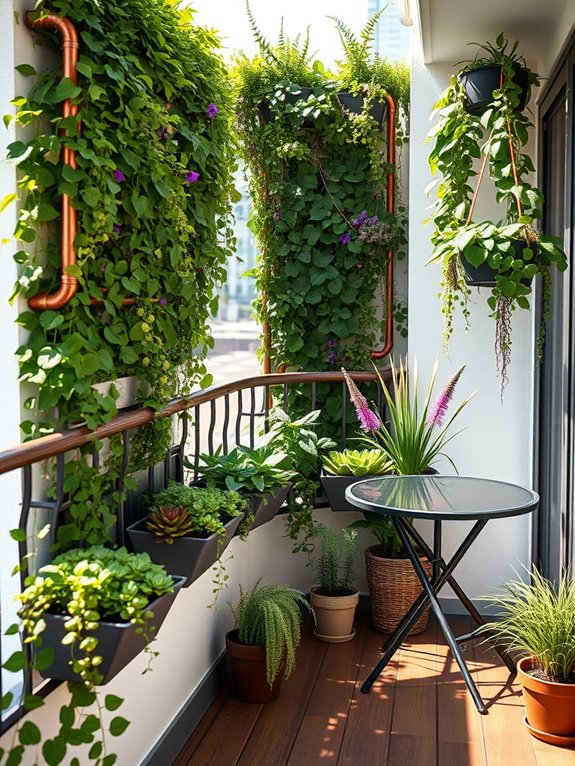
Transform your outdoor space into a lush vertical oasis with living plant walls and green barriers that create an enchanting natural screen. Cascading ferns, trailing ivy, and flowering vines interweave to form a tapestry of varying textures and shades of green, while compact shrubs and ornamental grasses provide sturdy foundation plantings. The verdant layers create a sense of privacy while maintaining an organic, garden-like atmosphere that attracts butterflies and birds.
The vertical garden system combines both practical and aesthetic elements, featuring modular panels filled with drought-resistant sedums, aromatic herbs, and delicate flowering plants like lobelia and fuschia. These living walls can incorporate built-in irrigation systems and grow lights for year-round vibrancy, while strategic placement of climbing roses, clematis, and jasmine adds seasonal color and fragrance to the green barrier.
Key Elements:
- Modular wall planting systems
- Irrigation equipment
- Growing medium suitable for vertical gardens
- Support structures (trellises, wire systems)
- Selection of climbing plants
- Drought-resistant perennials
- Trailing plants and vines
- Container plants for base layering
- LED grow lights for shaded areas
- Moisture meters
- Pruning tools
Install the vertical garden system by first securing sturdy support structures to walls or creating free-standing frameworks. Layer the planting modules from bottom to top, ensuring proper irrigation connections between sections. Select plants based on light exposure and climate conditions, placing sun-loving varieties at the top and shade-tolerant species below. Incorporate a mix of permanent and seasonal plants to maintain year-round interest.
For maintenance, establish a regular watering schedule through automated irrigation, checking soil moisture levels weekly. Prune plants seasonally to maintain desired shape and prevent overcrowding. Replace any struggling plants promptly to maintain the wall’s aesthetic appeal and structural integrity.
For smaller spaces or balconies, consider creating mini living walls using pocket planters or vertical garden kits that can be scaled to fit available space. Choose compact varieties and focus on plants that thrive in containers. South-facing walls may require shade cloth during peak summer months, while north-facing installations might need supplemental lighting. Consider weight restrictions for balconies and ensure proper waterproofing for wall-mounted systems to protect building structures.
Natural Wood Raised Garden Beds
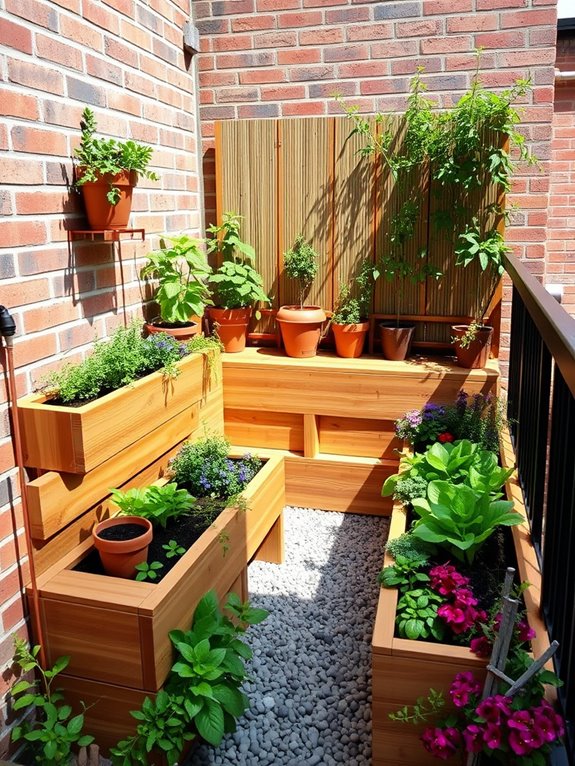
Natural wood raised garden beds transform an ordinary garden space into a rustic sanctuary that emanates warmth and organic beauty. Rich cedar planks and weathered oak timbers create striking geometric patterns across the landscape, lifting verdant herbs and vegetables to comfortable working heights. The elevated beds become natural focal points, drawing the eye across neat rows of leafy greens, climbing peas, and cascading cherry tomatoes, while aromatic herbs like thyme and sage spill over the edges.
The multi-level design adds architectural interest to the garden, with beds of varying heights creating a dynamic visual rhythm. Morning sunlight catches the natural grain of the wood, highlighting its subtle variations in color and texture, while the contrast between the dark soil and golden timber creates a satisfying earthen palette. Native flowers planted along the borders attract beneficial insects, adding splashes of color and movement to this practical yet beautiful growing space.
Key Elements:
- Untreated cedar or redwood lumber
- Galvanized screws and brackets
- Quality topsoil and compost mix
- Landscape fabric
- Gravel for drainage
- Corner posts and supports
- Drip irrigation system
- Plant markers
- Mulch material
- Garden tools
Construction begins with selecting a level site and laying out the bed dimensions. The wooden frames should be assembled using weather-resistant lumber at least 2 inches thick, with corner posts driven into the ground for stability.
Create a solid foundation by removing grass, laying landscape fabric, and adding a layer of gravel before filling with rich growing medium. Multiple beds should be spaced to allow comfortable access for maintenance, with main paths at least 3 feet wide.
To ensure longevity and optimal growing conditions, incorporate proper drainage holes in the base of each bed and angle the soil slightly toward these points. The beds’ height should be at least 12 inches for shallow-rooted plants, increasing to 24 inches for deeper-rooted vegetables. Adding an automated drip irrigation system during construction saves time and ensures consistent watering.
When adapting this design for different spaces, consider vertical growing options by adding trellises to the back of beds against walls or fences. For smaller areas, focus on creating fewer, deeper beds rather than multiple shallow ones.
Urban gardeners can scale down the design using modular bed sections that can be reconfigured as needed, while those with limited mobility should build beds at waist height (typically 36 inches) for comfortable access without bending.
Earth and Clay Garden Art Elements
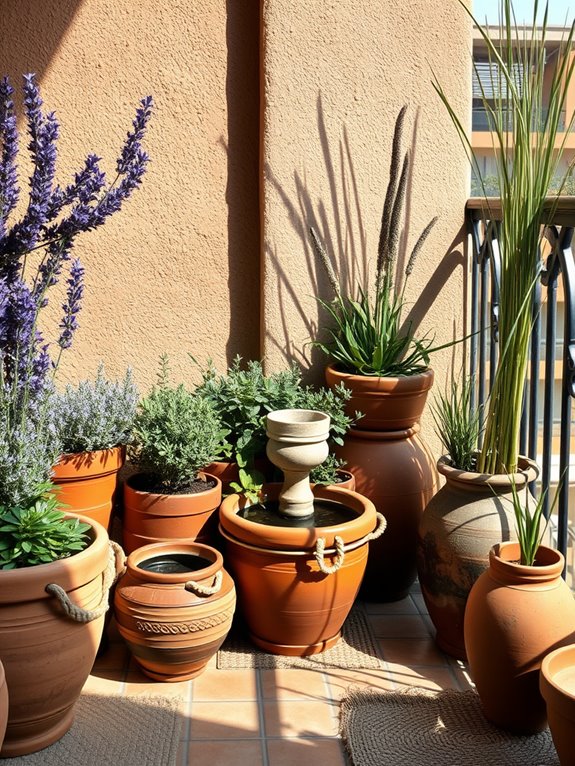
Transform your garden into a serene earthen sanctuary where clay and natural earth elements create a grounding, organic atmosphere. Terracotta vessels in varying sizes dot the landscape, their warm russet tones complementing natural stone pathways and hand-shaped clay sculptures. Native grasses sway between carefully placed earth-tone ceramic pieces, while handcrafted clay bird baths and water features provide both visual interest and a melodic soundtrack of trickling water.
Raw earth walls, adobe-style elements, and naturally weathered clay sculptures create fascinating focal points throughout the space. These pieces take on different personalities as the sunlight shifts throughout the day, casting ever-changing shadows across their textured surfaces. Drought-resistant plants like lavender, sage, and ornamental grasses emerge from rough-hewn pottery, creating a harmonious blend of cultivated and natural elements.
Key Elements:
- Terracotta pots and planters
- Clay sculptures and art pieces
- Adobe or earth walls
- Natural stone pathways
- Ceramic bird baths
- Clay water features
- Earth-tone decorative tiles
- Hand-formed garden borders
- Clay plant markers
- Natural fiber accent pieces
Begin implementation by establishing a clear layout that incorporates both functional and decorative clay elements. Position larger pieces like earth walls or substantial clay sculptures as anchor points, then arrange smaller elements in clusters to create visual interest without cluttering the space.
Consider the natural weathering process of clay items and position them where they can develop an authentic patina while remaining structurally sound. Install proper drainage beneath clay features to prevent water damage during wet seasons.
When incorporating clay and earth elements, consider your local climate and how it will affect these materials over time. In regions with freeze-thaw cycles, use frost-resistant clay products or bring delicate pieces indoors during winter. For smaller spaces like balconies, focus on vertical clay installations and wall-mounted pieces, using lightweight alternatives when structural limitations exist.
Integrate proper sealing and maintenance techniques to extend the life of your earth-based garden elements while preserving their natural beauty.