
10 Garden Ideas With Outdoor Lighting
You’ve probably noticed how outdoor lighting can transform an ordinary garden into an enchanting nighttime retreat. From the soft glow of string lights dancing above your dining area to the dramatic uplighting that showcases your favorite trees, strategic illumination creates layers of ambiance and functionality. Whether you’re hosting evening gatherings or simply enjoying quiet moments under the stars, these lighting ideas will help you maximize your garden’s potential after sunset. Let’s explore the magical possibilities that await in your outdoor space.
Contents
- 1 String Light Canopies for Dining Areas
- 2 Solar-Powered Path Markers
- 3 Uplighting for Trees and Statement Plants
- 4 Floating Pool and Pond Illumination
- 5 Pendant Lights for Covered Patios
- 6 LED Strip Lighting for Steps and Railings
- 7 Accent Lighting for Garden Features
- 8 Lantern Clusters for Cozy Corners
- 9 Color-Changing Landscape Lighting
- 10 Motion-Sensor Security Lighting
String Light Canopies for Dining Areas
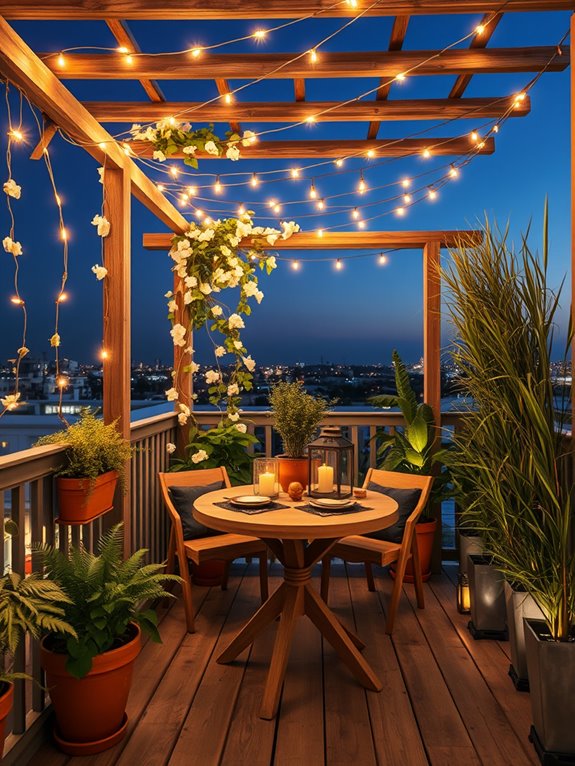
Transform your outdoor dining area into a magical retreat with an ethereal canopy of twinkling string lights dancing overhead. The soft, warm glow creates an enchanting atmosphere where climbing vines like jasmine or wisteria intertwine with the lights, creating a natural ceiling that transitions seamlessly from day to night.
Potted plants strategically placed around the dining space, such as fragrant gardenias or elegant bamboo, add layers of organic texture while maintaining the area’s intimate feel.
The string light canopy serves as both functional lighting and architectural element, drawing the eye upward and creating the illusion of an outdoor room. During daylight hours, the suspended cables and delicate bulbs add visual interest, while evening transforms the space into an intimate paradise where light dapples across table settings and illuminates the faces of dining guests.
The overall effect mirrors a starlit sky, bringing magic to every outdoor gathering.
Key Elements:
- Commercial-grade outdoor string lights
- Steel cable or strong rope for support
- Anchor points (posts, trees, or building structures)
- Climbing vines or trailing plants
- Outdoor dining furniture
- Potted plants for perimeter
- Weather-resistant cable ties
- Timer or smart plug for automation
- Ground-level accent lighting
- All-weather electrical outlets
Installation begins with creating a strong support system using steel cables or rope stretched between secure anchor points, forming a grid pattern overhead.
Space the cables approximately 4-6 feet apart, ensuring proper tension and using professional-grade hardware at connection points. Attach string lights in a deliberate pattern – whether zigzag, parallel lines, or concentric circles – securing them with weather-resistant ties.
Consider installing separate circuits to create lighting zones, allowing for varied ambiance levels.
Essential Tips:
Design your light canopy with scalability in mind – for smaller spaces, focus lights over the central dining area and use fewer crossing patterns.
Install dimmer switches to adjust brightness levels, and always include backup support cables for heavy vine growth.
Consider removable shade sails for daytime sun protection, and incorporate solar-powered accent lights at ground level to create depth.
For balcony installations, use tension cables between walls or railings, and opt for lightweight vining plants in vertical planters to maximize space while maintaining the enchanted atmosphere.
Solar-Powered Path Markers

Illuminating your garden pathway with solar-powered markers creates an enchanting nighttime display that transforms your outdoor space into a magical realm. The soft, glowing lights cast gentle shadows across surrounding plants while providing safe passage through your garden after sunset. These eco-friendly markers complement natural elements like ornamental grasses, low-growing sedums, and creeping thyme that line the edges of your walkway.
The marriage of modern solar technology with traditional garden design produces an effortless flow between functional lighting and aesthetic appeal. During daylight hours, the sleek markers blend seamlessly with the landscape, while at night, they create a starlit path that guides visitors through your garden’s various features. The gentle illumination highlights the texture of nearby foliage and creates depth in the landscape, making your garden an inviting destination even after dark.
Key Elements:
- Solar-powered path lights
- Ground cover plants
- Crushed stone or gravel pathway
- Edge restraints
- Solar panel cleaning supplies
- Replacement batteries (if applicable)
- Weather-resistant sealant
- Landscape fabric
- Garden stakes or anchors
Installation begins with mapping your pathway and marking light positions every 4-6 feet apart, ensuring even illumination throughout. Prepare the soil by removing weeds and laying landscape fabric to prevent future growth. Install edge restraints along the pathway borders, then add a 2-inch layer of crushed stone or gravel.
Mount solar lights securely using included stakes or anchors, positioning them to receive maximum sunlight exposure during the day. Place lights slightly back from the path’s edge to prevent accidental contact during maintenance. Test the placement by observing the lighting pattern for several nights, adjusting positions as needed for optimal coverage.
Consider installing lights at slightly different heights to create visual interest and improve overall illumination. For smaller spaces or balcony gardens, opt for compact solar markers that can be mounted on walls or railings instead of stakes. Choose multi-function lights that offer different brightness levels or color options to maximize versatility.
In areas with limited sunlight, select hybrid solar lights with backup battery power to ensure consistent illumination. Regular cleaning of solar panels and seasonal adjustment of light positions will maintain optimal performance throughout the year.
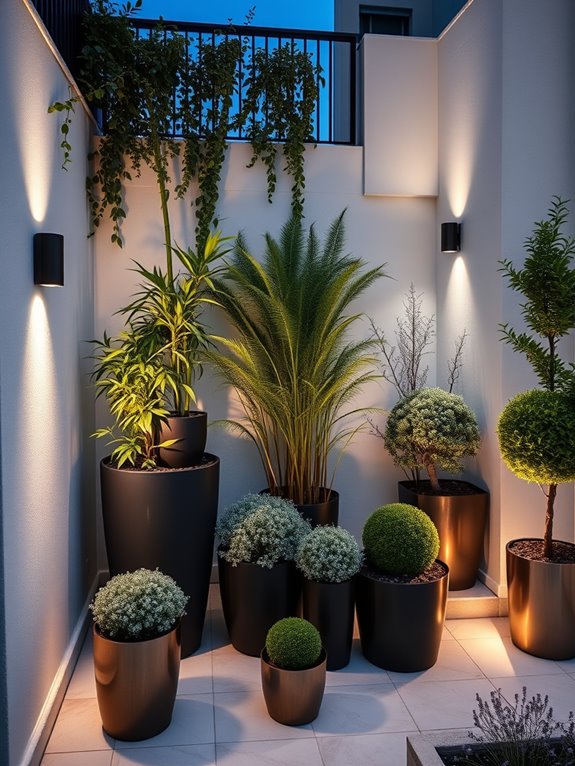
Uplighting for Trees and Statement Plants
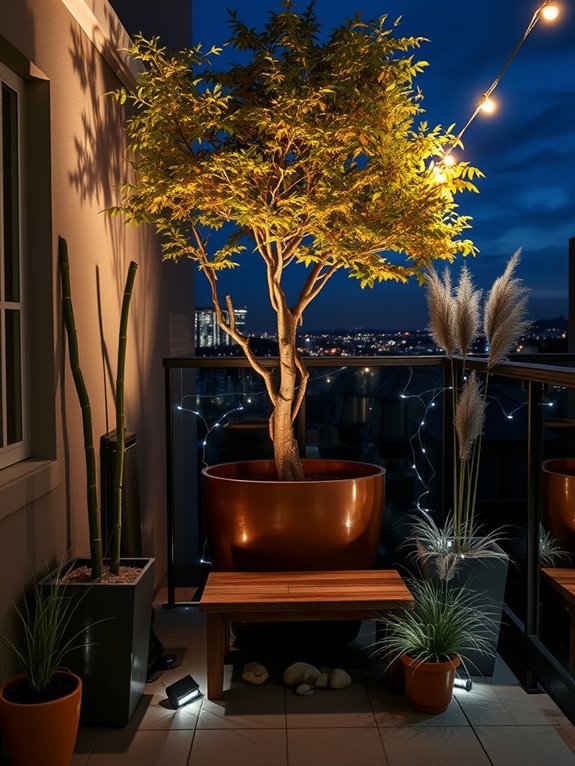
Transform your garden into a dramatic nighttime spectacle with strategically placed uplighting that showcases the majestic beauty of trees and statement plants. Powerful ground-mounted lights cast enchanting shadows across your landscape, highlighting the sculptural branches of Japanese maples, the strong silhouette of palm trees, or the architectural form of yucca plants. The upward beam creates depth and dimension, turning ordinary garden features into stunning focal points that command attention long after sunset.
As darkness falls, the illuminated canopy creates a magical ceiling of dancing leaves and branches, while ornamental grasses catch the light and seem to glow from within. This lighting technique particularly excels at emphasizing the texture of bark, the movement of bamboo stems, and the dramatic spread of fan palms. The result is an otherworldly atmosphere that transforms your garden into an enchanting nighttime retreat.
Key Elements:
- LED ground spotlights
- Well lights with adjustable heads
- Weatherproof wiring and connections
- Statement trees (Japanese maple, birch, palm)
- Architectural plants (yucca, bamboo, ornamental grasses)
- Timer or smart lighting controls
- Weatherproof junction boxes
- Ground stakes or mounting brackets
Install lights approximately 2-3 feet from the base of each tree or statement plant, angling the beam to capture the full height and spread of the specimen. For larger trees, use multiple lights positioned at different angles to prevent harsh shadows and create even illumination. Ensure all electrical connections are properly sealed and buried cables are at appropriate depths according to local codes.
Regular maintenance should include adjusting light angles as plants grow and cleaning fixtures to maintain optimal illumination. Important considerations include selecting the right color temperature (warm white typically works best), managing light pollution by using shields or directional fixtures, and being mindful of neighbors’ windows.
For smaller spaces or balconies, consider using portable, solar-powered spotlights that can be easily repositioned, or focus on illuminating smaller specimens like dwarf Japanese maples or container-grown architectural plants. Incorporate dimming capabilities to adjust light levels for different occasions and seasons.
Floating Pool and Pond Illumination

Transform your water features into enchanting nighttime displays with floating pool and pond illumination that creates a magical aquatic wonderland. The gentle glow of floating lights dancing across the water’s surface casts mesmerizing reflections, while strategically placed underwater lights illuminate aquatic plants and create depth in the darkness.
Water lilies and lotus flowers become ethereal sculptures when illuminated from below, their petals and leaves casting intricate shadows across the water’s surface. The combination of light and water produces a sensory experience that extends your garden’s enjoyment well into the evening hours.
Floating orbs in various sizes drift peacefully across the surface, while submersible LED strips outline the pond’s edges, creating a defined boundary that adds both safety and visual interest. The illuminated water features attract nighttime visitors like moths and frogs, adding natural movement and life to your nocturnal garden sanctuary.
Key Elements:
- Floating LED orbs or balls
- Submersible spotlights
- Underwater LED strip lighting
- Water lilies and floating plants
- Decorative rocks and pebbles
- Motion-activated sensors
- Waterproof power sources
- Timer controls
- Weather-resistant cables
- Safety covers for electrical components
Implementation begins with planning your lighting layout, considering both aesthetic appeal and practical illumination needs. Start by installing underwater lights along the pool or pond’s perimeter, spacing them evenly to create consistent illumination. Connect all electrical components to weatherproof power sources, ensuring cables are properly concealed and protected.
Add floating lights in varying sizes and brightness levels, arranging them to create visual interest while maintaining enough open water space for natural movement. For optimal results, layer your lighting by combining different types of water-safe fixtures. Position submersible spotlights to highlight specific features like fountains or striking aquatic plants, while using floating lights to create ambient illumination.
Regular maintenance includes checking electrical connections, cleaning light fixtures, and adjusting positions of floating elements as needed.
Design Considerations: When planning your illuminated water feature, consider the viewing angles from different areas of your garden and any nearby seating areas. For smaller spaces or balcony ponds, focus on fewer, brighter lights rather than multiple dim sources. Light pollution can be minimized by using directional fixtures and avoiding overly bright installations.
In areas with wildlife, use warm-toned lights and motion sensors to reduce impact on nocturnal creatures. Always ensure your lighting design complies with local safety regulations regarding outdoor electrical installations near water.
Pendant Lights for Covered Patios
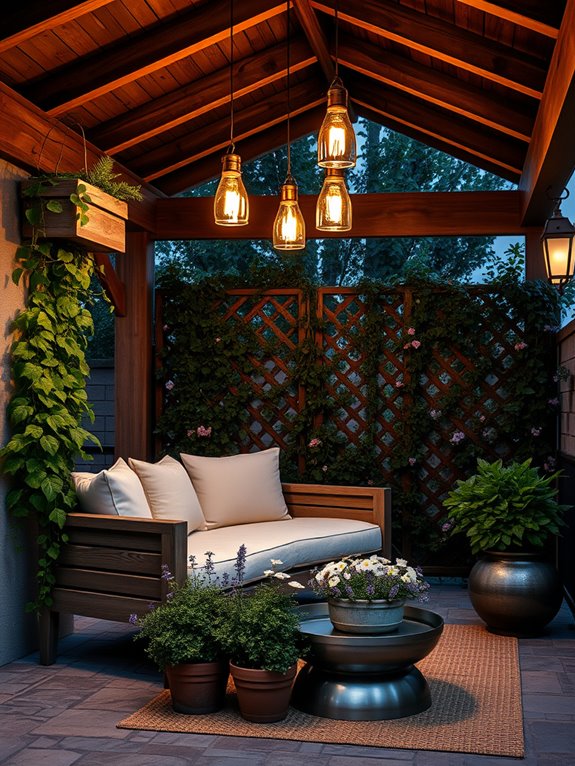
Transform your covered patio into an enchanting outdoor room with strategically placed pendant lights casting a warm, inviting glow across your garden sanctuary. Delicate glass orbs, vintage-inspired lanterns, or modern geometric fixtures suspended from wooden beams create magical light patterns that dance across climbing vines and potted plants below. The interplay between light and shadow adds depth to your outdoor living space, while illuminating comfortable seating areas and highlighting architectural features of your home.
Lush container gardens beneath the pendant lights become dramatic focal points as evening falls, with the gentle illumination highlighting the textures of trailing plants like ivy, ferns, and cascading petunias. Position metallic or glass-topped tables beneath the lights to reflect and multiply the ambient glow, creating an intimate atmosphere perfect for outdoor dining or evening relaxation. The overhead lighting solution leaves ample floor space for arranging furniture and planters while providing essential task lighting for outdoor activities.
Key Elements:
- Pendant light fixtures suitable for outdoor use
- Weather-resistant mounting hardware
- Sturdy ceiling beams or mounting points
- Electrical conduit and weatherproof wiring
- Timer or smart lighting controls
- Container plants with varied heights
- Comfortable seating arrangements
- Reflective surfaces (tables, mirrors, or water features)
- Climate-appropriate trailing plants
- Weather-resistant furniture
Installation begins with careful planning of electrical routes and mounting points, ensuring all wiring meets outdoor safety codes and is properly protected from the elements. Space pendant lights evenly across the covered area, typically 6-8 feet apart, and hang them at a height that provides adequate headroom while maintaining effective illumination of seating areas.
Consider installing dimmer switches or smart controls to adjust lighting levels for different occasions and times of day. The key to successful implementation lies in layering your lighting design. Use brighter pendant lights for task areas like dining spaces or outdoor kitchens, and softer, ambient fixtures for lounging areas. Allow approximately 30 inches between pendant lights and any plants to prevent heat damage and maintain proper air circulation. Regular cleaning of light fixtures and inspection of wiring ensures long-term safety and optimal performance.
Adaptability Considerations: For smaller covered patios, opt for compact pendant fixtures or consider mini-pendant clusters that provide adequate lighting without overwhelming the space. Utilize corner mounting techniques to maximize floor space, and choose multi-functional furniture pieces that can serve as both seating and plant display areas.
In areas with severe weather, select pendant lights with durable materials like brass or powder-coated aluminum, and install additional mounting security for wind protection. Consider removable covers or protective housing for pendant lights during extreme weather conditions.
LED Strip Lighting for Steps and Railings
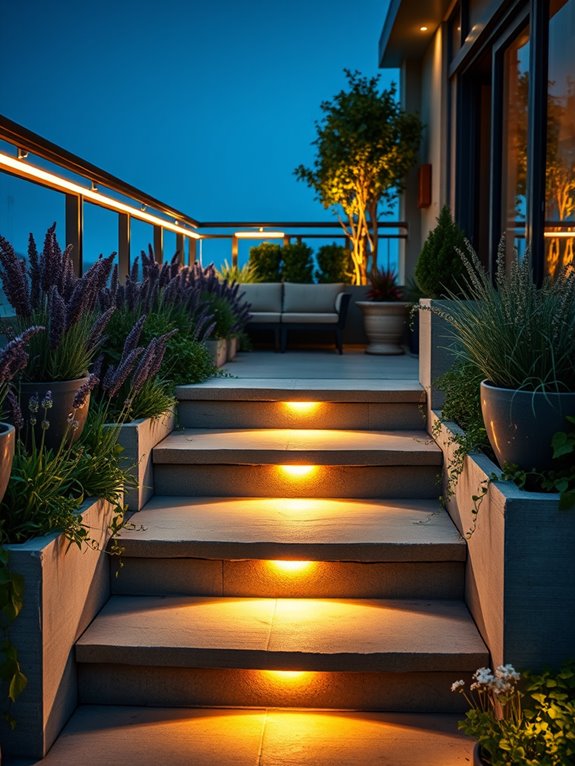
Transform your garden steps and railings into a mesmerizing pathway of light with strategically placed LED strip lighting. The soft, continuous glow creates an enchanting ribbon of illumination that traces architectural lines while providing essential visibility for nighttime navigation.
Modern LED strips cast a sophisticated ambiance that highlights the natural textures of stone steps, wooden railings, or metal handrails, creating depth and dimension after sunset. When integrated with surrounding plantings, LED strip lighting brings a magical quality to evening gardens. Imagine the gentle illumination reflecting off the silvery foliage of lamb’s ear or highlighting the cascading tendrils of creeping thyme spilling over step edges.
The combination of architectural lighting with carefully chosen plants creates a seamless blend of natural and designed elements, making your garden pathway both functional and aesthetically striking.
Key Elements:
- Waterproof LED strip lights
- Weather-resistant mounting channels
- Power supply unit
- Wire connectors
- Motion sensors (optional)
- Aluminum mounting clips
- Silicon end caps
- Waterproof connection boxes
- Timer or smart controller
- Compatible dimmer switch
Installation begins with careful planning of your power source location and routing of electrical connections. Mount the LED strips using aluminum channels beneath each step’s overhang or along the underside of railings, ensuring the lights are protected from direct exposure to elements while providing optimal illumination.
Connect all strips to the power supply using waterproof connectors, and secure any exposed wiring in protective conduit. Test the system thoroughly before finalizing installations with end caps and sealants.
Essential Tips: Consider using warm white LEDs (2700-3000K) for a more natural and inviting appearance, and install strips at a 45-degree angle under steps to maximize light spread while minimizing glare.
For smaller spaces or balcony steps, opt for battery-operated LED strips with motion sensors to conserve energy. Always factor in expansion and contraction of materials in different weather conditions when mounting strips, and include some slack in connections to prevent stress on the components.
Regular cleaning of the light covers will maintain optimal brightness and extend the system’s lifespan.
Accent Lighting for Garden Features
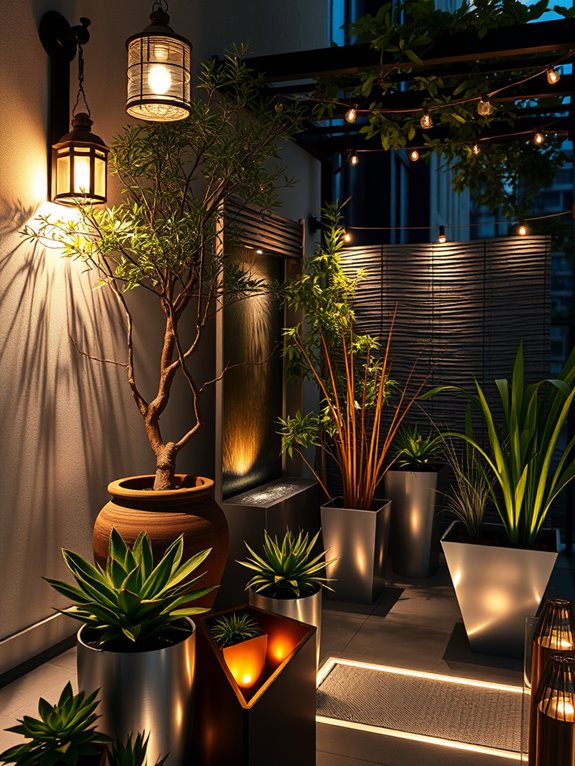
Transform your garden features into stunning nighttime focal points with strategically placed accent lighting that creates drama and dimension after sunset. Stone sculptures cast elongated shadows against garden walls, while illuminated water features shimmer with mystical reflections. Carefully positioned spotlights highlight the architectural qualities of ornamental trees, drawing attention to their graceful branches and unique bark textures.
Japanese maples, sculptural succulents, and ornamental grasses take on new personalities when lit from below, creating ethereal silhouettes against the night sky. The interplay of light and shadow adds depth to garden spaces, while soft uplighting on fountains, pergolas, and garden art pieces creates intimate vignettes throughout the landscape. The subtle glow transforms ordinary garden elements into magical nighttime displays.
Key Elements:
- Low-voltage LED spotlights
- Well lights for trees and tall plants
- Submersible lights for water features
- Path markers and step lights
- Weatherproof transformers and cables
- Timer systems
- Various fixture types (spots, floods, bullets)
- Light shields and glare guards
- Motion sensors (optional)
- Mounting stakes and brackets
Begin installation by mapping out your garden‘s key features and determining optimal viewing angles. Install the transformer in a protected location, then run main cables along planned routes, connecting individual fixtures with waterproof connectors.
Position spotlights 6-8 feet from target features, angling them to avoid glare and unwanted light spill. Layer different lighting techniques – uplighting, downlighting, and cross-lighting – to create depth and avoid flat, uniform illumination.
Start with subtle lighting levels and adjust gradually; less is often more effective in accent lighting. Remember to consider seasonal changes in foliage and adjust fixtures accordingly. Maintain clear zones around lights to prevent overgrowth, and clean lenses regularly for optimal performance.
For smaller spaces or balconies, focus on creating one or two strong focal points rather than multiple accents. Use compact fixtures and consider battery-operated or solar options where running electrical lines isn’t practical. Incorporate reflective surfaces like mirrors or metallic planters to maximize lighting effects, and choose plants with interesting silhouettes that cast dramatic shadows when lit.
Consider adjustable fixtures that can be redirected as plants grow or seasonal displays change.
Lantern Clusters for Cozy Corners
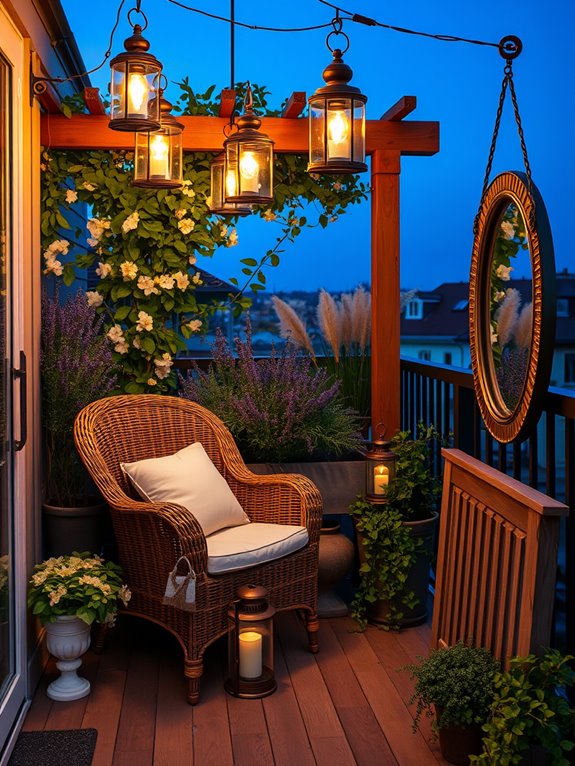
Transform mundane garden corners into enchanting retreats with strategically placed clusters of lanterns that cast a warm, inviting glow. Mixing vintage-style metal lanterns with modern glass iterations creates depth and visual interest, while suspended lanterns at varying heights add a magical quality to the space. The soft illumination highlights surrounding foliage like climbing jasmine, potted ferns, and delicate fairy roses, creating mesmerizing shadow plays on nearby walls and pathways.
The cozy corner becomes a natural gathering spot when anchored by comfortable seating, perhaps a weatherproof loveseat or oversized chair, surrounded by the gentle flicker of lantern light. Low-growing plants like creeping thyme or moss between pavers soften the ground plane, while taller ornamental grasses provide movement and texture when caught in the lanterns’ gentle glow.
Key Elements:
- 3-5 hanging lanterns of varying sizes
- 2-3 standing lanterns
- Weather-resistant seating
- Climbing vines or trailing plants
- Low-growing ground cover
- Ornamental grasses
- Solar or battery-operated LED candles
- Shepherd’s hooks or mounting brackets
- Weather-resistant throw pillows
- Small side table
Position the largest lantern at the corner’s focal point, typically at eye level or slightly above. Work outward with smaller lanterns, creating an asymmetrical arrangement that draws the eye naturally through the space. Install shepherd’s hooks or wall brackets at varying heights, ensuring they’re securely anchored. Layer plants from tallest to shortest, with climbing varieties trained up walls or trellises behind the seating area.
Essential Tips: Consider using battery-operated candles with timers to maintain consistent evening ambiance without daily maintenance. For smaller spaces, wall-mounted lanterns save valuable floor space, while balcony gardens can utilize railing-mounted options. Incorporate mirrors strategically to multiply the light effect and create the illusion of more space. Choose rust-resistant lanterns for coastal areas, and consider wind patterns when positioning hanging elements.
Color-Changing Landscape Lighting
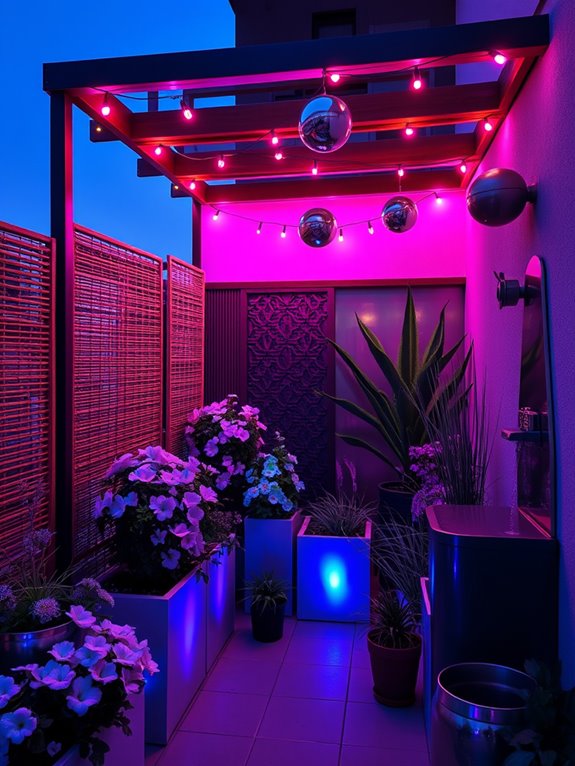
Transform your garden into a mesmerizing wonderland with color-changing landscape lighting that shifts through a spectrum of enchanting hues. Imagine your carefully curated flower beds bathed in gentle waves of purple, blue, and pink light, creating an ever-evolving display that brings new life to your outdoor space after sunset.
White flowering plants like moonflowers, white petunias, and silver-leafed artemisia take on magical qualities as they reflect the changing colors, while architectural plants like bamboo and ornamental grasses cast dramatic, shifting shadows.
The dynamic lighting system turns structural elements into artistic focal points, with pergolas, water features, and garden paths becoming part of an immersive light show. Stone walls and decorative screens provide perfect canvases for washing colors, while strategically placed spotlights highlight specimen trees from different angles, creating depth and dimension throughout the evening.
The result is a sophisticated outdoor entertainment space that transitions seamlessly from elegant dinner parties to vibrant nighttime gatherings.
Key Elements:
- LED color-changing fixtures
- White-flowering plants
- Silver-foliaged plants
- Architectural plants
- Water features
- Decorative screens or walls
- Timer system
- WiFi-enabled controllers
- Weather-resistant power supplies
- Light-reflecting surfaces
- Multiple lighting zones
Begin implementation by creating a detailed lighting plan that divides your garden into distinct zones. Install main power supplies near your home’s electrical source, running weather-rated cables through conduit to key areas.
Position uplights around specimen plants and trees, focusing on those with interesting shapes or textures. Mount wash lights on walls or fences to create background illumination, and install path lights along walkways.
Program your controller to create different color schemes for various occasions, ensuring smooth transitions between hues.
Design Tips: Consider your neighbors when positioning lights, and use shields or directional fixtures to prevent light pollution. For small balconies, focus on fewer, high-quality fixtures that can create multiple effects.
Incorporate reflective elements like mirrors or metallic sculptures to multiply the impact of your lighting. Choose plants with pale or variegated foliage that will show color changes most effectively, and maintain a balance between lit and unlit areas to create depth and mystery in your nighttime garden.
Motion-Sensor Security Lighting
Strategically placed motion-sensor security lighting transforms an ordinary garden into a sophisticated space that seamlessly blends safety with style. Modern LED fixtures mounted along pathways and near entrance points create an ethereal glow that activates only when needed, preserving the natural ambiance of your outdoor sanctuary while deterring unwanted visitors.
The gentle illumination highlights architectural features of your home and casts dramatic shadows through ornamental grasses like Miscanthus sinensis and tall Japanese forest grass. The thoughtful placement of motion-activated lights allows night-blooming plants like evening primrose and moonflowers to take center stage when darkness falls.
These botanical performers open their fragrant blooms at dusk, creating magical moments as security lights softly illuminate their delicate petals. Strategic positioning near robust shrubs like boxwood and hydrangea adds depth to your garden’s nighttime presence while maintaining its protective features.
Key Elements:
- Motion-sensor LED flood lights
- Solar-powered path lights
- Night-blooming flowers
- Reflective plants (silver-leaved varieties)
- Sturdy mounting posts
- Weather-resistant fixtures
- Timer controls
- Adjustable sensitivity settings
- Security camera integration options
- Emergency backup power source
Installing motion-sensor security lighting requires careful planning to maximize both safety and aesthetic appeal. Begin by identifying key areas requiring illumination: entryways, pathways, and vulnerable corners of the property.
Mount fixtures 6-8 feet high, angling them slightly downward to prevent glare and light pollution. Layer your lighting by combining motion sensors with subtle ambient lighting, such as low-voltage path lights, to maintain a welcoming atmosphere while ensuring security.
Create overlapping zones of detection to eliminate blind spots, and adjust sensitivity settings to prevent false triggers from small animals or moving branches. Consider using warm-white LED bulbs (2700-3000K) to complement your garden’s natural features while providing adequate illumination. Position lights to highlight both functional areas and decorative elements, creating a cohesive design that serves multiple purposes.
For smaller spaces or balcony gardens, opt for compact motion-sensor lights that can be mounted on walls or railings. Use reflective plants and light-colored surfaces to maximize illumination, and consider multi-functional fixtures that combine security lighting with decorative features.
Adjust detection ranges to prevent triggering from neighboring movement, and incorporate smart technology to customize lighting patterns based on your schedule and security needs.