
10 Garden Ideas With Raised Beds
Did you know that ancient Aztec gardeners used raised beds called “chinampas” to create floating gardens in shallow lakes? Today’s raised bed designs have evolved far beyond those early innovations, offering creative solutions for every garden challenge you might face. From space-saving vertical systems to ergonomic heights for comfortable gardening, you’ll discover that modern raised beds can transform any outdoor space into a productive and visually striking landscape. Let’s explore ten inspiring approaches that’ll reshape how you think about garden design.
Contents
- 1 Tiered Garden Beds for Sloped Landscapes
- 2 Multi-Level Geometric Raised Beds
- 3 Spiral Herb Garden Design
- 4 Urban Rooftop Container Gardens
- 5 Accessible Raised Beds for Senior Gardeners
- 6 Vertical Garden Wall Systems
- 7 Keyhole Garden Bed Layout
- 8 Modular Square-Foot Gardens
- 9 Decorative Metal and Wood Combinations
- 10 Water-Wise Wicking Bed Designs
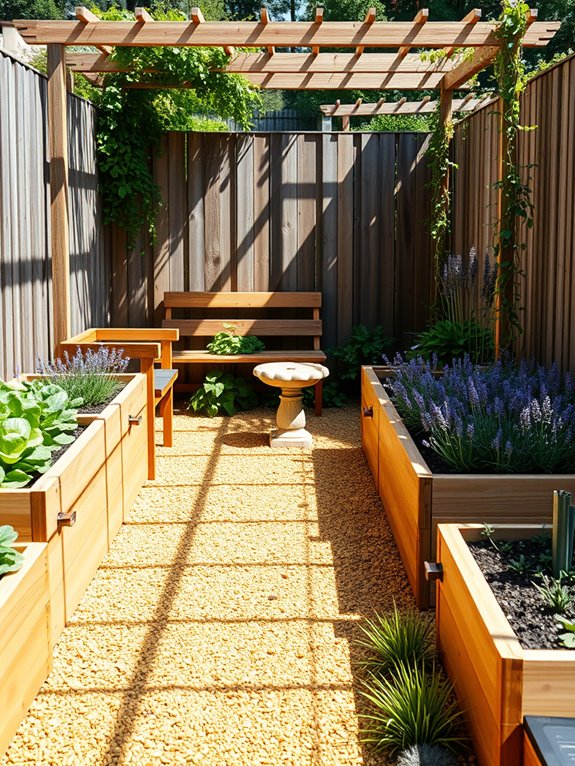
Tiered Garden Beds for Sloped Landscapes
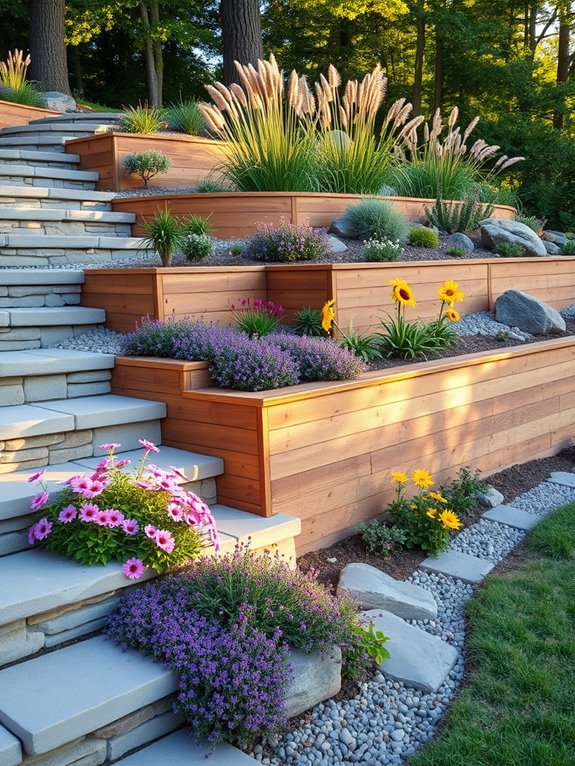
Transform your sloping yard into a dramatic cascade of greenery with tiered garden beds that turn challenging terrain into a stunning visual display. These stepped raised beds create a natural amphitheater of colors and textures, with trailing plants spilling over wooden or stone retaining walls while taller specimens stand proudly at attention in the upper tiers.
The varied heights allow you to showcase everything from ground-hugging herbs to statuesque flowering perennials, creating depth and interest from every viewing angle. The architectural elements of tiered beds introduce a sense of order to hillside gardens, combining the precision of geometric shapes with the organic flow of plant life.
Picture clusters of lavender and thyme perfuming the lower levels, while midheight beds burst with bright zinnias and black-eyed susans, all crowned by ornamental grasses swaying gracefully at the topmost tier. Stone pathways weaving between the levels invite exploration while making maintenance accessible and adding another layer of visual interest.
Key Elements:
- Pressure-treated lumber or stone for retaining walls
- Soil retention system
- Drainage materials (gravel, landscape fabric)
- Irrigation system with pressure compensating emitters
- Step stones or pathways
- Multi-level planting scheme
- Anchor plants for each tier
- Soil mix optimized for drainage
- Support stakes for taller plants
- Edge protection materials
Construction begins with careful measurement and grading of the slope, followed by installation of the lowest retaining wall as your foundation. Each subsequent tier should step back from the one below, typically 2-3 feet, allowing proper soil depth and root space.
Install drainage systems between tiers, using gravel and landscape fabric to prevent soil erosion. Build retaining walls slightly angled inward for stability, and ensure each level has independent irrigation to accommodate different watering needs based on elevation and exposure.
For optimal performance in sloped landscapes, consider incorporating these essential adaptations: Install deeper footings for retaining walls on steeper slopes, create wider paths on one side for wheelbarrow access, and position irrigation valves at the top of each tier for consistent water pressure.
Small spaces can adapt this concept by using narrower tiers or creating mini-terraces with container gardens, while larger areas might incorporate sitting areas or water features between levels.
Multi-Level Geometric Raised Beds
Multi-level geometric raised beds transform an ordinary garden into a stunning architectural landscape that draws the eye upward through varying heights and bold angular shapes. Square and rectangular beds, arranged in a deliberate pattern of ascending heights, create a modern sculptural effect while maximizing growing space.
Deep purple heuchera cascades over stark wooden edges, while structural plants like New Zealand flax and ornamental grasses provide dramatic vertical elements against the geometric framework.
The layered design allows for creative plant combinations that wouldn’t be possible in traditional gardens. Lower beds host compact herbs and flowering plants like lavender and thyme, while middle-tier planters showcase colorful perennials such as coneflowers and salvias. The highest beds become natural focal points, perfect for statement plants like dramatic cardoons or architectural succulents, creating a dynamic interplay of heights, textures, and colors.
Key Elements:
- Treated lumber or composite decking materials
- Metal corner brackets and supports
- Quality soil mix
- Landscape fabric
- Drip irrigation system
- Angular planters of varying heights
- Structural plants
- Ground cover plants
- Ornamental grasses
- LED strip lighting
- Gravel or slate pathways
Begin implementation by sketching a design that incorporates at least three different height levels, typically ranging from 1 to 3 feet tall. Install the tallest beds first, securing them firmly with posts and ensuring proper drainage.
Create clear pathways between beds that allow easy access for maintenance, ideally 2-3 feet wide. Layer the soil mix with organic matter and install irrigation before planting, ensuring each level receives adequate water.
When selecting plants, consider mature heights and spread to maintain the geometric aesthetic. Place taller plants toward the back of each bed, with trailing varieties near the edges to soften hard lines. Group plants with similar water needs together, and incorporate automatic irrigation zones based on plant requirements.
Design adaptations can accommodate various spaces by adjusting the scale and number of levels. For smaller areas, consider using miniature versions of architectural plants and limiting the design to two heights. Corner installations work well for balconies, while larger spaces can incorporate multiple clusters of geometric beds with connecting pathways.
Consider adding built-in seating to taller beds and installing subtle lighting to extend enjoyment into evening hours.
Spiral Herb Garden Design
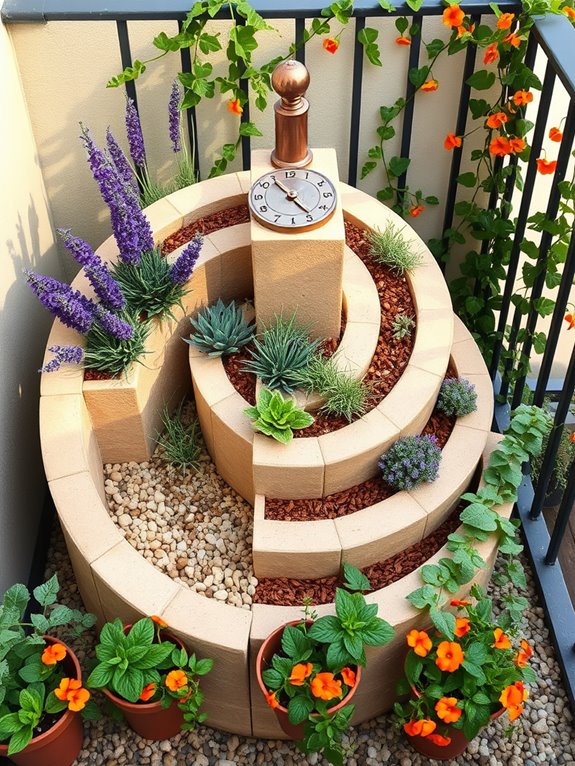
A spiral herb garden transforms an ordinary raised bed into a mesmerizing focal point that draws the eye upward through graceful curves. Aromatic herbs cascade down the spiraling pathway, creating layers of texture and color that dance from ground level to a central peak. Mediterranean herbs like lavender and rosemary anchor the upper tiers, while creeping thyme and oregano spill over the edges, softening the structural elements with their flowing forms.
The spiral design maximizes growing space while creating distinct microclimates along its winding path. Sun-loving herbs thrive at the top, while shade-tolerant varieties flourish in the cooler, protected spaces below. Stone or brick walls absorb heat during the day, creating perfect growing conditions for heat-loving herbs like basil and sage, while also providing visual interest through their natural textures and earthy tones.
Key Elements:
- Foundation materials (stones, bricks, or concrete blocks)
- Quality soil mix with excellent drainage
- Selection of herbs suited to different light conditions
- Irrigation system or watering access points
- Pathway markers or stepping stones
- Decorative top piece (sundial, sculpture, or focal plant)
- Ground cover plants for edges
- Mulch or gravel for pathways
Construction begins by marking a circular base approximately 6 feet in diameter and establishing a center point. Build the spiral clockwise from the outside, gradually increasing height toward the center while maintaining a comfortable pathway width of 18-24 inches. Layer the growing medium behind retaining walls as you build upward, ensuring proper drainage through the structure.
Install irrigation lines or create easy access points for watering before adding plants. For successful adaptation, consider the spiral’s height-to-width ratio based on available space. Balcony gardens can utilize a modified design starting at 3 feet in diameter, while larger spaces can accommodate grander spirals up to 8 feet across.
Orient the spiral to maximize sun exposure, with taller sections facing north to prevent shading. Choose drought-resistant herbs for the upper levels where watering can be challenging, and incorporate self-watering systems for maintenance ease.
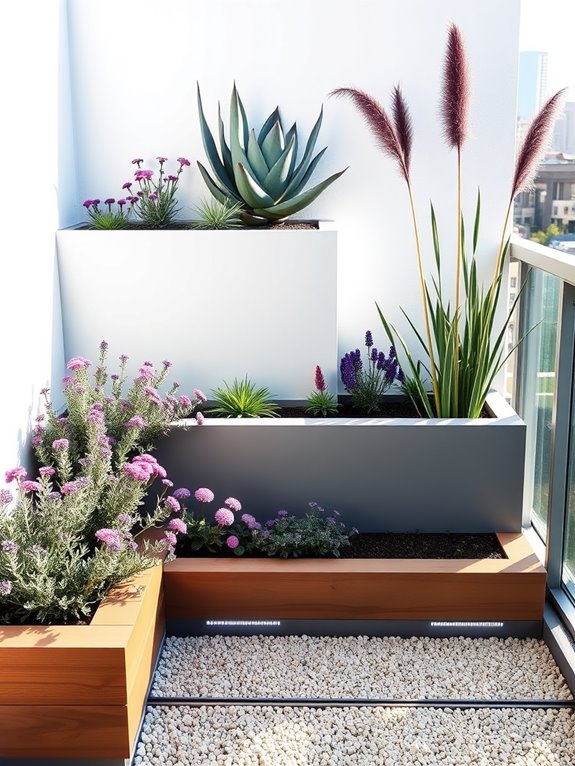
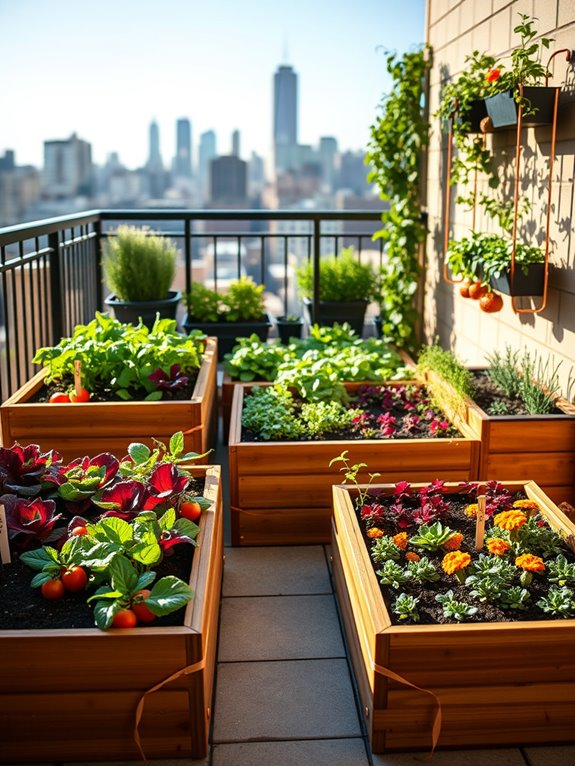
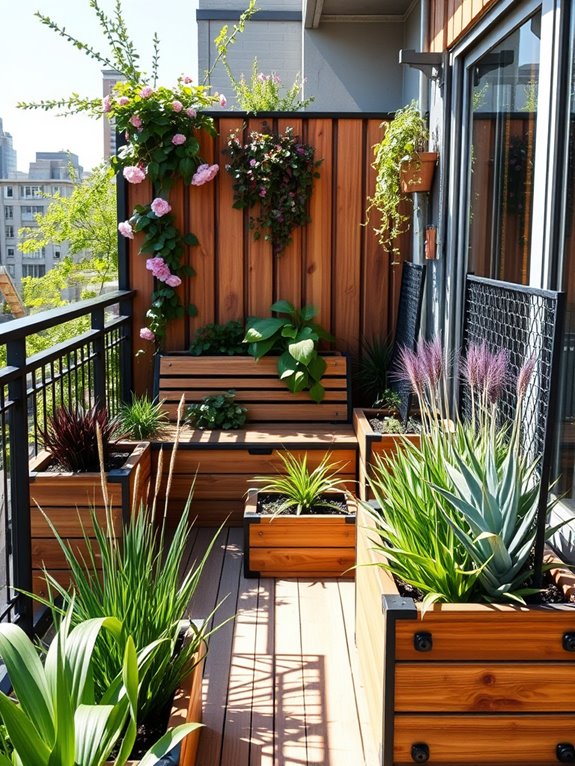
Urban Rooftop Container Gardens
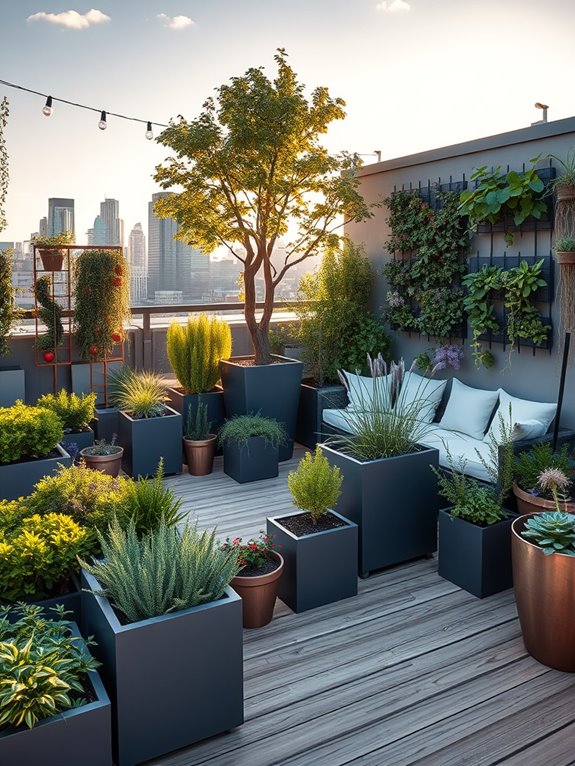
Transform your urban rooftop into a verdant oasis where sleek container gardens rise above the cityscape, creating a peaceful retreat from bustling streets below. Geometric arrangements of raised beds in galvanized steel and weather-resistant composites house a vibrant mix of edibles and ornamentals.
Cherry tomatoes climb copper trellises, while cascading herbs like thyme and oregano spill over container edges, their aromatic leaves dancing in the breeze. Japanese maples in statement containers provide height and structure, while lavender and ornamental grasses sway gracefully against the urban backdrop.
String lights weave between container clusters, illuminating intimate seating areas nestled among potted citrus trees and flowering perennials. The careful arrangement of containers creates natural pathways through the garden, leading to cozy conversation nooks furnished with weather-resistant seating.
Vertical gardens mounted on walls maximize growing space, displaying a tapestry of succulents, trailing vines, and compact flowering plants that attract urban pollinators.
Key Elements:
- Lightweight container materials (fiberglass, plastic composites)
- Drip irrigation system
- Wind-resistant trellises and supports
- Weather-resistant furniture
- Container-friendly soil mix
- Hardy, drought-tolerant plants
- Shade structures or umbrellas
- proper drainage systems
- Storage solutions for tools
- LED or solar lighting
- Wind breaks or screens
Begin by assessing your rooftop’s weight-bearing capacity and installing proper drainage solutions. Arrange larger containers along load-bearing walls and structural points, creating a framework for your design.
Group containers of varying heights to create visual interest, ensuring taller plants won’t shade shorter ones. Install an automated irrigation system with moisture sensors to maintain consistent soil moisture, crucial for container gardens exposed to wind and sun.
Position wind breaks strategically to protect delicate plants, using either physical barriers or sturdy screening plants in containers. Create designated zones for different activities – cooking, dining, and relaxation – connecting them with clear pathways that allow easy maintenance access.
Monitor soil moisture daily during hot periods, and apply slow-release fertilizers to compensate for frequent watering.
For smaller balconies, focus on vertical growing systems and multi-tiered planters to maximize space. Consider modular furniture that can be easily rearranged or stored, and choose plants that serve multiple purposes – like herbs that are both ornamental and edible.
In windy locations, secure containers to prevent tipping, and select compact plant varieties that won’t become too top-heavy. Regular pruning and maintenance will keep the garden looking its best while preventing plants from outgrowing their containers.
Accessible Raised Beds for Senior Gardeners
A thoughtfully designed accessible raised bed garden creates an inviting oasis where senior gardeners can continue their passion for growing without strain or difficulty. The elevated wooden or composite beds, positioned at a comfortable 30-36 inches high, showcase cascading herbs, compact vegetables, and colorful flowers at perfect reaching height. Weathered cedar planks and smooth-finished corners provide both rustic charm and safety, while strategically placed benches offer convenient resting spots among the flourishing greenery.
The garden pathways, covered in non-slip, compressed gravel, wind between raised beds filled with easy-maintenance plants like cherry tomatoes, bush beans, and compact herbs. Vertical elements such as trellised sugar snap peas and container-friendly cucumbers maximize growing space while minimizing reaching. Solar-powered path lights illuminate the garden edges, creating a peaceful atmosphere for evening gardening when temperatures are cooler.
Key Elements:
- Elevated beds (30-36 inches height)
- Wide, stable pathways (minimum 4 feet)
- Non-slip pathway materials
- Built-in seating areas
- Ergonomic tool storage
- Irrigation system
- Weather-resistant construction materials
- Vertical growing supports
- Path lighting
- Shade structures
Implementation begins with positioning raised beds in a north-south orientation for optimal sun exposure, ensuring 4-foot-wide paths between beds for wheelchair or walker access.
Install irrigation systems with easy-to-reach controls and consider incorporating vertical growing spaces along the backs of beds to maximize growing area while maintaining accessibility.
Add permanent seating every 15-20 feet along pathways, and ensure tool storage is positioned at comfortable reaching height.
The beds themselves should feature railings or broad edges for support and rest periods during gardening sessions. Include a mix of permanent plantings like herbs and perennials with seasonal vegetables to reduce maintenance demands.
Consider installing automatic watering systems with moisture sensors to minimize daily maintenance requirements.
For adapting to different spaces, focus on modular designs that can be scaled according to available area. Small spaces might utilize corner beds with built-in seating, while larger areas can incorporate multiple connected beds with shared irrigation systems.
Consider adding shade sails or pergolas over seating areas, and position scented plants near resting spots for sensory enjoyment.
Install raised beds against existing walls or fences to provide additional stability and support while gardening.
Vertical Garden Wall Systems
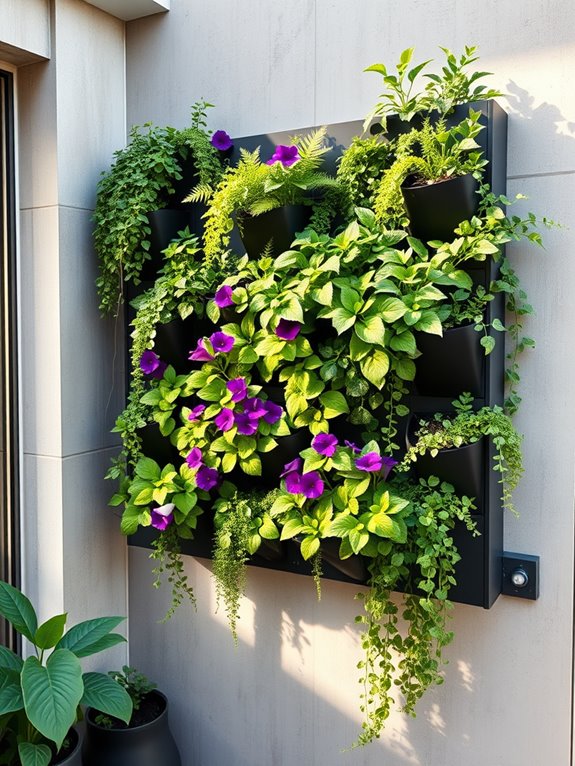
Transform any outdoor wall into a living tapestry with a vertical garden wall system that creates a stunning visual impact while maximizing growing space. Lush cascading ferns spill over modular panels, while compact herbs, flowering succulents, and trailing vines create a mesmerizing pattern of textures and colors.
The geometric arrangement of planting pockets gives a modern architectural feel, while the natural growth patterns soften the overall aesthetic, creating a perfect balance between structure and organic beauty. As sunlight plays across the various levels of greenery, the vertical garden becomes an ever-changing artwork throughout the day.
Purple wave petunias contrast beautifully with silver dichondra, while compact strawberry plants offer both ornamental appeal and edible rewards. The vertical arrangement allows for creative plant combinations that draw the eye upward, making even the smallest spaces feel grand and garden-like.
Key Elements:
- Modular wall-mounted planting panels
- Irrigation system with timer
- Water collection tray
- Growing medium suitable for vertical gardens
- Plant anchoring materials
- Weather-resistant mounting hardware
- Selection of suitable plants
- LED grow lights (for shaded areas)
- Moisture meters
- Pruning tools
Installation begins with securing the mounting framework to a sturdy wall, ensuring proper weight distribution and waterproofing. Each modular panel should be installed with slight spacing to allow for proper air circulation and maintenance access.
The irrigation system needs to be installed from the top down, with water collection mechanisms at the bottom to prevent waste and wall damage. Plant selection and placement should follow a careful plan, positioning drought-tolerant species at the top and moisture-loving plants at the bottom where water naturally accumulates.
Choose plants based on your wall’s specific light conditions and climate zone. Shallow-rooted plants work best in vertical systems, and mixing different leaf shapes and colors creates visual interest.
Maintain proper moisture levels by checking sensors regularly and adjust irrigation timing seasonally. Prune plants to maintain desired shape and prevent overcrowding, which can lead to moisture problems and plant failure.
For different-sized spaces, adapt the system by using modular units that can be expanded or reduced as needed. Small balconies might focus on a single dramatic panel, while larger areas can incorporate multiple connected sections.
Consider incorporating seasonal rotation zones where plants can be easily switched out to maintain year-round interest. In areas with limited natural light, supplement with grow lights and choose shade-tolerant species.
Always ensure your mounting wall can support the weight of the fully saturated system, and plan for easy access to all areas for maintenance.
Keyhole Garden Bed Layout
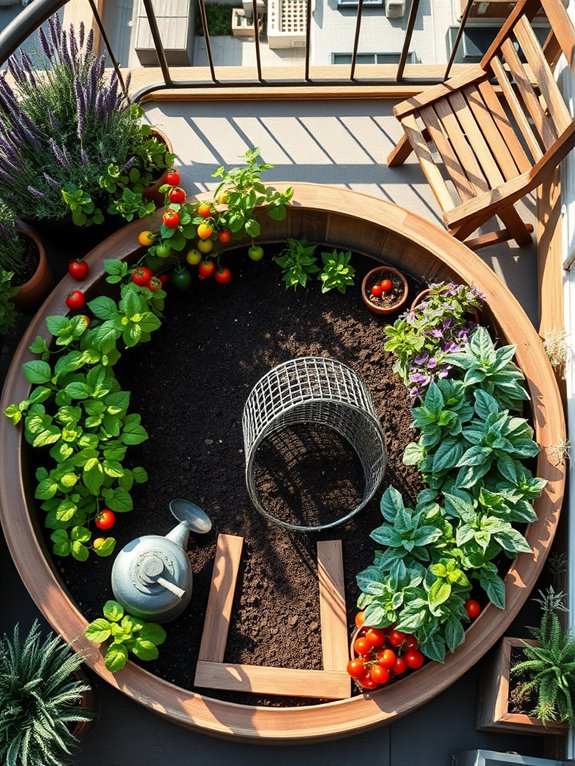
The keyhole garden bed stands as a captivating circular oasis, with its distinctive notched pathway leading to a central composting basket. This innovative design creates a spiral of abundant growth, where cascading herbs like thyme and oregano spill over curved stone edges, while climbing peas and beans reach skyward along the higher back wall. The natural stone or brick edging adds rustic charm, complemented by the vibrant greens and seasonal colors of vegetables arranged in concentric rings.
From the entrance point, the garden unfolds like a living mandala, each section thoughtfully planted to maximize both beauty and function. Tall sunflowers and amaranth create a dramatic backdrop, while mid-height vegetables like peppers and eggplants fill the middle zones. The front edges burst with strawberries and compact herbs, creating a lush, layered effect that draws the eye inward toward the central composting system.
Essential Elements:
- Circular raised bed structure (6-8 feet diameter)
- Center composting basket
- Access pathway (keyhole shape)
- Retaining wall materials (stone, brick, or timber)
- Irrigation system or watering access point
- Multi-layer growing medium
- Support structures for climbing plants
- Edge plants and ground covers
- Central compost materials
Creating a keyhole garden begins with marking a circular outline and cutting the distinctive keyhole entrance pathway. Build the outer walls to a height of 3-4 feet, gradually sloping down toward the front.
Install the central composting basket using sturdy wire mesh or perforated pipe, ensuring it reaches deep into the soil layers. Layer the growing medium from bottom to top: coarse materials for drainage, followed by composted organic matter, and finally, rich topsoil mixed with compost.
The planting strategy follows a deliberate pattern – tallest plants at the back (north side), medium-height plants in the middle zones, and compact or trailing plants along the front edges. Regular maintenance involves adding kitchen scraps and organic matter to the central basket, which naturally irrigates and fertilizes the surrounding soil as materials decompose.
For smaller spaces or balcony adaptations, consider creating a mini keyhole garden using a circular container at least 4 feet in diameter. The same principles apply, but scale down the central composting unit and focus on compact varieties of vegetables and herbs.
Urban gardeners can use lightweight materials for construction and ensure proper drainage systems are in place to protect balcony surfaces. The design can be modified into a half-circle against a wall to maximize limited space while maintaining the efficient composting and growing system.
Modular Square-Foot Gardens
A modular square-foot garden transforms any outdoor space into an organized masterpiece of productive beauty. The geometric precision of raised beds, arranged in a grid pattern, creates an appealing checkerboard effect that draws the eye across neat sections filled with vibrant vegetables, aromatic herbs, and cascading flowers. Each square foot becomes its own miniature garden, hosting carefully chosen plants that complement one another in height, color, and growing requirements.
The clean lines and systematic arrangement allow for maximum creativity within a structured framework. Trellises rise gracefully from back squares, supporting climbing peas and flowering vines, while compact bush beans and leafy greens fill middle sections. Front squares burst with marigolds, compact herbs, and strawberry plants that spill over the edges, softening the geometric design with their natural flow.
Key Elements:
- Raised bed frames (cedar or composite)
- Grid system markers (string, wood, or plastic)
- Soil mix specifically for raised beds
- Irrigation system components
- Plant supports and trellises
- Square-foot spacing templates
- Selection of compatible plants
- Ground cover or mulch for pathways
- Edge barriers for pest control
Implementation requires careful planning of the grid system, typically using 1’x1′ squares within larger 4’x4′ or 4’x8′ raised beds. Start by installing raised beds with at least 6 inches of depth, ensuring proper spacing for comfortable access between units.
Create the grid system using durable materials, secured at the edges of each bed. Fill with quality soil mix, then plant according to square-foot spacing guidelines: one tomato per square, four lettuce plants per square, or sixteen carrots per square, depending on plant size.
The modular nature of square-foot gardens allows for endless customization based on available space. Balcony gardeners can start with a single 4’x4′ unit, while larger areas can accommodate multiple beds arranged in pleasing patterns. Consider factors like sun exposure, accessibility, and companion planting when deciding placement and plant selection.
Include vertical elements strategically to maximize growing space without overshadowing neighboring squares, and incorporate automatic watering systems to maintain consistent moisture levels across all sections.
Extra Design Tips: Scale your grid size slightly larger for easier maintenance in small spaces, using 18-inch squares instead of 12-inch ones. On balconies, use lightweight soil mixes and ensure structural support can handle the weight when beds are fully saturated.
Create multi-level displays by varying bed heights, and consider incorporating hinged covers for season extension or pest protection. For aesthetic appeal, maintain symmetry in your layout while varying plant heights and colors within each square foot.
Decorative Metal and Wood Combinations
The elegant fusion of decorative metal and reclaimed wood creates a stunning industrial-chic aesthetic in raised bed gardens.
Weathered copper or wrought iron frames contrast beautifully with warm wooden planks, while climbing roses and jasmine weave through metal trellises, softening the structured elements.
Persian shield plants and purple fountain grass add dramatic touches, their deep hues complementing the metallic accents and creating a sophisticated outdoor sanctuary.
Natural cedar planks paired with black metal trim offer a contemporary edge while maintaining an organic feel.
The combination allows for creative architectural elements like metal archways spanning between beds, creating enchanting pathways draped with flowering vines.
Ornamental grasses sway gracefully against metal backdrop panels, while herbs and vegetables flourish in wood-lined beds, their foliage providing a lush contrast to the industrial elements.
Key Elements:
- Metal frame components (steel, iron, or copper)
- Weather-resistant wood planks (cedar, redwood, or treated pine)
- Metal trellises or archways
- Decorative metal panels or screens
- Corner brackets and support posts
- Plant supports and climbing structures
- Metal edging strips
- Drainage materials
- Weather-resistant hardware
- Soil and mulch materials
Begin installation by establishing a level foundation and assembling the metal frame components as anchor points.
Install wooden planks between metal supports, ensuring proper drainage holes are incorporated.
Create visual interest by varying bed heights and incorporating vertical elements like trellises at strategic points.
Consider integrating metal screens or panels as backdrop elements, positioning them to catch evening light or create shadows.
Maintain the garden by regularly treating wooden elements with protective sealants and checking metal components for rust or wear.
For smaller spaces or balcony gardens, consider modular designs that can be reconfigured as needed.
Use lighter gauge metals for upper-story installations, and incorporate fold-down or removable trellis elements.
Create visual barriers with decorative metal screens that double as plant supports, and choose compact varieties of climbing plants that won’t overwhelm limited spaces.
Consider incorporating built-in seating elements that combine metal frames with wooden tops, maximizing functionality in restricted areas.
Water-Wise Wicking Bed Designs
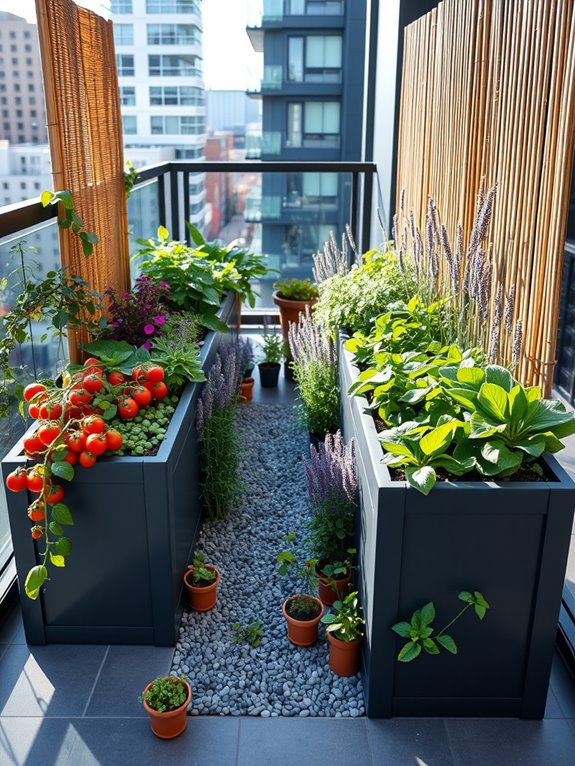
A wicking bed garden transforms an ordinary raised bed into an efficient water-conserving oasis. Lush vegetables and herbs cascade over the edges of sleek wooden or metal beds, while drought-tolerant flowers like lavender and salvias add bursts of color and texture.
The clean lines of modern raised beds contrast beautifully with the natural growth patterns of plants, creating an organized yet organic aesthetic that draws the eye and invites exploration. The garden maintains its vibrancy even during hot summer days, thanks to the innovative water reservoir system hidden beneath the soil.
Deep-rooted tomatoes thrive alongside shallow-rooted lettuces, their foliage creating layers of green punctuated by ripening vegetables. Stone or gravel paths between the beds add a polished look while providing practical access for maintenance, creating a seamless blend of form and function.
Key Elements:
- Raised bed frames (minimum 24″ depth)
- Waterproof liner
- Drainage pipe system
- Reservoir filling pipe
- Water level indicator
- Gravel or scoria for reservoir
- Geotextile fabric barrier
- Quality potting mix
- Drip irrigation system (optional)
- Water-wise plant selection
The implementation begins with constructing raised beds at least 24 inches deep to accommodate the reservoir system. Create a water chamber in the bottom 6-8 inches using gravel or scoria, lined with waterproof material and fitted with perforated drainage pipes.
Layer geotextile fabric above the reservoir to prevent soil migration, then add high-quality potting mix. Install vertical pipes for filling and monitoring water levels. Position the beds to maximize sun exposure while maintaining accessibility for maintenance.
Plant selection should consider root depth and water needs, placing deep-rooted plants toward the center and shallow-rooted varieties along the edges. Group plants with similar water requirements together to optimize the wicking system’s efficiency.
For smaller spaces or balcony gardens, consider modular wicking bed designs that can be configured to fit available space. Mini wicking beds as small as 2×2 feet can be effective for herb gardens or compact vegetable growing.
Use lightweight materials and ensure structural support meets weight requirements for elevated installations. Multiple small wicking beds can be more manageable than one large bed and offer flexibility in arrangement and plant rotation.